How-to
A step by step guide to help you accomplish what you need to get done.
Course Enrolment
Students from different divisions at U of T enrol in courses at different times. Learn when your division has set up your enrolment time by visiting their website. They may also send you an email about it. Once your division has setup your enrolment start time—usually a week or so prior to your enrolment day—log into ACORN to view your start date and time on the Dashboard.

This is an example of a blue message that will appear on your ACORN Dashboard. Yours will look a little different, as the date and time will be personalized to your program and year of study.
ACORN will not take any additional actions if you enrol in courses that result in a conflict (i.e., it will not drop any course activities on your behalf). It is up to you to resolve any conflicts. You can either leave the courses as they are or enrol in alternative options.
You can try to resolve the conflict in a few different ways:
- Explore different combinations of course sections (Lectures, Tutorials and Practicals)
- See if you can take one of the courses at a later term. Try using Degree Explorer to experiment with your options.
- Select a different course if one of the conflicting courses is not required to complete your program or degree
- On the Courses page, select the Edit button for the course section that you want to change.
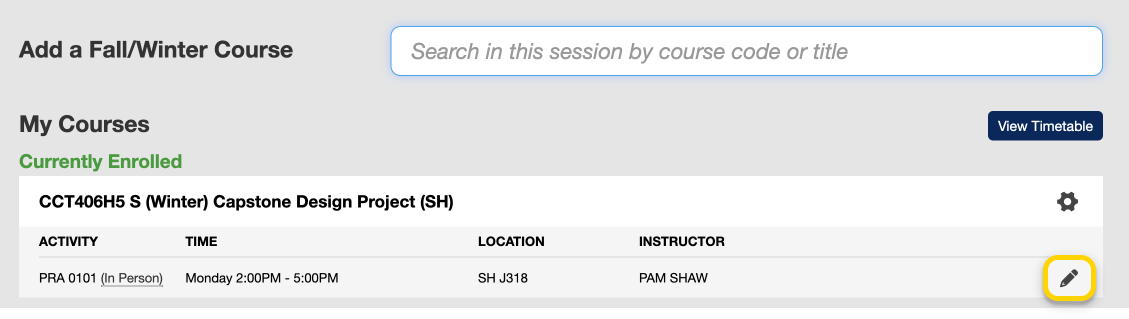
- A modal window will appear that will list the sections that you can change. Select the course section(s) you would like to change to, and then select the Modify button. If you cannot select a certain section, it may be full or you may not have priority to enrol in the section; ACORN should tell you why.
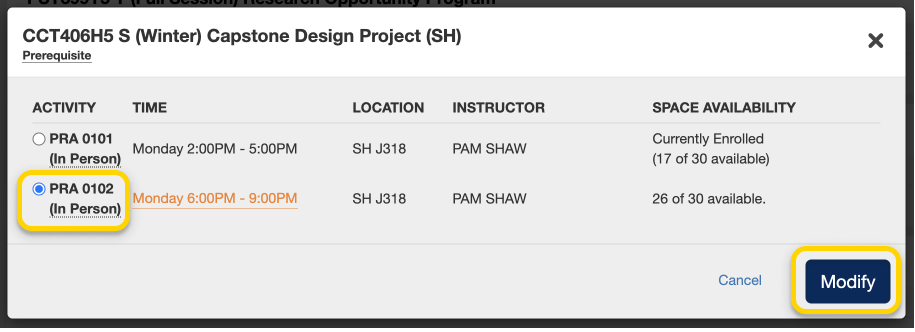
In this example, the student is switching from the first Practical section (PRA 0101) to the second one (PRA 0102).
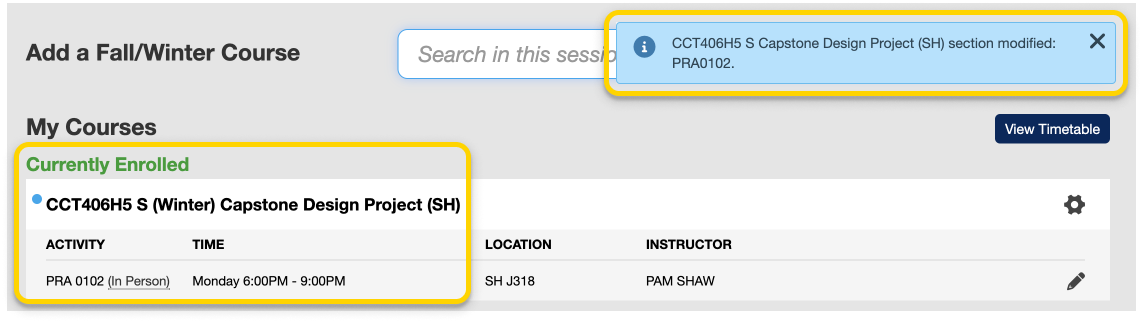
- If you have successfully switched to your desired course section you will receive a success message towards the top of the page. You will also see your updated course in the My Courses section.
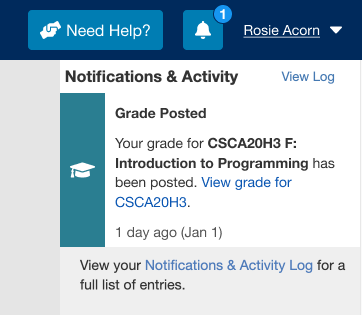
- When a final grade is released for each of your courses, you will get a new notification in ACORN. When you have a new notification, a blue badge containing a number will appear on top of a bell icon towards the top of your page. Select this button to open your Notifications menu.

- If you have received a final grade, there will be a notification here alongside any other notifications that you recently received. Select the link within the notification to view your grade.
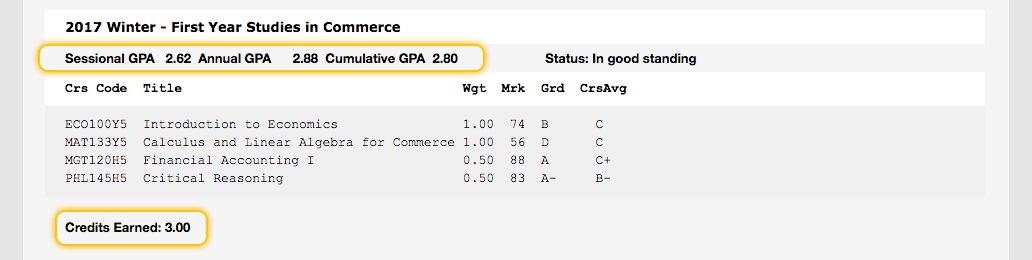
- You will be taken to your Academic History page containing your final grade for the course. You can visit your Academic History page at any time via ACORN’s main navigation menu to see an up-to-date list of grades for all of your courses.

Watch a video walkthrough for U of T’s GPA calculator.
The GPA calculator is a U of T-wide tool that allows you to estimate your GPA (Grade Point Average) for the current or upcoming academic sessions. This tool should be used for planning purposes only; refer to your Academic History page in ACORN for your official GPA calculations.
Using the GPA Calculator, you can:
- Calculate your CGPA, SGPA and AGPA
- Use your current CGPA from ACORN to speed up your calculations
- See your GPA calculations update in real-time
- Explore useful academic resources
You may want to calculate your GPA for the following reasons and more:
- Find out what your GPA will be at the end of the semester or year
- Determine whether you will make it into your program of study (POSt)
- Find out if you will graduate with distinction
- Learn which grades you will need to achieve to meet personal goals
Before starting, have your grades on hand for reference. Find them on your Academic History page in ACORN. When entering grades, include failed courses, and exclude transfer credits, extra (EXT), Credit/No Credit (CR/NCR) and Late Withdrawal (LWD) courses.
You can view tips for using the GPA Calculator by clicking the help icons beside the step one and step two headings.
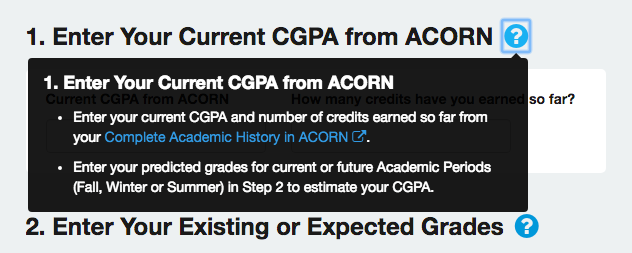
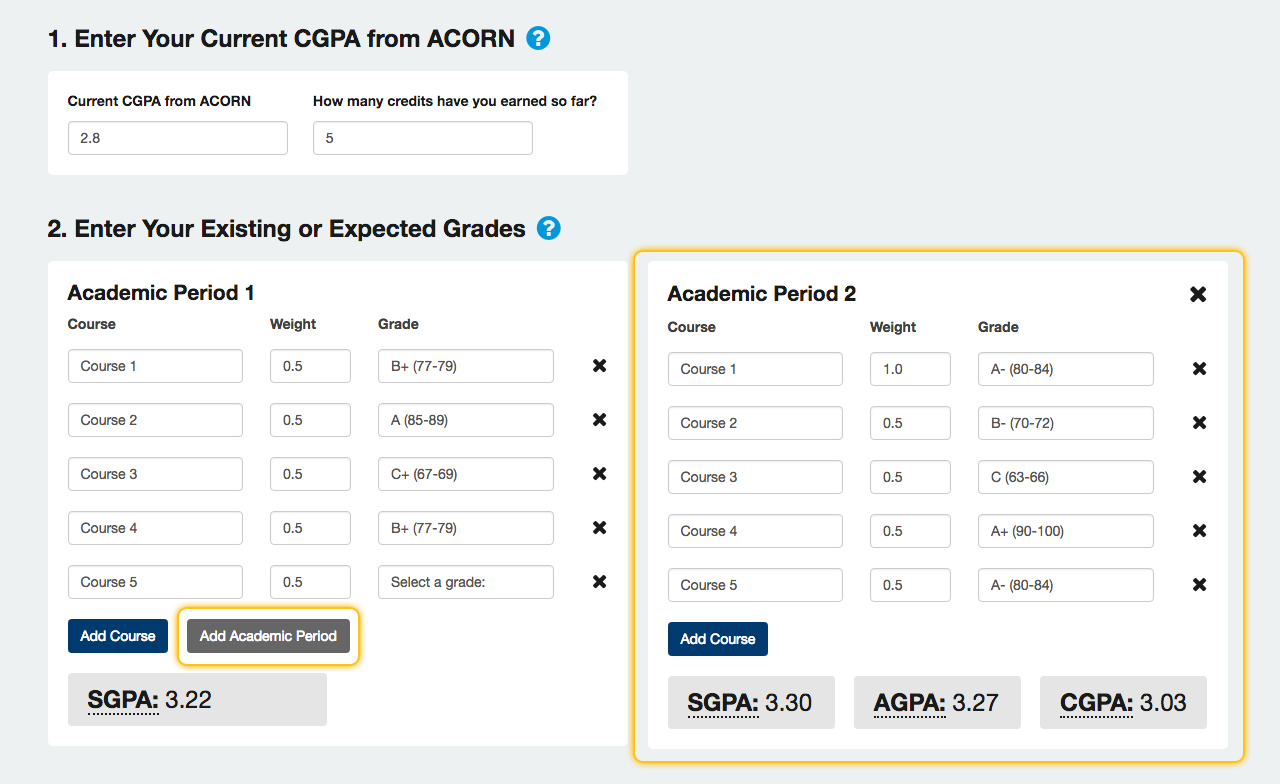
Estimate Your CGPA
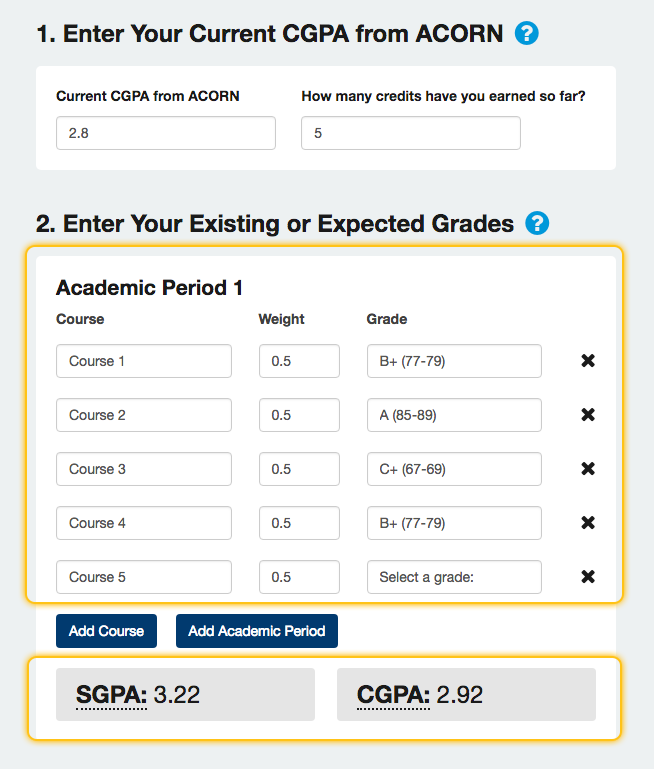
To estimate your Cumulative GPA (CGPA), enter your current Cumulative GPA and current number of credits earned from ACORN into Step 1 of the calculator. This step is optional; you can always enter all of your grades manually into the Academic Period containers, but this method is faster.
In this example, “Academic Period 1” means whichever session you are predicting your grades for. If your official CGPA from ACORN was calculated last Winter, and you are predicting courses for the current Fall/Winter session, Academic Period 1 will represent the Fall semester. You can also enter all of your Fall and Winter marks into Academic Period 1, or enter Fall marks in Academic Period 1 and Winter marks in Academic Period 2. It is up to you.

Next, enter anticipated grades for your courses in progress. Your Sessional and Cumulative GPAs will update immediately at the bottom of the Academic Period 1 container. Your CGPA calculation will take into account the “Current CGPA from ACORN” that you entered in Step 1. Your SGPA calculation will only take into account grades entered in Academic Period 1.
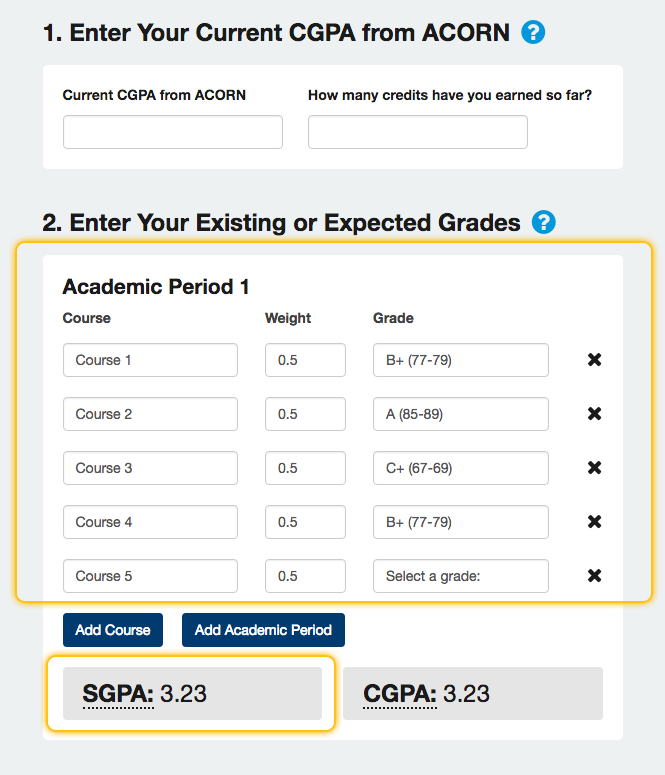
Estimate your SGPA
To estimate your Sessional GPA (GPA), enter current and anticipated grades for a single Fall or Winter or entire Summer session (this includes both sub-sessions) in Academic Period 1.
You do not need to add your Current CGPA from ACORN in Step 1 unless you want to see your potential CGPA at the same time.
Estimate Your AGPA
To calculate your Annual GPA (AGPA), enter current and anticipated grades for the Fall session in Academic Period 1 and the Winter session in Academic Period 2. You will need to click the “Add Academic Period” button to open the second session.
You do not need to add your Current CGPA from ACORN in Step 1 unless you want to see your potential CGPA at the same time.
If you are including Y courses worth 1.0 credit courses: Include grades for these courses in Academic Period 2, as grades for these courses are calculated in the Winter term. On your Academic History in ACORN, for the Fall session these courses will have a grade of “IPR” (In Progress). If you enter Y courses in Academic Period 1 (Fall), your estimated AGPA will not be correct.
Tip: If you already know your Fall SGPA, enter it in Step 1 along with the number of credits you earned for the Fall, and enter your Winter grades in Academic Period 1. The calculated CGPA will actually be your AGPA.
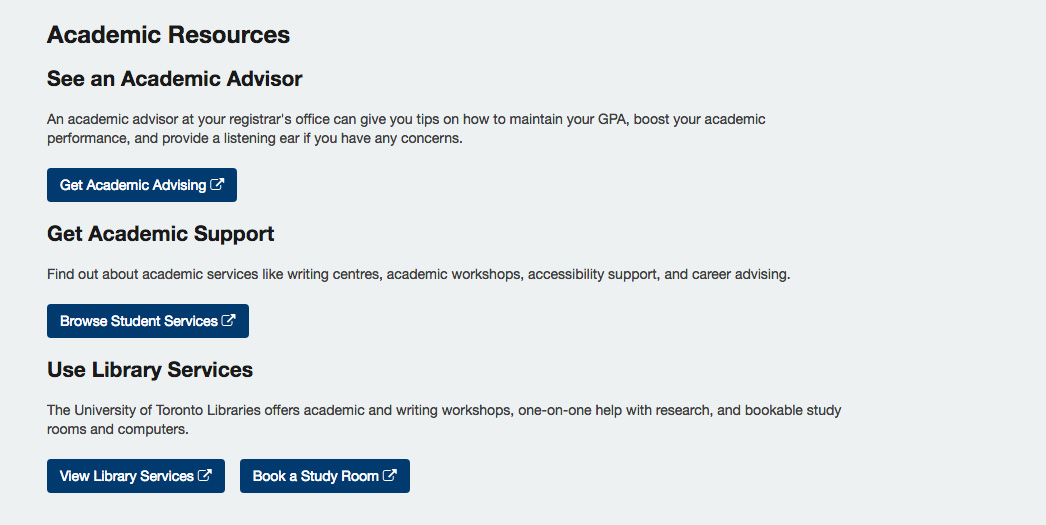
Get Academic Help
Some useful academic resources are located below the calculator itself. If you want academic advising or have questions about courses, contact your Registrar. You can also find links to helpful academic workshops and events that U of T offers, as well as study spaces you can use.
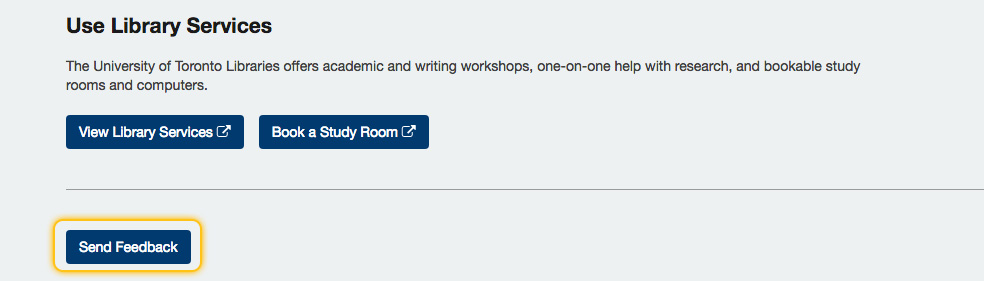
Send the ACORN/GPA Calculator Team Feedback
We want to hear your thoughts, ideas and suggestions to improve this GPA Calculator! We care about how and if it works for you, so send us a message via the “Send Feedback” button towards the bottom of the page.
Instructional videos: UTM | UTSC | UTSG
Before enrolling in courses, check when you will be eligible to enrol by viewing your divisional registrar’s important academic dates, and check your enrolment start time on ACORN. You can plan the courses you want to take using the Timetable builder, and learn if you will be eligible to enrol in a course by checking the “Enrolment Controls” section of a course in the search results area. To plan for your entire degree, check out Degree Explorer.
Once you know which courses you want to take, you can add them to your Enrolment Cart in ACORN so that you can enrol in them without searching for them again on enrolment day. The Enrolment Cart is like adding courses to a shopping cart so that you can save them for later. On enrolment day, you’ll need to enrol in each course individually from your cart.
- To get to you Enrolment Cart from the ACORN dashboard, select ‘Enrol & Manage’ on the main navigation menu on the left side of the screen.
- On the Enrol & Manage page, there will be one or more tabs labelled with the academic session. Ensure that you have selected the tab for the session in which you want to enrol in courses. Then, select the Courses button, or the Courses page from the main navigation.
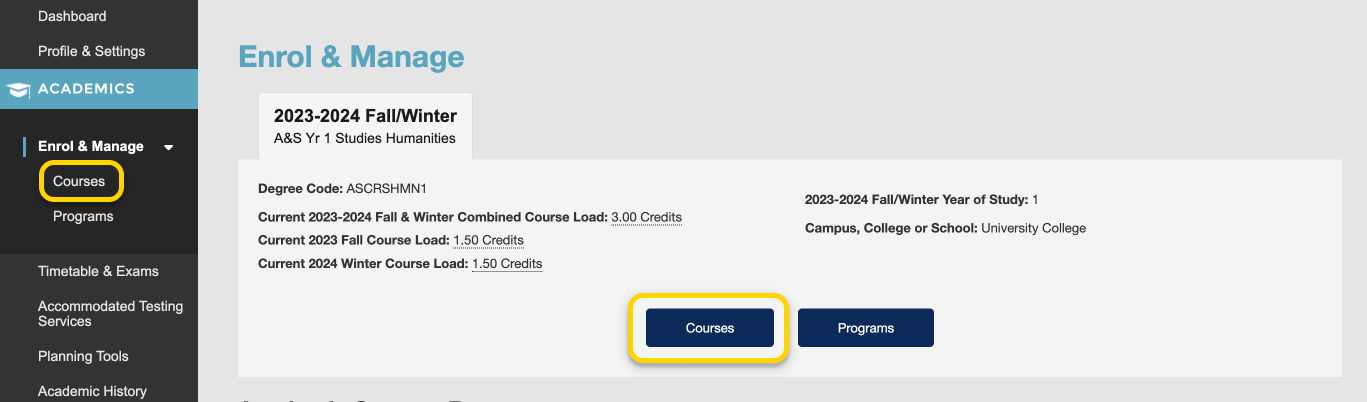
- Find your enrolment cart at the bottom of the Courses screen. If your cart is empty, learn how to add courses to your Enrolment Cart.

- For each course that you would like to enrol in from your Enrolment Cart, select the “Enrol” button.
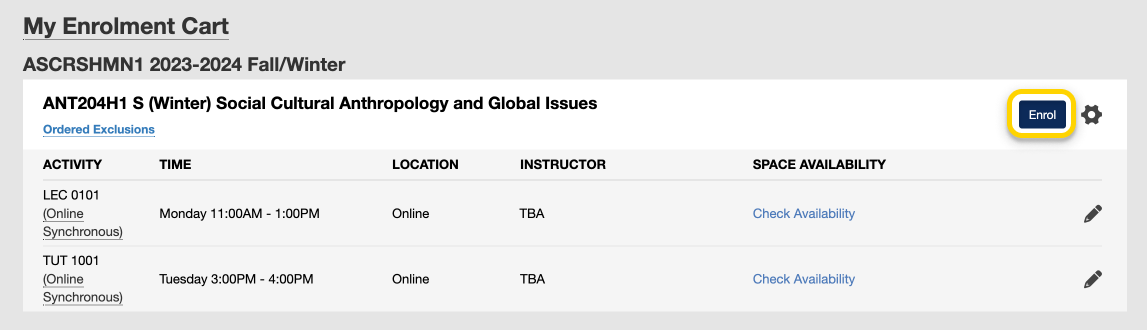
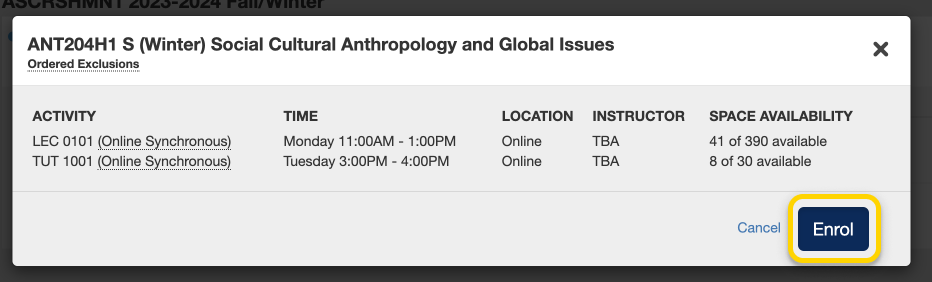
- You will see a confirmation modal window asking whether you would like to enrol in this course. Be sure to check the Time column in case there is a conflict with any of your other currently-enrolled courses, and ensure that the activity that you are selecting do not say “Enrolment Blocked” or “Section Full” under the Space Availability column. If a section says “Enrolment Blocked”, the activity or course may be restricted to students from a certain program, year of study, or campus. Please check the Timetable Builder to learn about any restrictions or Enrolment Controls that a course may have.Next, select “Enrol”.
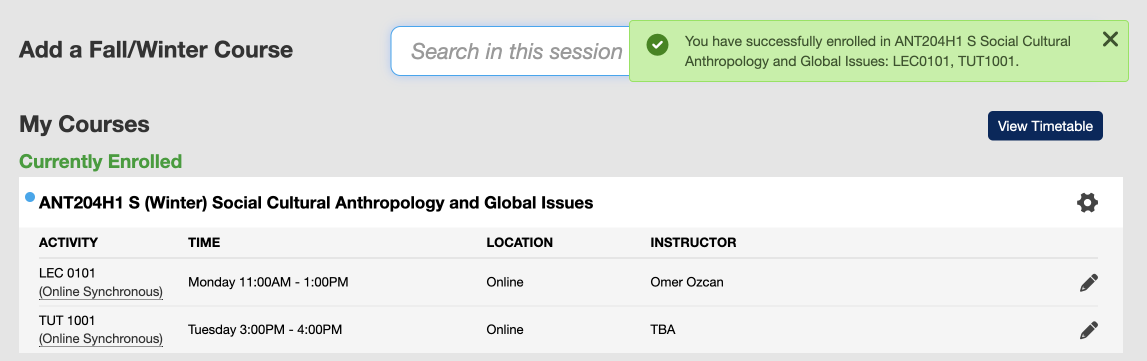
- If you have successfully enrolled in the course you will receive a success notice on the top right corner of your screen and the course will be listed under your currently enrolled courses.
Instructional videos: UTM | UTSC | UTSG
Before enrolling in courses, check when you will be eligible to enrol by viewing your divisional registrar’s important academic dates, and check your enrolment start time on ACORN. You can plan the courses you want to take using the Timetable builder, and learn if you will be eligible to enrol in a course by checking the “Enrolment Controls” section of a course in the search results area. To plan for your entire degree, check out Degree Explorer.
- From the ACORN dashboard, click ‘Enrol & Manage’ on the main navigation menu.
- On the Enrol & Manage page, there will be one or more tabs labelled with the academic session. Ensure that you have selected the tab for the session in which you want to enrol in courses. Then, select the Courses button, or the Courses page from the main navigation.
- Use the search field to search for courses by course code or title. Results will start appearing after three characters. From the list of courses that appears, select a course.
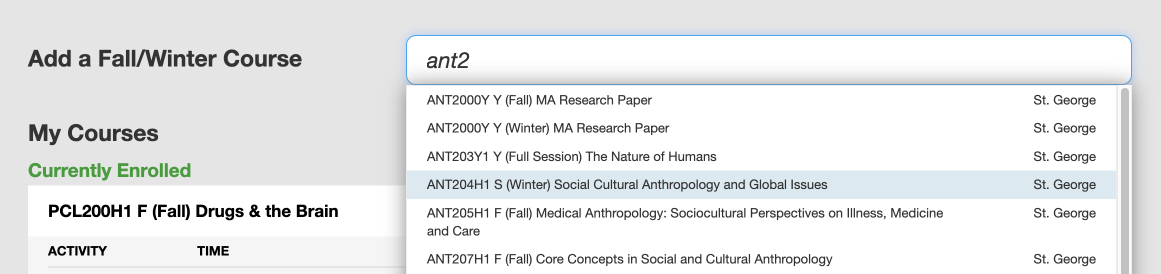
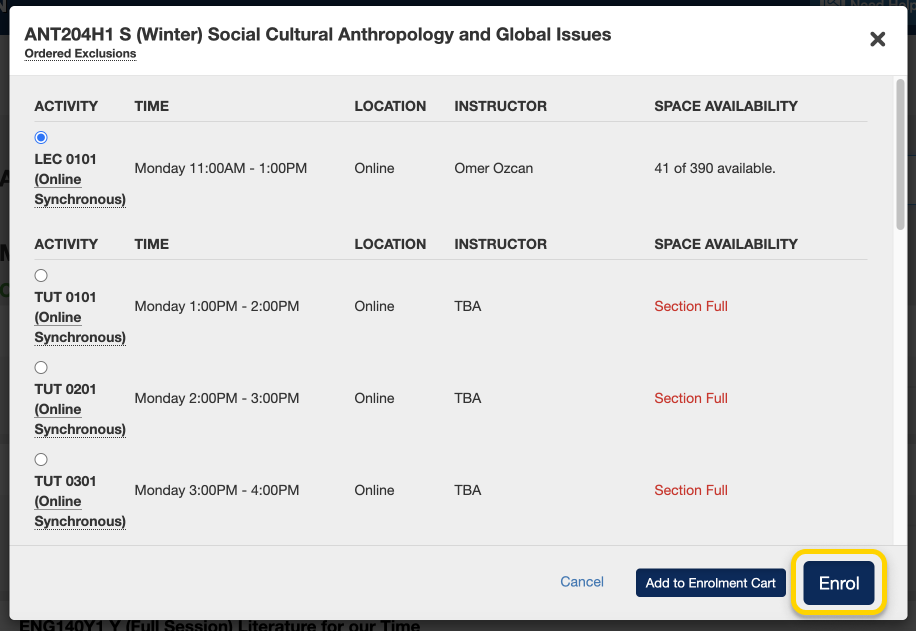
- A modal window will appear. Select a primary activity, which is typically a lecture (LEC), and any secondary activities, which are typically tutorials (TUT) or practicals (PRA). Not every course will have a lecture, and not every course will have tutorials and practicals. Be sure to check the Time column in case there is a conflict with any of your other currently-enrolled courses, and ensure that the activity that you are selecting do not say “Enrolment Blocked” or “Section Full” under the Space Availability column. If a section says “Enrolment Blocked”, the activity or course may be restricted to students from a certain program, year of study, or campus. Please check the Timetable Builder to learn about any restrictions or Enrolment Controls that a course may have. Next, select the “Enrol” button towards the bottom of the modal window. If you are unable to select a particular activity or enrol in the course, ACORN will tell you why. If you think you should be able to enrol in a course and you cannot, please contact your college, divisional or faculty registrar.
- If you have successfully enrolled in the course you will receive a success notice on the top right corner of your screen and the course will be listed under your currently enrolled courses.
If you want to drop a course, check your division’s important academic dates to determine when you can drop a course without facing an academic or financial penalty.
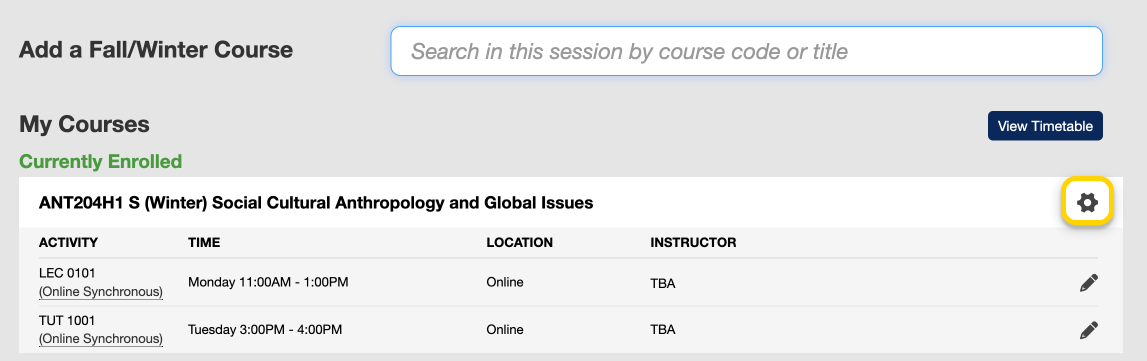
- From your Courses screen, click the gear icon towards the right of the course that you want to drop.
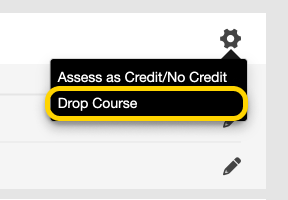
- Select “Drop Course” from the drop-down menu that appears.
- A modal window will pop up to confirm that you want to drop this course. Once it, appears, double-check the course to make sure it is correct, and select “Drop Course”.
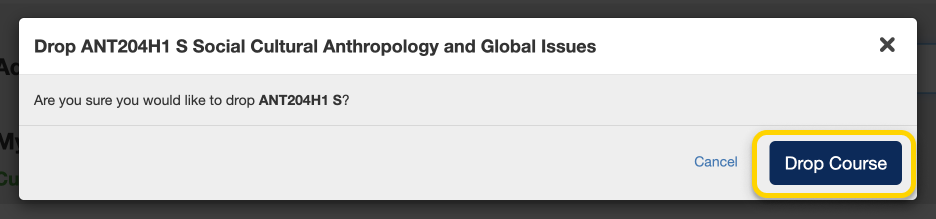
- If you have successfully dropped the course you will receive a success notice towards the top right corner of your screen and the course will no longer be listed under your currently enrolled courses.

You can choose to assess courses as Credit/No Credit when you want to take a course but don’t want it to contribute to your GPA. A course that is assessed as Credit/No Credit will count towards the number of credits you need for your degree as long as you pass the course according to your division’s standards. If you need a final grade in a course for a program requirement or to apply for a certification in the future, you generally should not consider Credit/No Credit. If you’re unsure, contact an academic advisor. Before assessing any courses as Credit/No Credit, check your divisional registrar’s guidelines and deadlines because they may vary.
- On the Courses screen, click the gear icon on the top right corner of the course you want to assess as Credit/No Credit.
- Select ‘Add Credit/No Credit’ from the drop-down menu that appears.

- A modal window will appear to provide more information about assessing the course as Credit/No Credit. Read through this and ensure that assessing the course as Credit/No Credit is appropriate for your situation, and then select “Assess as Credit/No Credit”.
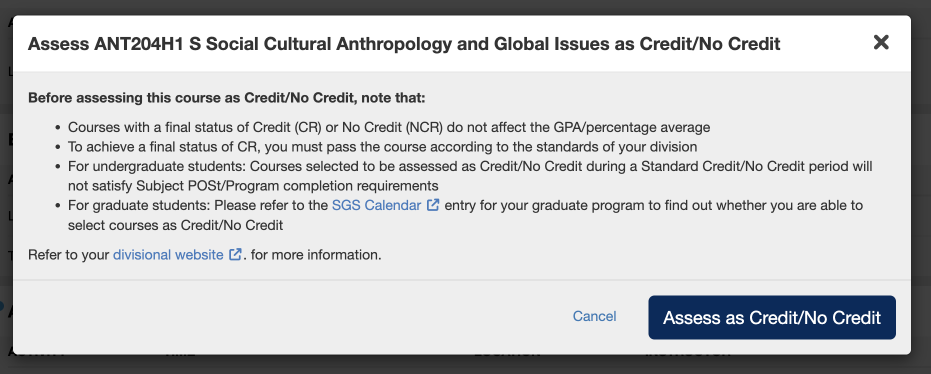
- If you have successfully assessed the course as Credit/No Credit you will receive a success message on the top right corner of your screen. A “Credit/No Credit” indicator will also appear below the course title under your Currently Enrolled courses.

Instructional videos: UTM | UTSC | UTSG
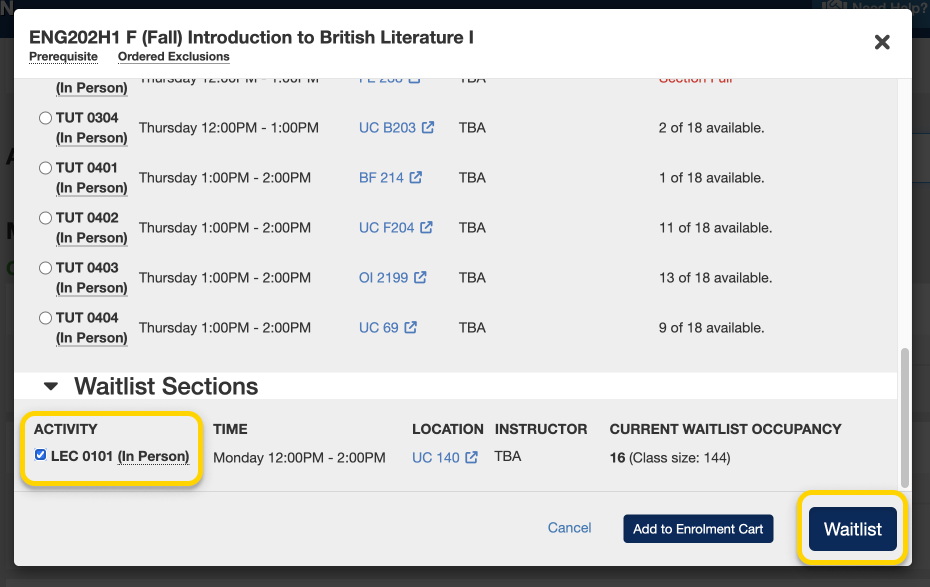
If a course lecture (LEC), tutorial (TUT) or practical (PRA) is full when you try to enrol, you may be able to enrol in the waitlist instead. If enough students drop the course and space becomes available, ACORN will automatically enrol you in that course. Check the academic deadlines for your division to learn when the waitlist period ends. At this point, the waitlist will be removed from that course.
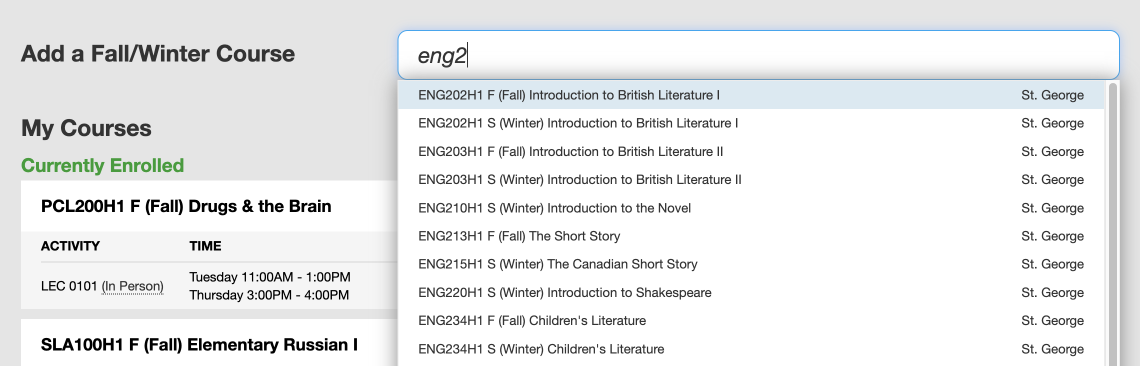
- On the Courses page, use the search field to search for courses by course code or title. Results will start appearing after three characters. From the list of courses that appears, select a course.
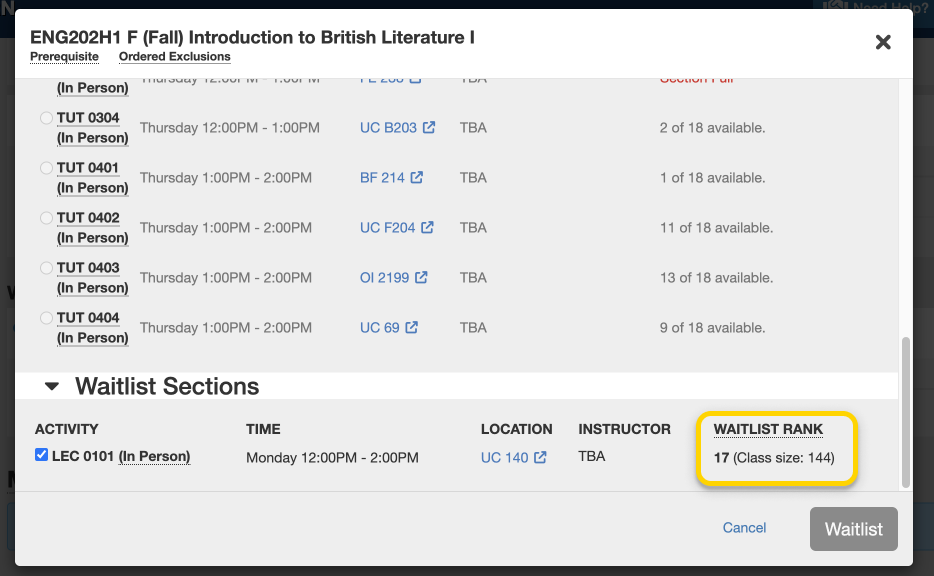
- A modal window will appear. If the course has a waitlist, it will be towards the bottom of the modal window. The “Current Waitlist Occupancy” shows the number of other students who are currently on the waitlist. In this example, the class size is 144, and there are 16 students on the waitlist, excluding you. Select the primary activity (usually a lecture or LEC) for which you would like to join the waitlist, and select the “Waitlist” button. You cannot join the waitlist for secondary activities such as tutorials (TUT) and practicals (PRA), so be sure to enrol in those if needed and after you get into the course.
- If you have successfully enrolled on the waitlist, you will receive a success message towards the top right of your screen and the course will be in the “Waitlisted” section of your currently enrolled courses. You can check your rank on the waitlist at any time by selecting “View rank on waitlist”.

- A modal window will appear showing your rank on the waitlist. In this example, your current position on the waitlist would be 17. There are 16 students in front of you on the waitlist, and the class size is 144 students. If your waitlist rank is 0, then you are next in line to be enrolled into the course. ACORN will send you a notification in your Notifications area if your rank on the waitlist changes.
- ACORN will enrol you in the primary activity (usually a lecture or LEC) of the course automatically if you get into the course from the waitlist. You will also get an email at your U of T email address to update you. If your course has additional activities, such as tutorials (TUT) and practicals (PRA), ACORN will not automatically enroll you in these. Please enrol in these activities as soon as you can after getting into your course so you do not miss any classes.
Your enrolment cart allows you to plan the courses that you want to enrol in ahead of time. You can experiment with different courses, lecture (LEC), tutorial (TUT) and practical (PRA) sections so that you can quickly enrol in your top choices on enrolment day.
Courses in your enrolment cart will not automatically be enrolled for you once your enrolment period begins.
Before adding courses to your cart, check when you will be eligible to enrol by viewing your divisional registrar’s important academic dates, and check your enrolment start time on ACORN. You can plan the courses you want to take using the Timetable builder, and learn if you will be eligible to enrol in a course by checking the “Enrolment Controls” section of a course in the search results area. To plan for your entire degree, check out Degree Explorer.
Instructional videos: UTM | UTSC | UTSG
- From the ACORN dashboard, click ‘Enrol & Manage’ on the main navigation menu.
- On the Enrol & Manage page, you will see one or more tabs labelled with the academic session. Ensure that you have selected the tab for the session for which you want to add courses to your cart. Then, select the Courses button, or the Courses page from the main navigation.
- Use the search field to search for courses by course code or title. Results will start appearing after three characters. From the list of courses that appears, select a course.
- A modal window will appear. Select a primary activity, which is typically a lecture (LEC), and any secondary activities, which are typically tutorials (TUT) or practicals (PRA). Not every course will have a lecture, and not every course will have tutorials and practicals. Be sure to check the Time column in case there is a conflict with any of your other currently-enrolled courses, and ensure that the activity that you are selecting do not say “Enrolment Blocked” or “Section Full” under the Space Availability column. If a section says “Enrolment Blocked”, the activity or course may be restricted to students from a certain program, year of study, or campus. Please check the Timetable Builder to learn about any restrictions or Enrolment Controls that a course may have.Next, select the “Add to Enrolment Cart” button towards the bottom of the modal window. If you are unable to select a particular activity or enrol in the course, ACORN will tell you why. If you think you should be able to enrol in a course and you cannot, please contact your college, divisional or faculty registrar.
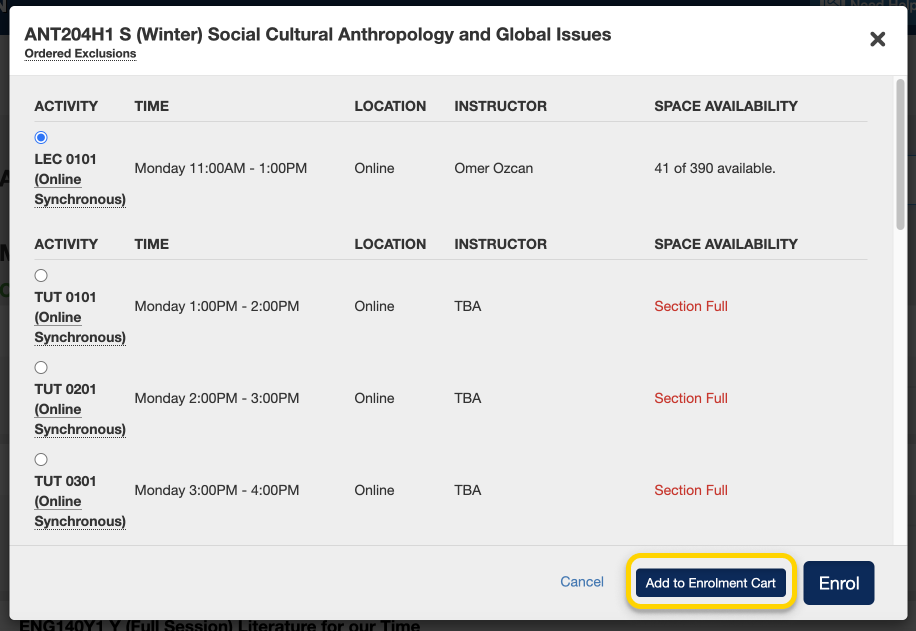
- The course should now appear under your Enrolment Cart towards the bottom of your Courses screen. From here, you can edit the course activities, remove the course from your cart, and enrol starting on your enrolment day. Learn more about how to enrol in a course from your Enrolment Cart.

Program Enrolment
Instructional videos: All campuses
To explore your options for enrolling in minor, major or specialist programs, check out the Programs Directory and your division’s academic calendar.
Read more about program selection for your division:
- UTM Program Selection
- UTSC Program Selection
- Faculty of Arts & Science Program Selection
- School of Graduate Studies Program Selection
- For other divisions, please refer to your divisional website or academic calendar.
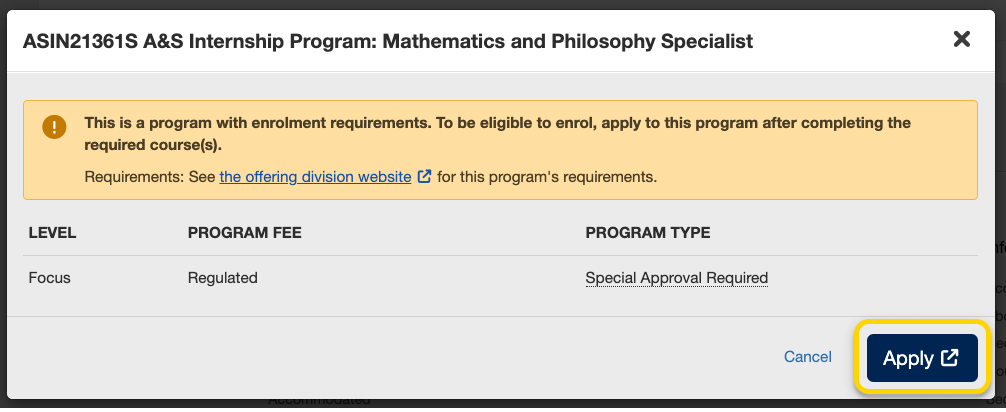
Limited programs (sometimes called Type 2 or 3) typically require an application, have requirements that you must meet, and cannot be enrolled in directly through ACORN.
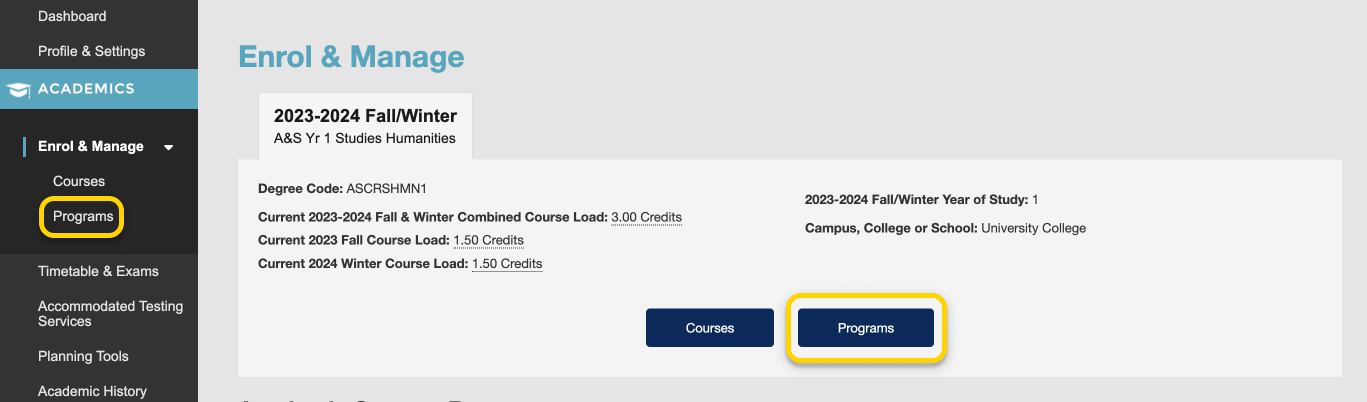
- From the ACORN dashboard, select “Enrol & Manage” from the main navigation.
- On the Enrol & Manage page, there will be one or more tabs labelled with the academic session. Ensure that you have selected the tab for the session in which you want to enrol in a program. Then, select the Programs button, or the Programs page from the main navigation.
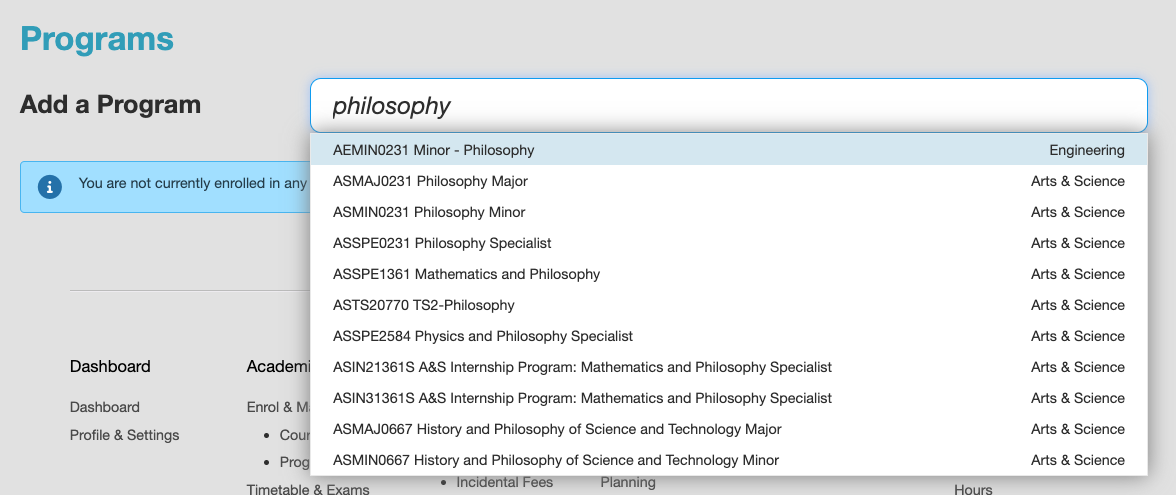
- Use the search field to search for programs by program code or title. Results will start appearing after three characters. From the list of programs that appears, select a program.
- If your program is a Type 2 or Type 3 program, you will need to request to enrol in the program. Review the information presented and select “Request to Enrol”.
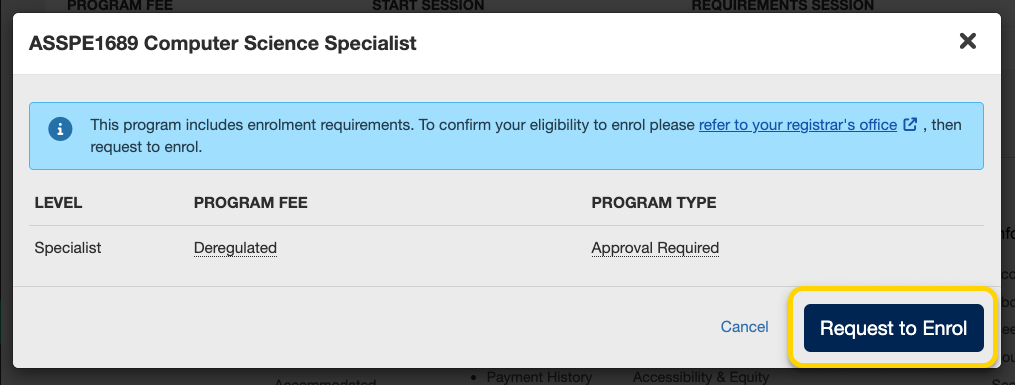
- If there are requirements that you have not fulfilled, the modal window will inform you. Select the Apply button to learn more about what you need to do in order to apply for the program.
- After requesting to enrol in the program, your division will need to verify that the requirements have been met. Check your division’s information for when you will be able to check your results. Your enrolment in the program may either be Invited, Refused, or Requested. Once you have been accepted into your program, you will see it under your Currently Enrolled section on the Programs page.
Instructional videos: UTM | UTSC
To explore your options for enrolling in minor, major or specialist programs, check out the Programs Directory and your division’s academic calendar.
Read more about program selection for your division:
- UTM Program Selection
- UTSC Program Selection
- Faculty of Arts & Science Program Selection
- School of Graduate Studies Program Selection
- For other divisions, please refer to your divisional website or academic calendar.
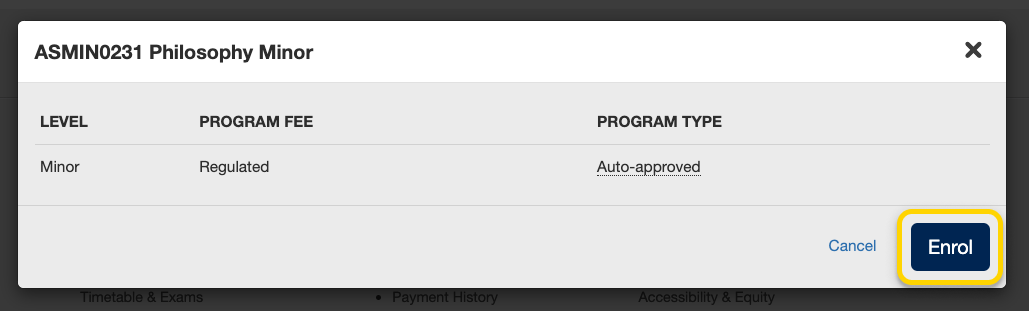
Unlimited programs (sometimes called Type 1) do not require an application, and can be enrolled in directly from ACORN.
- From the ACORN dashboard, select “Enrol & Manage” from the main navigation.
- On the Enrol & Manage page, there will be one or more tabs labelled with the academic session. Ensure that you have selected the tab for the session in which you want to enrol in a program. Then, select the Programs button, or the Programs page from the main navigation.
- Use the search field to search for programs by program code or title. Results will start appearing after three characters. From the list of programs that appears, select a program.
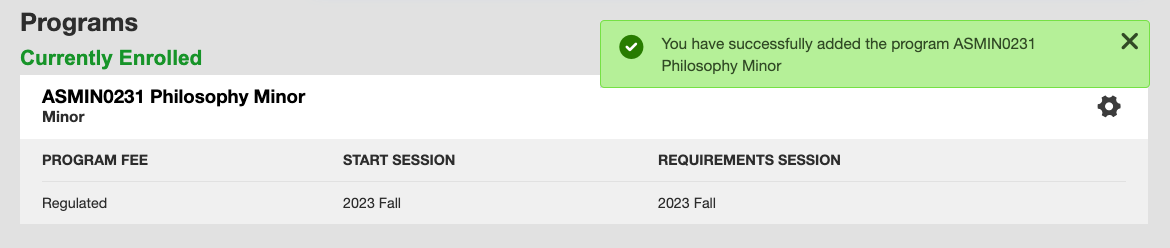
- On the program enrolment modal, review the information presented and select “Enrol”.

- If you have successfully enrolled in the program you will receive a success message towards the top right of your screen. The program will be listed under your currently enrolled programs.
- On the Programs screen, click the gear icon towards the right of the program you want to drop, then select “Drop Program”.

- A modal window will appear to confirm your decision. Review the information presented to ensure that you are dropping the correct program, and then select “Drop”.
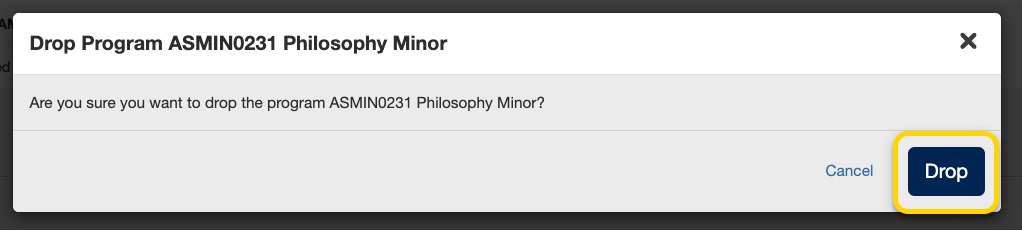
- If you have successfully dropped the program you will receive a success message towards the top right of the page. The program will no longer be listed under your currently enrolled programs.

Finances
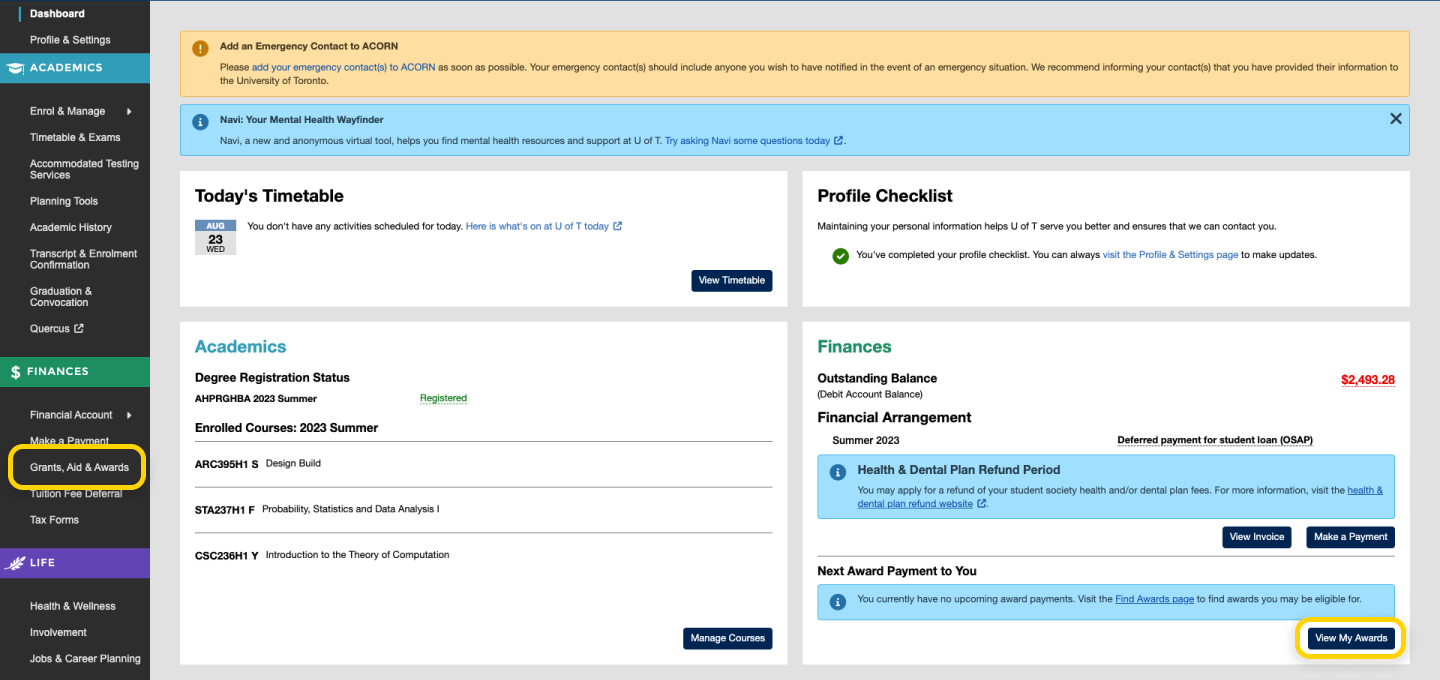
- From the ACORN Dashboard, select “Grants, Aid & Awards” on the main navigation menu. Alternatively, select “View My Awards” on the Dashboard Finances card.
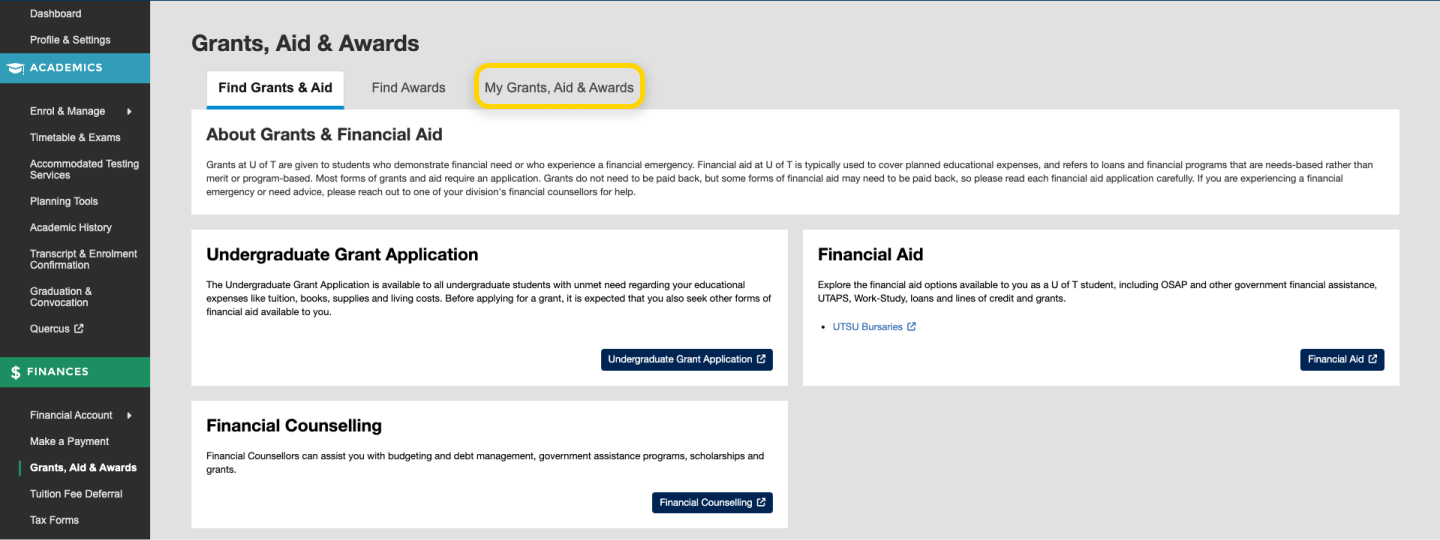
- You will be taken to the My Awards screen. If you selected the “Grants, Aid & Awards” navigation link, select the “My Grants, Aid & Awards” Tab towards the top of the screen to get to My Grants, Aid & Awards.
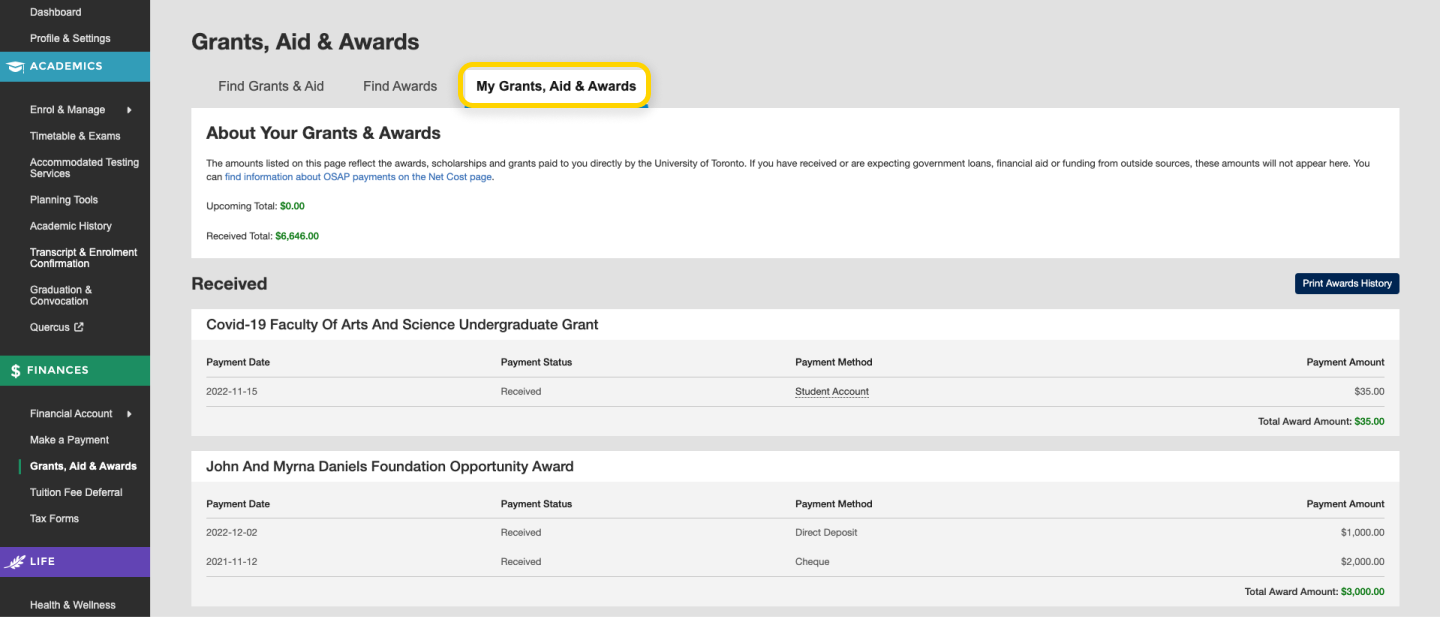
- If you have any received grants, aid or awards, you will see individual payments listed on this screen along with details like payment date, payment status, payment method and payment amount. Some awards are disbursed in multiple installments. If you have an award for which you have received at least one payment, you will see future payments for that award in the “Upcoming” section. Please note that changes to your registration status may affect your eligibility to receive these future payments.
Instructional video: All campuses
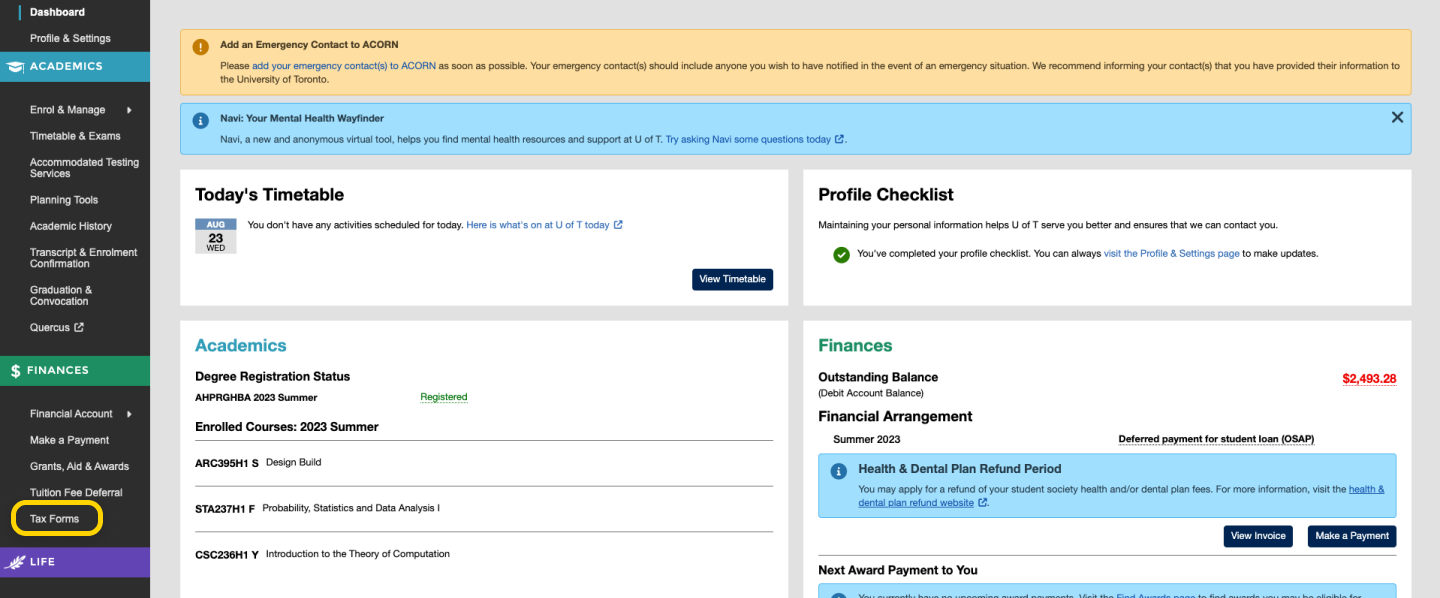
From the ACORN dashboard, select “Tax Forms” on the main navigation menu under Finances.
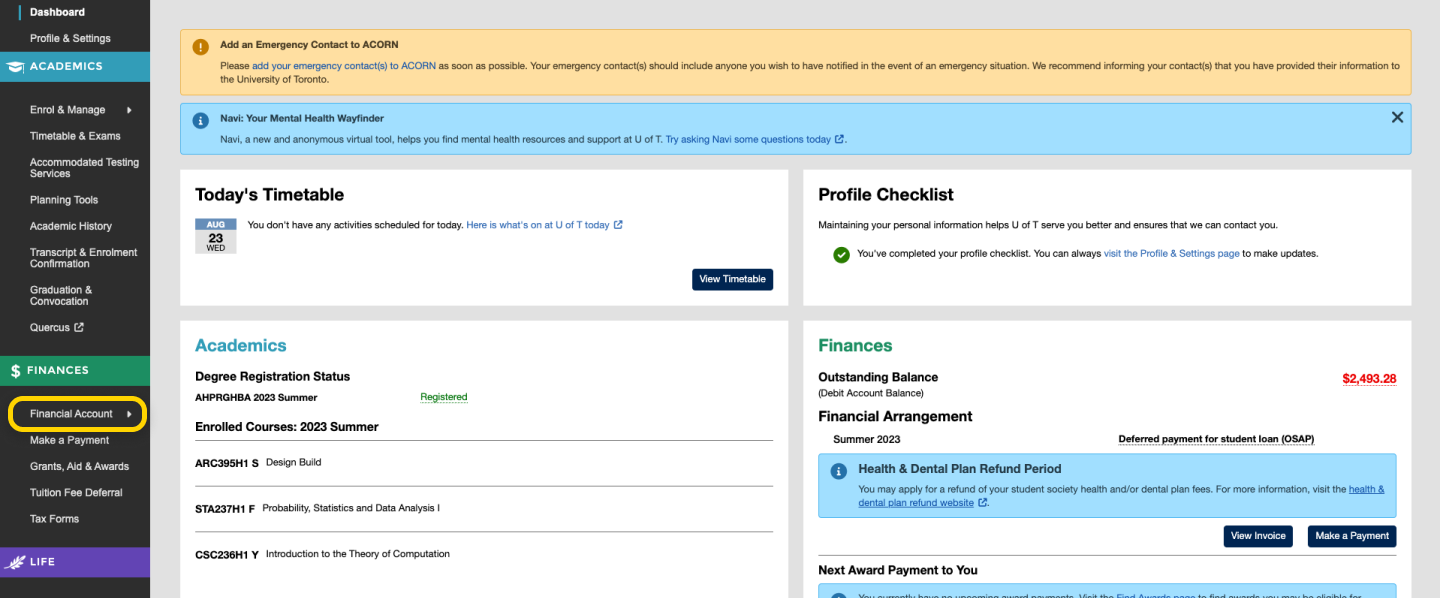
- From the ACORN dashboard, select ‘Financial Account’ on the main navigation under Finances.
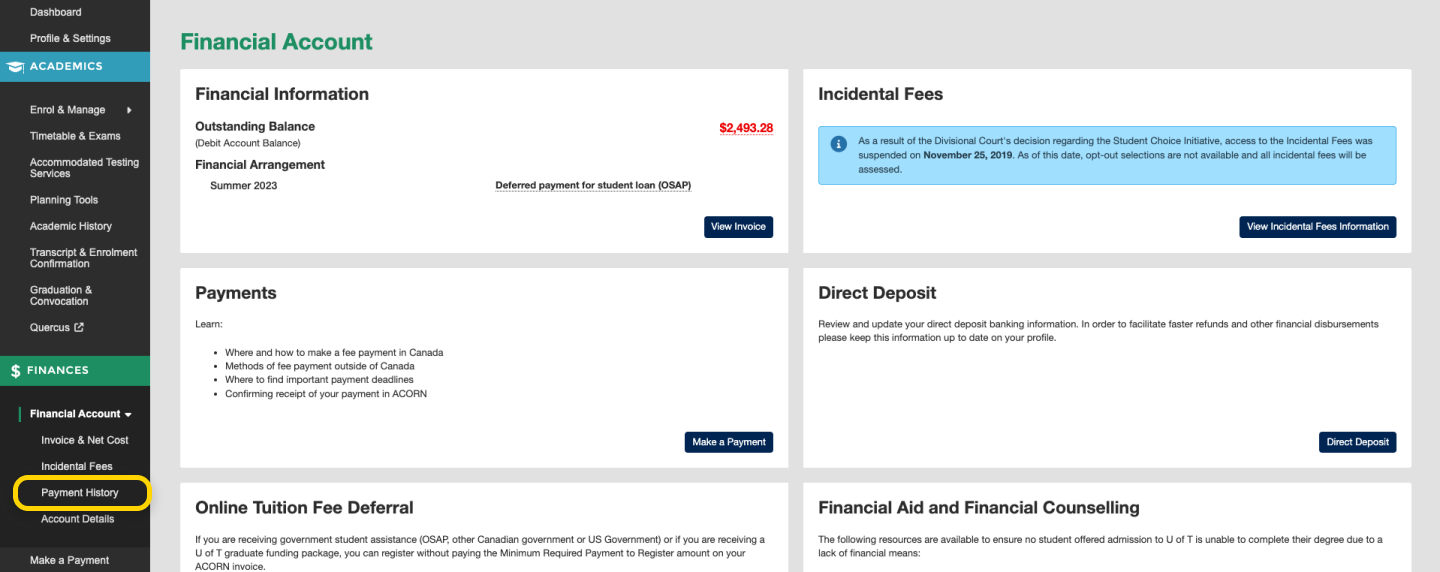
- Select ‘Payment History’ on the sub list of items under the Financial Account menu heading.
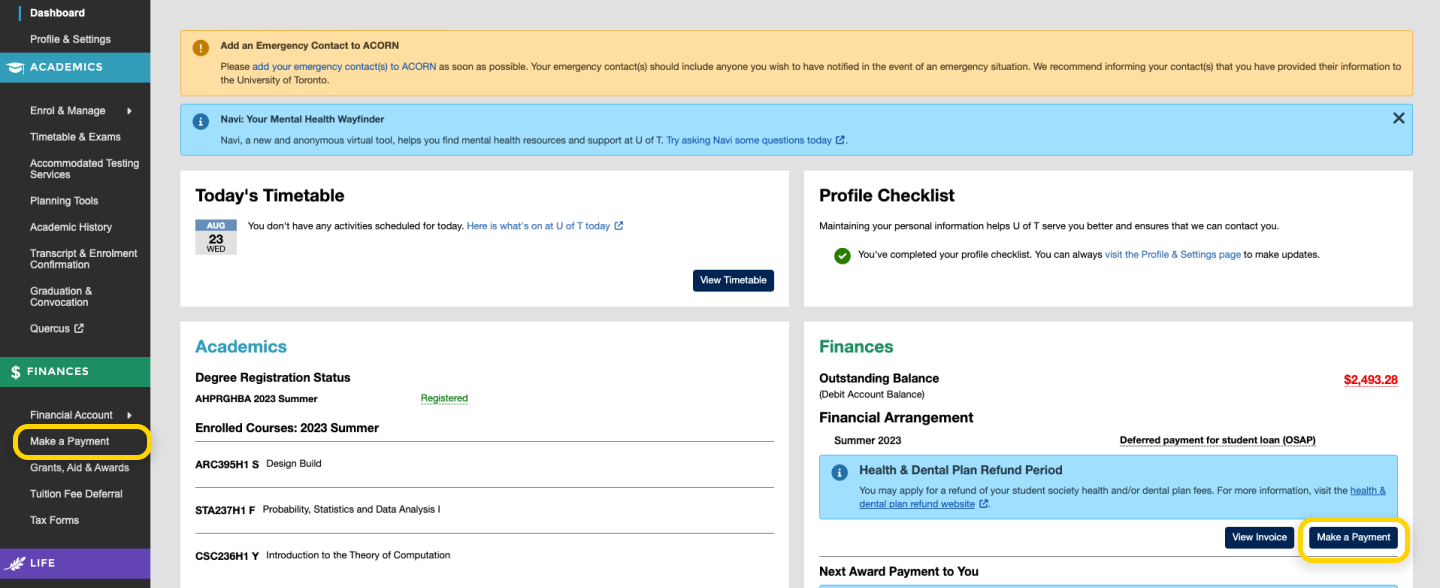
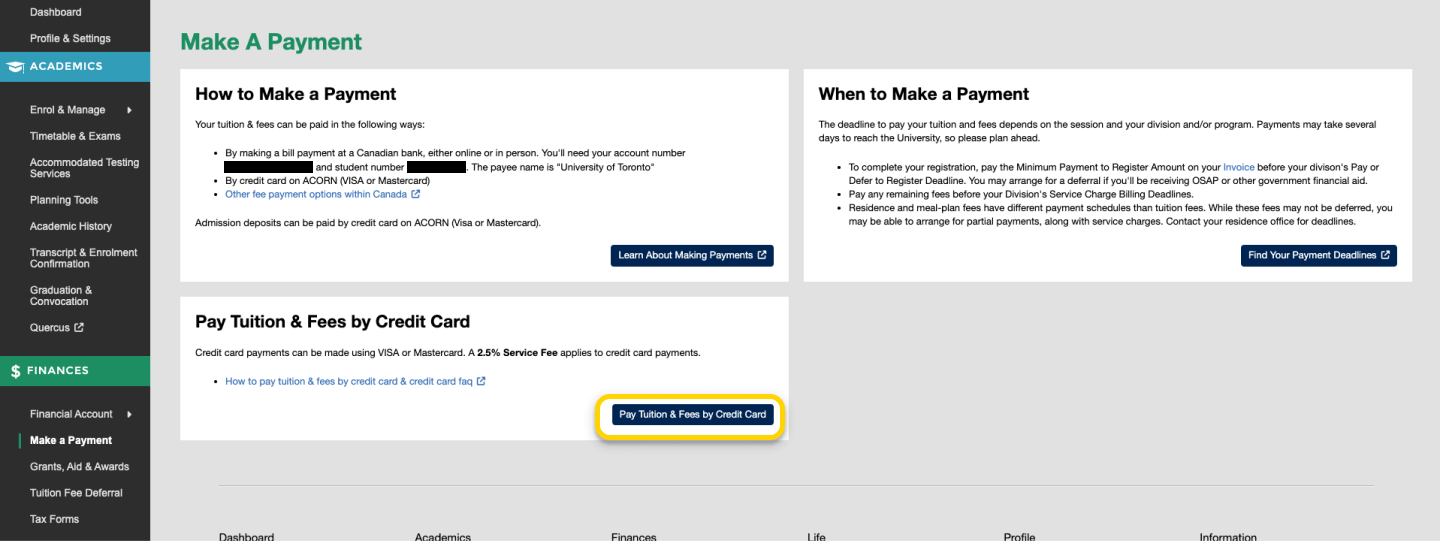
- From the ACORN dashboard, select the “Make a Payment” link on the main navigation or the “Make a Payment” button within the Finances card.
- You will arrive on the Make a Payment Page, which contains information about different ways to pay your fees, as well as payment deadlines. To begin the credit card payment process, select the “Pay Tuition & Fees by Credit Card” button. Keep in mind that a 2.5% Service Fee—charged by and paid to the payment service Moneris—will apply to credit card transactions.
- After you have read the instructions on the Credit Card Payment page, fill out your billing information.
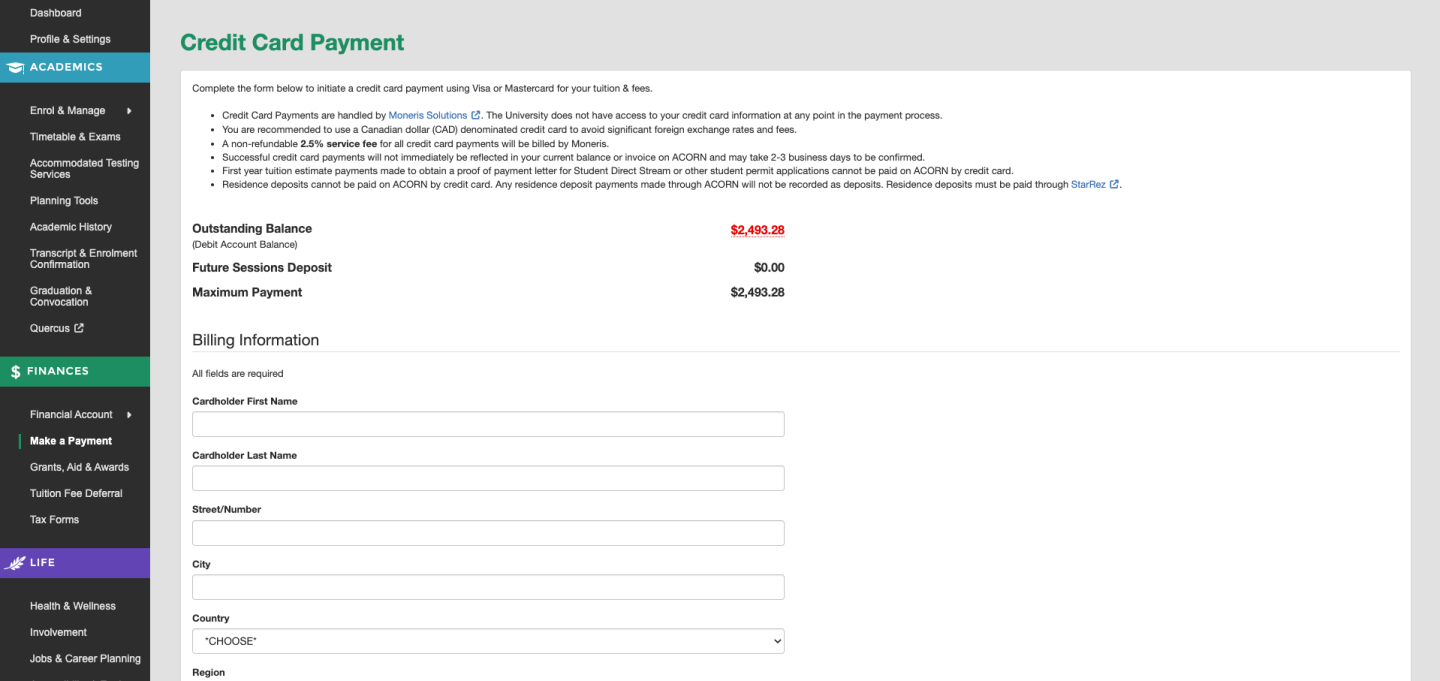
- Enter the amount you want to pay. Please note that your payment amount cannot exceed your outstanding balance in ACORN. After entering your payment amount, the total charge will display. This amount includes the service fee. Read and agree to the terms & conditions and select the “Make Payment” button to move on to the credit card payment step.

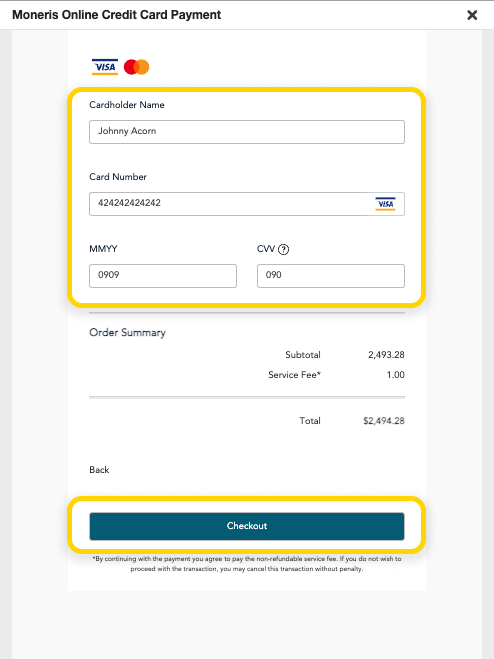
- A pop-up window will appear and ask for your credit card details. Enter your credit card information and select the “Checkout” button to complete your payment.
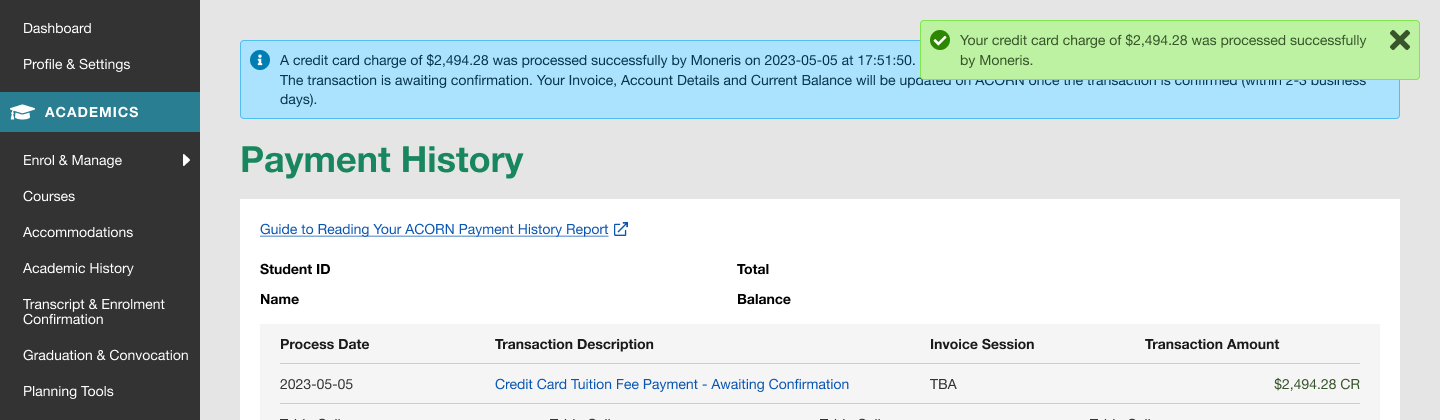
- You will be taken to the Payment History page, and a success message will appear if the payment was successful. Your payment will be processed by Moneris within approximately two business days. Select the link in the Transaction Description column that says “Credit Card Tuition & Fee Payment – Awaiting Confirmation” to view and download your receipt. You will not be able to make another payment until the pending payment has been approved.
Before paying an admission deposit, please make sure you have accepted the admission offer to your degree program by following your division’s instructions. For undergraduate students who applied through OUAC, you will need to accept your offer on OUAC.
- From the ACORN dashboard, you will see the admission deposit that you can pay for in the Finances card. Multiple deposits may appear here if you were admitted to multiple programs, so please ensure you pay for the right one. Select the “Make a Payment” link on the main navigation or the “Make a Payment” button within the Finances card.
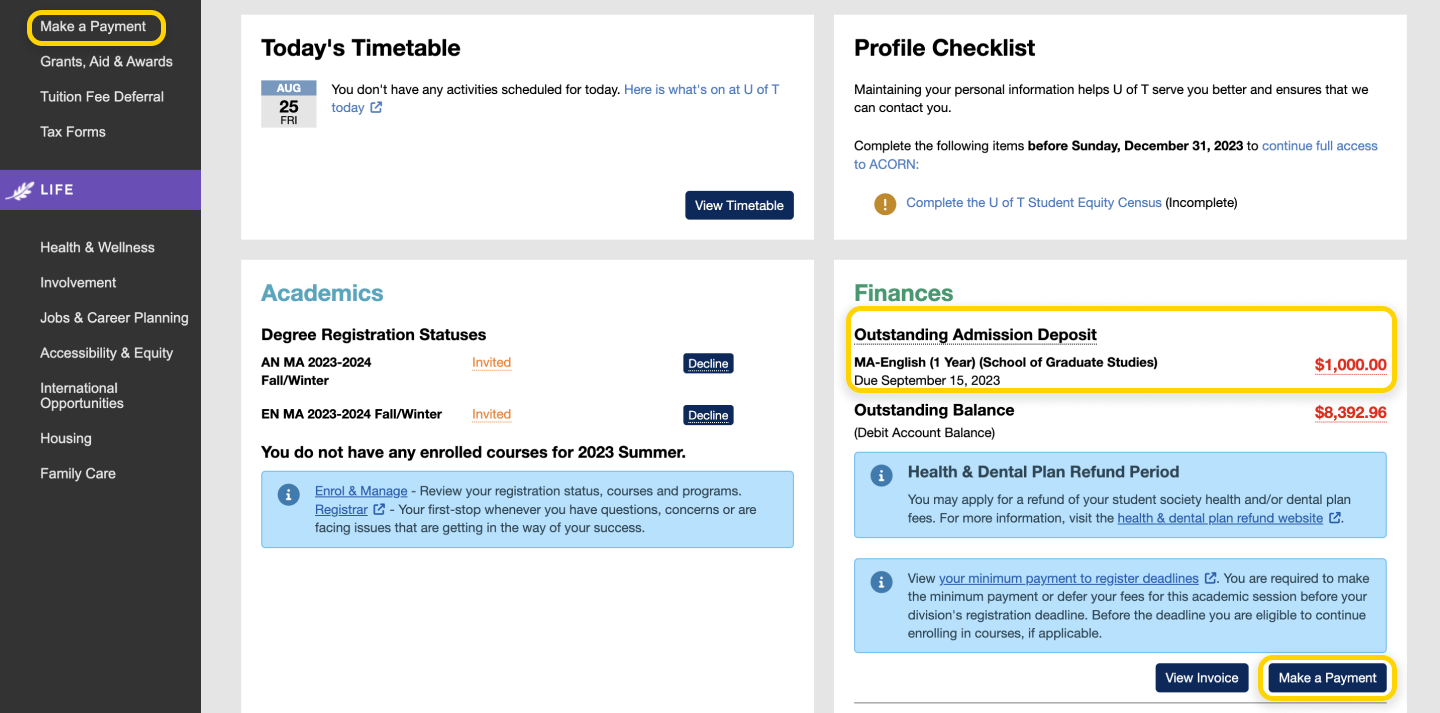
- You will arrive on the Make a Payment Page, where you can learn about your options for making tuition & fee and admission deposit payments. Admission deposit payments can only be paid by credit card on ACORN. To begin the credit card payment process, select the “Pay Deposit by Credit Card” button. Keep in mind that a 2.5% Service Fee—charged by and paid to the payment service Moneris—will apply to credit card transactions.

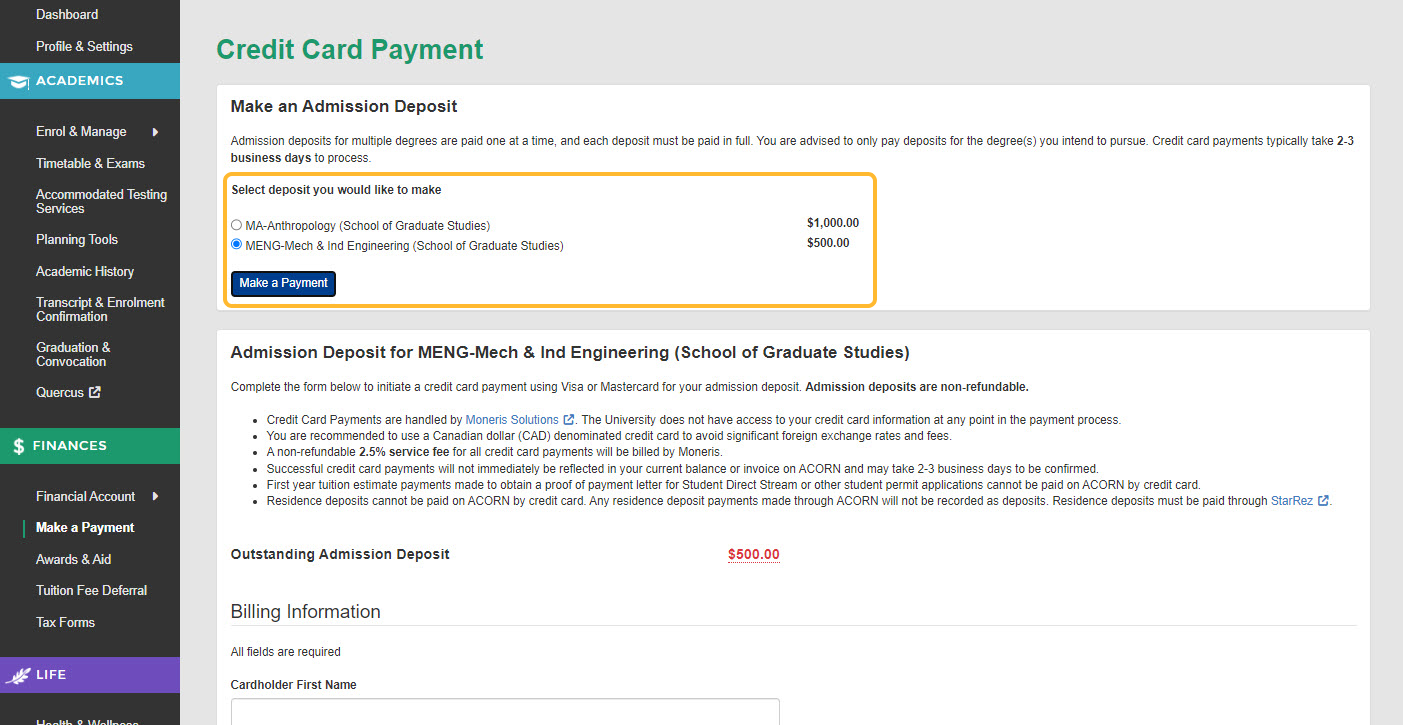
- If you have the option to pay deposits for multiple degree programs, please ensure you select the correct one. After you have read the instructions, fill out your billing information.
If you are only paying for one deposit, the payment page will look like the following: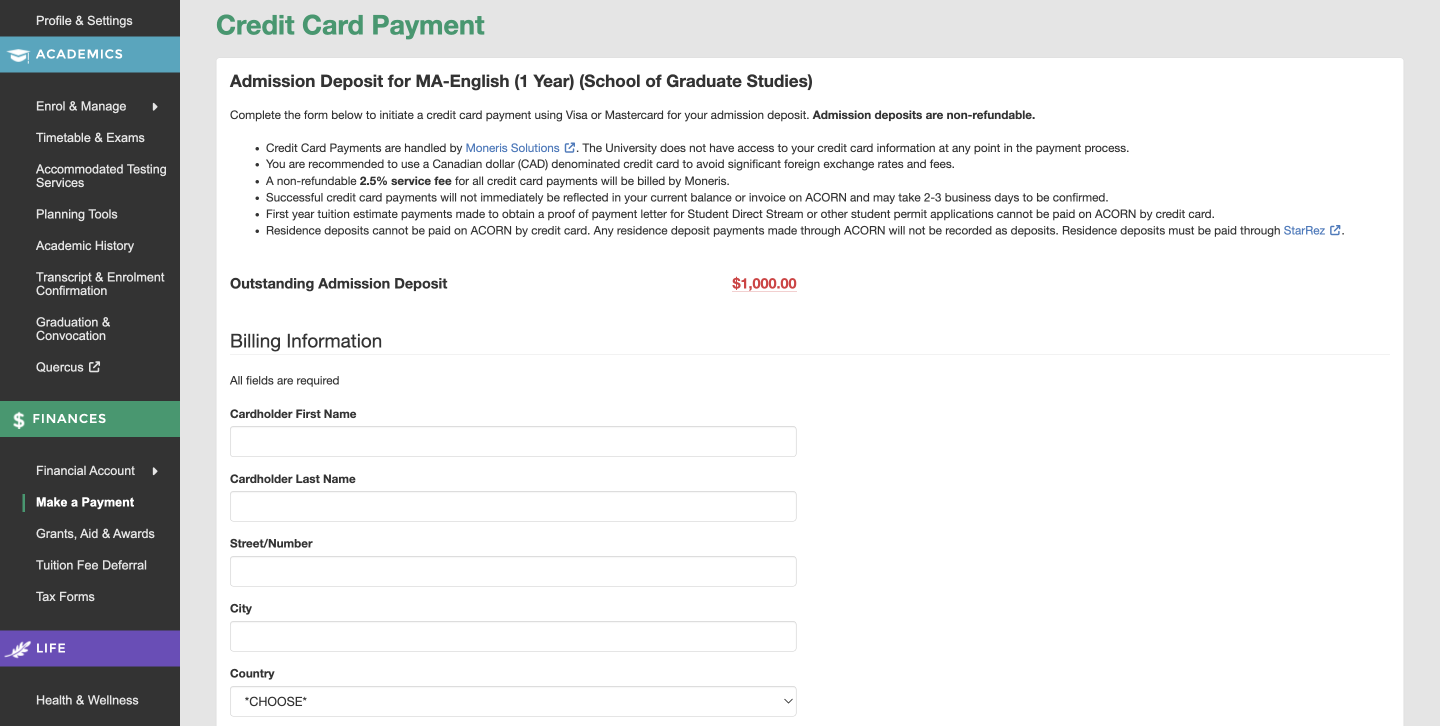
If you have the option to pay more than one deposit, the payment page will look like the following:

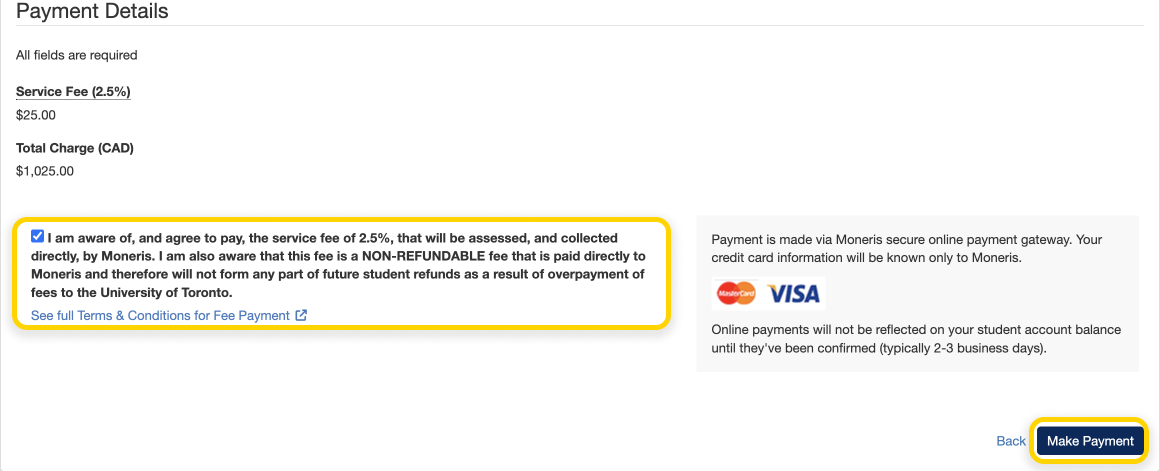
- Admission deposits can only be paid in full, so you cannot change the amount to pay. The total charge will display, including the service fee. Read and agree to the terms & conditions and select the “Make Payment” button to move on to the credit card payment step.
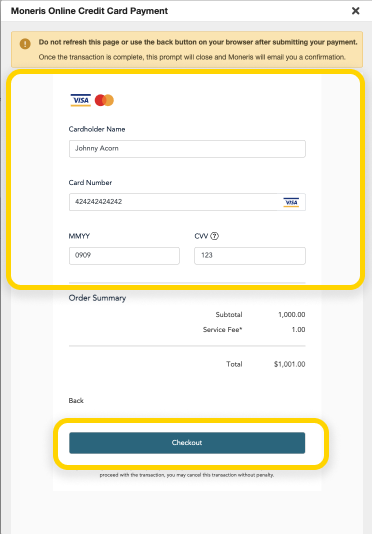
- A pop-up window will appear and ask for your credit card details. Enter your credit card information and select the “Checkout” button to complete your payment.
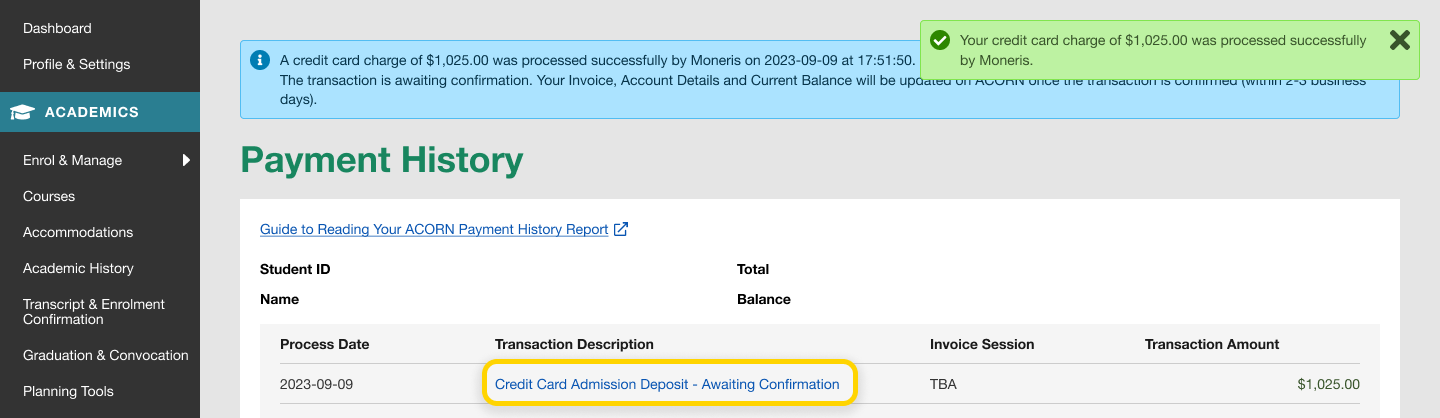
- You will be taken to the Payment History page, and a success message will appear if the payment was successful. Your payment will be processed by Moneris within approximately two to three business days. Select the link in the Transaction Description column that says “Credit Card Admission Deposit – Awaiting Confirmation” to view and download your receipt.
As of Summer 2018, if you will be receiving Full-Time OSAP for the Summer or Fall/Winter sessions, you will be able to see an estimate for what you may need to pay U of T once your upcoming OSAP is applied against your tuition & fees (learn about eligibility for Full-Time OSAP).
This amount is called your “Net Cost”, and it will help you plan ahead and estimate how much in awards funding you may need to seek, or how much you may need to pay out of pocket.
Accessing Your Net Cost
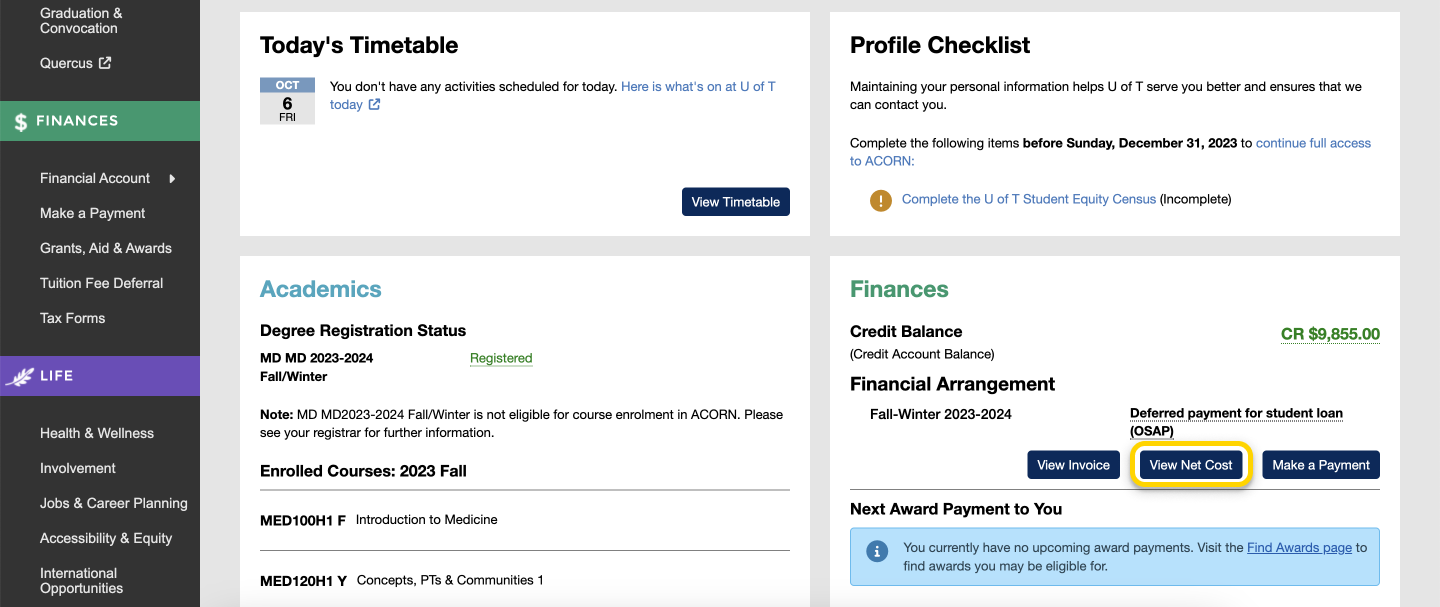
If you will be receiving Full-Time OSAP payments for the upcoming session, you can access your Net Cost page from the ACORN Dashboard.
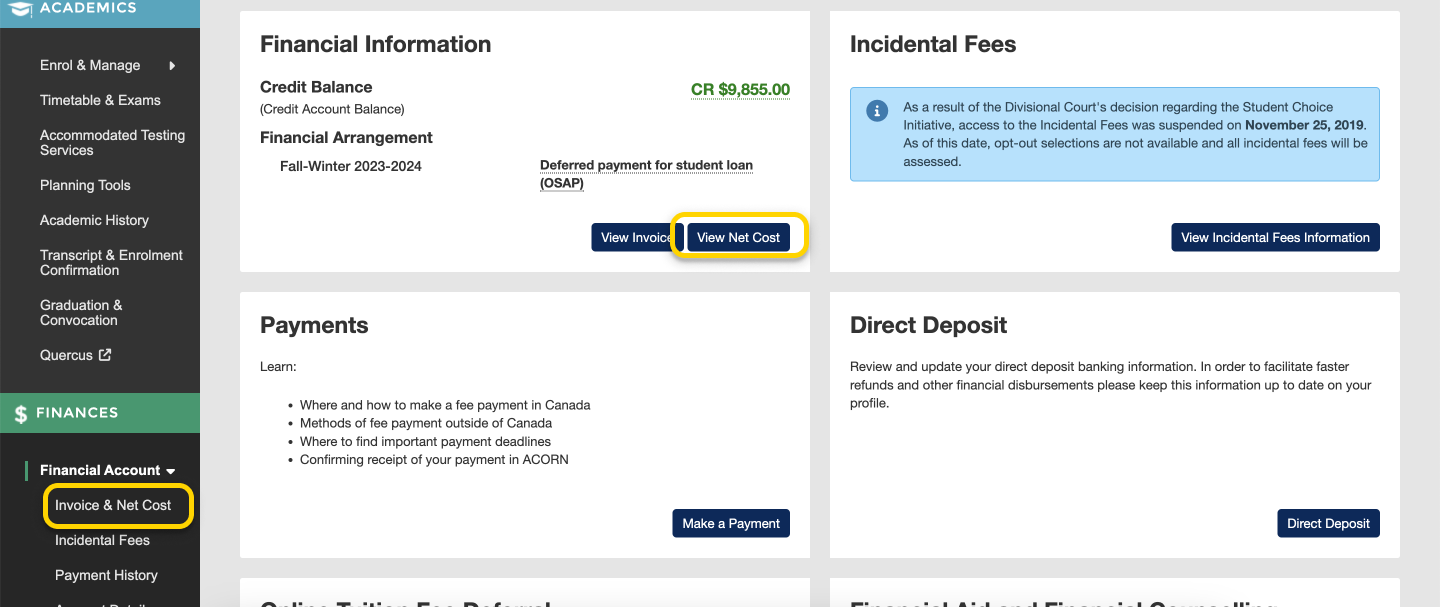
You can also go to Financial Account > Invoice & Net Cost via the main navigation, or click the “View Net Cost” button within the Financial Information card on your Financial Account page.
Understanding Your Net Cost
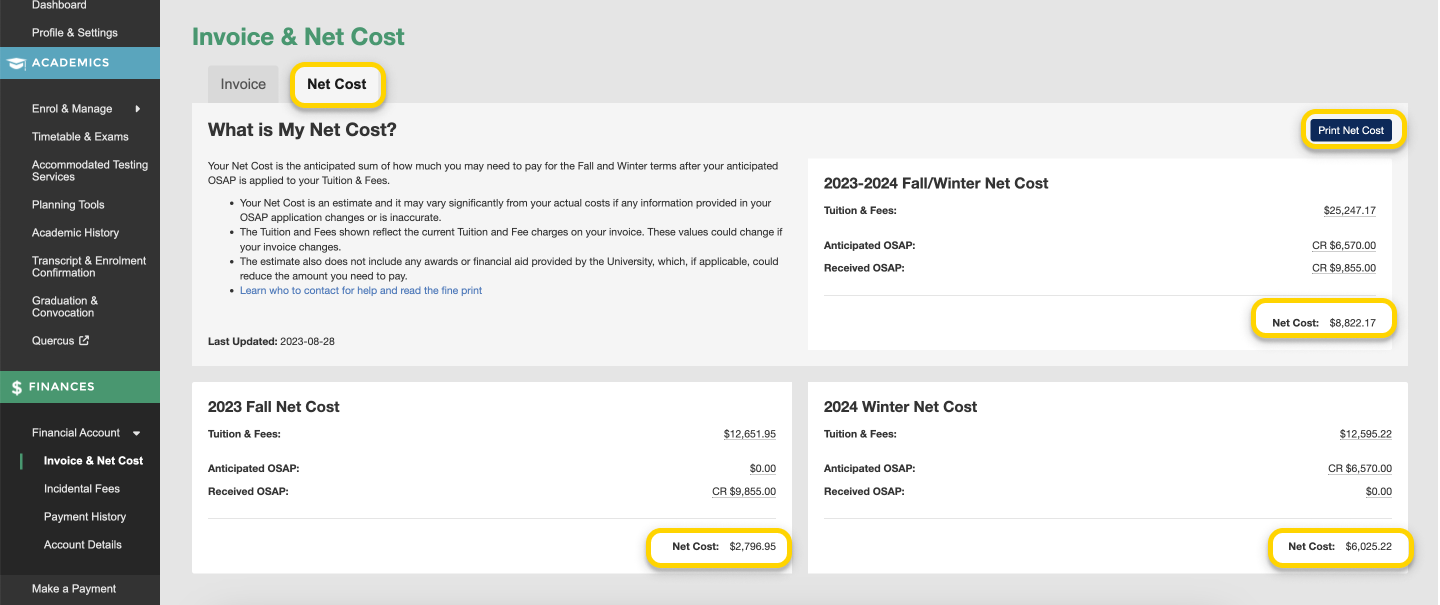
Your Invoice and Net Cost exist on the same page, and you can switch back and forth between them using the two tabs towards the top. Your Net Cost overview for the entire Fall-Winter session is displayed at the top of the page, and contains your tuition and fee charges, anticipated OSAP and received OSAP for the entire Fall-Winter session. Below, your Net Cost is broken down into the Fall and Winter terms individually, and you can find your tuition and fee breakdown and estimated and received OSAP for each term.
For specific definitions of each field, you can hover over an amount—or tap it on mobile—to see more information about it.
Why You May Not See Your Net Cost
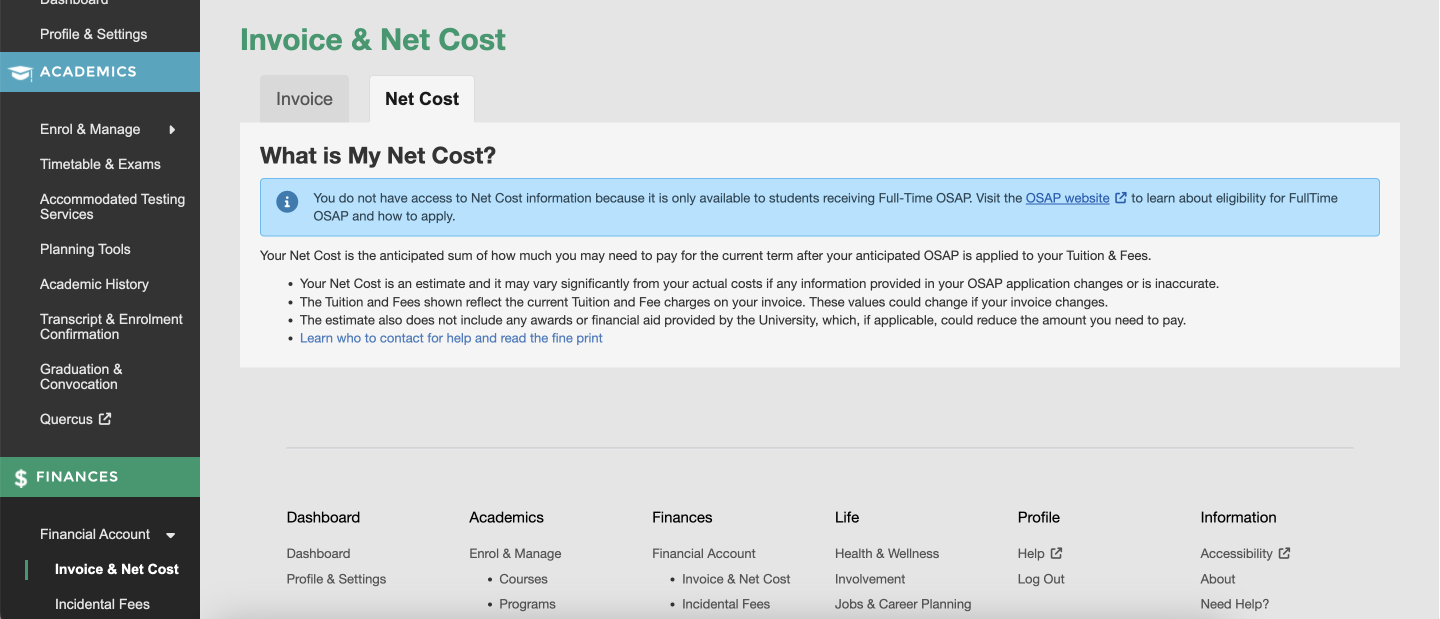
If you see a message like the ones above, it means you cannot see your Net Cost information due to one of the following reasons:
- You are not eligible for Full-Time OSAP
- You are receiving or are eligible only for Part-Time OSAP
- You are not eligible for OSAP for the upcoming term
- You applied for OSAP but your application has been closed
In these cases, unfortunately ACORN cannot display your Net Cost because it does not have an OSAP funding estimate.
Getting Help & More Information
Who to Contact for Help
- For OSAP help, visit the OSAP website. If you still need help, contact osap.staff@utoronto.ca
- For questions about your invoice or charges, contact Student Accounts via ACORN’s Help & Contact form
Net Cost
Your actual Net Cost may vary if the information used to calculate your OSAP assessment is updated.
OSAP
Your Anticipated OSAP is the amount of assistance that OSAP will send directly to the University of Toronto to apply to your tuition and other fees, and is based on your most recent OSAP assessment. If you do not register in the program or course load you indicated on your OSAP application, your eligibility for this assistance may change.
If your Anticipated and Received OSAP amounts are less than your total OSAP funding, OSAP will deposit the difference directly to your bank account. Log in to your OSAP account for the current status of your grants and loans.
There are circumstances where grants provided through OSAP may be converted into OSAP student loans. OSAP grants reflected in your net cost do not include the Ontario Living and Learning Grant (for Crown Wards only).
The financial planning calculator is an exploratory tool that anyone can use in order to estimate what a single year of study might cost at U of T. As an alternative to this article, you can learn how to use the tool by watching this three-minute video.
Before you begin, you should have a general idea of what you will be studying during the upcoming academic year and what your income and savings will be from all sources. This can include summer job savings, expected job earnings for the upcoming academic year or any financial assistance and awards you have received or expect to receive.
- To begin, go to the Financial Planning Calculator and click ‘Start Planning’.

- Provide background information by selecting options that currently apply to you, or if you are exploring your options, simply select which options you think apply to you. You can always change them later to see how your expenses will change. Click ‘Continue’ to proceed to the Estimated Expenses section.

- Estimate your various sources of income to the best of your ability. The more accurate your income estimates are, the more accurate our calculations and financial recommendations will be. If you have no income to enter for a particular field, you may leave it blank. If you want more information about what belongs in each expenses field, hover over (or tap, on a mobile device) the label you are curious about. Click ‘Continue’ to proceed to step 3.

- Based on the background information you provide, we calculate expense estimates for your upcoming academic year. We use educated estimates and calculated averages for many of these values, but feel free to change them to represent your individual situation more accurately. To see information about how each estimate was calculated, hover over (or tap) the label you are curious about. Click ‘Continue’ to proceed to the Summary page.

- On the Budget Summary page, you will see a graph displaying your income, expenses and a third bar indicating whether you are projected to be in a budget deficit or surplus.

- Below the graph you will find a list of personalized resources and next steps that you can take to find ways to save money or receive more financial support, depending on your situation. If you have a budget deficit, these resources will give you a few approaches to getting back on track.

- Want to see what it would cost to switch programs? Live away from home or on campus? Eat out at restaurants a little less and cook more? Use the “Jump to Step” menu to go back and change the information on the form.

- If you change any of your initial inputs, click ‘Recalculate Budget’ and you will be taken to the Budget Summary page with an updated budget summary and set of resources reflecting your changes.

If you have any comments on how you used this calculator or suggestions on how to improve it, please let us know via the “Send Feedback” button at the bottom of the calculator.
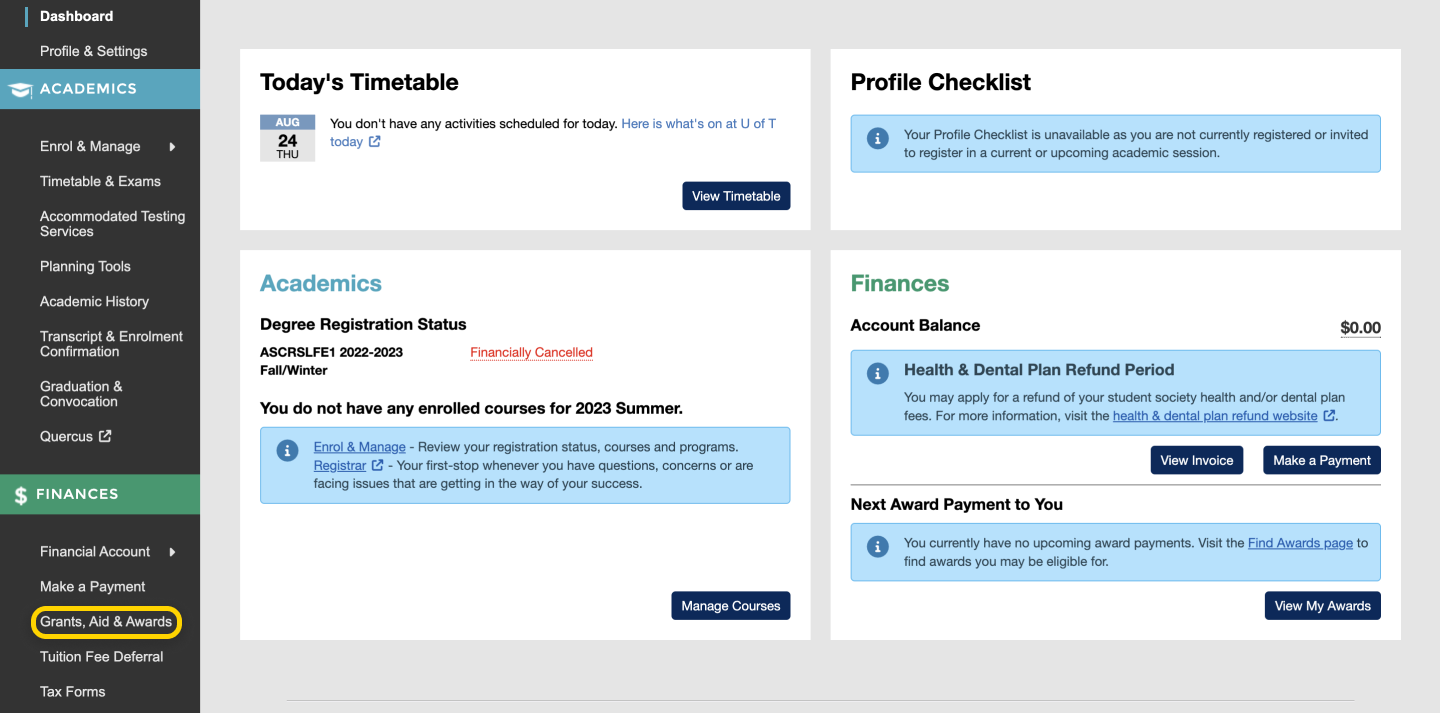
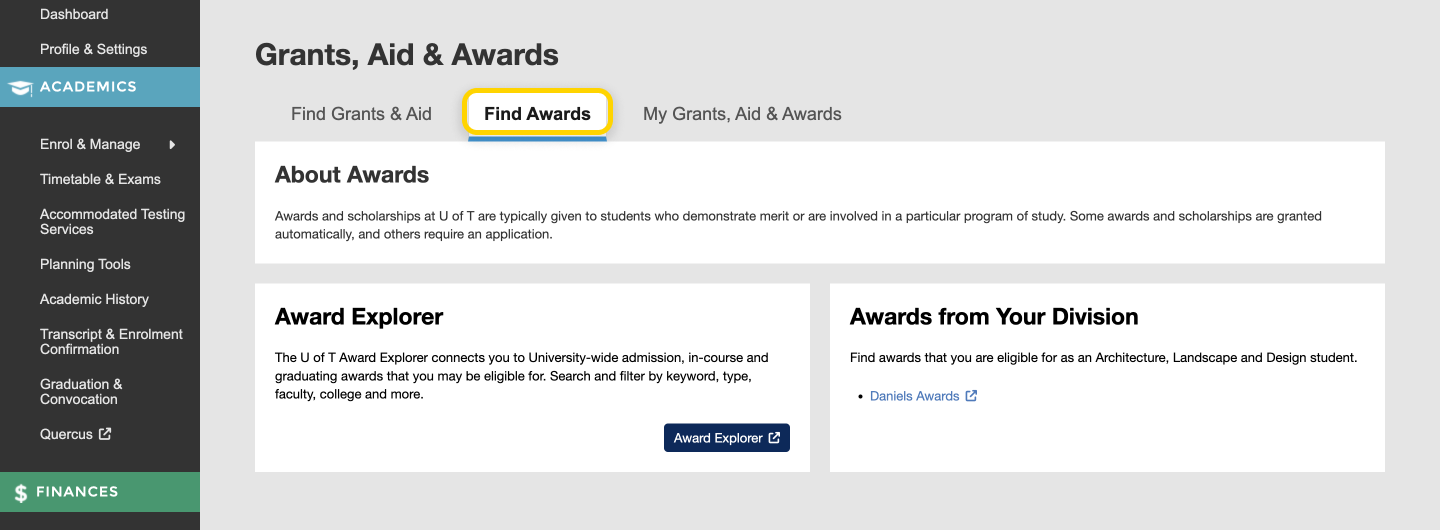
- From the ACORN Dashboard, select “Grants, Aid & Awards” on the main navigation menu.
Screenshot highlighting the ‘Grants, Aid & Awards’ link in ACORN’s main navigation.
- You will be on the “Find Grants & Aid” section of the Grants, Aid & Awards page. From here, you will see a personalized collection of resources that will direct you to sources of financial aid, grants and awards that you may be eligible for. On this page, you can select the “Find Awards” tab.
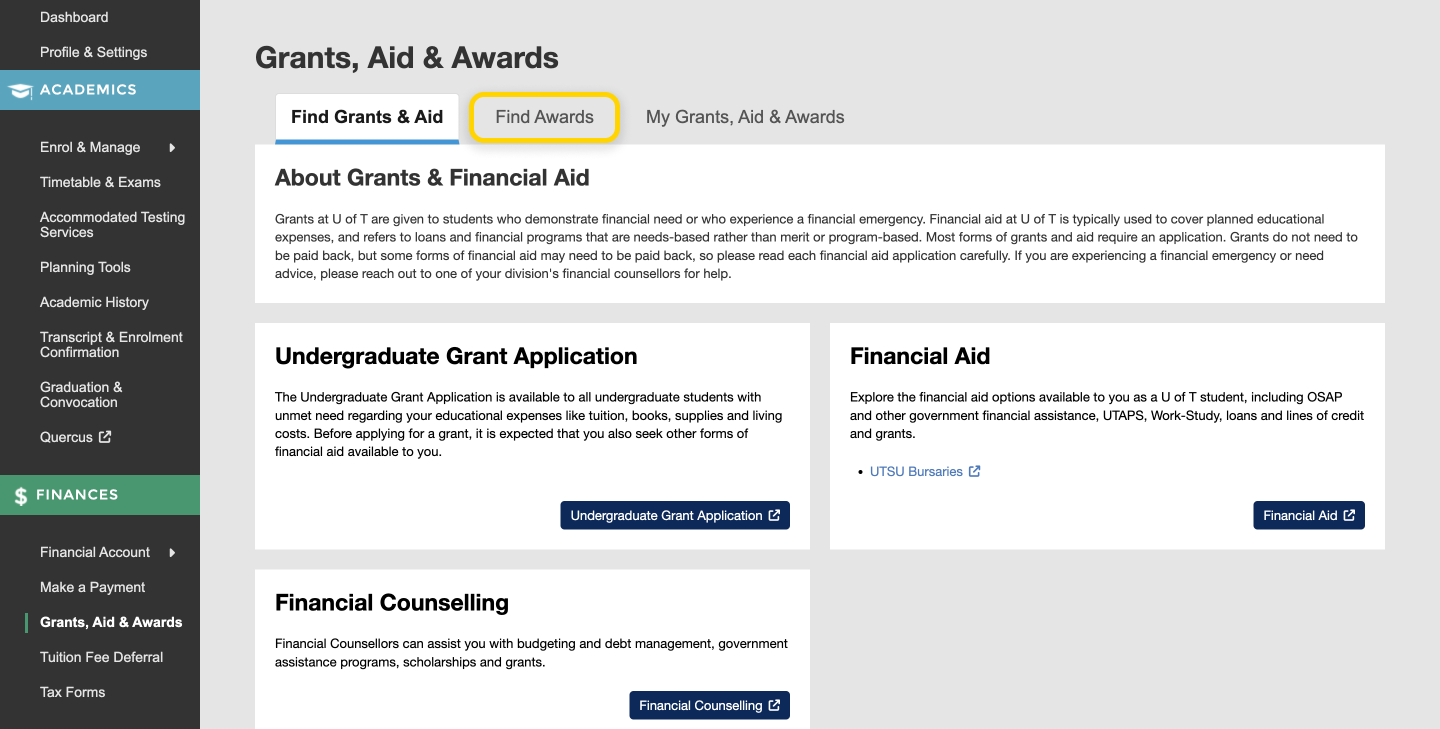
- Once you’re on the Find Awards page, you will see a personalized page with resources for your division, as well as a link to the Award Explorer page.
Instructional video: All campuses
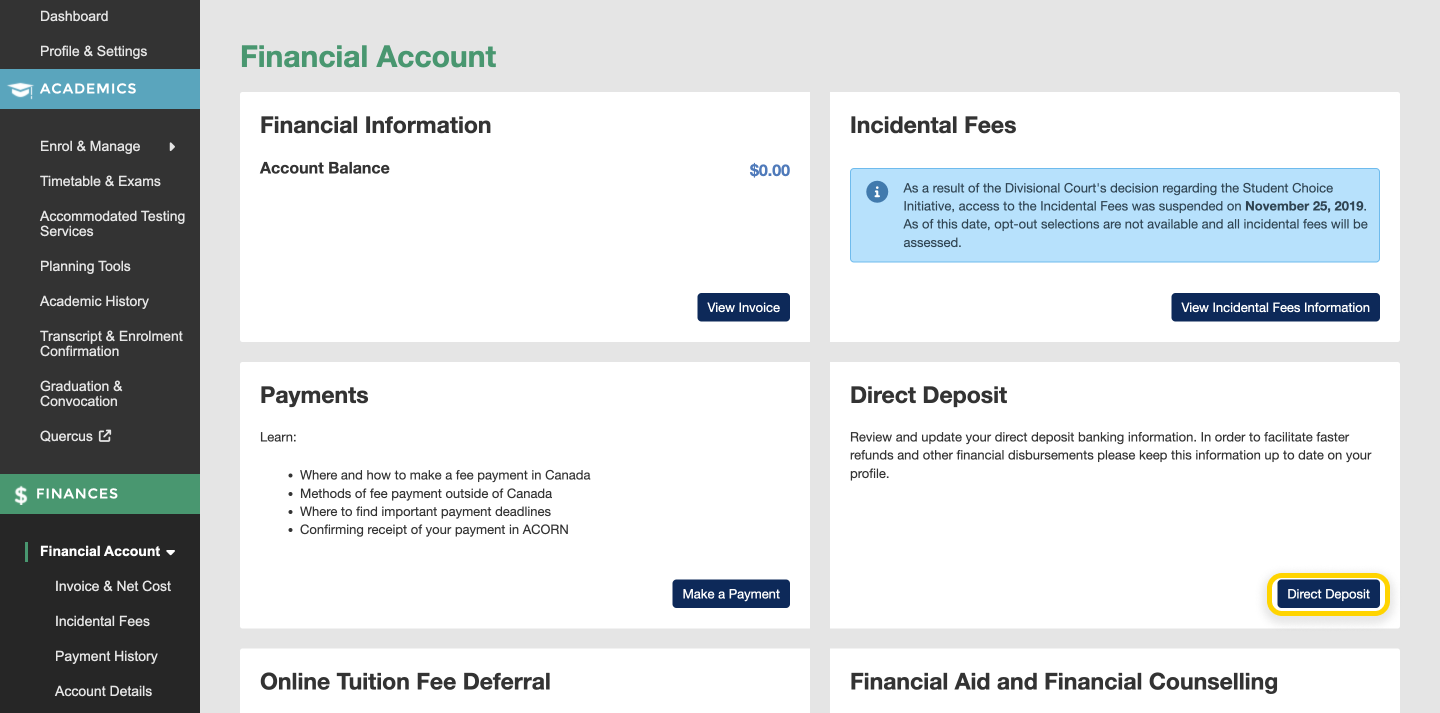
- From the ACORN dashboard, select ‘Financial Account’ on the main navigation menu under Finances.
- On the Financial Account screen, locate the direct deposit card and select ‘Direct Deposit’.
- Select ‘Enter Banking Info’.
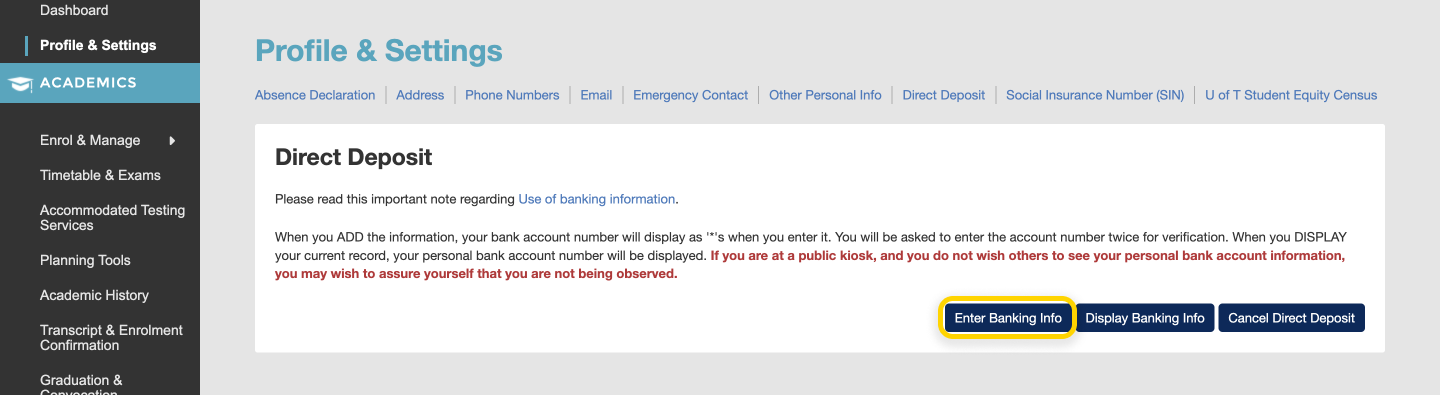
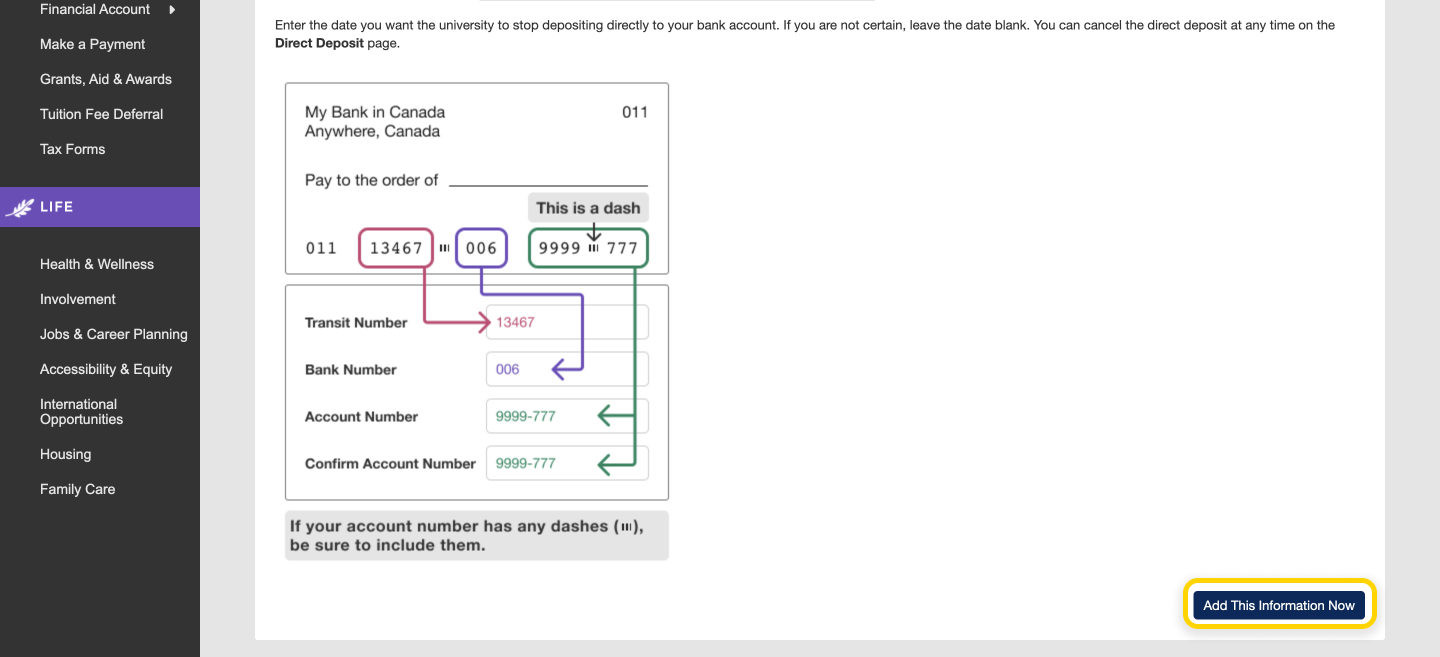
- Enter your banking information. You can find your Transit, Bank and Account numbers by requesting a blank cheque or a print-out of your banking information from your bank.
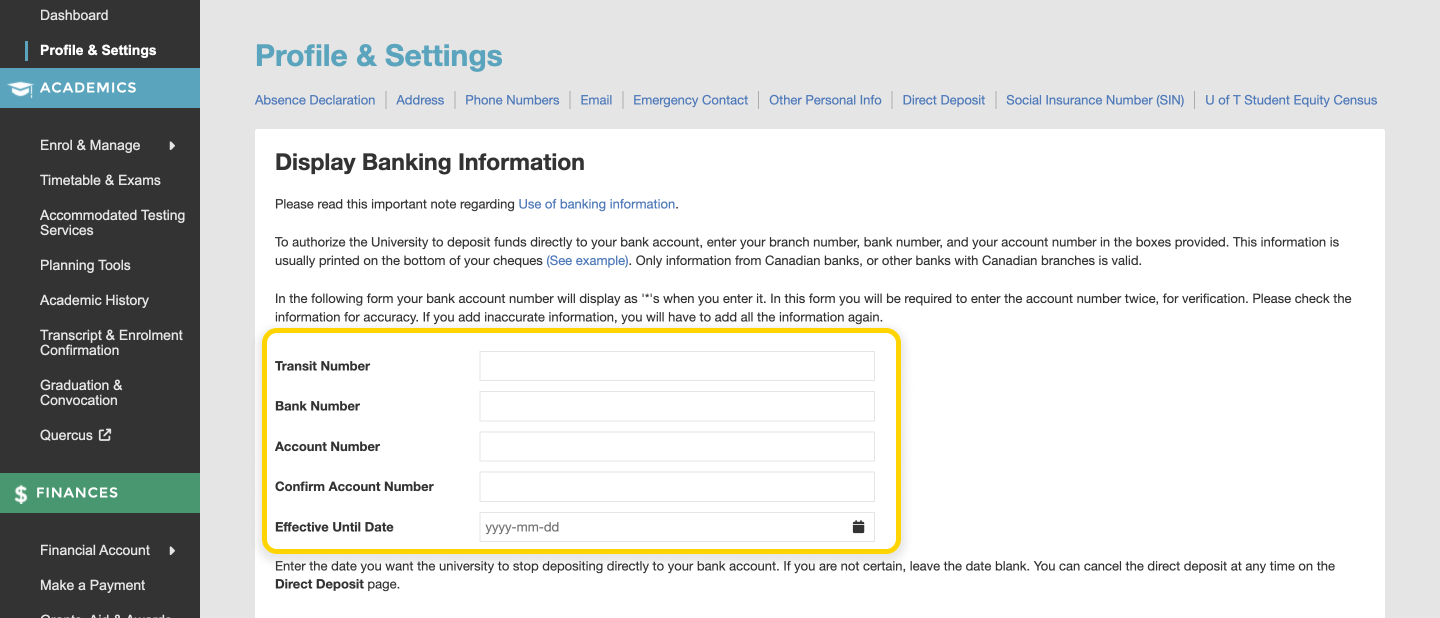
- Select ‘Add This Information Now’.
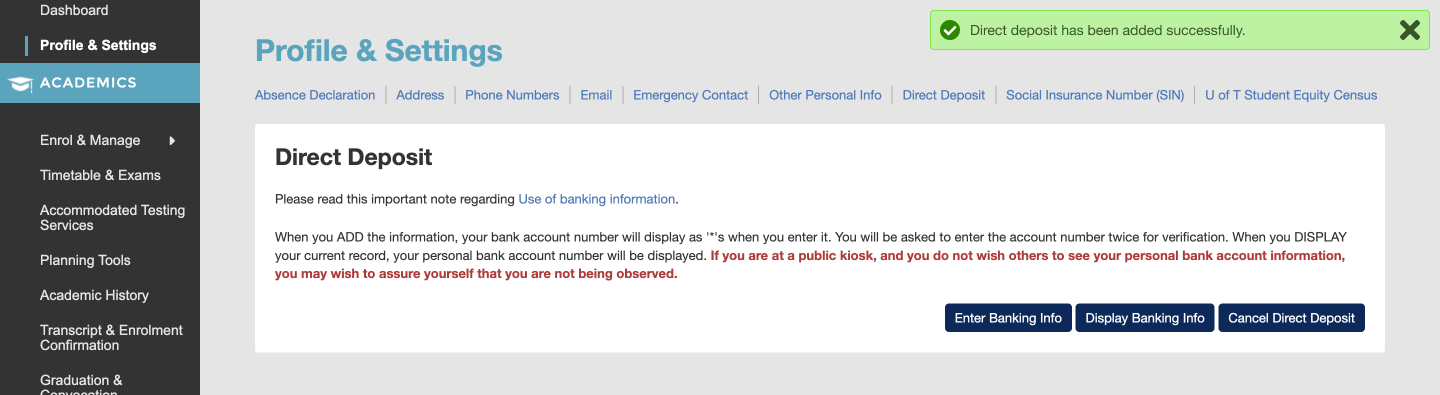
- After you have successfully added your banking information, you will get a confirmation message.
Instructional videos: Undergrad student | Grad student
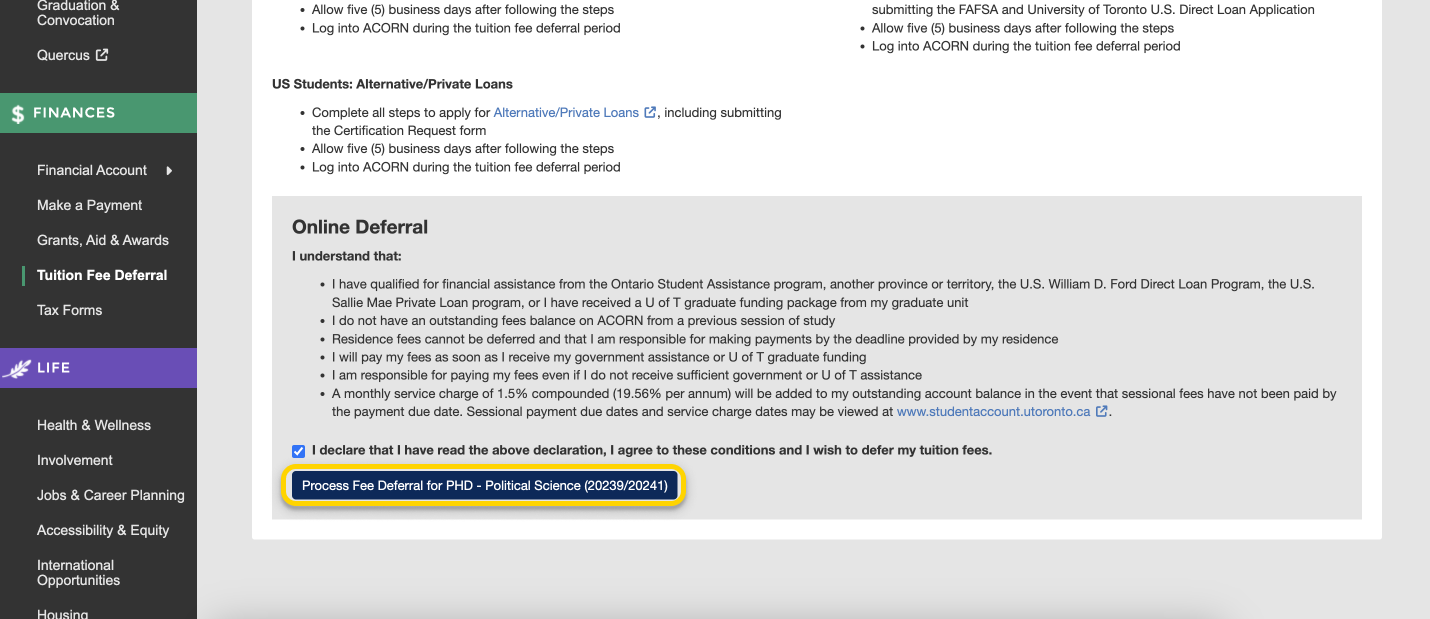
- To defer fees, click ‘Tuition Fee Deferral’ on ACORN’s main navigation under Finances.
- If you are eligible to defer fees, click on the declaration checkbox, and click ‘Process Fee Deferral’ and confirm.
Instructional video: All campuses
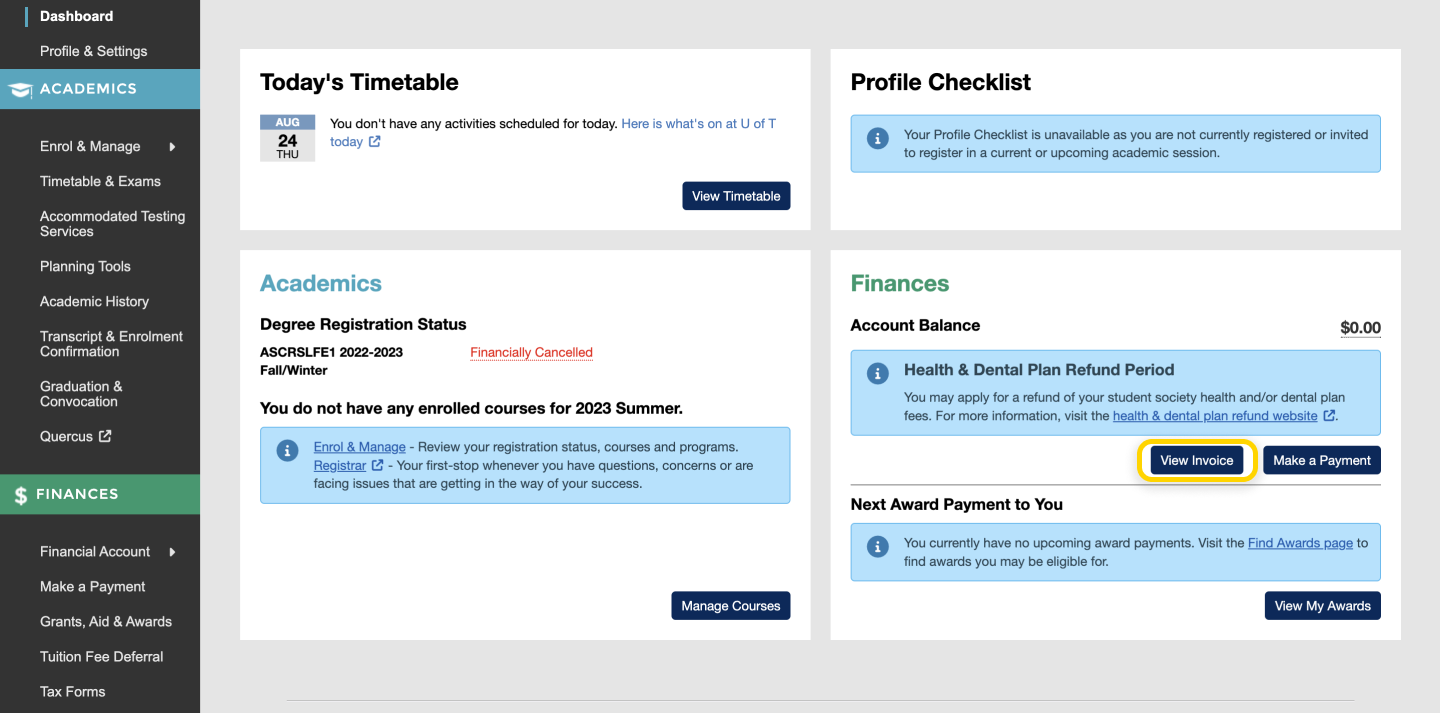
On the ACORN dashboard, select ‘View invoice’ on the Finances status box.
Profile & Settings
Starting February 21, 2023, you will find the new Profile Checklist area on ACORN’s Dashboard. The Profile Checklist will remind you when you need to update your personal information so that U of T staff can better assist you and reach you with important information.
For now, the Student Equity Census is the only item on your Profile Checklist. In the future, additional Checklist items will exist for your address, emergency contacts, and more. All items in your Profile Checklist need to be completed before the specified deadline in order to maintain full access to all areas within ACORN.
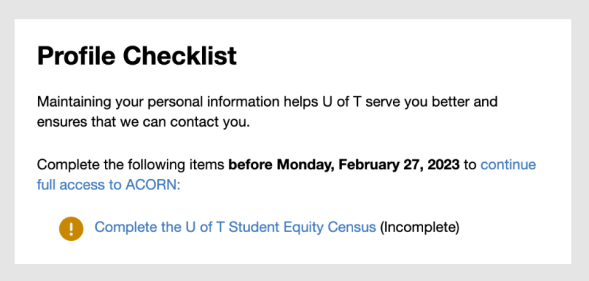
A screenshot of a Profile Checklist with one incomplete item: The U of T Student Equity Census.
If you have already completed the Student Equity Census, you’re done for now! The University will email you when there are new items to complete on your Profile Checklist, and you can check ACORN periodically to see if new items have been added. Even when your checklist is complete, please try your best to keep your personal information up to date in ACORN’s Profile & Settings area.
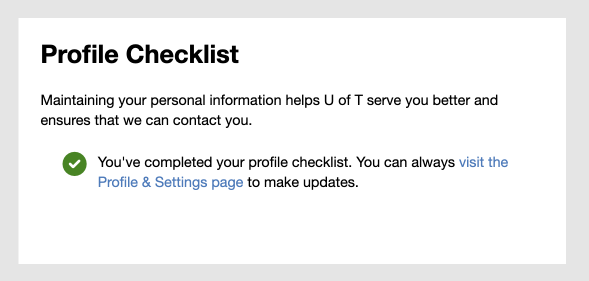
A screenshot of a completed Profile Checklist.
Completing Your Checklist Before the Deadline
Whenever new items are added to your Profile Checklist, ACORN will display a deadline by which you need to complete them. This deadline is written both in your Profile Checklist, and in a message near the top of every ACORN page.
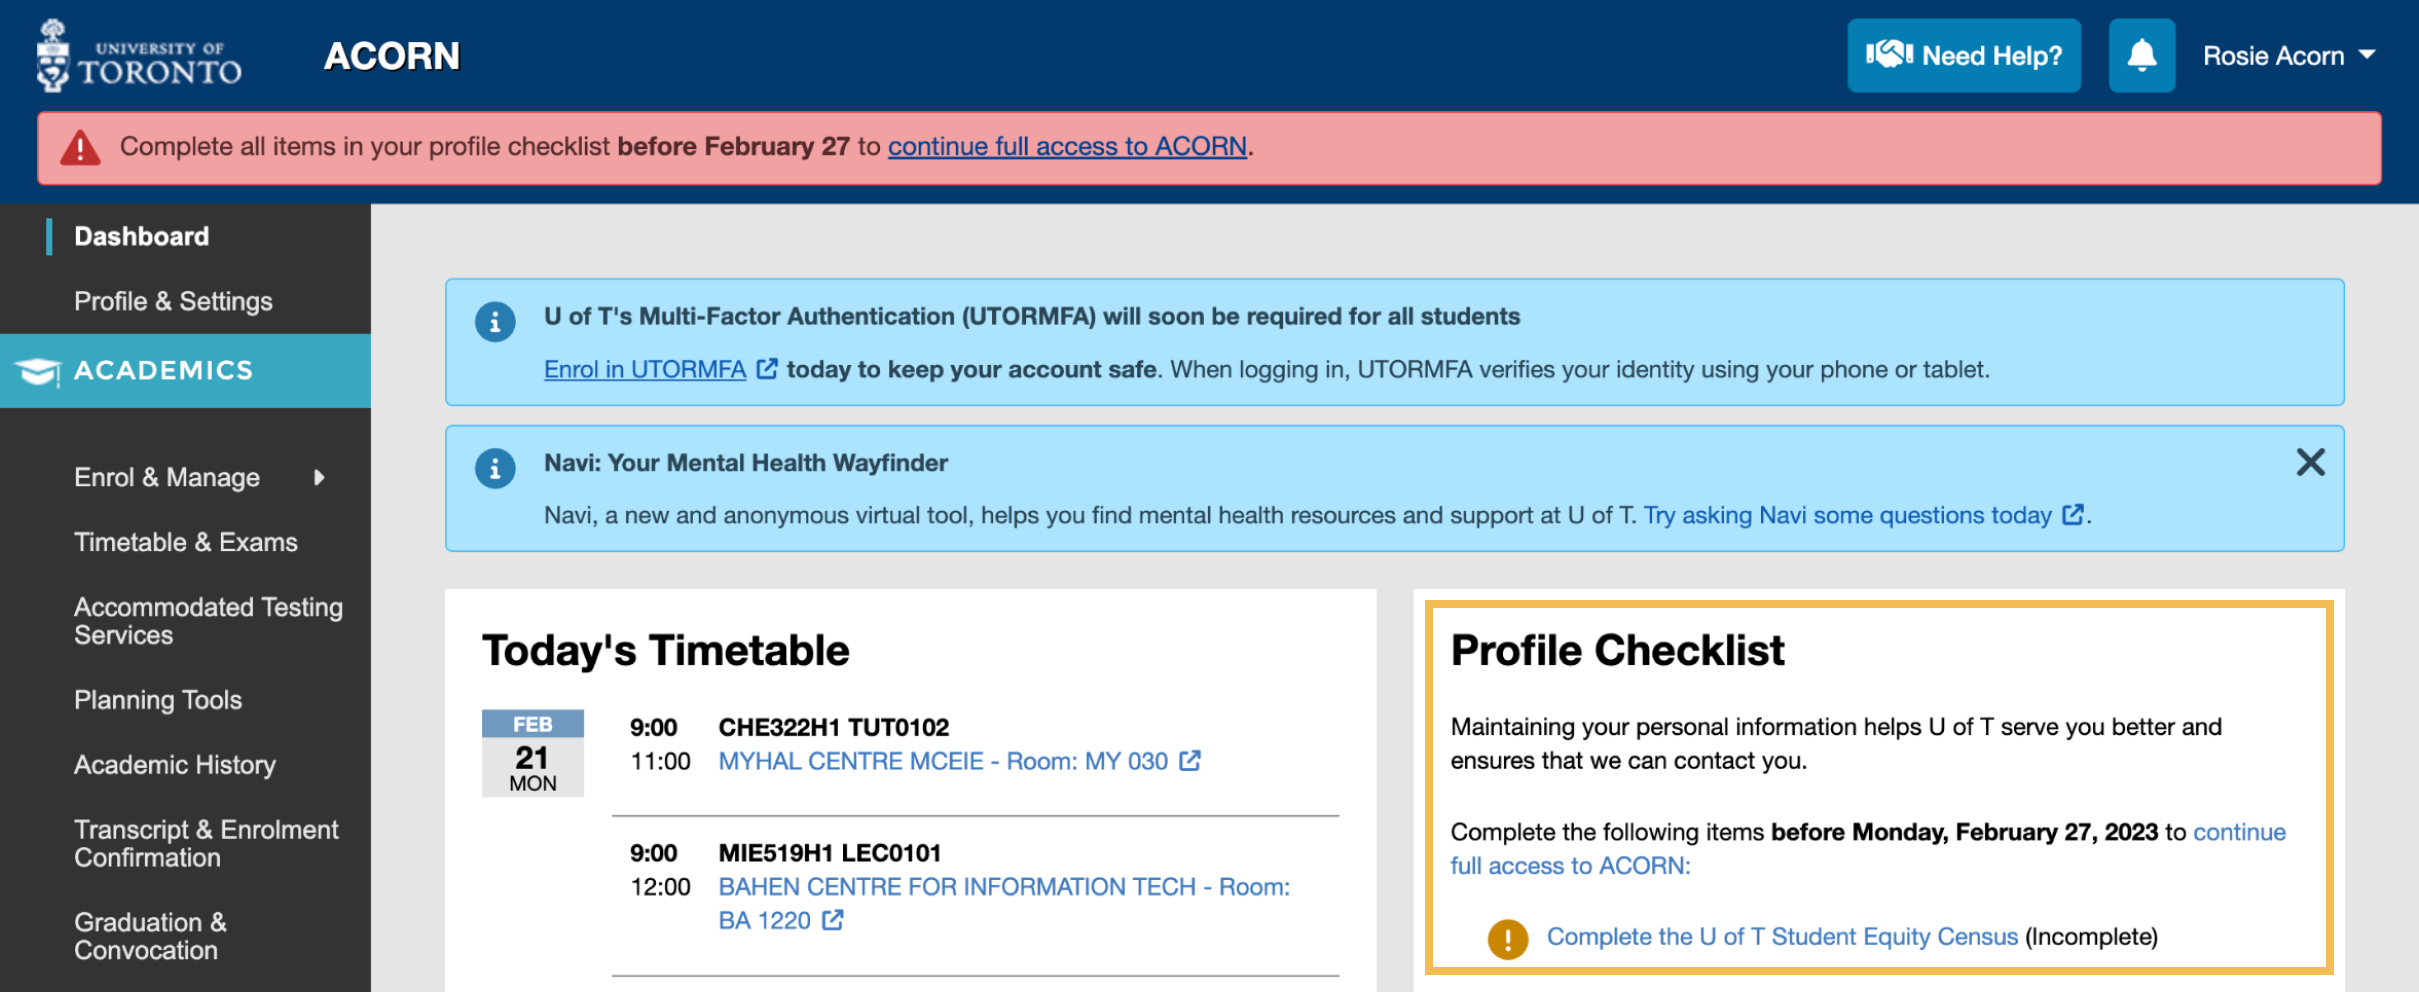
A screenshot of the ACORN Dashboard featuring a red message instructing you to complete your Profile Checklist, and a Profile Checklist with one incomplete item. The deadline is featured in both areas.
For now, the Student Equity Census is the only item on your Profile Checklist. If the deadline passes and you have not completed the census, many areas of ACORN such as course enrolment and your Academic History will be unavailable until you complete it. You will always be able to reach the Need Help, Health & Wellness, Accessibility & Equity and Accommodated Testing Services areas.
Access the Student Equity Census by selecting “Complete the U of T Student Equity Census” within the Profile Checklist. This will take you to the census within the Profile & Settings area. If you have never completed the census before, select the “Get Started” button. If you have an existing incomplete response, select the “Continue Response” button. For more information, read about how to complete the Census.
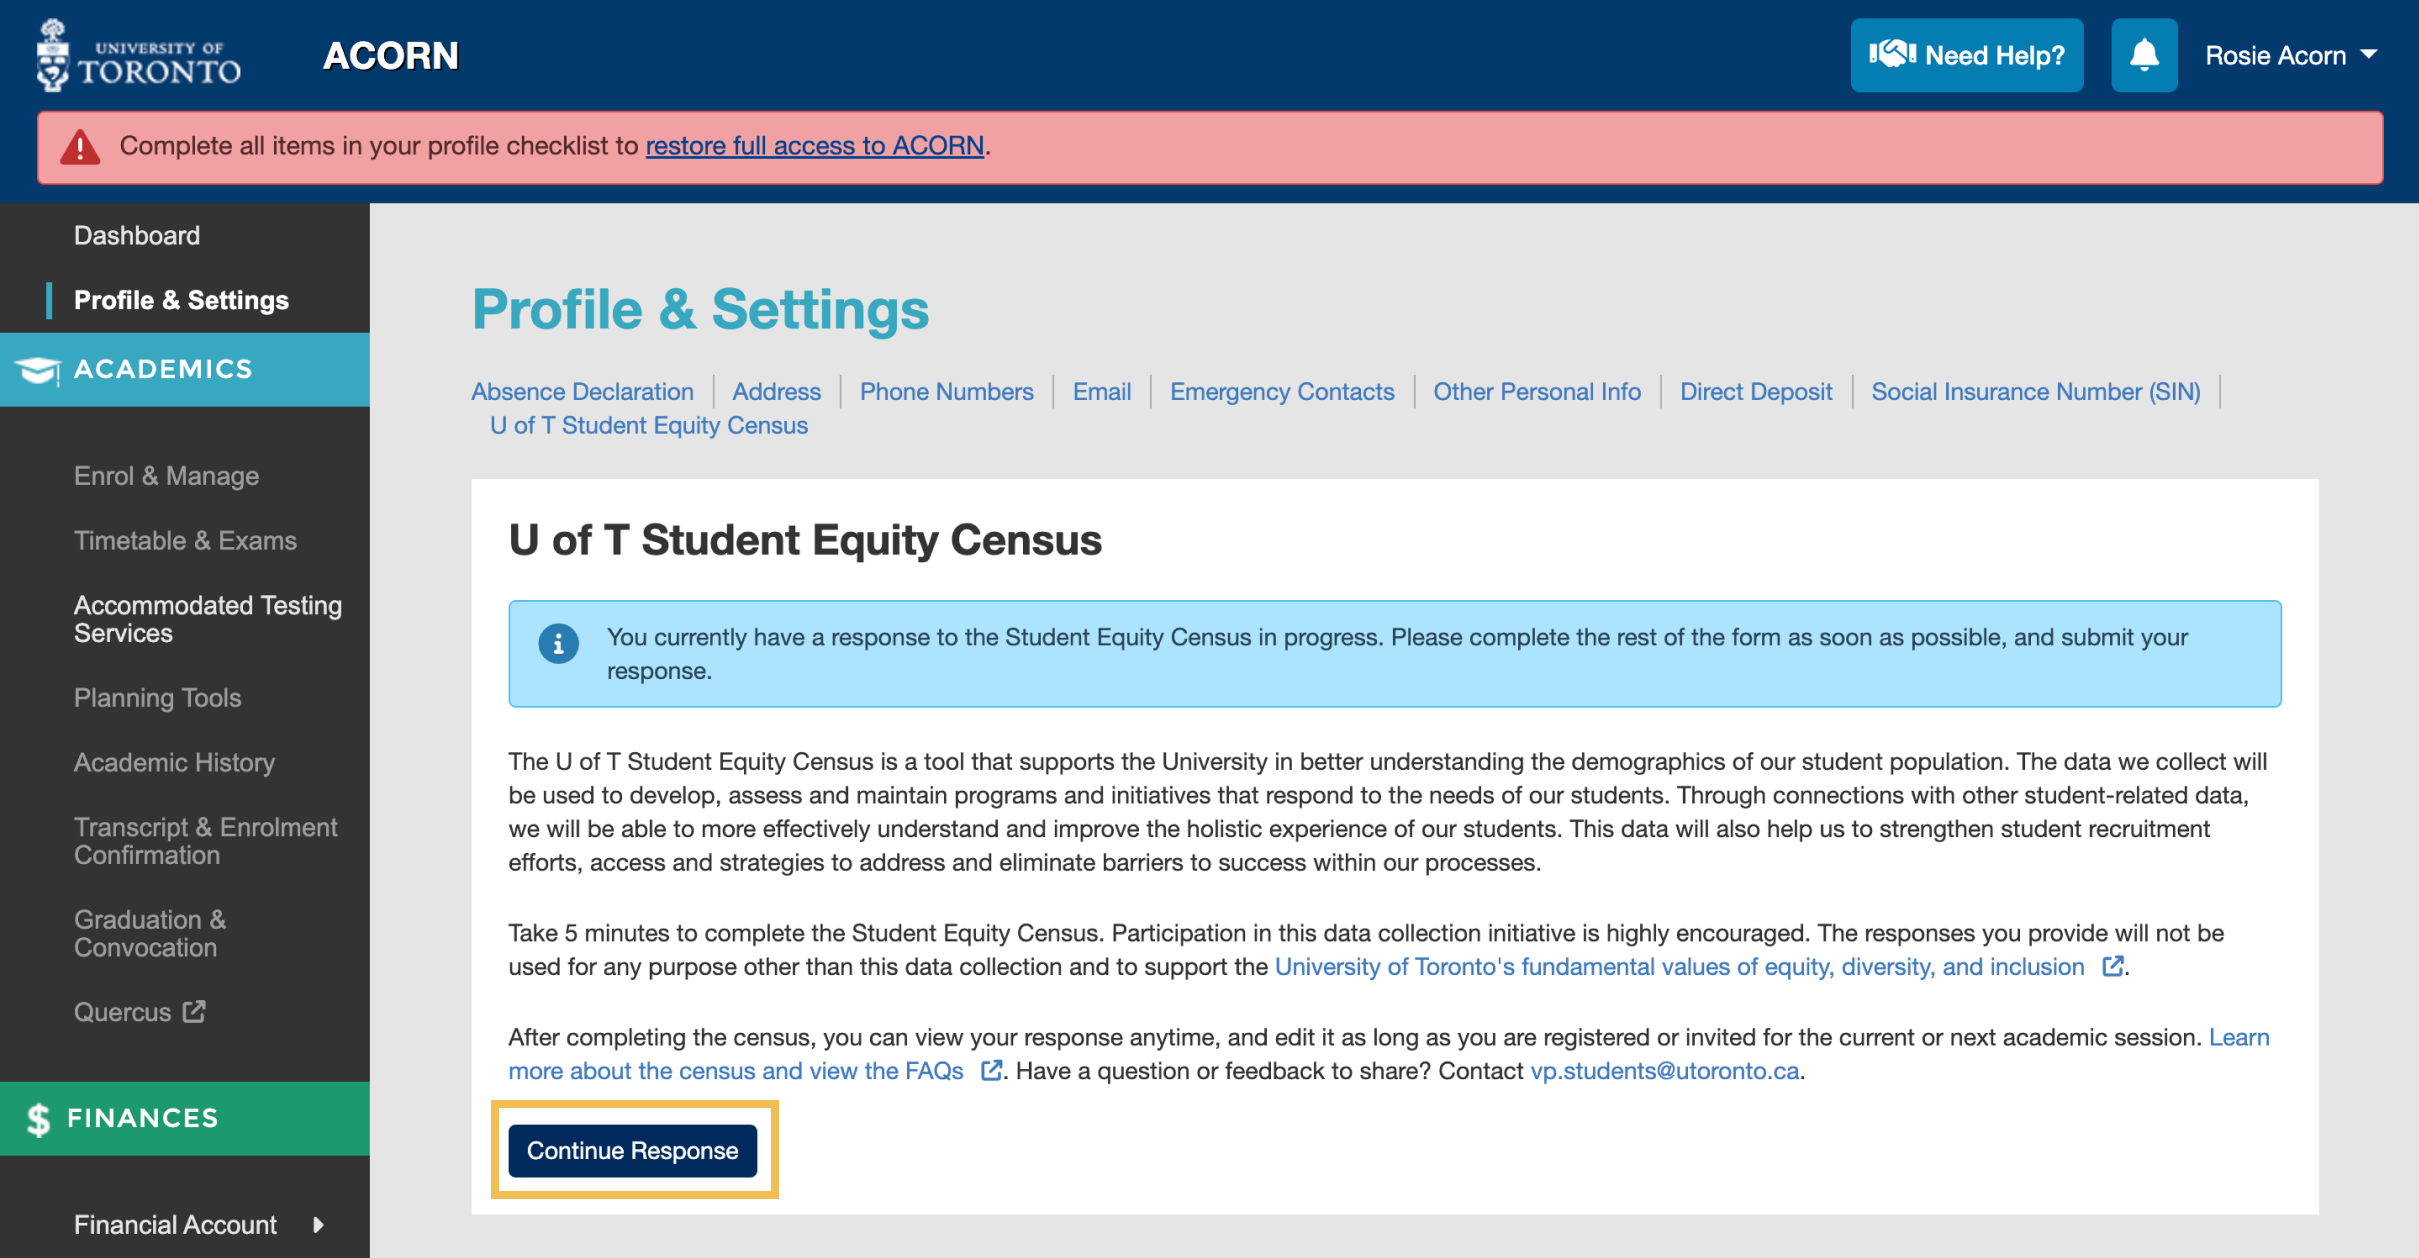
A screenshot of the U of T Student Equity Census page with a highlighted button that reads “Continue Response”.
Once you have answered all required questions on each step, select “Submit Response” on Step 7. You will be taken back to the Student Equity Census page, and the warning message near the top of the page will be gone.
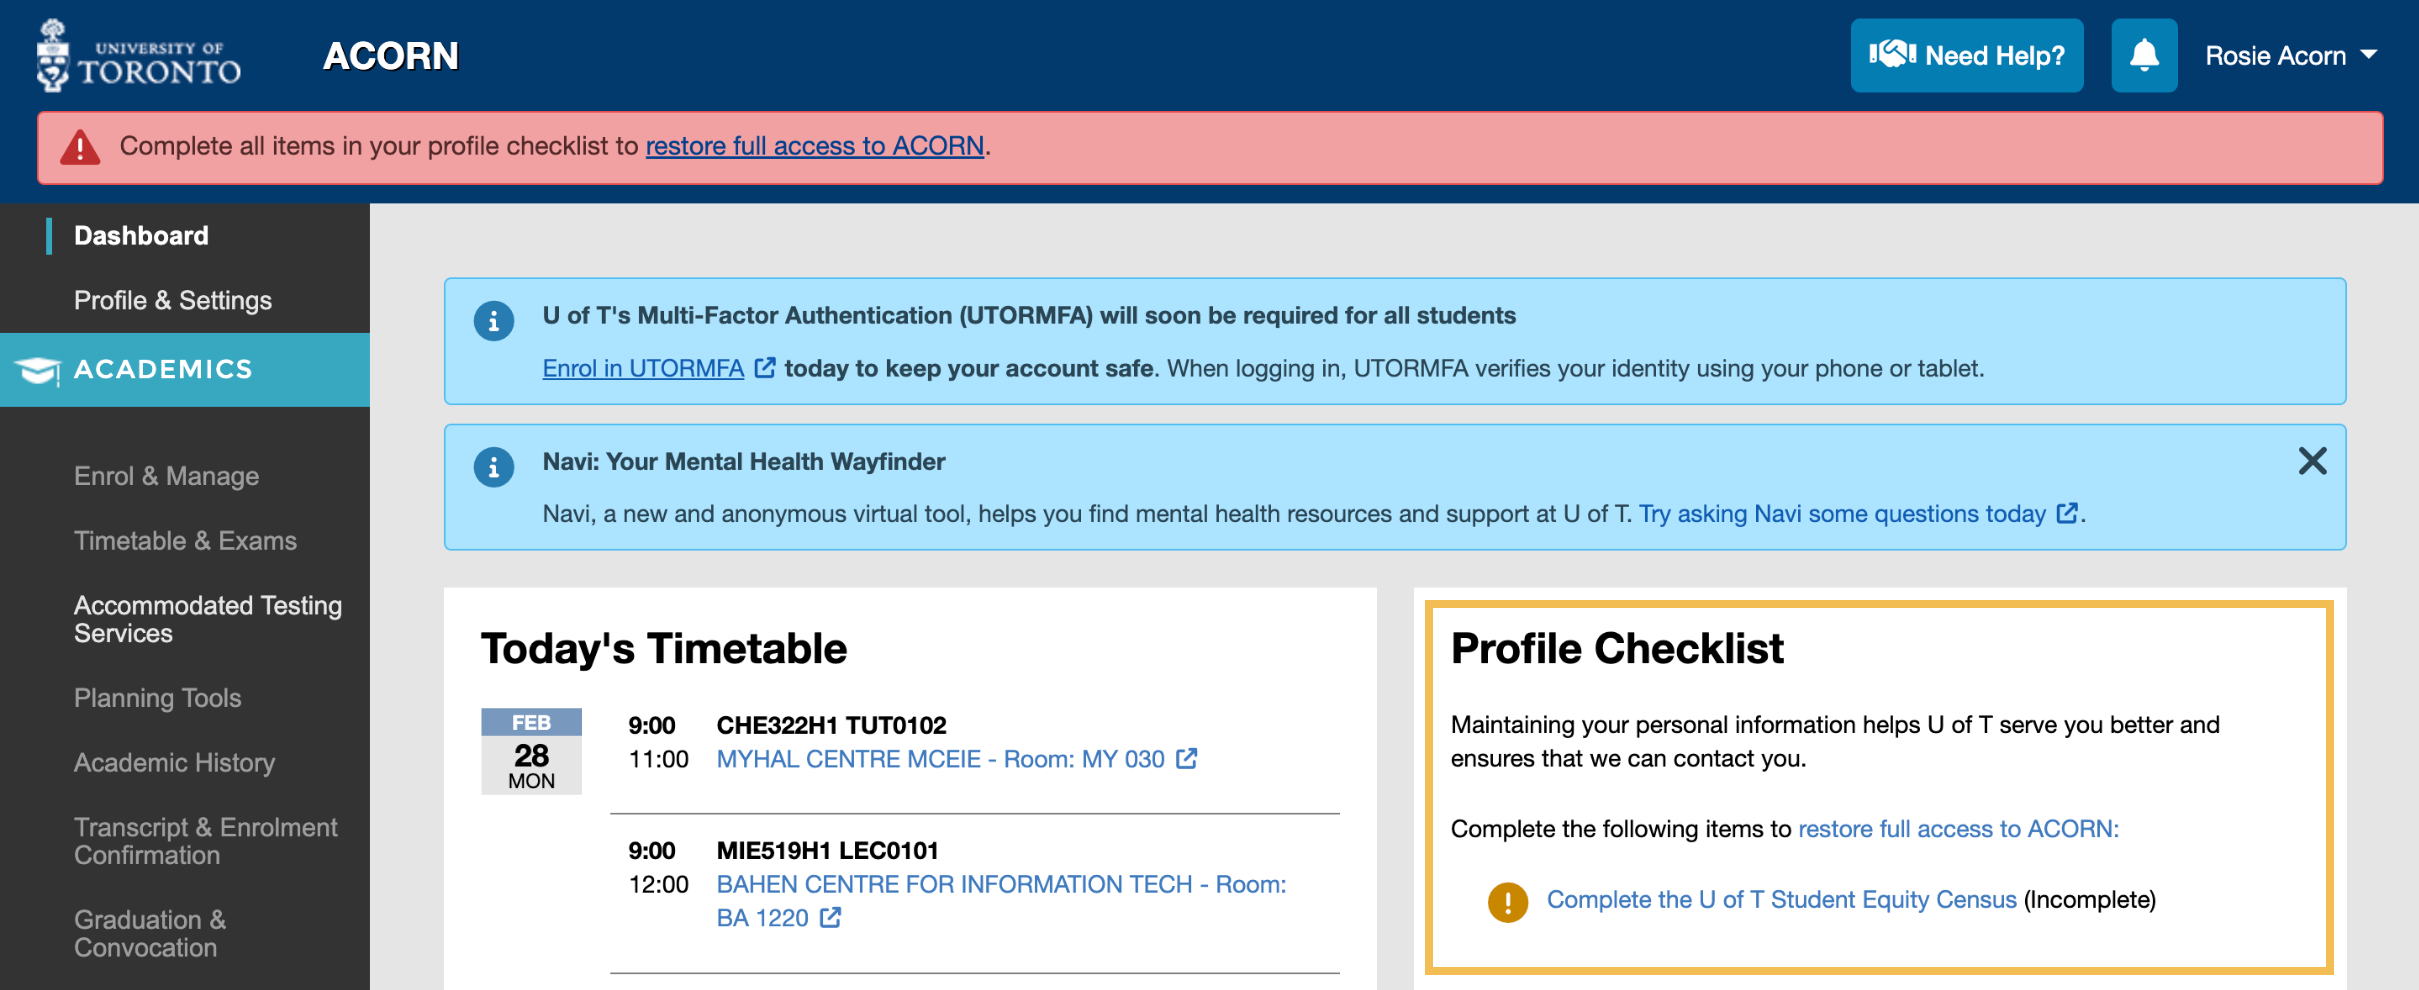
When you return to the ACORN Dashboard, you will notice that your Profile Checklist is complete. Please check your Profile Checklist in ACORN periodically, as new items will be added for you to complete in the future.
Completing Your Checklist After the Deadline
If you have not submitted a response to the Student Equity Census by the specified deadline, many areas of ACORN such as course enrolment and your Academic History will be unavailable. You will always be able to reach the Need Help, Health & Wellness, Accessibility & Equity and Accommodated Testing Services areas.
A screenshot of the ACORN Dashboard featuring a red message instructing you to complete your Profile Checklist, a Profile Checklist with one outstanding item, and several inactive links in the main navigation.
The census only takes a few minutes to complete, so you can select “Complete the U of T Student Equity Census” to submit it and restore full access to ACORN. Once you submit your response, your Profile Checklist will be complete and full access to all areas of ACORN will be restored.
A screenshot of a completed Profile Checklist.
Thank you for working with us to keep your profile up to date!
The U of T Student Equity Census is a demographic data collection initiative that will be used to develop, assess, and maintain programs and initiatives that respond to the needs of our students. You can learn more about the U of T Student Equity Census and view the FAQs here.
- If you have not yet completed the U of T Student Equity Census and are registered for the current academic session, there will be a blue or yellow notification towards the top of the ACORN Dashboard. The link in that notification message will direct you to the U of T Student Equity Census page in ACORN.
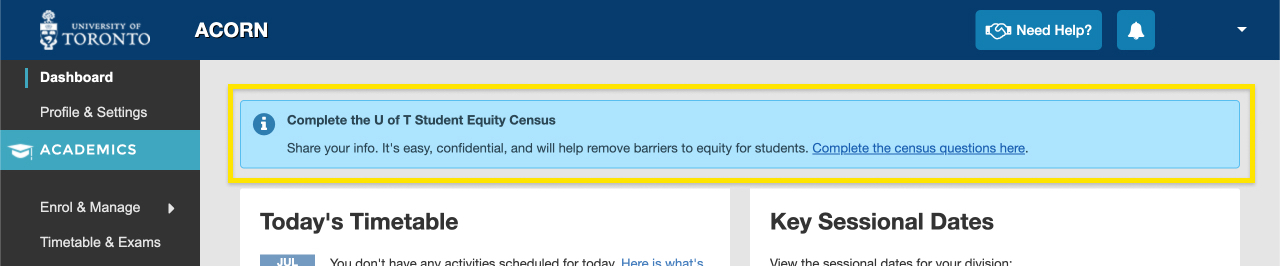
The notification to complete the U of T Student Equity Census that appears on the ACORN Dashboard.
- You can also access the U of T Student Equity Census page by going to “Profile & Settings” from the main navigation menu and selecting “U of T Student Equity Census” towards the top of the page or in the card.

How to get to the “U of T Student Equity Census” from the “Profile & Settings” area in ACORN.
- On the U of T Student Equity Census page, you can read an introduction about the census and select the “Get Started” button.
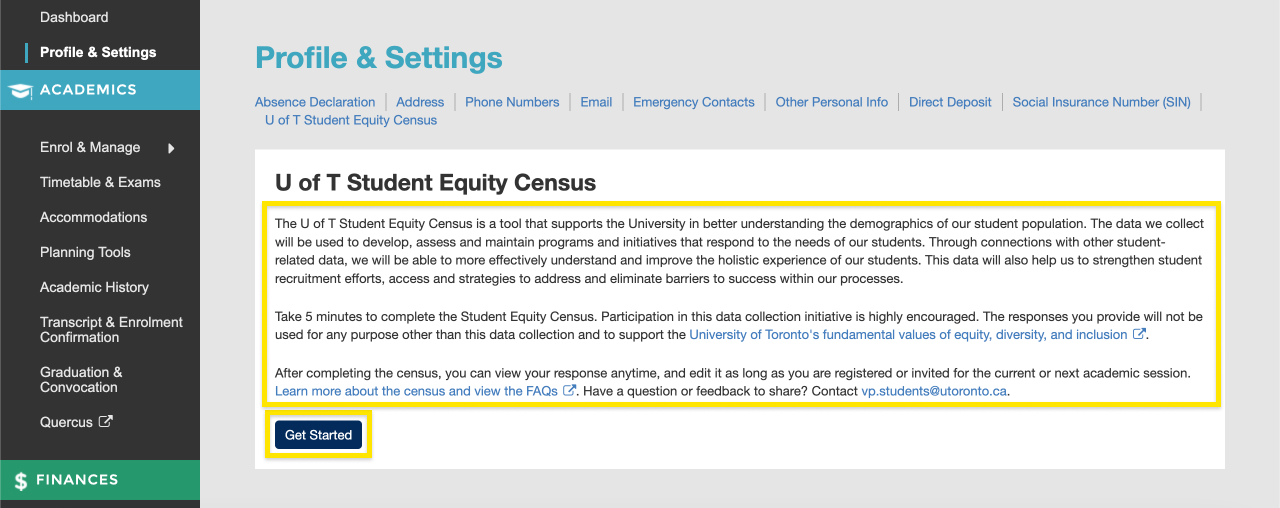
The “U of T Student Equity Census” page in the “Profile & Settings” area containing instructions on how to complete the Census.
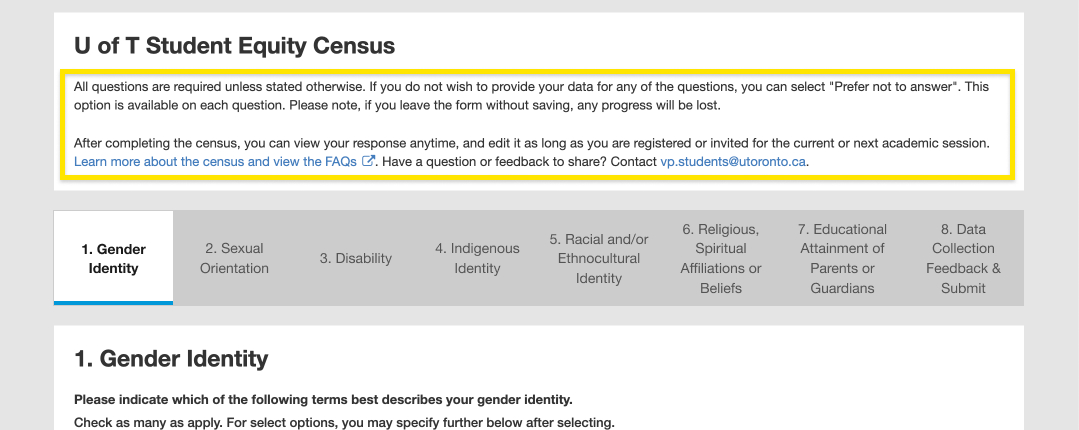
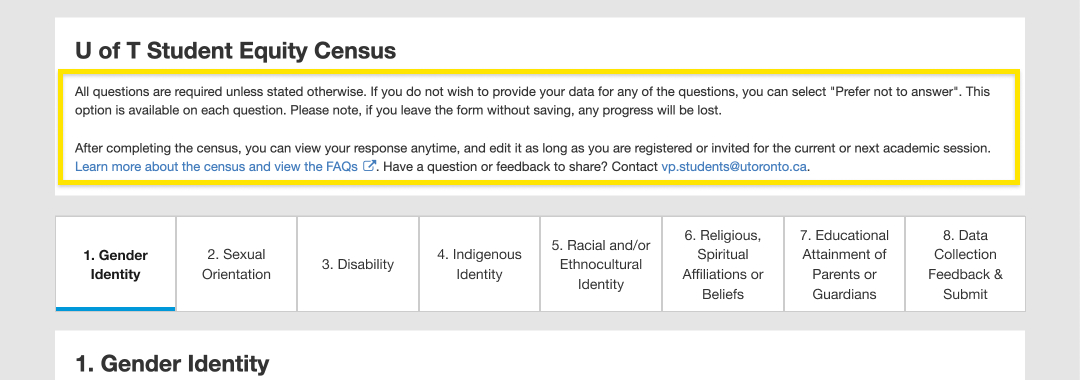
- You will be directed to the first page of the census form. At the top of every page, you can read instructions on how to answer the questions and complete the form.
- All questions are mandatory unless stated otherwise, so you will need to complete all the questions within each step before selecting the “Save & Continue” button to progress. This will save the answers that you’ve provided so far in case you navigate away from the Census.
Instructions when completing and submitting a response for the first time.
The “Save & Continue” button appears on every page of the form when submitting a response for the first time.
- As you progress through the form, you can select “Previous” or use the navigation towards the top of the form to go to the previous page.
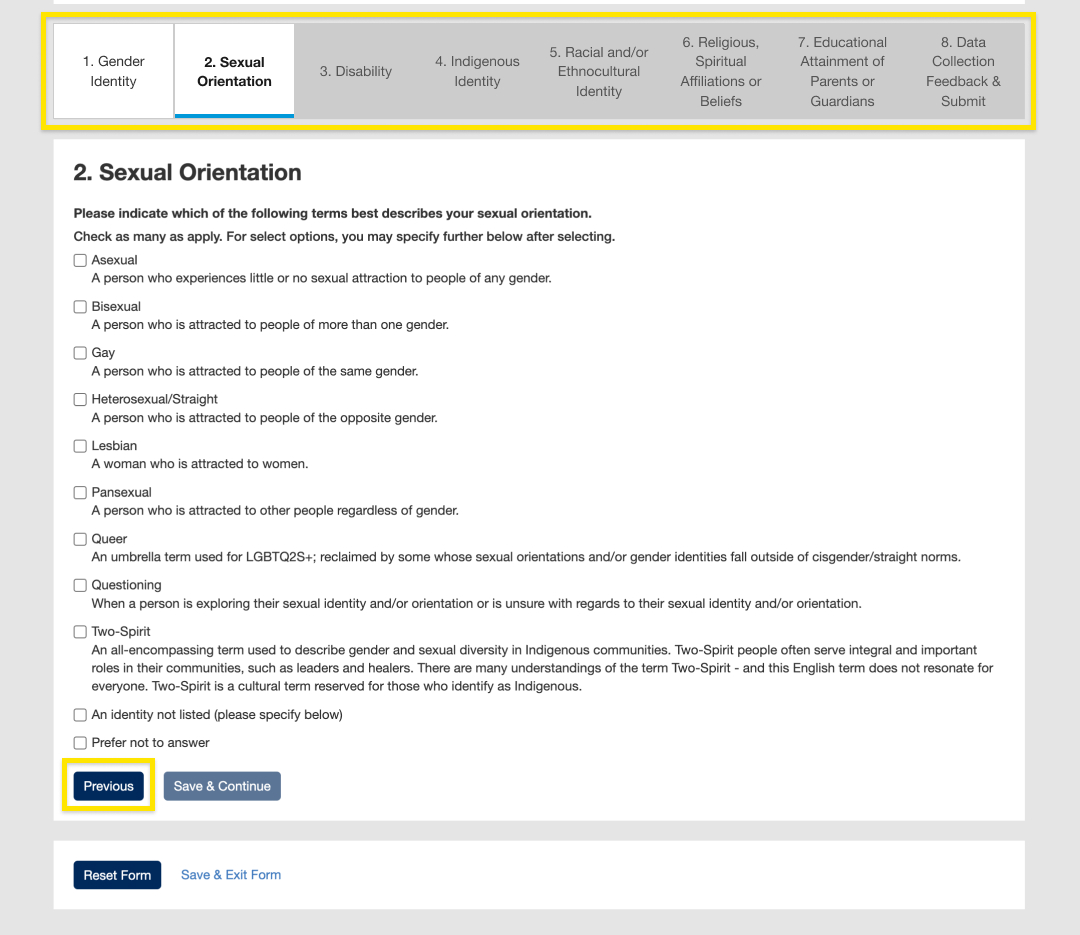
How to navigate the Census form when completing the Census for the first time.
- Depending on your answers to certain questions, additional mandatory questions may appear.
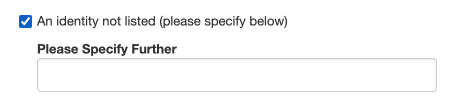
An example of the “Please Specify Further” text field that appears when the option “An identity not listed (please specify below)” is selected.
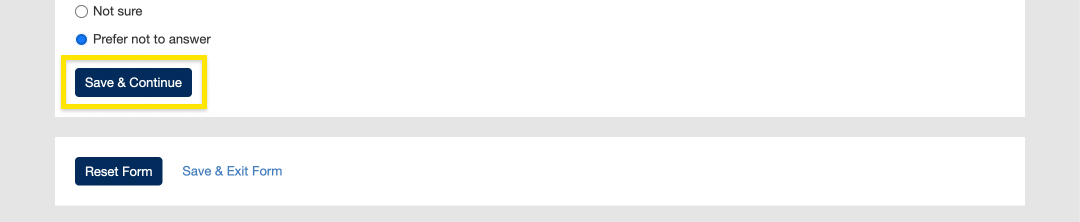
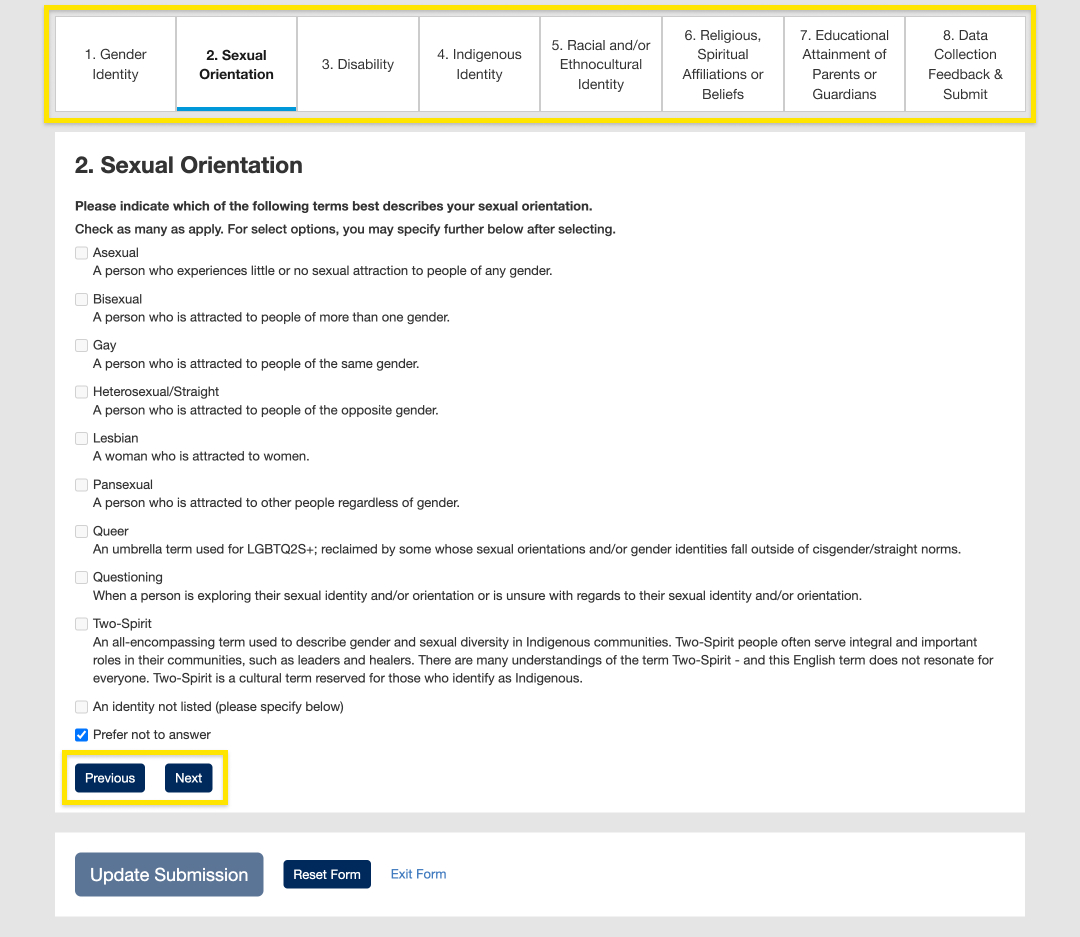
- If you don’t want to answer a question, select “Prefer not to answer”. If you select this option, you will not be able to select other options for the question.

An example of a “Prefer not to answer” option selected for a question, with the rest of the options disabled.
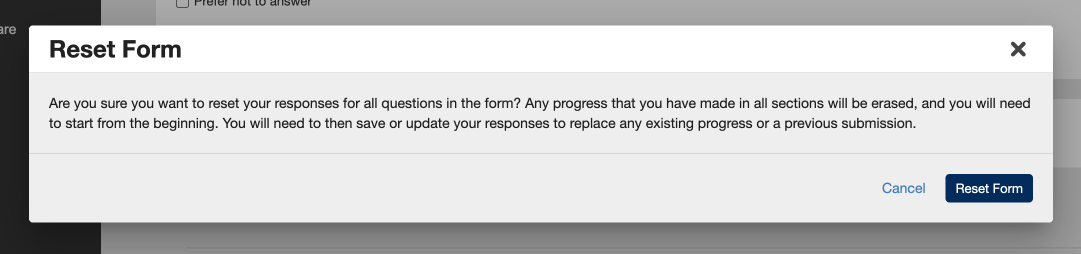
- To erase all of your answers and restart the form, select “Reset Form”. Your answers will be removed, and you will be directed to the first page of the form where you can start over. This action will not override any saved progress until you select either “Save & Continue” or “Save & Exit”.

The “Reset Form” button that appears on every section in the Census when submitting a response for the first time.
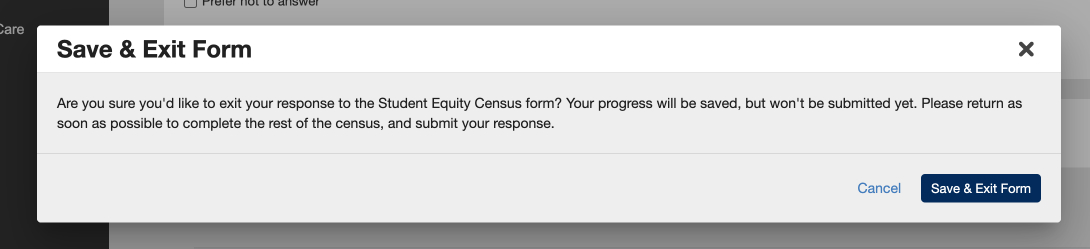
- To navigate away from the census, select “Save & Exit Form”. This will redirect you to the U of T Student Equity Census home page where ACORN will inform you that you currently have a response in progress. Please ensure that you return and complete the form as soon as possible.

The “Save & Exit Form” button that appears on every section in the Census when submitting a response for the first time.
- All questions are mandatory unless stated otherwise, so you will need to complete all the questions within each step before selecting the “Save & Continue” button to progress. This will save the answers that you’ve provided so far in case you navigate away from the Census.
- When you’ve reached the final page of the form (8. Data Collection Feedback & Submit), you can choose to provide the U of T Student Equity Census team with any feedback regarding your experience with the census. This field is optional.
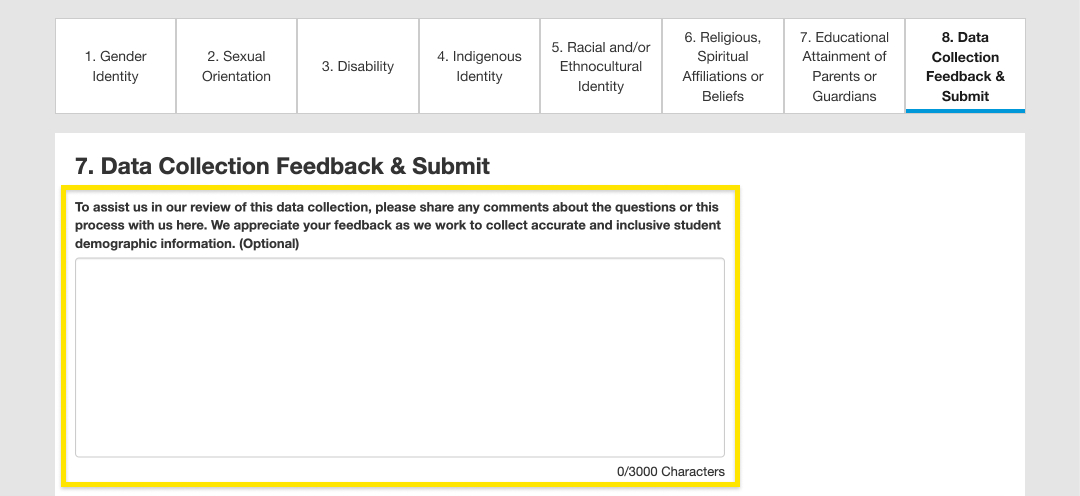
The “7. Data Collection Feedback & Submit” step highlighting the large text box where students may provide feedback and comments before submitting a response.
- Once you’ve answered all the required questions in the census and read the important information on the page, select “Submit Response” to save and submit your response.
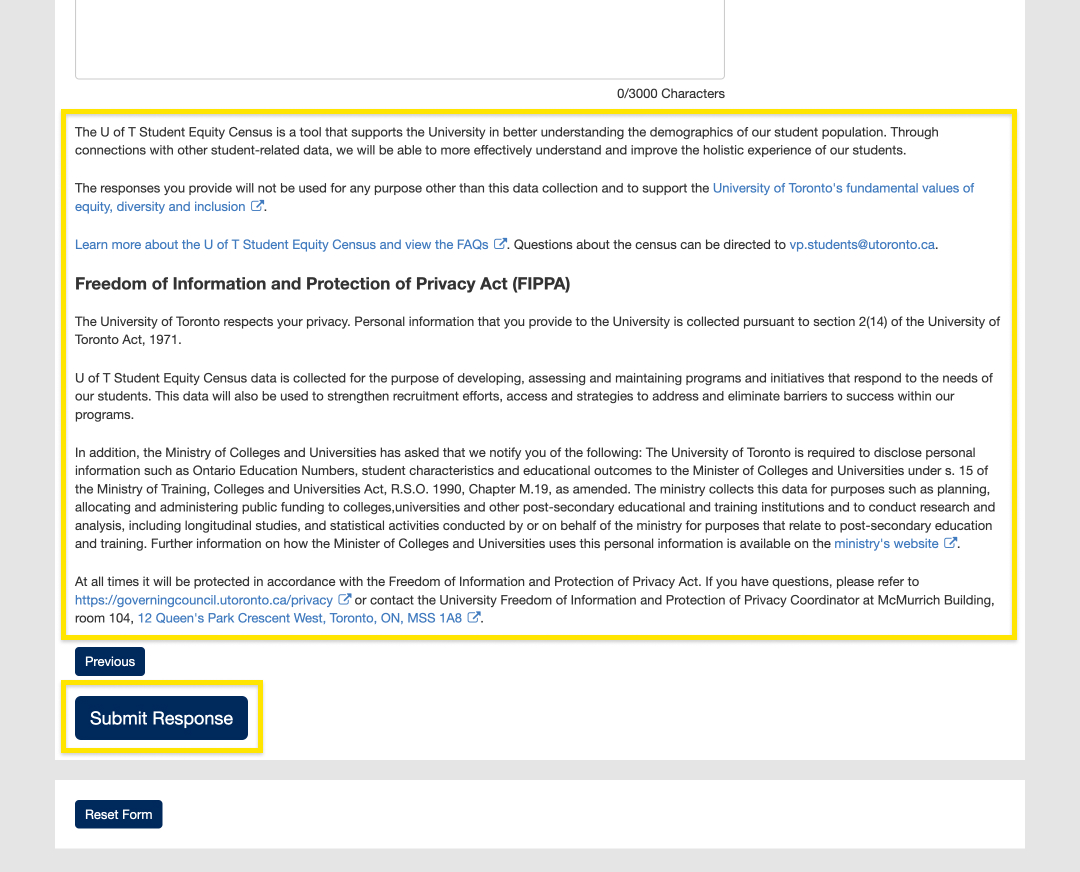
The important information and the “Submit Response” button under “7. Data Collection Feedback & Submit”.
- If your response was submitted successfully, a success toast will appear towards the top of the page. You will be directed to the U of T Student Equity Census home page where you can view your response anytime and edit it as long as you are registered for the current academic session.
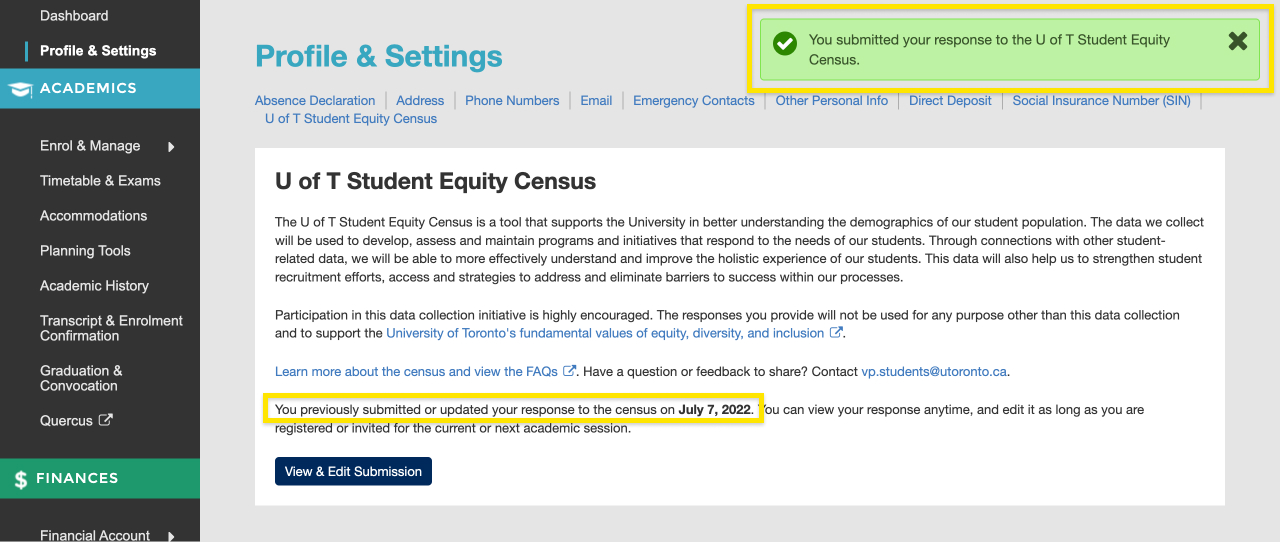
The “U of T Student Equity Census” page in “Profile & Settings” and the success toast that appears after submitting a response.
Once you’ve completed and submitted a response, you can return to the U of T Student Equity Census page in ACORN to view it anytime. You may edit your response as long as you are registered for the current academic session.
- On the U of T Student Equity Census page in ACORN, you can see the date when you last submitted or updated your response. To view and/or edit it, select the “View & Edit Submission” button (for non-registered students, select the “View Submission” button).

The U of T Student Equity Census page when you have already submitted a response.
- You will be directed to the first page of the census form. At the top of every page, you can read instructions on how to edit and answer the questions. You can edit any of your previous answers to the questions. If you remove an answer (e.g., removing all selected options or removing a typed response), you will not be able to progress to the next pages in the form until you have selected or typed a new response.
Instructions when viewing & editing a response.
- You can use the navigation at the top of the form to navigate to any page, or select “Back” or “Next” to go to the previous or next page.
How to navigate the Census form when viewing & editing a response.
- To erase all of your answers and restart the form, select “Reset Form”. Your answers will be removed, and you will be directed to the first page of the form where you can start over. This will not override your previous submission until you answer all the questions and select “Update Submission”.

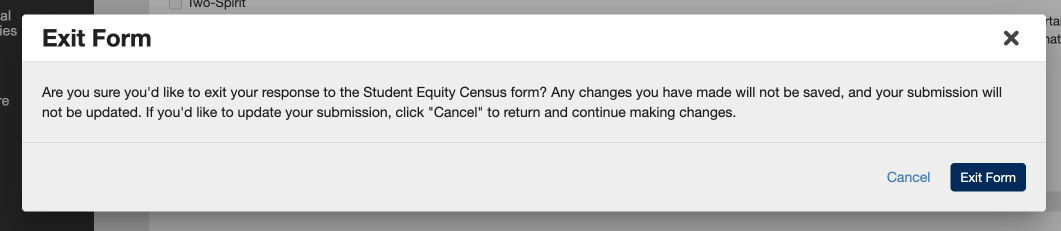
- To navigate away from viewing or editing your response, select “Exit Form”. This will re-direct you to the U of T Student Equity Census home page. If you have made any changes to your response, your response will not be updated to reflect those changes unless you select “Update Submission”.

- You can use the navigation at the top of the form to navigate to any page, or select “Back” or “Next” to go to the previous or next page.
- Once you’ve finished making changes, select “Update Submission” to save and submit your response. The “Update Submission” button appears on every page of the form and will submit any changes you have made on every page.

- If your response has updated successfully, you will be directed to the U of T Student Equity Census home page and see a success notice at the top-right corner of your screen as well as the date you last updated your response.

The “U of T Student Equity Census” page in “Profile & Settings” and the success toast that appears after updating a response.
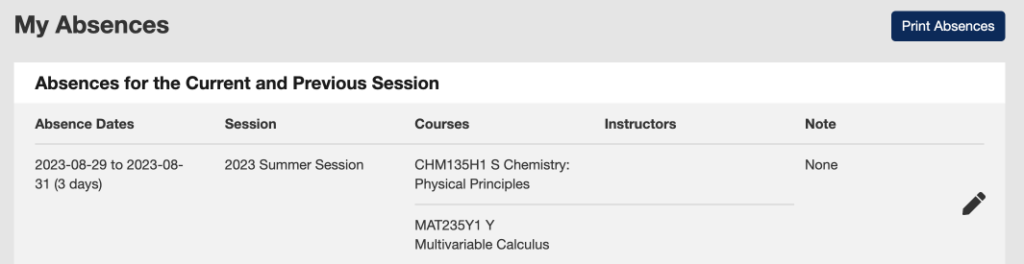
You can edit an existing absence declaration until 11:59 PM on the date that it was created. Absence declarations cannot be cancelled. Next to the absence, select the Edit button.
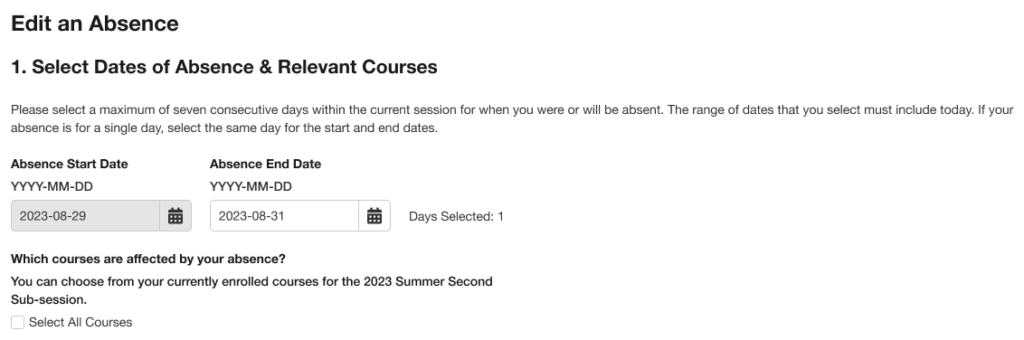
- On the Absence Declaration screen, select the Edit button next to the absence that you want to edit.
- Next, go through the absence information and change the details that you need to change. You can edit the Absence End Date, but not the Absence Start Date.
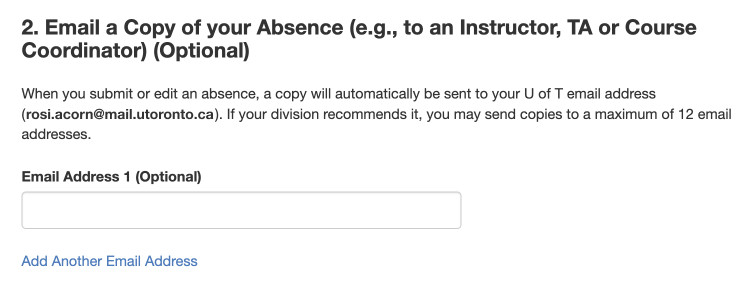
- If your division recommends it, you can send a copy of your absence declaration to a maximum of 12 email addresses for your instructor, TA, Course Coordinator, etc. You will need to re-enter these email addresses if you want copies of your updated absence to be sent. A copy of your absence declaration will automatically be sent to your official U of T email address.
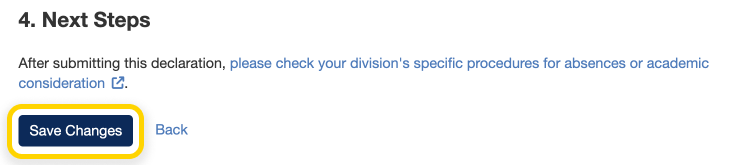
- Select the Save Changes button once you have filled out all mandatory fields and see no errors. Afterwards, please check your division’s specific procedures for absences or academic consideration. There may be additional steps required by your division beyond submitting an absence declaration on ACORN.
- If your absence declaration was updated successfully, you will receive a success message at the top of your screen.

- In some cases, you may receive an error message that tells you that ACORN was not able to do what you requested and to try again. Occasionally, technical issues like this will occur. Please try again after an hour or two, and the problem should be resolved. If for any other reason you need help with declaring your absence, please reach out to your divisional registrar.


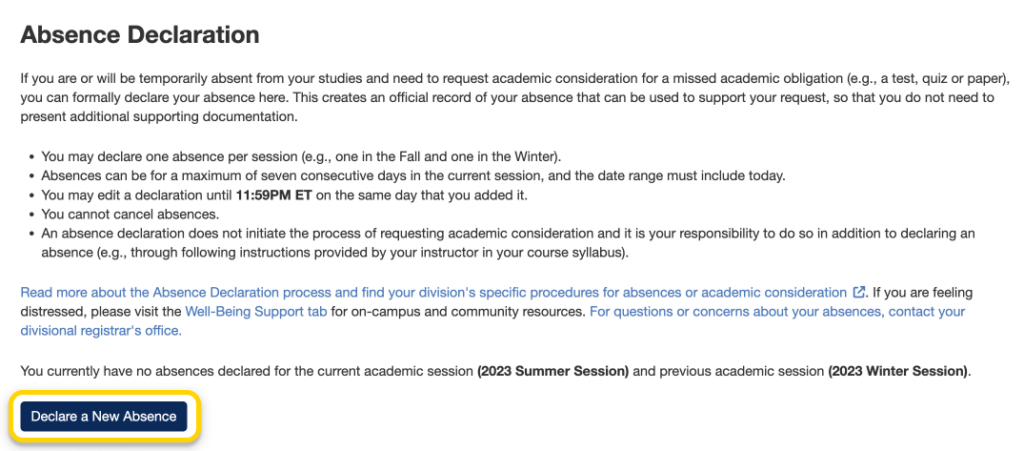
If you are or will be temporarily absent from your studies and need to request academic consideration for a missed academic obligation (e.g., a test, quiz or paper), you can formally declare your absence using the Absence Declaration tool in ACORN. This creates an official record of your absence that can be used to support your request, so that you do not need to present additional supporting documentation.
To declare an absence, you must be registered and currently enrolled in courses. Your division must also allow absences to be declared through ACORN. Read more about the Absence Declaration process and find your division’s specific procedures for absences or academic consideration.
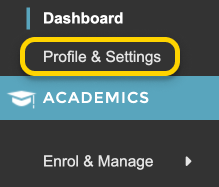
- To get to Absence Declaration from the ACORN Dashboard, select Profile & Settings near the top of the navigation menu.
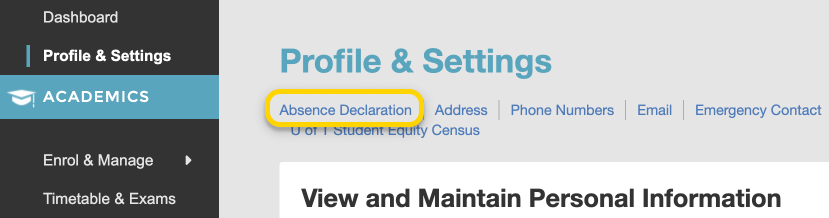
- On the Profile & Settings page, select Absence Declaration.
- On the Absence Declaration screen, select the Declare a New Absence button. If this button does not appear, ACORN will tell you why on this page. Your division may not allow absences to be declared through ACORN, you may have already declared an absence during the current session, or you may not be registered in courses for the current session.
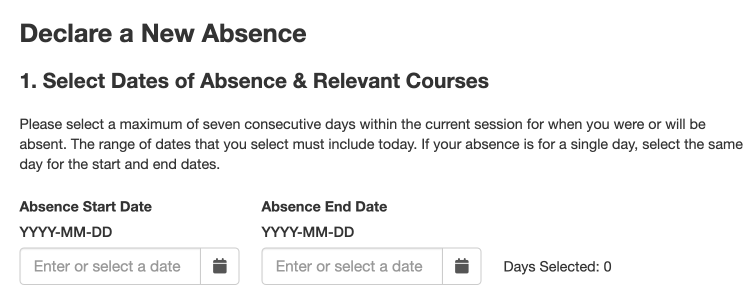
- On the Declare a New Absence page, first you will be asked to provide a start and end date for your absence. Follow the instructions on this page for when and for how long your absence period can be.
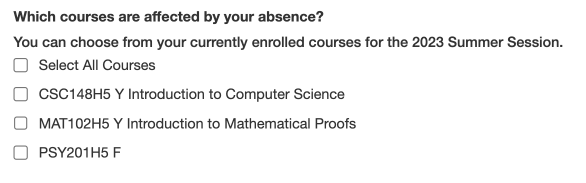
- Next, select the course(s) that are affected by your absence. For example, select a course if you missed its quiz, text or exam. You can also declare absences if you have an arrangement with your instructors regarding missing course-related work or assignments.
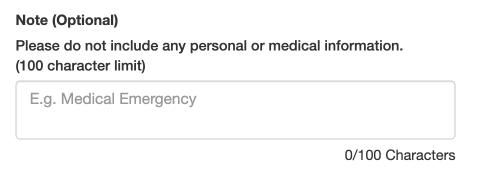
- You may optionally add any additional notes regarding your absence. Please do not include any personal or medical information in this field.
- If your division recommends it, you can send a copy of your absence declaration to a maximum of 12 email addresses for your instructor, TA, Course Coordinator, etc. A copy of your absence declaration will automatically be sent to your official U of T email address.
- Read the Declarations and check the checkbox to confirm that you have read and agree with the statements.
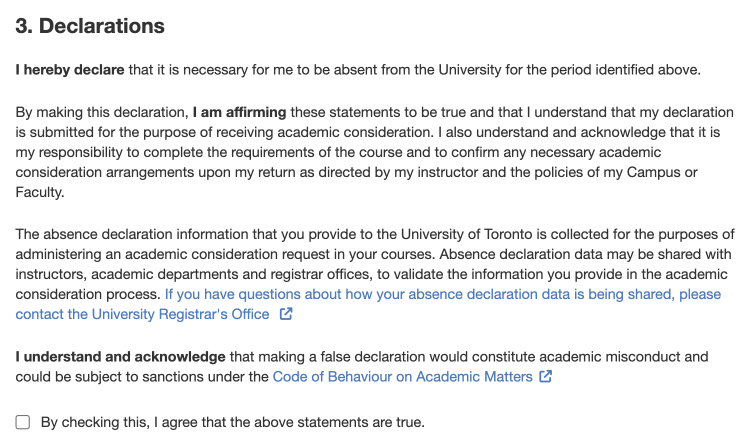
- elect the Submit Absence Declaration button once you have filled out all mandatory fields and see no errors. Afterwards, please check your division’s specific procedures for absences or academic consideration. There may be additional steps required by your division beyond submitting an absence declaration on ACORN.

- If your absence declaration was created successfully, you will receive a success message at the top of your screen. You can now view your absence declaration. If you need to edit it, you may do so until 11:59 PM on the day that it was created. Absence declarations cannot be cancelled. Read more about editing absences here.


- In some cases, you may receive an error message that tells you that ACORN was not able to do what you requested and to try again. Occasionally, technical issues like this will occur. Please try again after an hour or two, and the problem should be resolved. If for any other reason you need help with declaring your absence, please reach out to your divisional registrar.


Instructional video: All campuses
- From the ACORN dashboard click ‘Profile & Settings’ near the top of the left hand menu.

- On the Profile & Settings page click ‘Phone Numbers’.

- On the Phone Numbers screen click the pencil icon to edit an existing phone number, or ‘Add new’ to enter a new number.

- Follow the prompts on the screens following to save your phone number information.
Instructional video: All campuses
- From the ACORN dashboard click ‘Profile & Settings’ near the top of the left hand menu.

- On the Profile & Settings page click ‘Address’.

- On the Address update screen click the pencil icon to edit an existing address, or ‘Add new’ to enter a new address.

- Follow the prompts on the screens following to save your address information.
UTORid & Password Reset
To get your UTORid, U of T email address and TCard, visit the TCard Office website and follow the steps provided.
Your password is used to access important U of T services such as UTmail+, ACORN and Quercus. If you forgot your password or need to change it because you think it may have been compromised, go to the UTORid Account Management webpage. You will find password management options under “Password and Account Management”.
Notifications & Activity
- To view your notifications from any page in ACORN, you can select the bell icon in the header towards the top of the page.

Screenshot highlighting the bell icon button in the ACORN header.
- From the notifications panel that opens, you can either select ‘View Log’ on the top right of the panel or the link to the ‘Notifications & Activity Log’ at the bottom to access the Notifications & Activity Log.

Screenshot highlighting the ‘View Log’ and ‘Notifications & Activity Log’ links in the notifications panel,
- On the ‘Notifications and Activity Log’ page, you can select the ‘Notifications’ tab to view a list of your past notifications or the ‘Activity’ tab for a list of your past activity on ACORN.
Screenshot of ‘Notifications and Activity Log’ page with Notifications and Activity tabs highlighted.
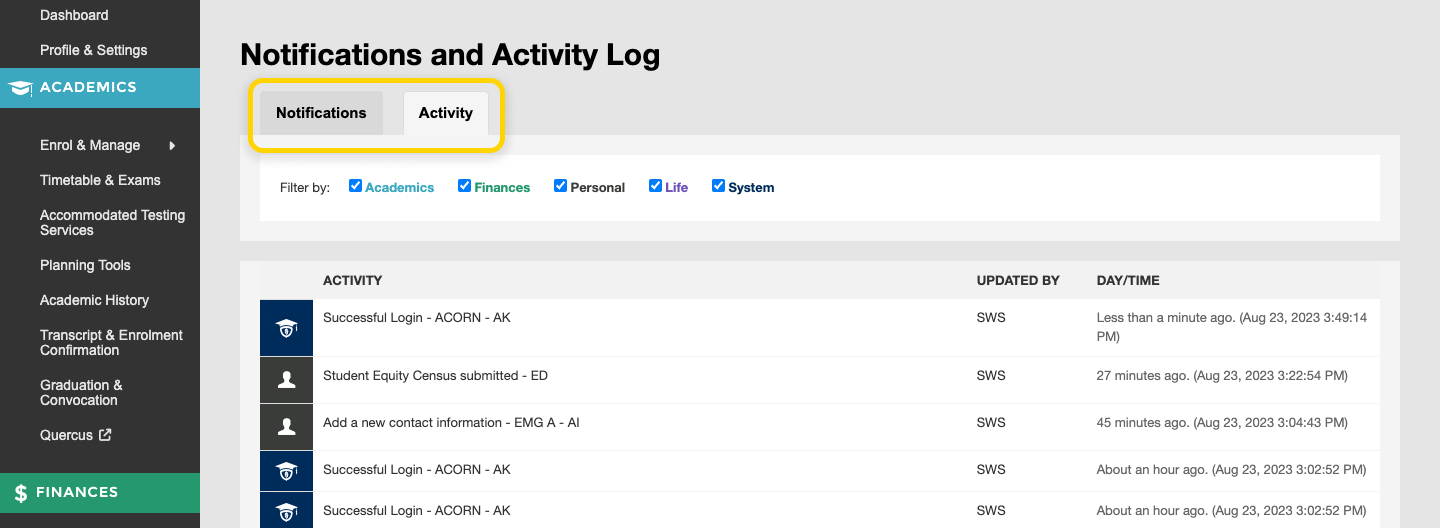
- You can select or deselect the checkboxes in the card to filter the entries by category.
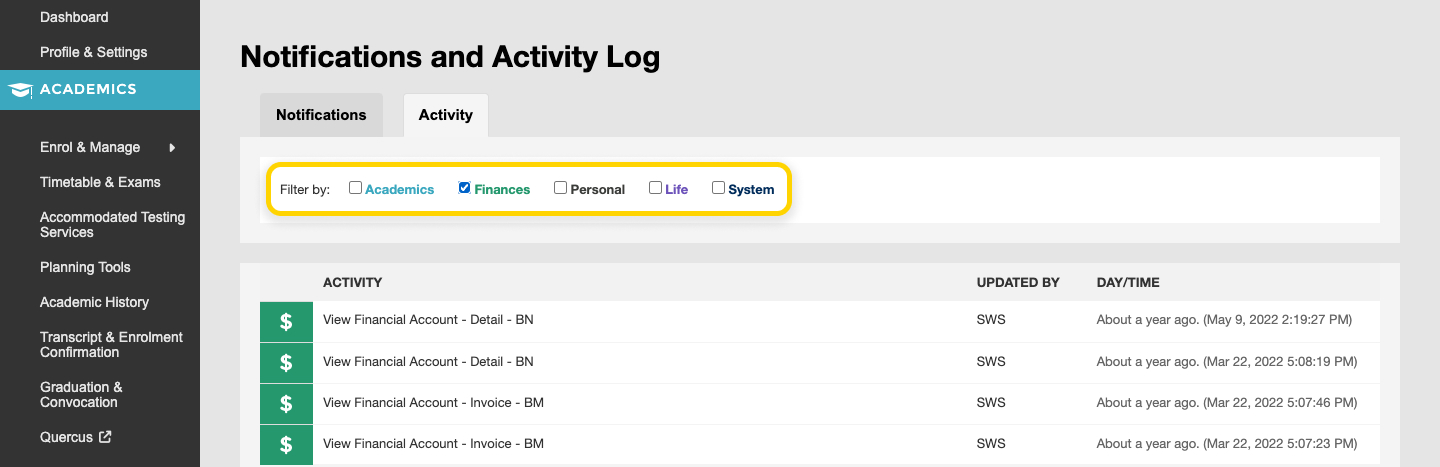
Screenshot of ‘Notifications and Activity Log’ page with Notifications and Activity with the filter selection area highlighted.
- You can select or deselect the checkboxes in the card to filter the entries by category.
Graduation & Convocation
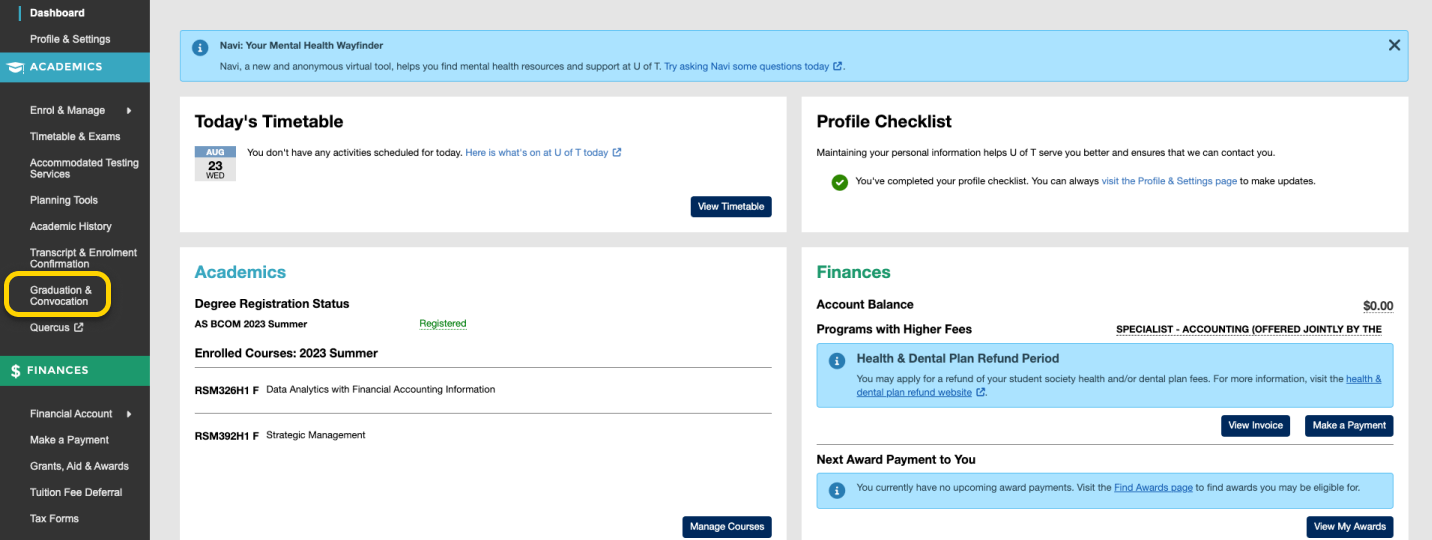
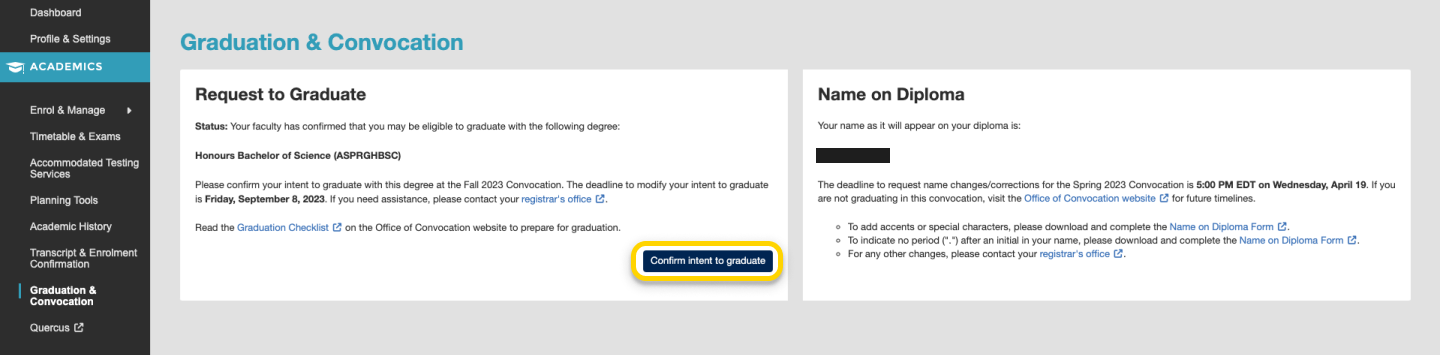
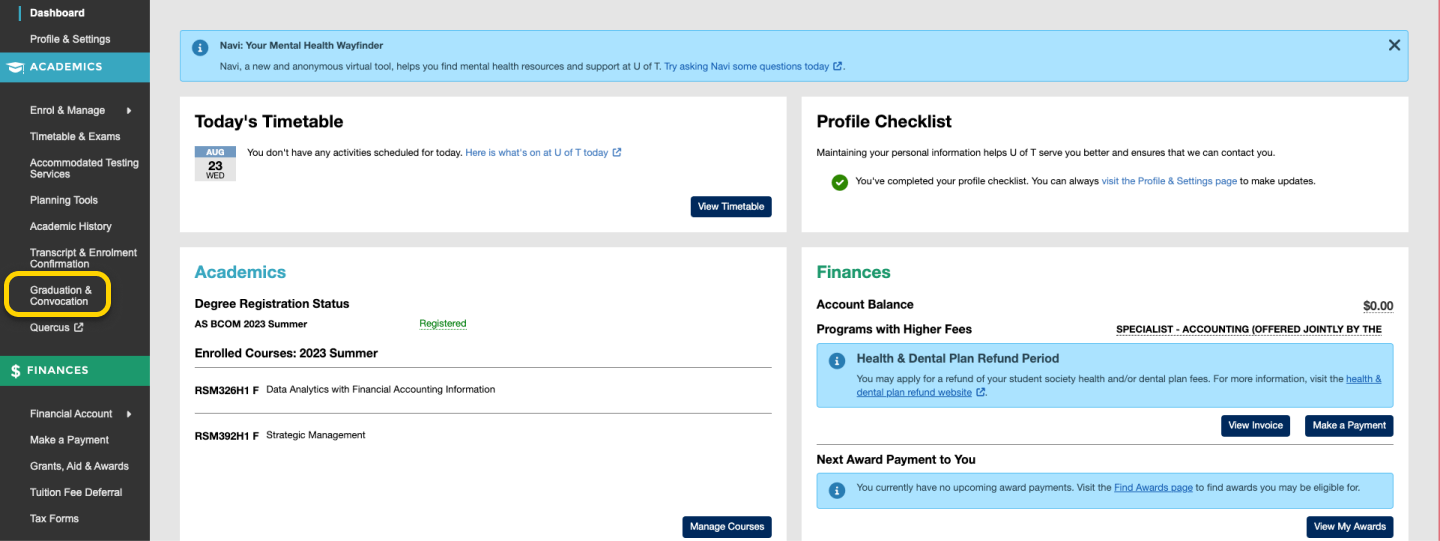
- Firstly, be sure to familiarize yourself with the dates, deadlines and important information within the Graduation Checklist. From the ACORN dashboard, click “Graduation & Convocation” on the main navigation.
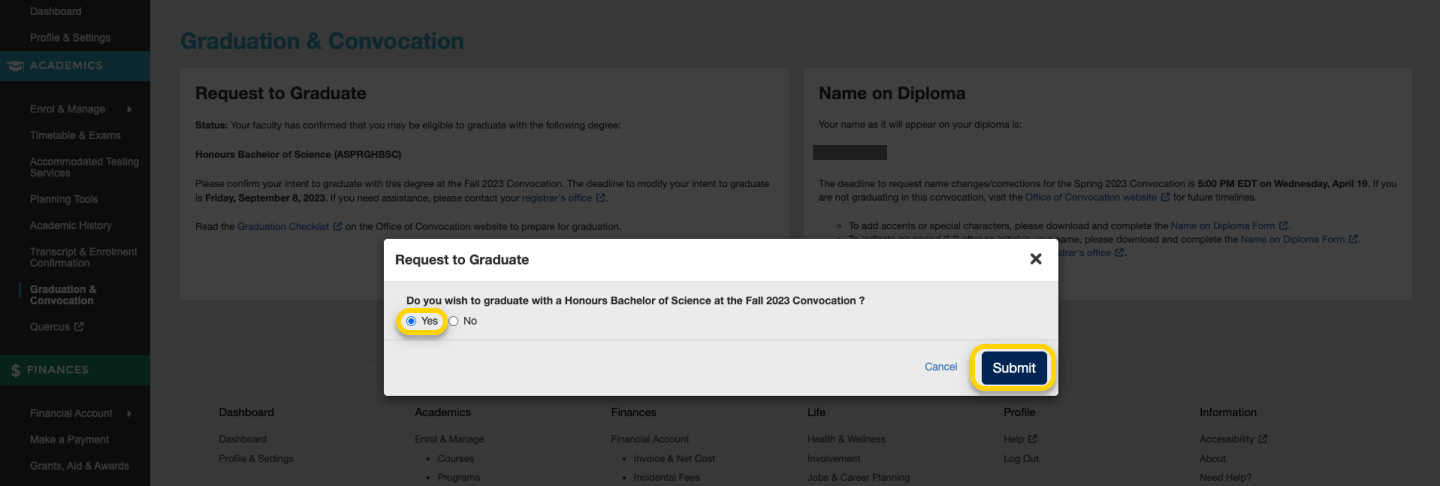
- This page contains all information you will need concerning your graduation. During the request to graduate period determined by your faculty, you will see a button that says “Confirm intent to graduate” in the Request to Graduate card. Click this to indicate whether you will or will not graduate during the session stated (Fall 2023 in this example). Please check the Name on Diploma card to make sure the name displayed is spelled correctly, as it will appear on your diploma as it is. If you require any changes to your name, follow the instructions to complete the Name on Diploma Form. If your faculty requires you to confirm your intent to graduate on ACORN and it is within the request to graduate period but you still aren’t able to, please contact your registrar.
- Select “Yes” if you plan to graduate, and “No” if you do not. If your faculty requires a response from you via ACORN and you do not select either option, it will be assumed that you do not intend to graduate.
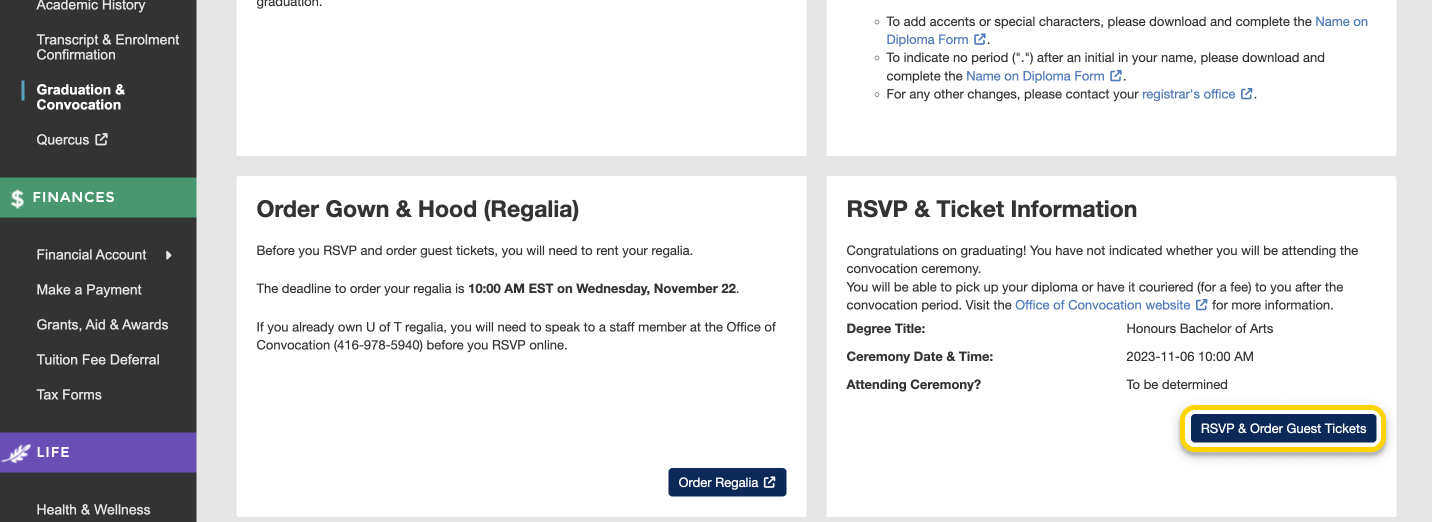
- During the RSVP and guest ticket ordering period (see step 5 of the Graduation Checklist for dates), you will be able to RSVP for your graduation and order guest tickets. Click the “RSVP & Order Guest Tickets” button in the RSVP & Ticket Information card to be taken to the form where you can fill out this information.
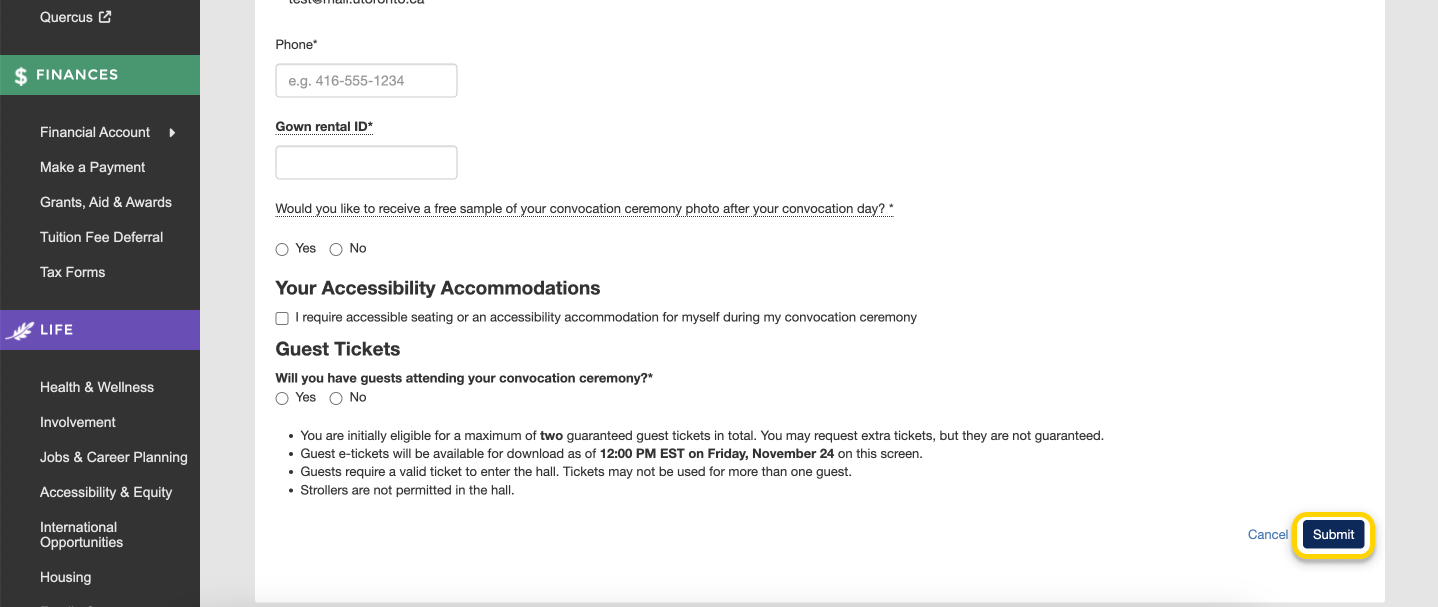
- RSVP for your graduation ceremony by selecting “Yes” or “No”. If you select “Yes”, fill out the rest of the RSVP & guest ticket form and select up to two guaranteed guest tickets and the number of extra guest tickets you would like to request. These extra tickets are not guaranteed and are distributed via a lottery system. Click the “Submit” button to complete your RSVP and guest ticket order.
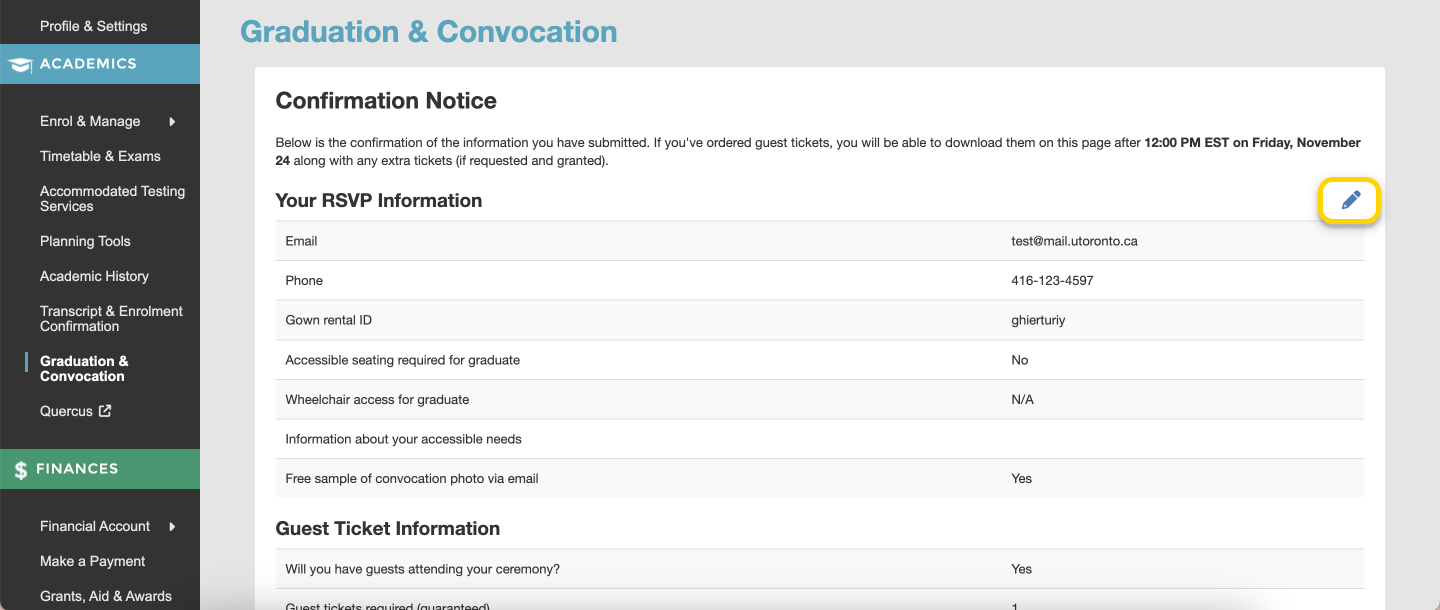
- You will be presented with a confirmation notice containing the information submitted in your RSVP & guest ticket form. If there are any errors, edit the form using the pencil icon. Otherwise, you must wait until the date indicated on the confirmation screen before you can download your guest tickets and find out how many extra guest tickets you will receive.
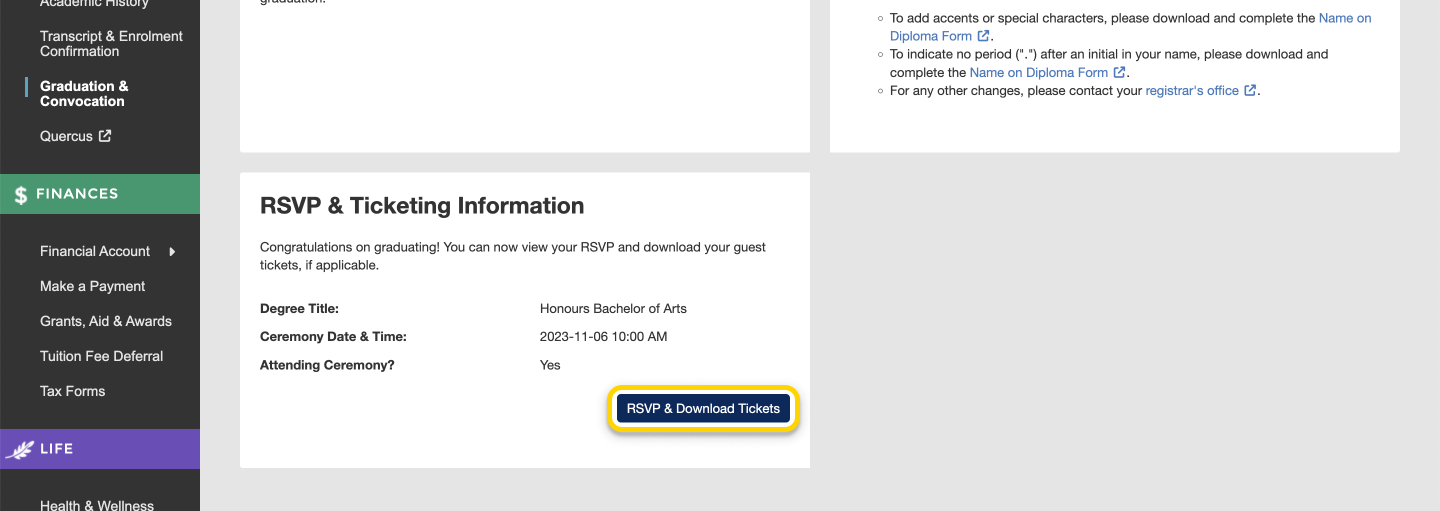
- On or after the aforementioned date, return to the Graduation & Convocation screen and click the “RSVP & Download Tickets” button in the RSVP & Ticketing Information card to download your guest E-Tickets (electronic tickets).
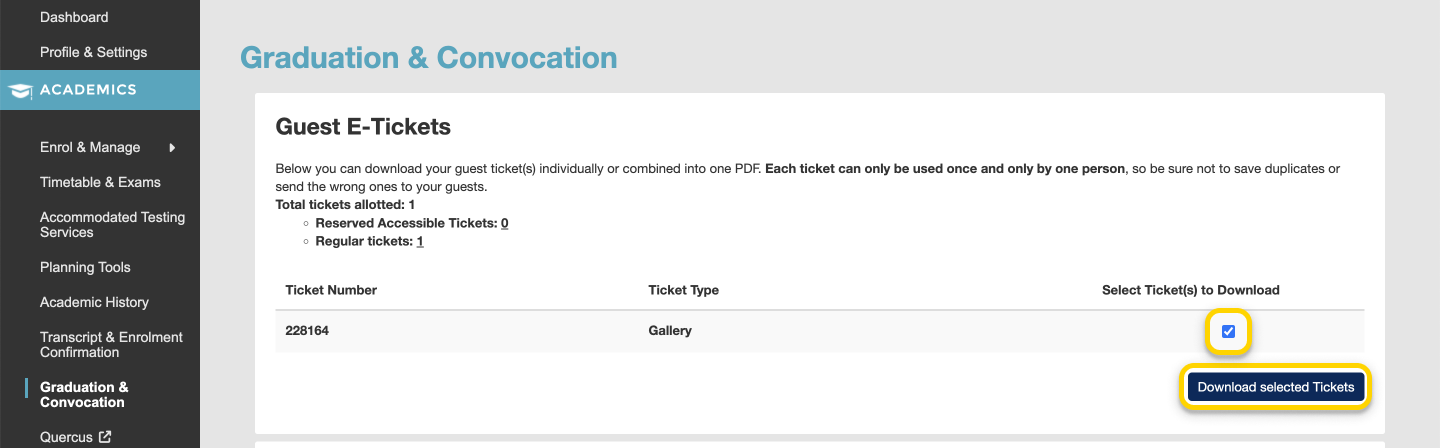
- Download your guest E-Tickets by selecting the check boxes and clicking the “Download Selected Tickets” button. Tickets will be downloaded to your computer as PDF files. If you select and download multiple tickets at once, they will be combined into one PDF file. If you wish to have the tickets remain as separate files to send to your guests, you will need to select and download each ticket individually.
Printing Transcripts & Other Documents
You can print a PDF version of several documents on ACORN, including your timetable, invoice, awards history and an unofficial version of your academic history.
Print Timetable
To print a copy of your timetable, navigate to the Timetable & Exams page via the left navigation and view the timetable for the session you want to print. Next, click the “Print Timetable” button to save your timetable as a PDF and/or print it.
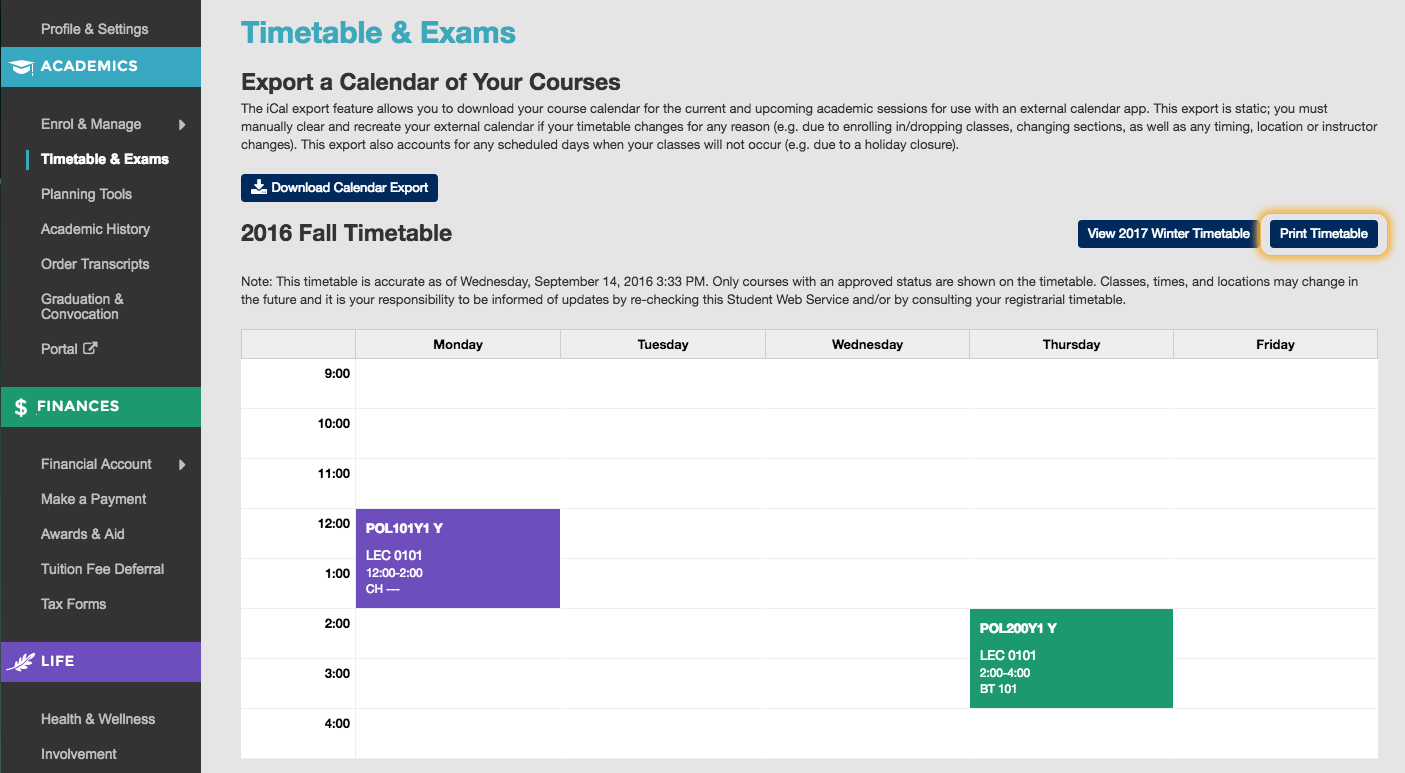
Screenshot of a student’s timetable for a selected session, highlighting the “Print Timetable” button above it.
Print Invoice
To print a copy of your invoice, navigate to the Invoice tab on the Invoice & Net Cost page via the Financial Account link on the left navigation. Click the “Print Invoice” button to save your invoice as a PDF and/or print it.
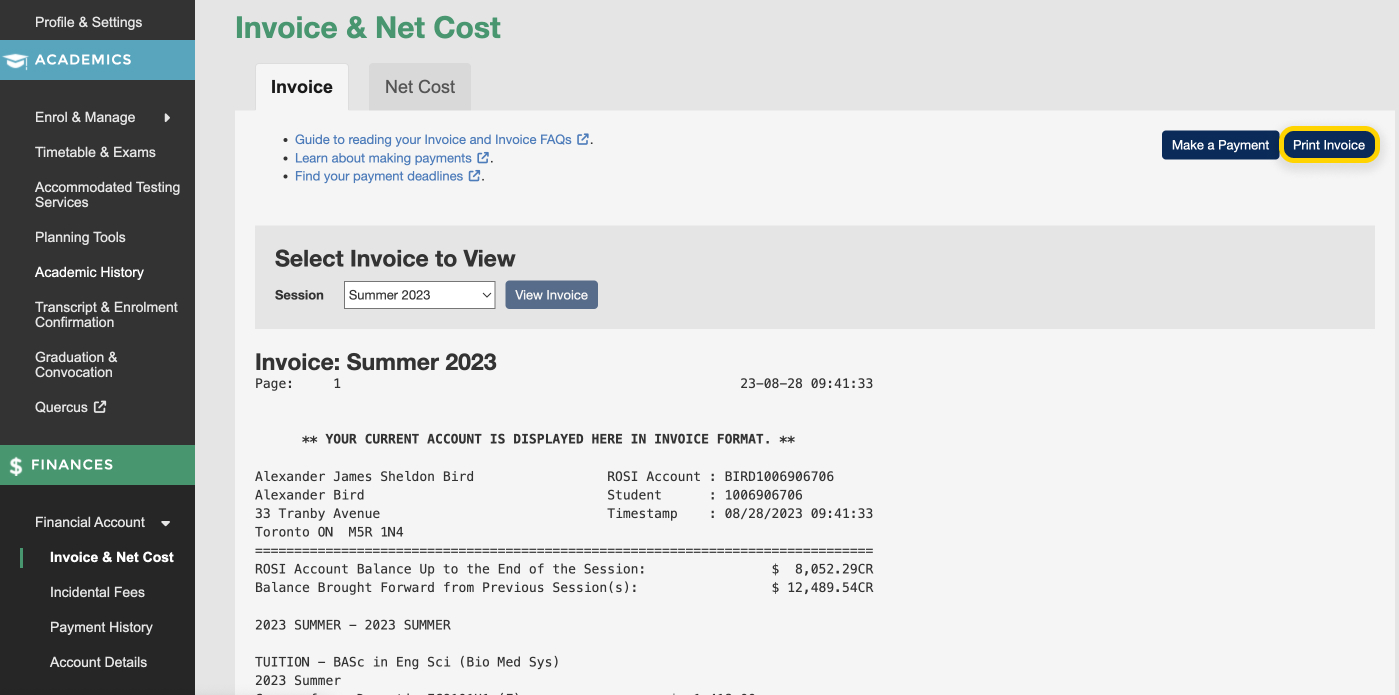
Screenshot of the Invoice tab, highlighting the “Print Invoice” button above the invoice information.
Print Academic History
If you need an official, sealed copy of your academic history, you can order a transcript on the Order Transcripts page in ACORN. To print an unofficial copy of your academic history, navigate to the Academic History page via the left navigation. Click “Complete Academic History” towards the top of the page.
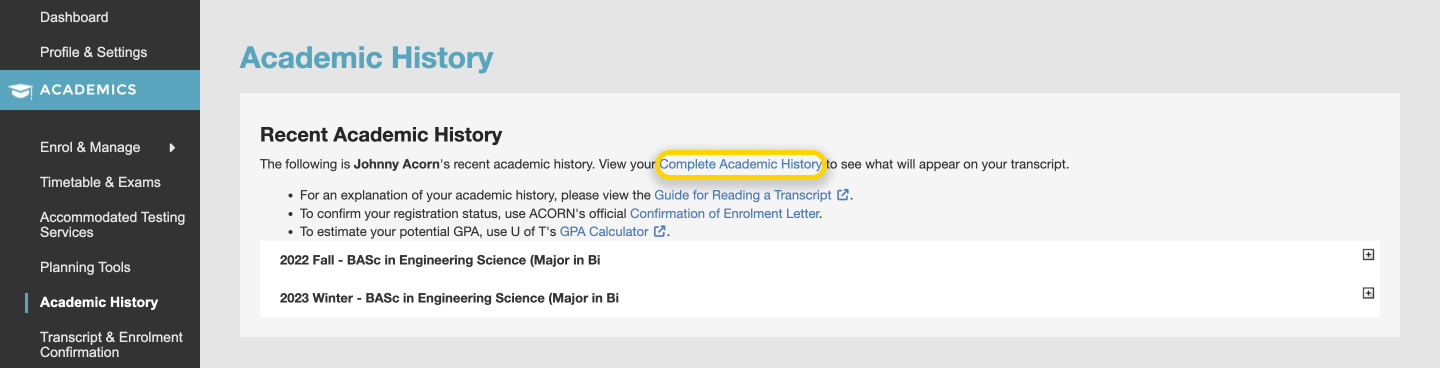
Screenshot highlighting the “Complete Academic History” link.
Next, click the “Print Academic History” button to save your academic history as a PDF and/or print it.
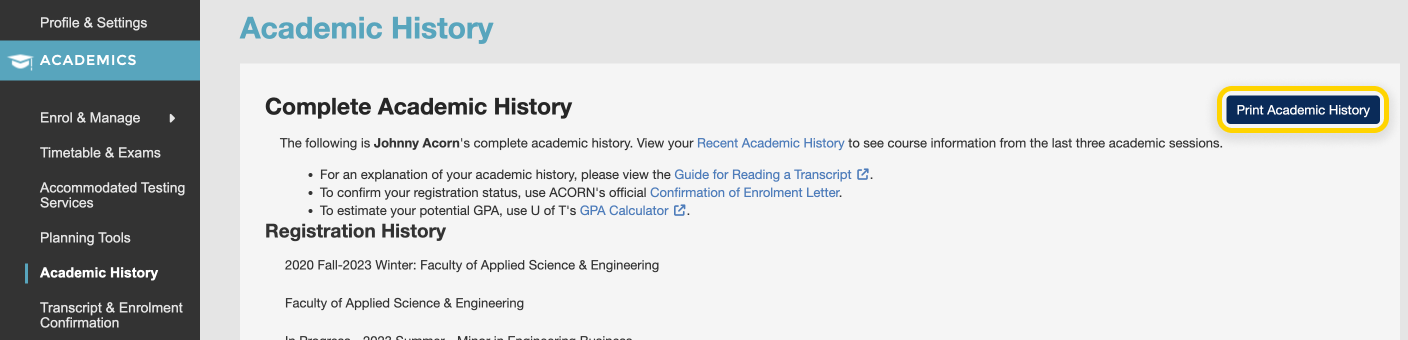
Screenshot of the “Complete Academic History” page, highlighting the “Print Academic History” button above the academic history information.
Print Awards History
To print a copy of your awards history, navigate to the Grants, Aid & Awards page via the left navigation. Click the My Grants, Aid & Awards tab to view a list of your awards and click the “Print Awards History” button to save your awards history as a PDF and/or print it.

Screenshot of the “My Grants, Aid & Awards tab, highlighting the “Print Awards History” button on above the awards information.
eTranscripts are the official transcript for the University of Toronto and are issued through the Parchment platform. It is the fastest and most secure way to send or receive an official University of Toronto transcript. You can learn more about Ordering Transcripts from the University Registrar’s Office. From the ACORN dashboard, click Order Transcripts on the left navigation menu.
- From the ACORN dashboard, select “Transcript & Enrolment Confirmation” on the main navigation menu.

Screenshot of a student’s dashboard in ACORN highlighting the “Transcript & Enrolment Confirmation” option on the main navigation.
- On the Transcript & Enrolment Confirmation page, select the “Order eTranscript” button.
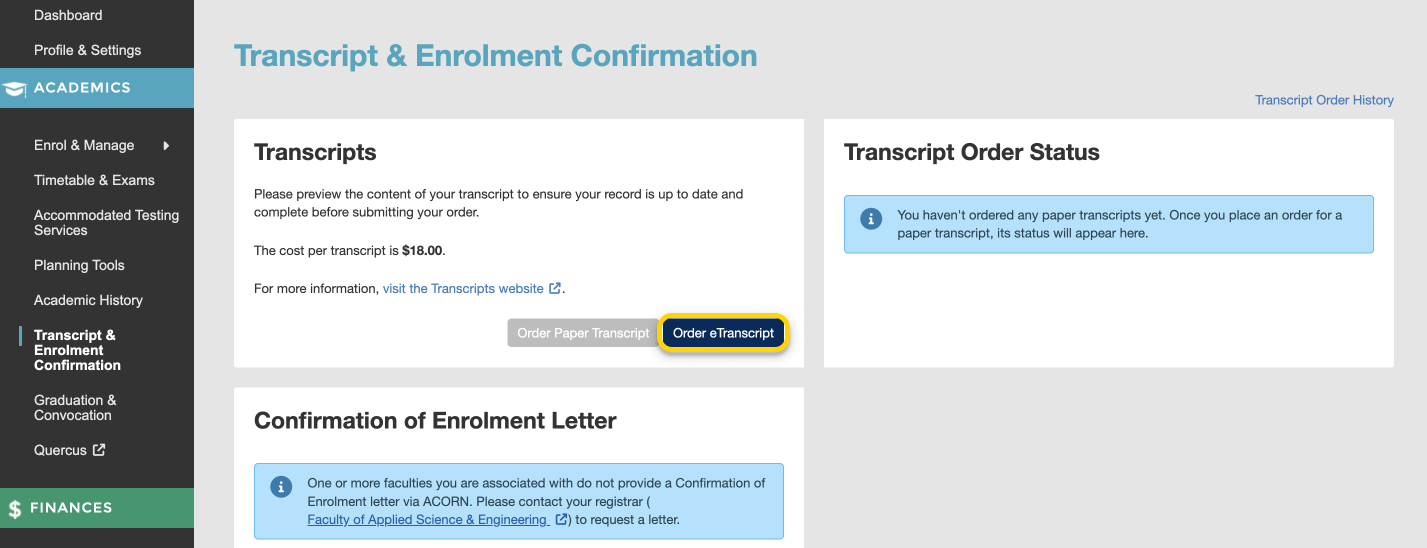
Screenshot of the “Transcript & Enrolment Confirmation” page highlighting the “Order eTranscript” button.
- You will be asked to confirm that you understand that ACORN will be providing Parchment, the transcript service, with your basic personal information. Select the checkbox to confirm, then select “Provide Info & Order Transcript” to continue.
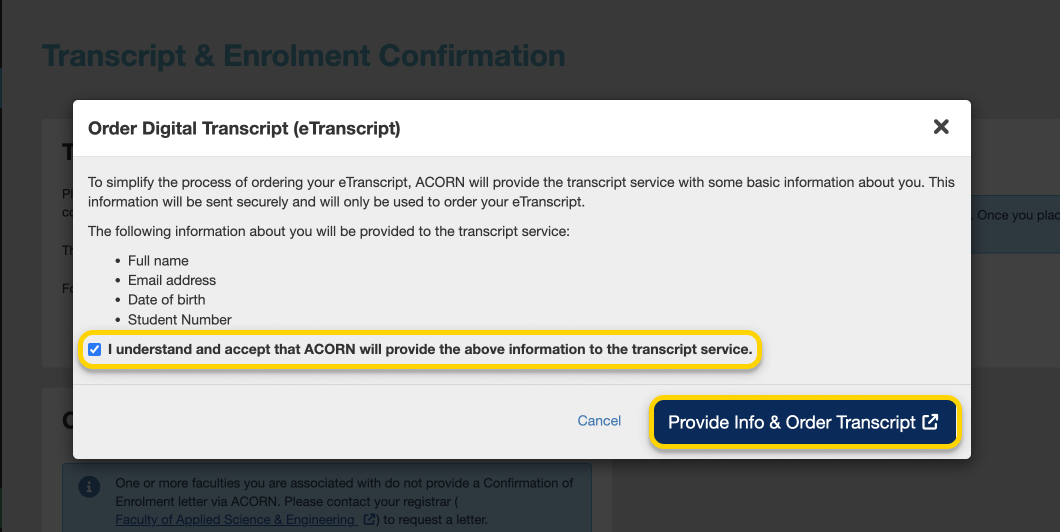
Screenshot of a confirmation to allow ACORN to share your information with the transcript service, Parchment.
- You will then be redirected to Parchment’s external website, where you will be asked to follow the instructions and fill out the necessary information.
- Once you have completed filling out the form, you will receive a confirmation email informing you that your order was placed successfully. You will also be able to review your order status on the Transcript Order Status card in ACORN. To view more details about your transcript order, select the status button on the card. In this example, the status button reads “Printed”. You will then receive your etranscript by email once it has been processed.
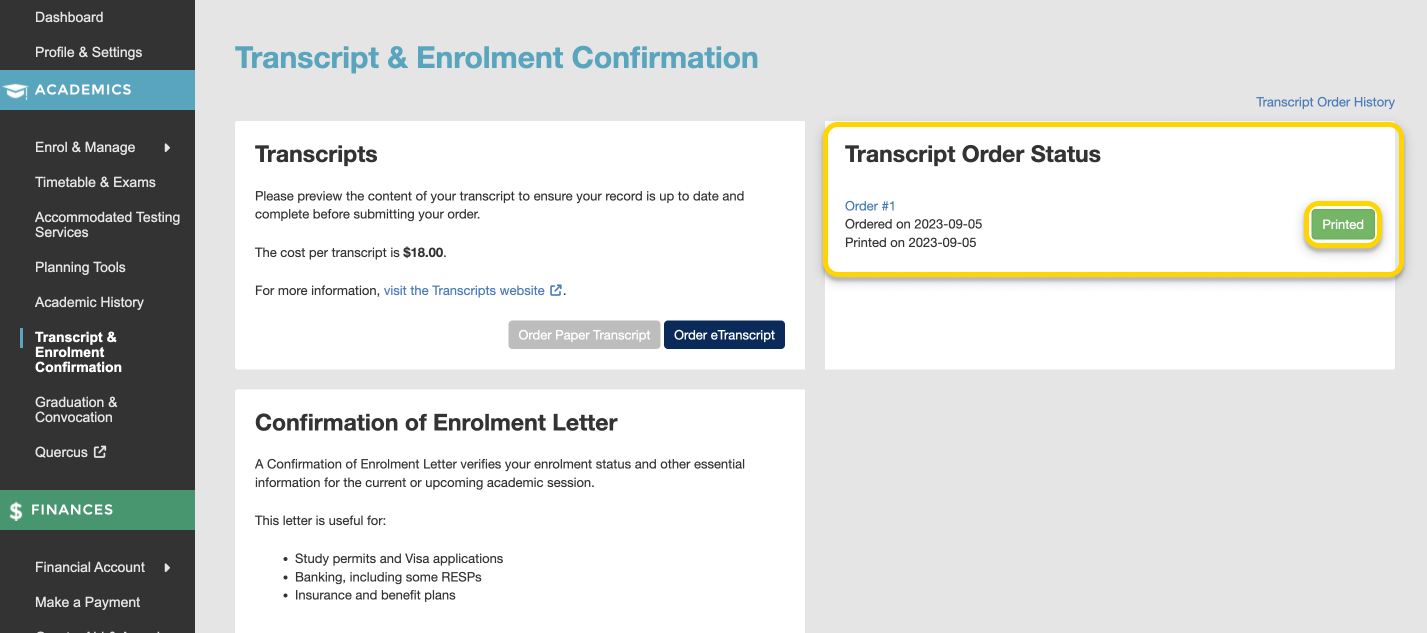
Screenshot of the “Transcript & Enrolment Confirmation” page highlighting the Transcript Order Status section.
- From the “Order Transcripts” page, you can select the “Show Receipt” button to view your receipt for your order.
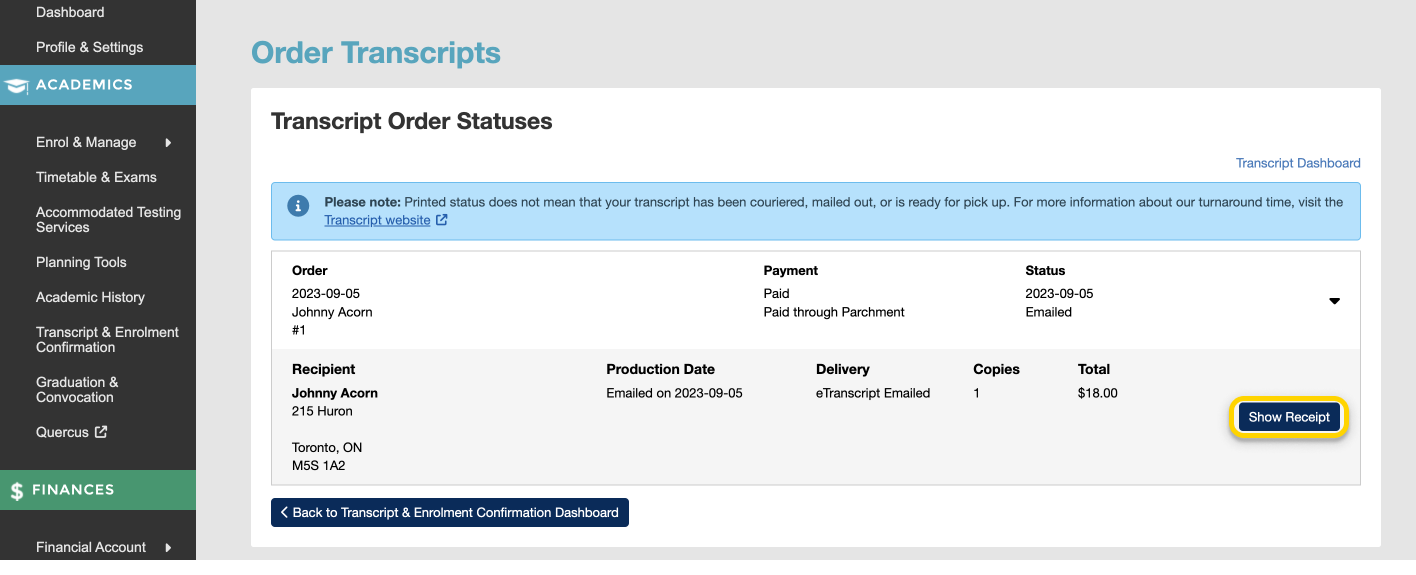
Screenshot of the “Order Transcripts” page showing a student’s Transcript Order Statuses and highlighting the “Show Receipt” button.
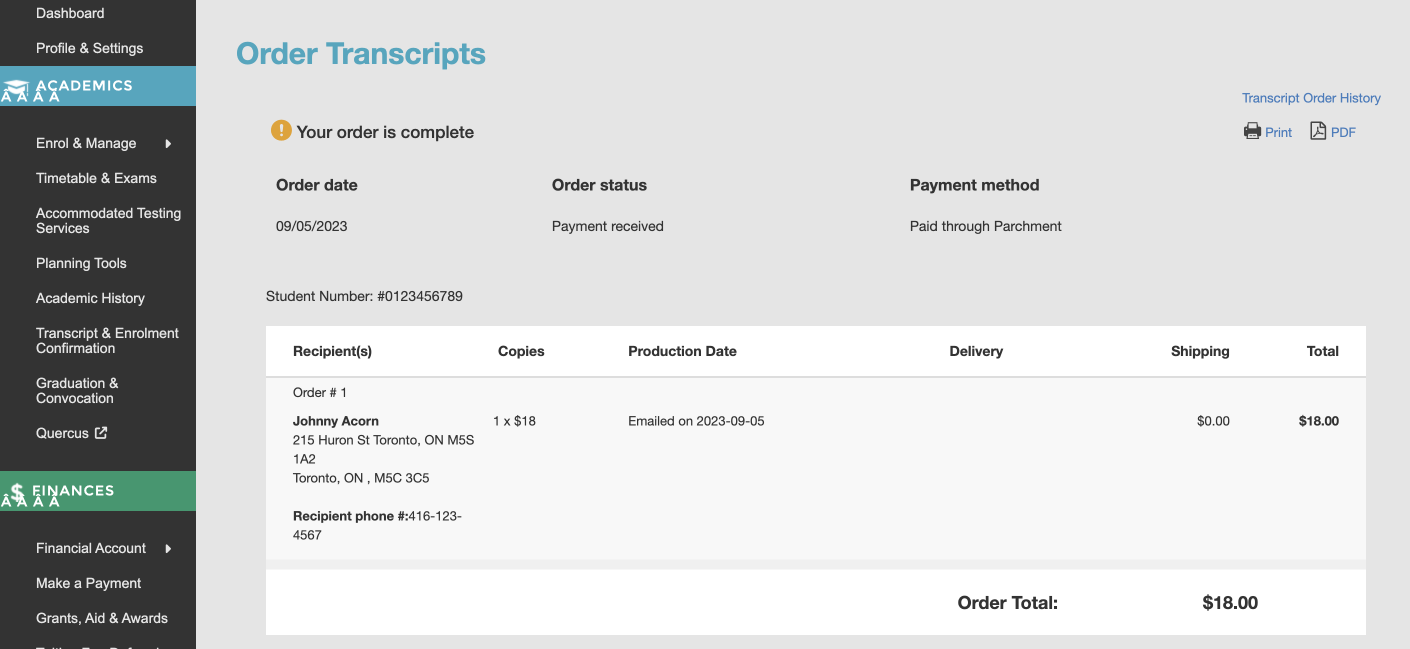
Screenshot of the “Order Transcripts” page showing the receipt for the eTranscript order.
Watch a video walkthrough of how to generate a Confirmation of Enrolment letter.
A Confirmation of Enrolment letter is an official document that can be used to verify your status as a student at U of T. If your faculty allows students to generate letters via ACORN and you are currently registered or invited to register in a current or upcoming session, you can download a Confirmation of Enrolment letter in PDF format via ACORN by visiting the Transcripts & Enrolment Confirmation page. If your faculty does not provide these letters via ACORN, please contact your registrar to get one.
This letter is useful for the following purposes, among others:
- Study permits and Visa applications
- Banking, including some RESPs
- Insurance and benefit plans
Before you download your letter, you may customize the following information that it will contain:
- Include registration information for either the current or upcoming session that you are Registered or Invited for
- Include or exclude your full-time or part-time status
- Include and indicate your intended graduation date, or exclude it*
* The Confirmation of Enrolment letter will only allow you to select an intended graduation date if you are a full-time student, and if ACORN has enough information to reasonably predict your graduation date. If you require an intended graduation date on your letter and do not see the option, or if this letter otherwise does not suit your needs, please request a custom letter from your registrar).
- From the ACORN Dashboard, go to the “Transcript & Enrolment Confirmation” page via ACORN’s left navigation.

- Click the “Customize and Download Enrolment Letter” button.

- You will be brought to the Confirmation of Enrolment Letter page. Here you will be able to customize the information that appears on your letter. The information you can customize will depend on whether you are a full-time or part-time student, and whether you are Invited or Registered in only one session. If you are Invited or Registered for both the current and upcoming sessions, you will have the option to select the session for which you want the letter to confirm your enrolment.
 If you are Invited or Registered for only one session, you will not have the option to choose.
- Next, select whether you want your full-time or part-time status to appear in the letter. Your current status for the indicated session will be used.

- If you are a full-time student or if ACORN has enough information to reasonably predict your graduation date, you will have the option to include or exclude this date. If you select “Yes”, choose the month and year that you intend to graduate.

- Once you are satisfied with your selections, click “Download Enrolment Letter” to download a PDF of your customized letter. You must answer every question to download your letter. If you want to change your answers to the questions on the Confirmation of Enrolment form, simply adjust your answers and download your letter again.

ACORN does its best to predict when you might be graduating, plus or minus one year. It can only do this accurately if you are a full-time student. If ACORN does not have all the information it needs to make an accurate prediction for any other reason, you will unfortunately not be able to include your graduation date in the letter. Please request a letter from your divisional or college registrar in this case.
Getting Help & Feedback
If you have questions regarding academics, finances, and anything else at the University, the “Contacts & Resources” tab on ACORN’s “Need Help?” page directs you to the appropriate office. This page also provides links to helpful resources that may answer your questions.
- First, after logging into ACORN, select the “Need Help?” button located towards the top or bottom of the page.
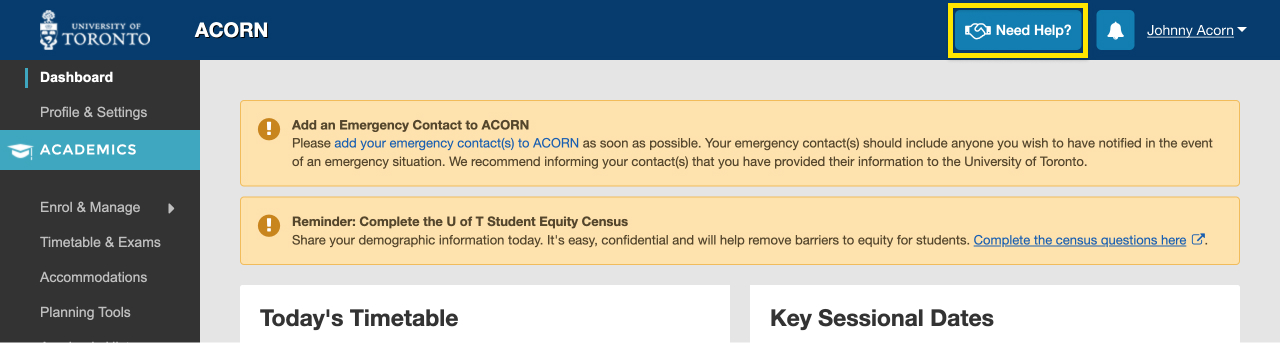
The “Need Help” button is located the ACORN header.
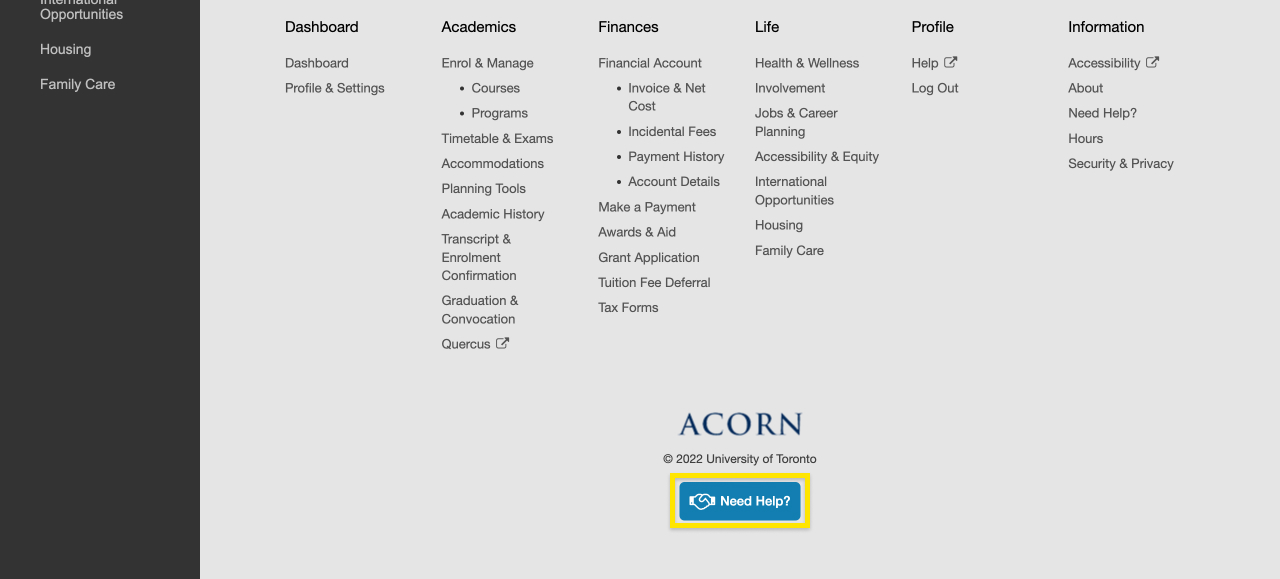
The “Need Help” button is also located in the ACORN footer.
- Next, make sure you are on the “Contacts & Resources” tab.
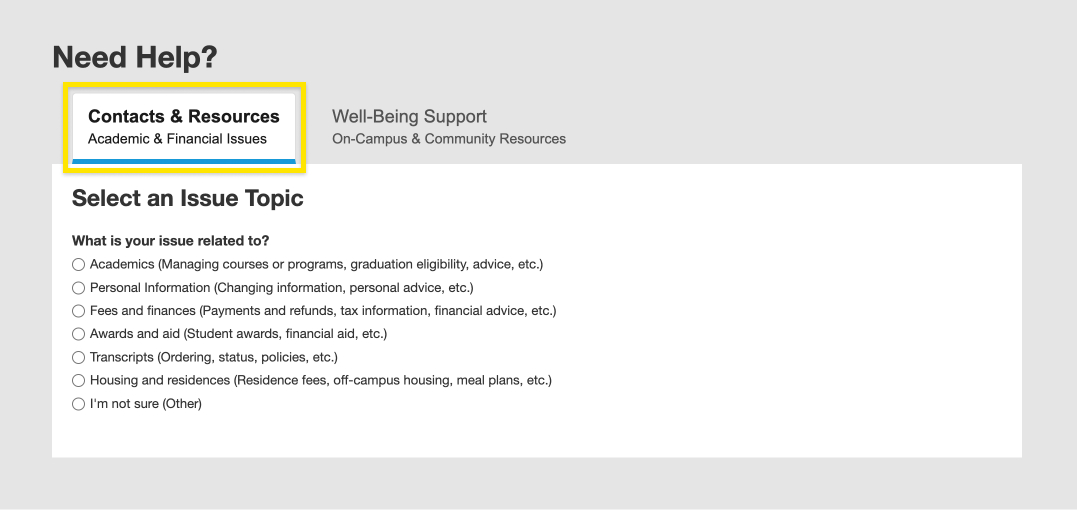
Several issue topics are available on “Contacts & Resources” tab.
- Select the topic that relates to your question or issue. Some topic categories have more specific options underneath that you can choose from. If you’re not sure what topic your question or issue falls under, select “I’m not sure”.
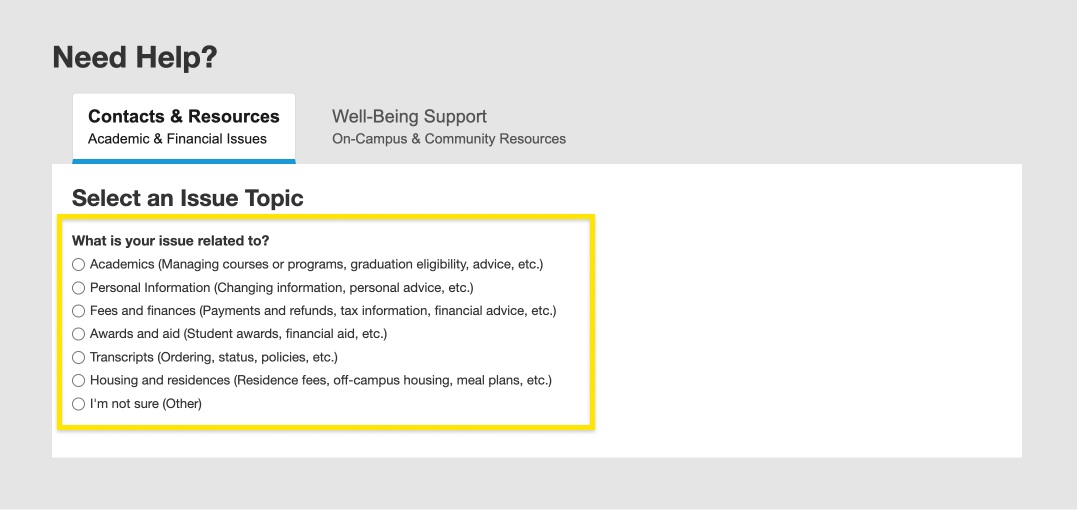
- Depending on the topic you choose, you will be directed to different offices to contact and provided with helpful links and resources about your issue.
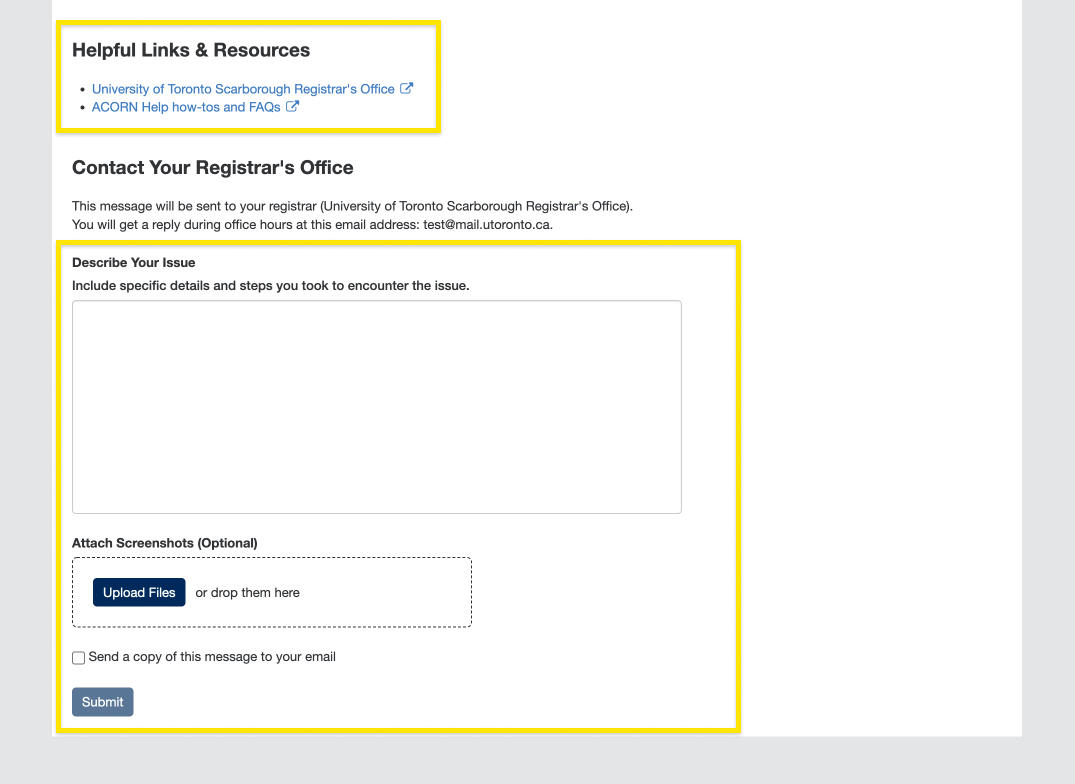
Contacts for each topic:- Academics, Personal information, Financial account, Financial advice, or I’m not sure: Your registrar is your first stop when it comes to academic and financial matters in the University, and you can email your Registrar’s Office directly in ACORN, or by finding their website from this list of registrars. Please note, if you have more than one registrar, you will need to select which registrar to contact. You can describe your issue and upload relevant screenshots or attachments. Once you’re done, you can choose whether you’d like a copy of the email and select submit to send the email.
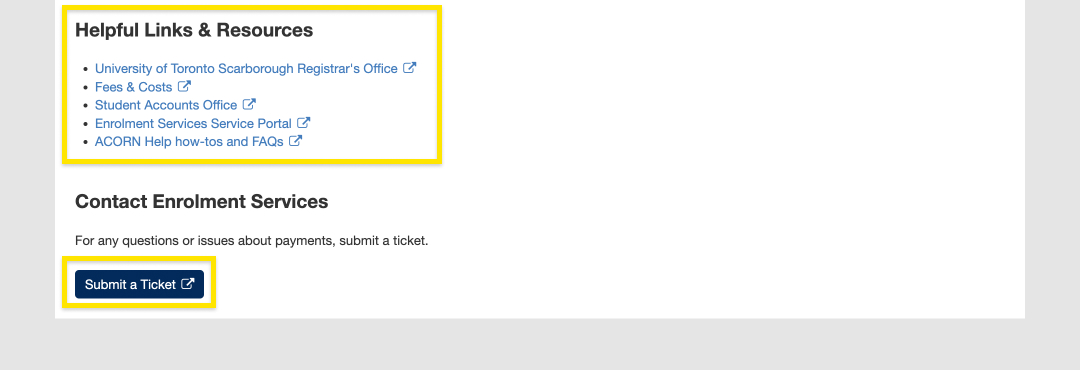
- Payments, Tax receipts and information, Student awards, Financial aid, or Transcripts: You will be directed to Enrolment Services’ Service Now form where you can follow instructions to submit a ticket regarding your issue.
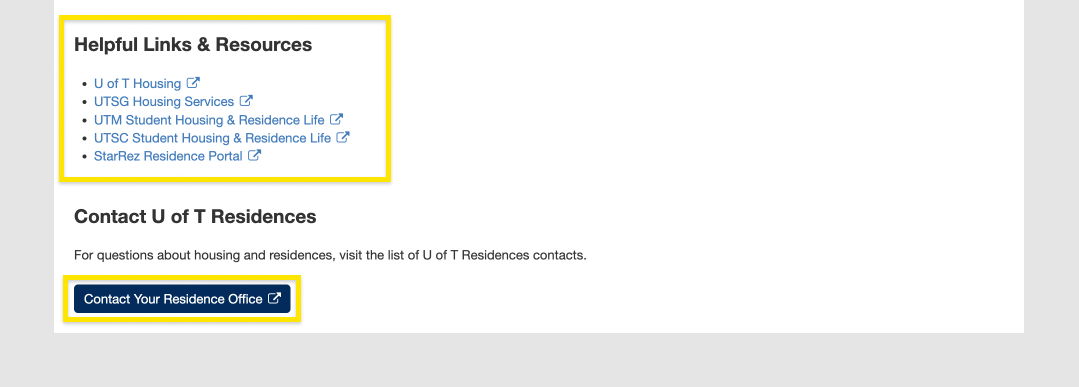
- Housing and residences: You will be directed to a list of residence offices with their emails and phone numbers.
- Academics, Personal information, Financial account, Financial advice, or I’m not sure: Your registrar is your first stop when it comes to academic and financial matters in the University, and you can email your Registrar’s Office directly in ACORN, or by finding their website from this list of registrars. Please note, if you have more than one registrar, you will need to select which registrar to contact. You can describe your issue and upload relevant screenshots or attachments. Once you’re done, you can choose whether you’d like a copy of the email and select submit to send the email.
Accommodated Testing Services
Accommodated Testing Services coordinates on-campus and online assessment accommodations for students with disabilities who are enrolled in courses offered on the St. George Campus. You can learn more about Accommodated Testing Services here.
For more information on making a request for accommodated tests outside of the ATS Exam Period and navigating your accommodated bookings dashboard see How do I Make a Request for an Accommodated Test?
To view a walkthrough on creating a booking for an assessment during the ATS Exam Period, see Accommodated Testing Services – How to Request an Accommodated Test During the ATS Exam Period.
- After navigating to the Accommodated Testing Services page, you can select the “Request Accommodated Testing” button, where you will be asked a few questions in order to complete your booking request.
The first question asks when the assessment for which you are making the request will be written. In this example, if the assessment is written during the ATS Exam Period which is between April 11 – April 29 then you will select the second option, “Assessment written during the ATS Exam Period (April 11 – April 29)”. If the assessment will be written outside of this period, then select the first option, “Assessment written during the Term Period (January 2 – April 10)”.
You will only be able to make bookings for assessments written during the ATS Exam Period for a limited time using ACORN. For this example, it is between March 6 – March 17. If you miss the deadline on March 17, then you will have to submit a late request using the Alternate Registration Form.
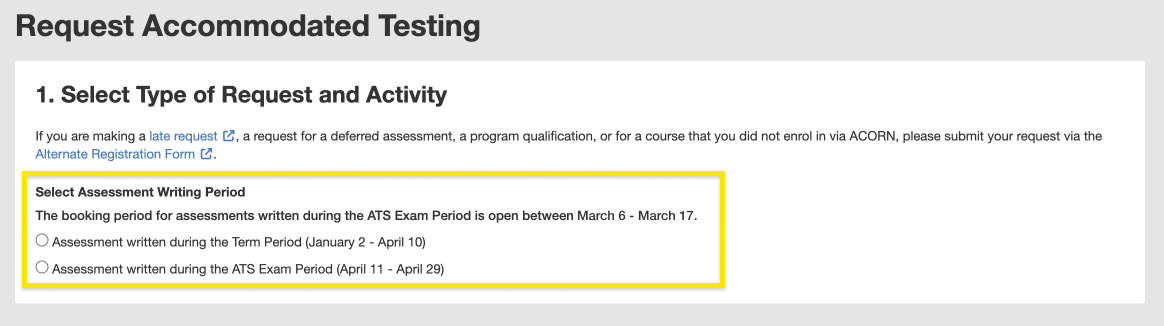
Screenshot highlighting the “Select Assessment Writing Period” question and options to indicate whether you are writing the assessment during the Term or Exam Period.
- Once you have selected the assessment period, “Assessment written during the ATS Exam Period” you will be asked to select the course which you are making the booking for.
- If you have selected a course that does not have any scheduled assessments available, then you must submit your request using the Alternate Registration form.

Screenshot highlighting the course selection with no scheduled assessments.
- However, if your selected course has scheduled assessments, then you can choose from the dropdown list. For this example, there are two scheduled assessments available: a Standard Test and Standard Exam.
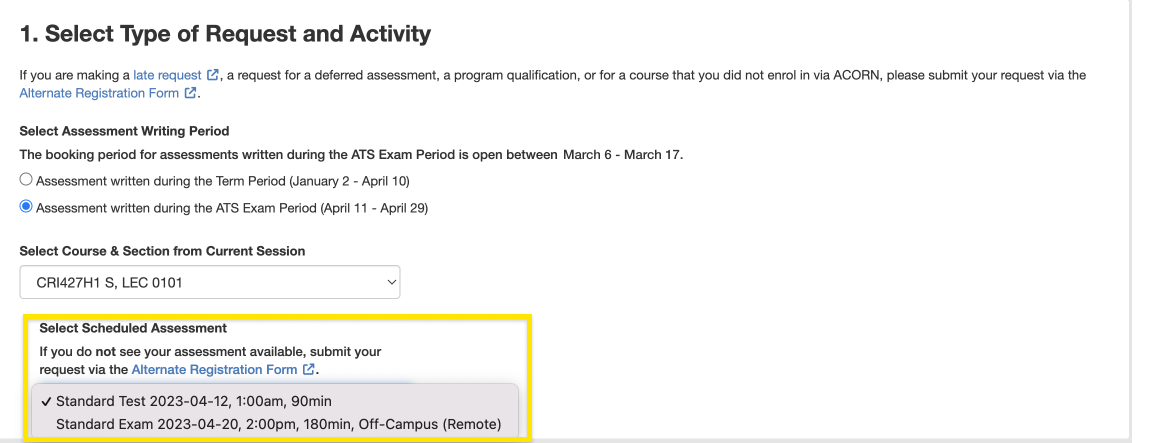
Screenshot highlighting the course selection with scheduled assessments.
-
If there is no location in the option as seen in ”Standard Test”, you must state whether your instructor has indicated that you must complete this assessment in person.

Screenshot highlighting the assessment writing location questions.
- If you have selected a course that does not have any scheduled assessments available, then you must submit your request using the Alternate Registration form.
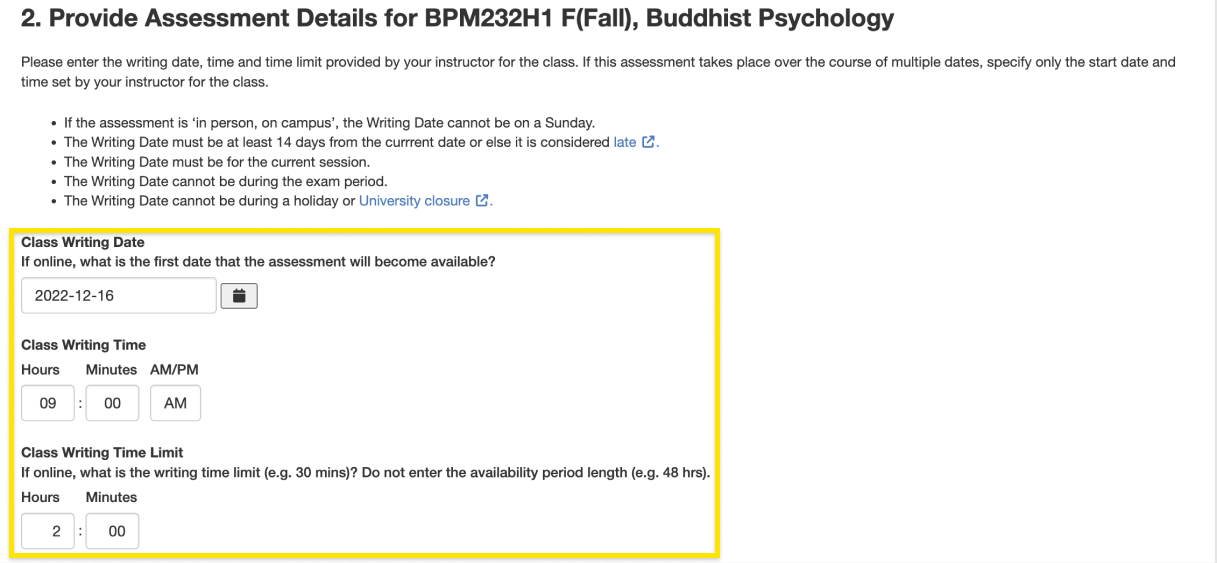
- After you complete the assessment writing location questions or if you selected an assessment with a location that is included, for e.g., as shown in the dropdown option for “Standard Exam” in the screenshot above, then from here you can review your assessment details, including the Class Writing Date, Time, Time Limit and Location.
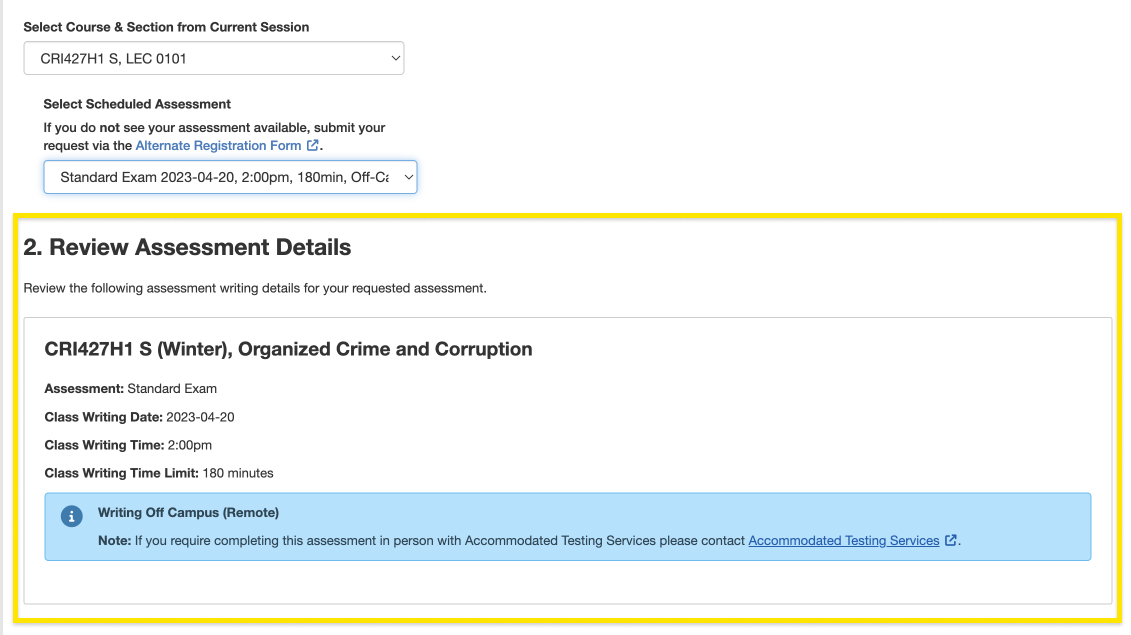
Screenshot highlighting the second step of the form, Step 2. Review Assessment Details.
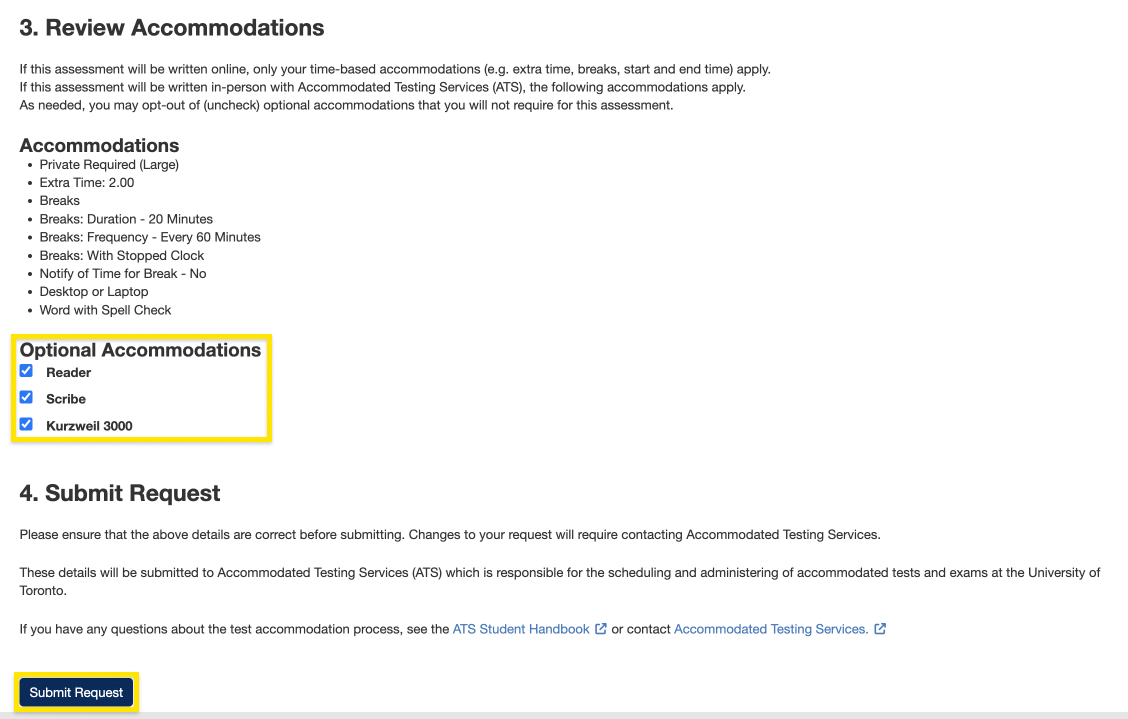
- After reviewing your assessment details, you can review your accommodations and submit your request by clicking “Submit Request”. If you have any optional accommodations you can opt in for or opt out of this request by clicking on the checkbox.
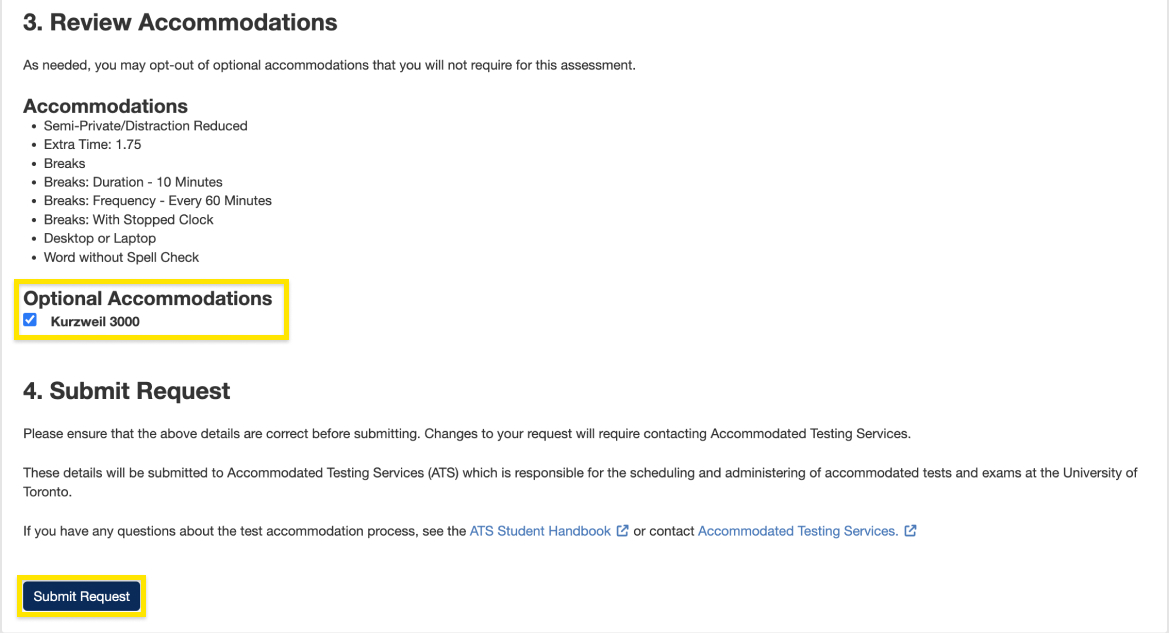
Screenshot highlighting the third and fourth steps of the form, Step 3. Review Accommodations and Step 4. Submit Request.
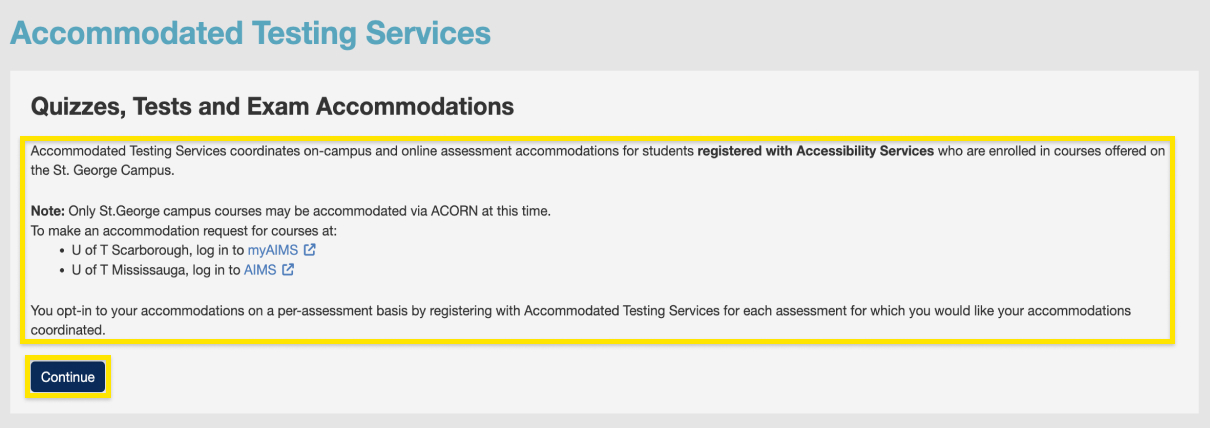
Accommodated Testing Services coordinates on-campus and online assessment accommodations for students with disabilities who are enrolled in courses offered on the St. George Campus. You can learn more about Accommodated Testing Services here.
- From the ACORN dashboard, click Accommodated Testing Services under the Academics section of the left-hand navigation menu.
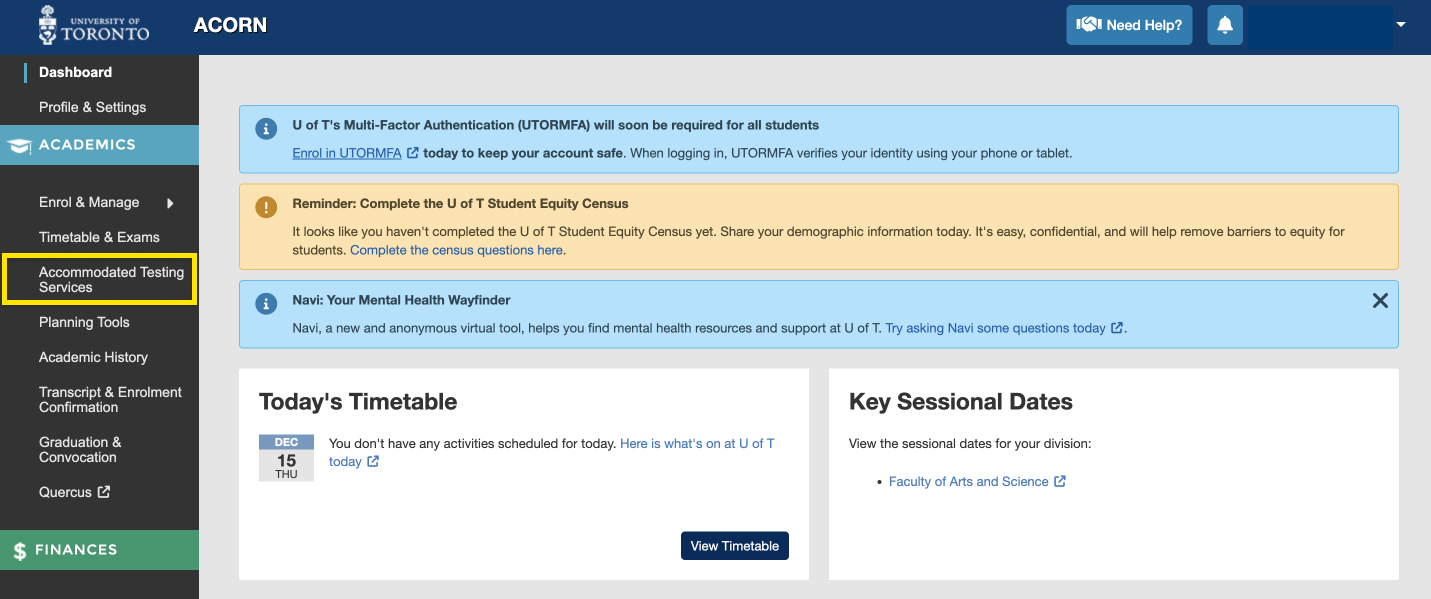
Screenshot of the main navigation menu highlighting the Accommodated Testing Services option on the ACORN Dashboard.
- On the Accommodated Testing Services (ATS) page, you can read an introduction about ATS which includes eligibility requirements. If you would like to make requests for U of T Scarborough or U of T Mississauga, you can click on the links provided which will redirect you to the appropriate pages. If you do meet the eligibility requirements, you can click on the “Continue” button to proceed to the next steps which include requesting an accommodated test and viewing your bookings dashboard.
Screenshot highlighting information on the introduction page to ATS
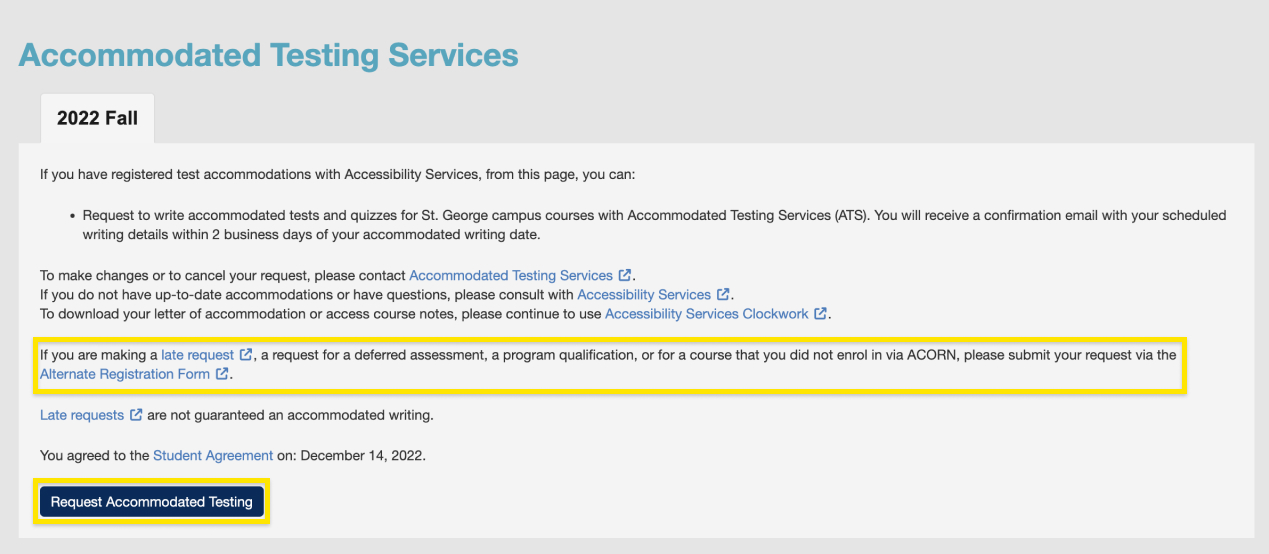
- If you are already registered with Accessibility Services, approved to write quizzes, tests or exams with accommodations and are also registered with Accommodated Testing Services, then you will be able to request to write on-campus or online accommodated tests and quizzes for St. George campus courses by clicking on the “Request Accommodated Testing” button. If you would like to make a request that is late a request, for a deferred assessment, a program qualification, or for a course that you did not enrol in via ACORN, then you will need to submit your request via the Alternate Registration Form.
Screenshot highlighting the request accommodated testing button and how to request an accommodated test for different situations.
- If you are not registered with Accessibility Services or do not yet have approved accommodations, then you will not be able to proceed with making a request or view your bookings dashboard.

- If you are already registered with Accessibility Services, approved to write quizzes, tests or exams with accommodations and are also registered with Accommodated Testing Services, then you will be able to request to write on-campus or online accommodated tests and quizzes for St. George campus courses by clicking on the “Request Accommodated Testing” button. If you would like to make a request that is late a request, for a deferred assessment, a program qualification, or for a course that you did not enrol in via ACORN, then you will need to submit your request via the Alternate Registration Form.
- After you click on the “Request Accommodated Testing” button, you will be asked to complete the form. Keep in mind, this form asks for information about the assessment writing details for the class and not for your requested accommodated details. The first part requires you to complete information about the type of request and activity that you are making the request for. This includes selecting the type of request, choosing a course from your list of registered courses for the current session and selecting whether your instructor has indicated that this assessment must be written in person or not.
- Keep in mind the first part of this question is asking where your instructor said you and your class must write this assessment and not where you would like to write it.
If you have selected a standard assessment and your instructor indicated you must complete this assessment ‘in person, on campus’, then you will be required to write this assessment in person with Accommodated Testing Services (ATS). If your instructor did not indicate that this assessment must be written in person, then you can choose whether you would like to write it in person with Accommodated Testing Services (ATS), or at home or elsewhere.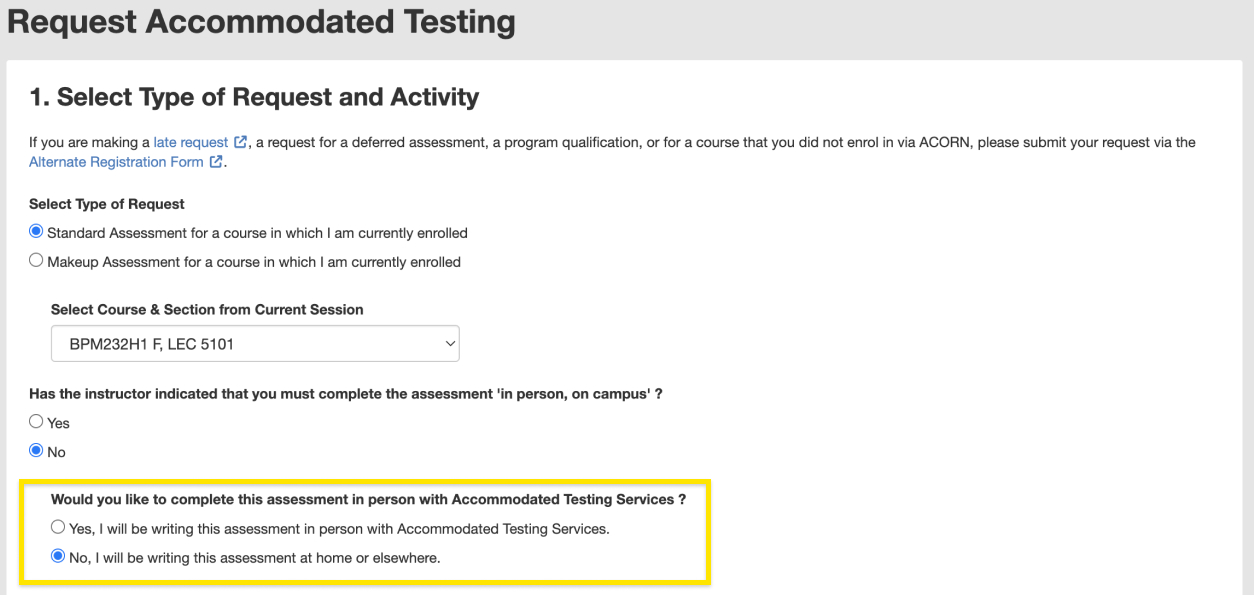
- The next section of the form will ask you to enter the writing details of the assessment including date, time and duration. Please note, if you have selected a Makeup Assessment, then you will be required to enter the date, time and duration the instructor indicated you must write this assessment.
- If you have selected a Standard Assessment then enter the details that the instructor has indicated for you and your class.
Keep in mind these questions are asking you to enter the class writing details for Standard Assessments or details arranged by the instructor for Makeup Assessments and not when you would like to write this assessment.
E.g., My instructor indicated that I have an in-person assessment on September 14th at 2:00pm for a duration of 2 hours. You will enter the following for this scenario:
Class Writing Date: September 7th
Class Writing Time: 2:00pm
Class Writing Time Limit: 2 hours - Also, if your assessment takes place over the course of multiple dates, i.e., has an end date that is different from the start date, then only enter the start date and time for when this assessment will become available.
E.g., My instructor indicated that I have an online assessment that will be available between September 14th at 9:00am to September 16th at 11:59pm. I can write this assessment anytime within that time period but once I start this assessment then I have 3 hours to complete it. You will enter the following for this scenario:
Class Writing Date: September 14th
Class Writing Time: 9:00am
Class Writing Time Limit: 3 hours - Additionally, only enter the duration of the assessment and not the period for when this assessment is available. For example, do not enter 48 hours, in the “Class Writing Time Limit” section for an assessment that has a 2-day availability period.
E.g., My instructor indicated that I have an online assessment that will be available between September 14th from 9:00am to September 16th at 11:59pm . I can choose to complete this assessment any time within that period and there is no time limit. You will enter the following for this scenario:
Class Writing Date: September 14th
Class Writing Time: 9:00am
Class Writing Time Limit: the time you think it will take to complete this assessment (up to 23 hours and 59 mins).
- If you have selected a Standard Assessment then enter the details that the instructor has indicated for you and your class.
- After completing this information, you can review your accommodations and submit your request by clicking “Submit Request”. If you have any optional accommodations, then you can opt in or out for this request by clicking on the checkbox.
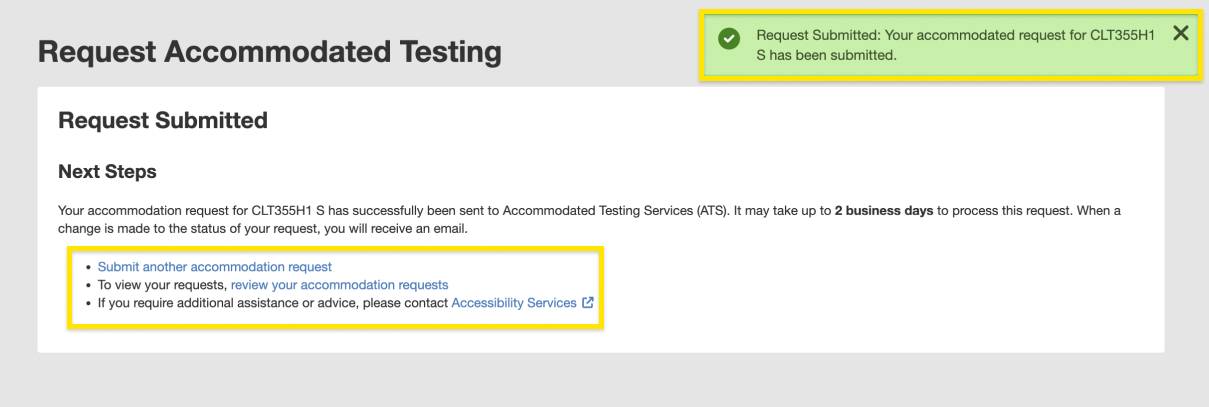
- If your accommodated testing request was created successfully, you will receive a success notice at the top-right corner of your screen. You can now submit another request or navigate to your bookings dashboard.
- If you are making another request for a booking that you have previously made, then you will receive an error message instead. Please follow the instructions in the error message.
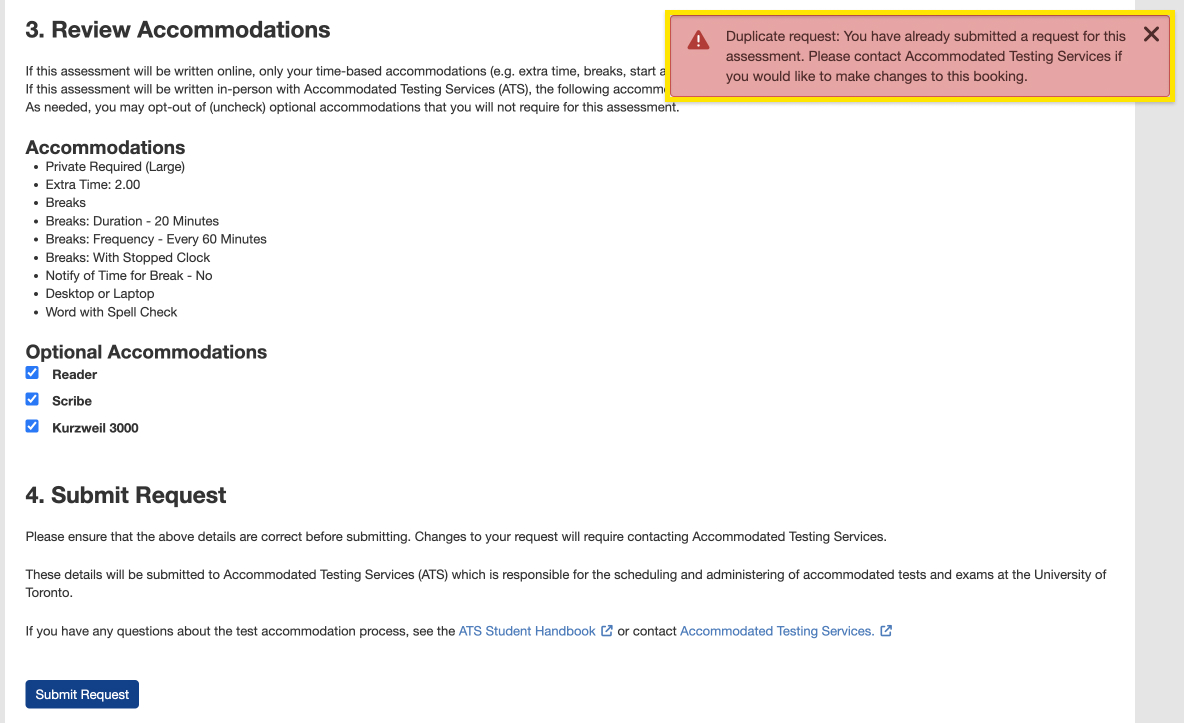
- Keep in mind the first part of this question is asking where your instructor said you and your class must write this assessment and not where you would like to write it.
- If your booking is successful and you return to your dashboard, then you can see your upcoming, past or cancelled bookings in the table by clicking through the different tabs. To see more options for your booking you can click on the settings icon.
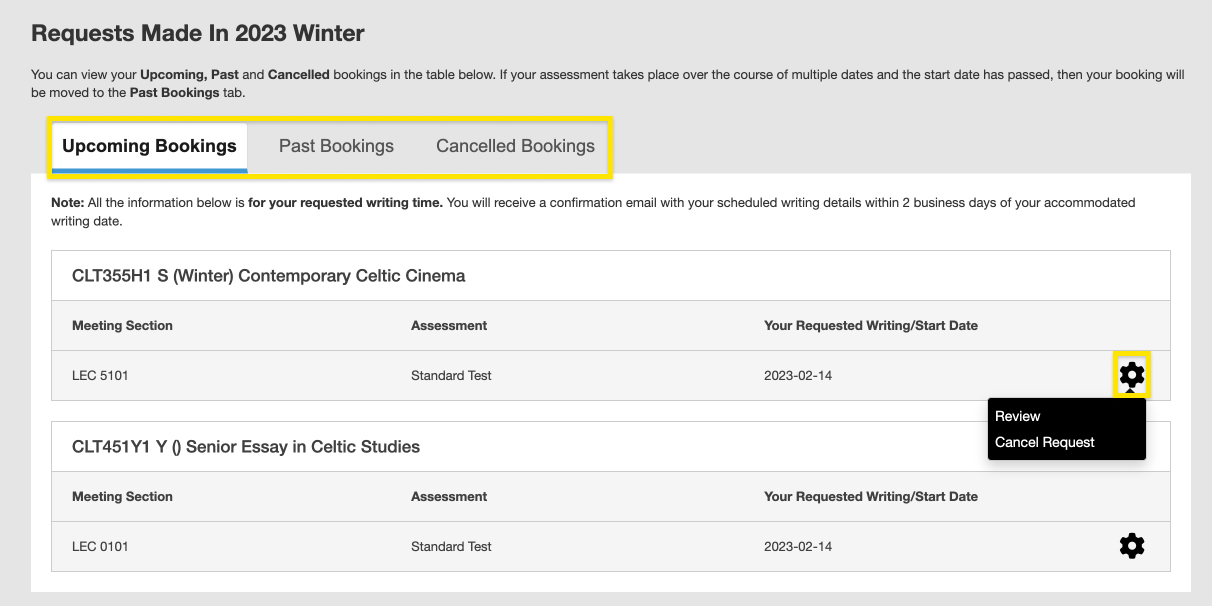
- You can review the details of your booking request by clicking “Review”.
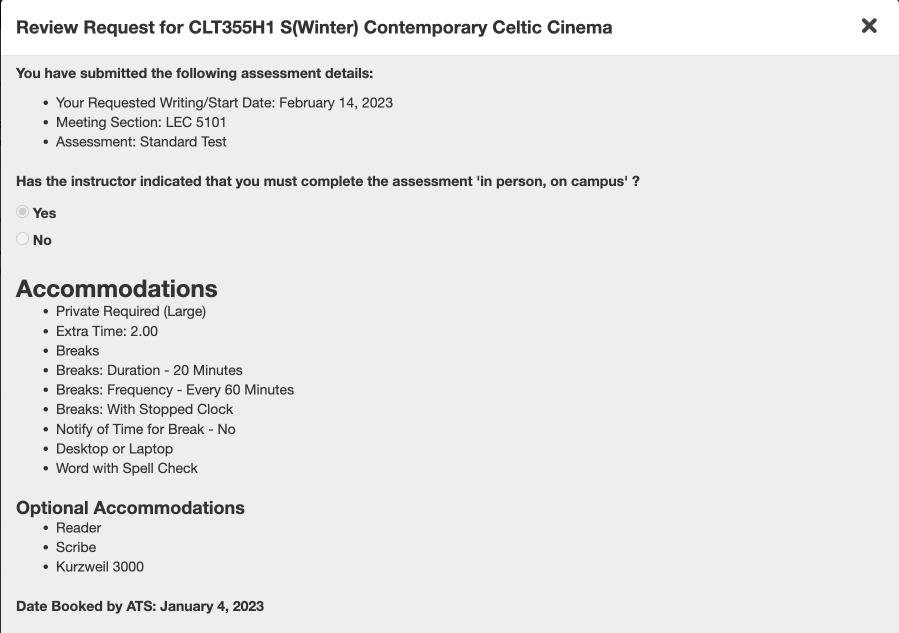
- If you would like details on how to cancel your booking request, then click “Cancel” and follow the instructions.

- You can review the details of your booking request by clicking “Review”.