To get your UTORid, U of T email address and TCard, visit the TCard Office website and follow the steps provided.
How do I change or reset my password?
Your password is used to access important U of T services such as UTmail+, ACORN and Quercus. If you forgot your password or need to change it because you think it may have been compromised, go to the UTORid Account Management webpage. You will find password management options under “Password and Account Management”.
Why is ACORN telling me that my access is suspended?
If ACORN displays a message about your access being suspended, this is because of inappropriate use. Please contact your faculty or department registrar to request to have your access restored.
Students are expected to use ACORN responsibly, which means that you are not permitted to flood the system with requests or automate actions such as course enrolment.
How do I make a request for an Accommodated Test during the ATS Exam Period?
Accommodated Testing Services coordinates on-campus and online assessment accommodations for students with disabilities who are enrolled in courses offered on the St. George Campus. You can learn more about Accommodated Testing Services here.
For more information on making a request for accommodated tests outside of the ATS Exam Period and navigating your accommodated bookings dashboard see How do I Make a Request for an Accommodated Test?
To view a walkthrough on creating a booking for an assessment during the ATS Exam Period, see Accommodated Testing Services – How to Request an Accommodated Test During the ATS Exam Period.
- After navigating to the Accommodated Testing Services page, you can select the “Request Accommodated Testing” button, where you will be asked a few questions in order to complete your booking request.
The first question asks when the assessment for which you are making the request will be written. In this example, if the assessment is written during the ATS Exam Period which is between April 11 – April 29 then you will select the second option, “Assessment written during the ATS Exam Period (April 11 – April 29)”. If the assessment will be written outside of this period, then select the first option, “Assessment written during the Term Period (January 2 – April 10)”.
You will only be able to make bookings for assessments written during the ATS Exam Period for a limited time using ACORN. For this example, it is between March 6 – March 17. If you miss the deadline on March 17, then you will have to submit a late request using the Alternate Registration Form.

Screenshot highlighting the “Select Assessment Writing Period” question and options to indicate whether you are writing the assessment during the Term or Exam Period.
- Once you have selected the assessment period, “Assessment written during the ATS Exam Period” you will be asked to select the course which you are making the booking for.
- If you have selected a course that does not have any scheduled assessments available, then you must submit your request using the Alternate Registration form.
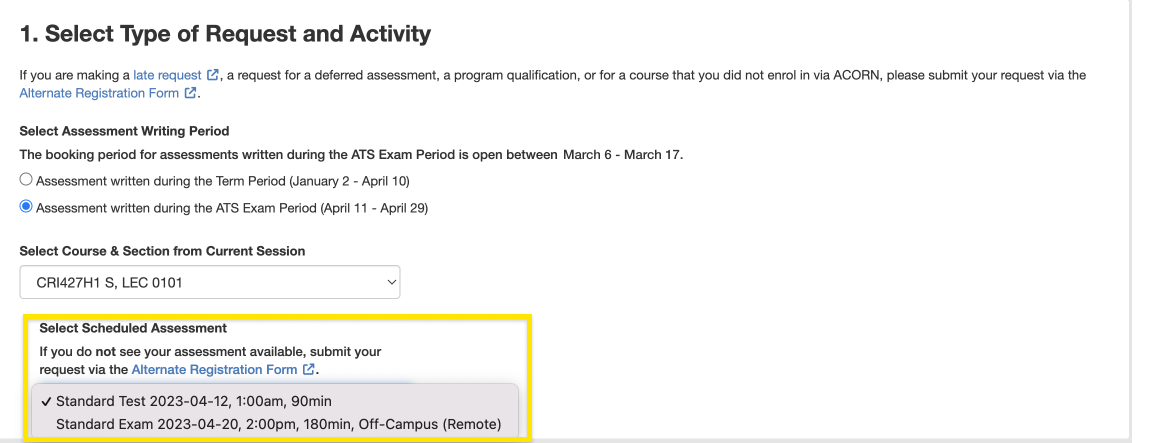
- However, if your selected course has scheduled assessments, then you can choose from the dropdown list. For this example, there are two scheduled assessments available: a Standard Test and Standard Exam.
-
If there is no location in the option as seen in ”Standard Test”, you must state whether your instructor has indicated that you must complete this assessment in person.
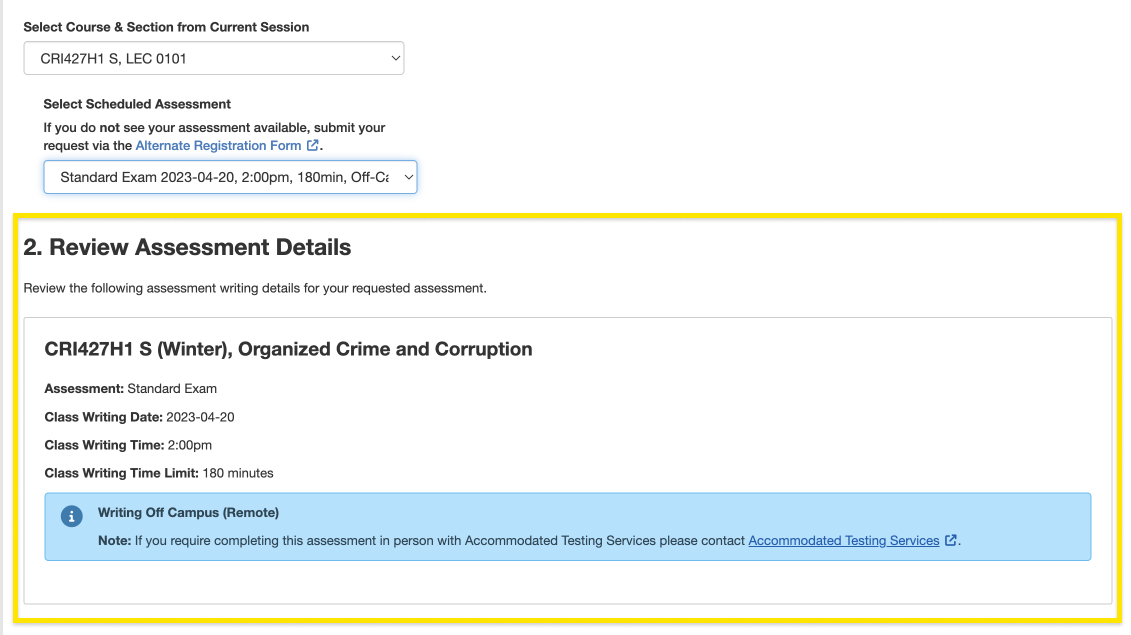
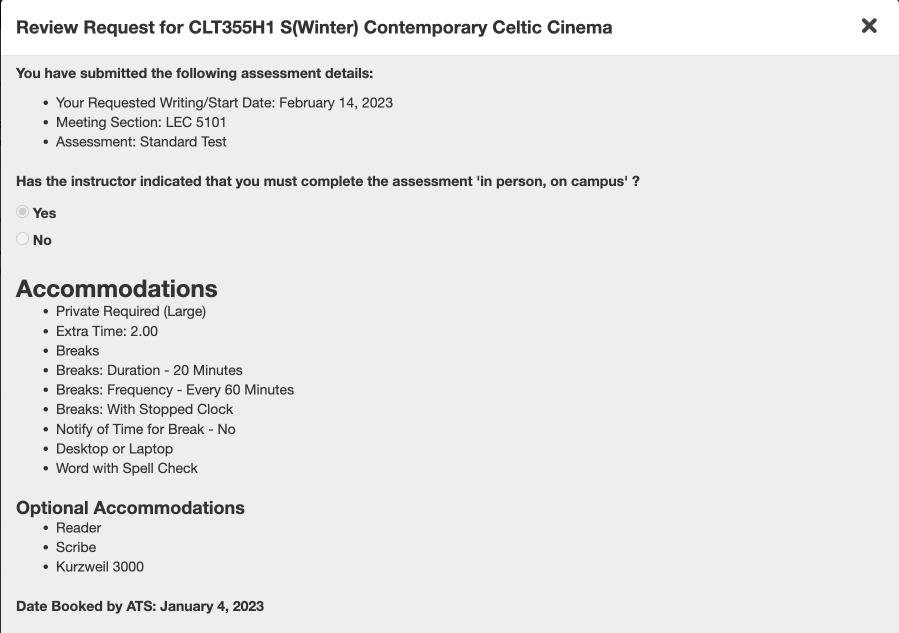
- After you complete the assessment writing location questions or if you selected an assessment with a location that is included, for e.g., as shown in the dropdown option for “Standard Exam” in the screenshot above, then from here you can review your assessment details, including the Class Writing Date, Time, Time Limit and Location.
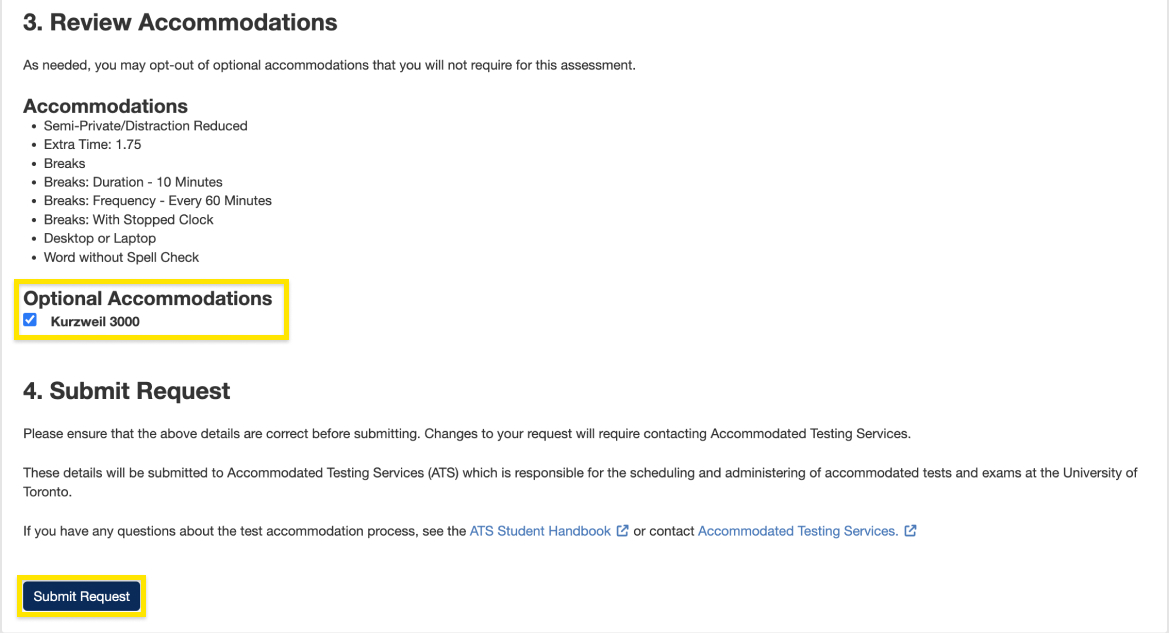
- After reviewing your assessment details, you can review your accommodations and submit your request by clicking “Submit Request”. If you have any optional accommodations you can opt in for or opt out of this request by clicking on the checkbox.
How do I complete my Profile Checklist?
Starting February 21, 2023, you will find the new Profile Checklist area on ACORN’s Dashboard. The Profile Checklist will remind you when you need to update your personal information so that U of T staff can better assist you and reach you with important information.
For now, the Student Equity Census is the only item on your Profile Checklist. In the future, additional Checklist items will exist for your address, emergency contacts, and more. All items in your Profile Checklist need to be completed before the specified deadline in order to maintain full access to all areas within ACORN.
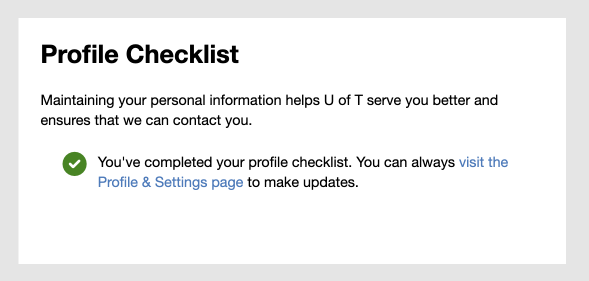
If you have already completed the Student Equity Census, you’re done for now! The University will email you when there are new items to complete on your Profile Checklist, and you can check ACORN periodically to see if new items have been added. Even when your checklist is complete, please try your best to keep your personal information up to date in ACORN’s Profile & Settings area.
Completing Your Checklist Before the Deadline
Whenever new items are added to your Profile Checklist, ACORN will display a deadline by which you need to complete them. This deadline is written both in your Profile Checklist, and in a message near the top of every ACORN page.
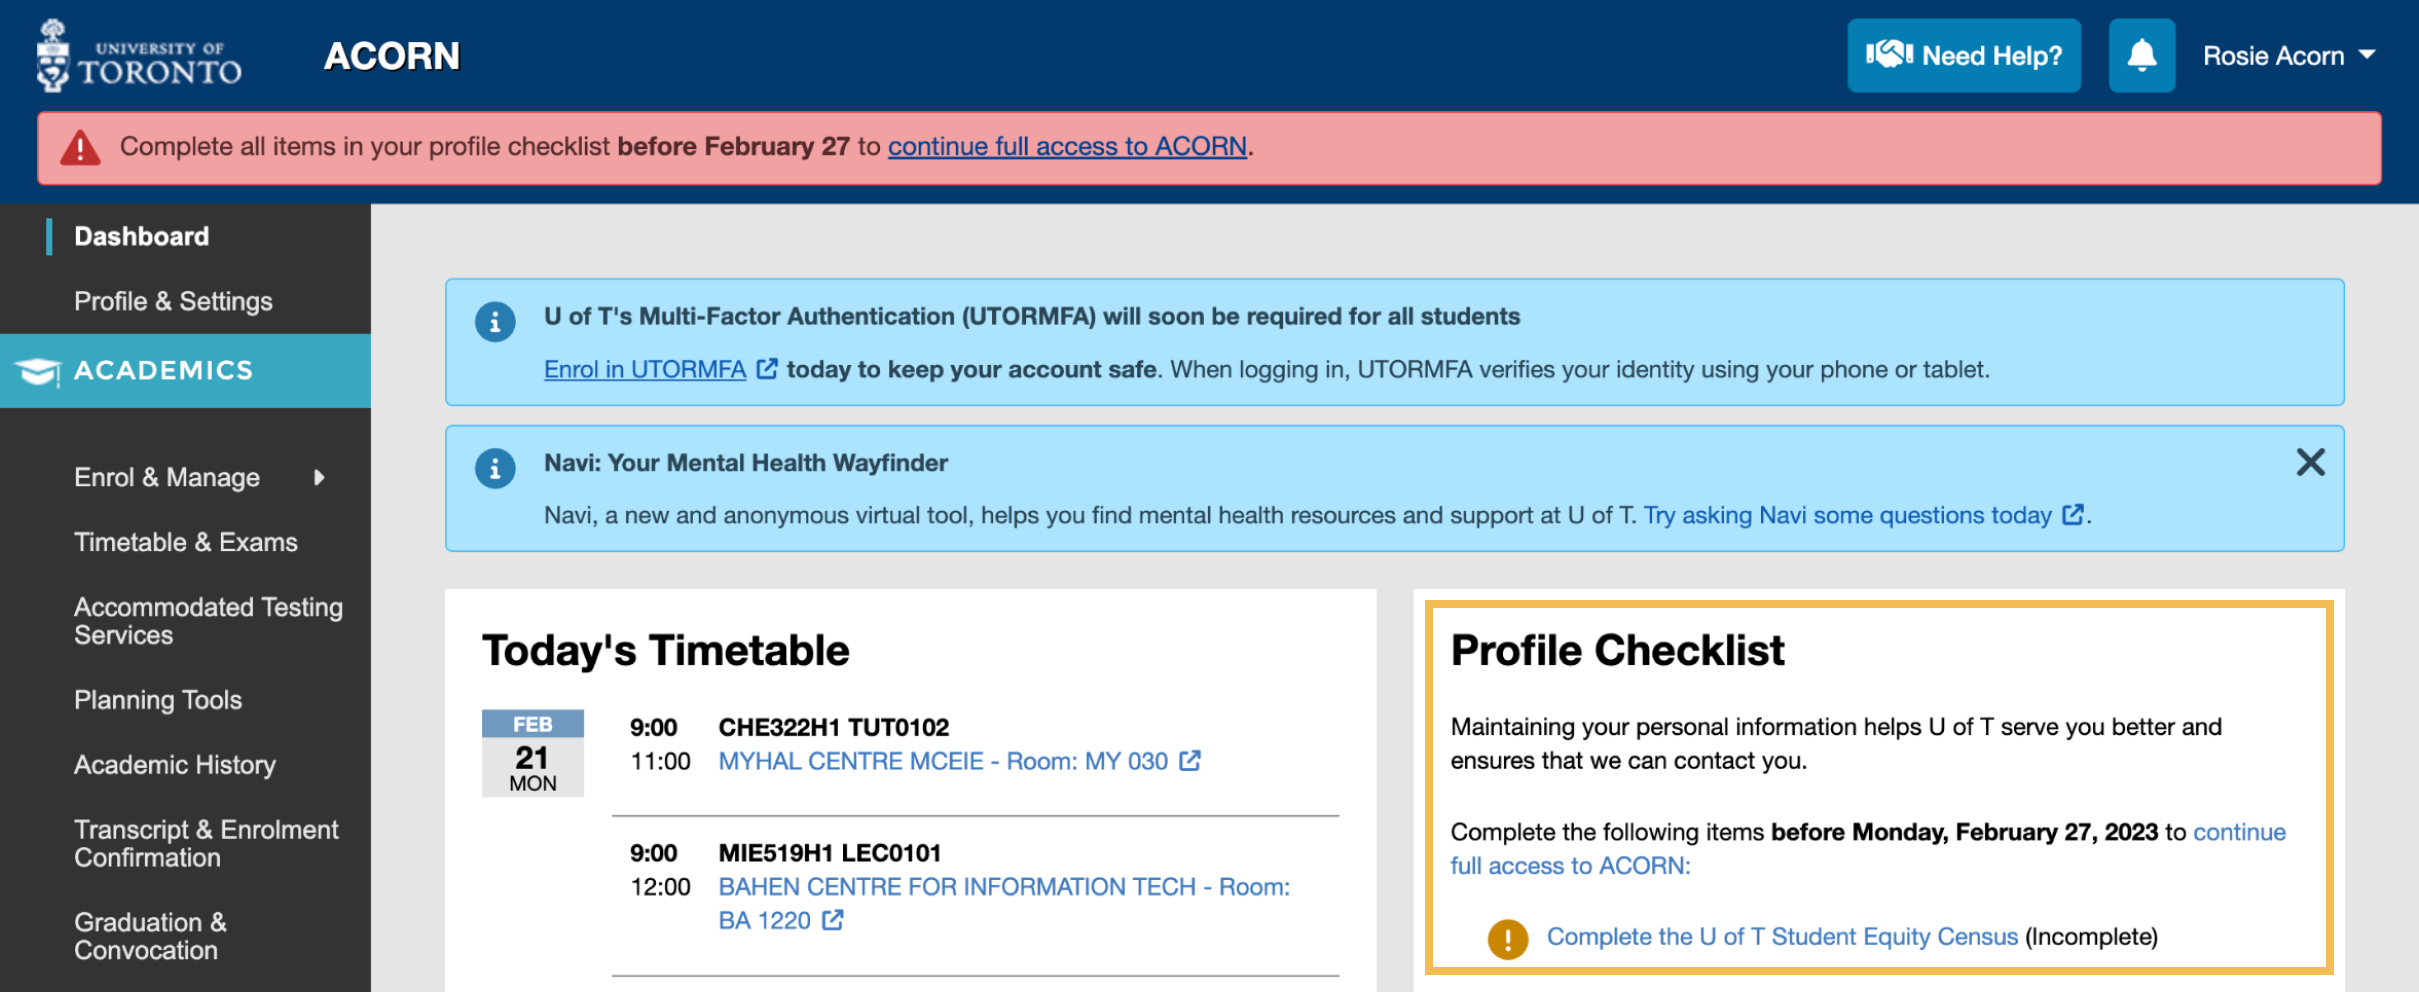
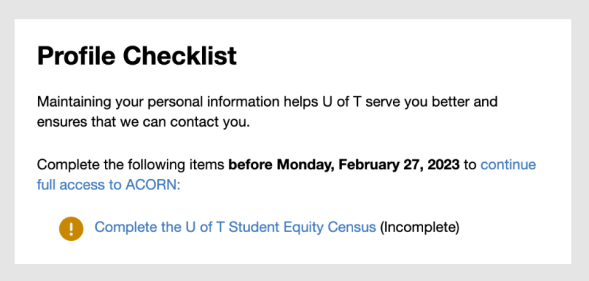
A screenshot of the ACORN Dashboard featuring a red message instructing you to complete your Profile Checklist, and a Profile Checklist with one incomplete item. The deadline is featured in both areas.
For now, the Student Equity Census is the only item on your Profile Checklist. If the deadline passes and you have not completed the census, many areas of ACORN such as course enrolment and your Academic History will be unavailable until you complete it. You will always be able to reach the Need Help, Health & Wellness, Accessibility & Equity and Accommodated Testing Services areas.
Access the Student Equity Census by selecting “Complete the U of T Student Equity Census” within the Profile Checklist. This will take you to the census within the Profile & Settings area. If you have never completed the census before, select the “Get Started” button. If you have an existing incomplete response, select the “Continue Response” button. For more information, read about how to complete the Census.
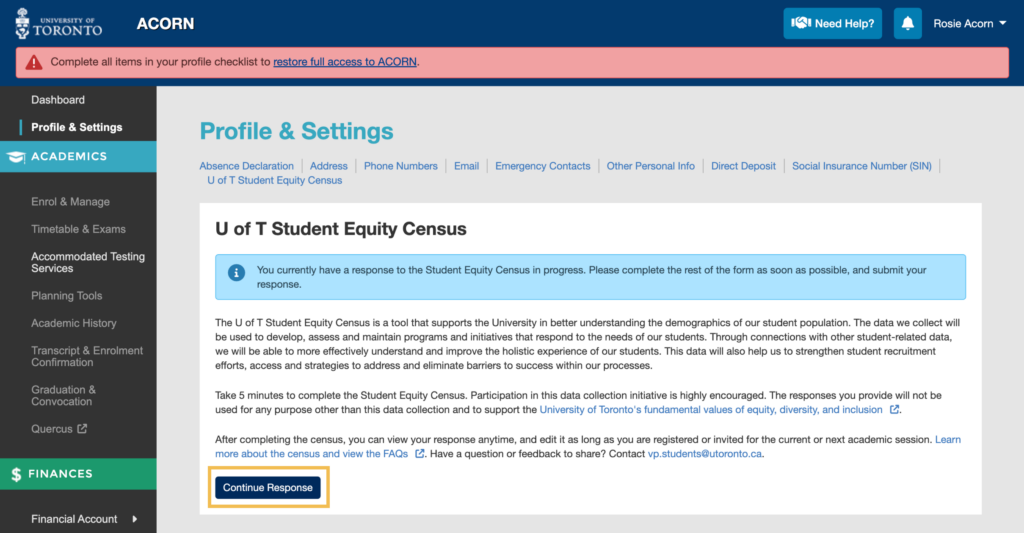
A screenshot of the U of T Student Equity Census page with a highlighted button that reads “Continue Response”.
Once you have answered all required questions on each step, select “Submit Response” on Step 7. You will be taken back to the Student Equity Census page, and the warning message near the top of the page will be gone.
When you return to the ACORN Dashboard, you will notice that your Profile Checklist is complete. Please check your Profile Checklist in ACORN periodically, as new items will be added for you to complete in the future.
Completing Your Checklist After the Deadline
If you have not submitted a response to the Student Equity Census by the specified deadline, many areas of ACORN such as course enrolment and your Academic History will be unavailable. You will always be able to reach the Need Help, Health & Wellness, Accessibility & Equity and Accommodated Testing Services areas.
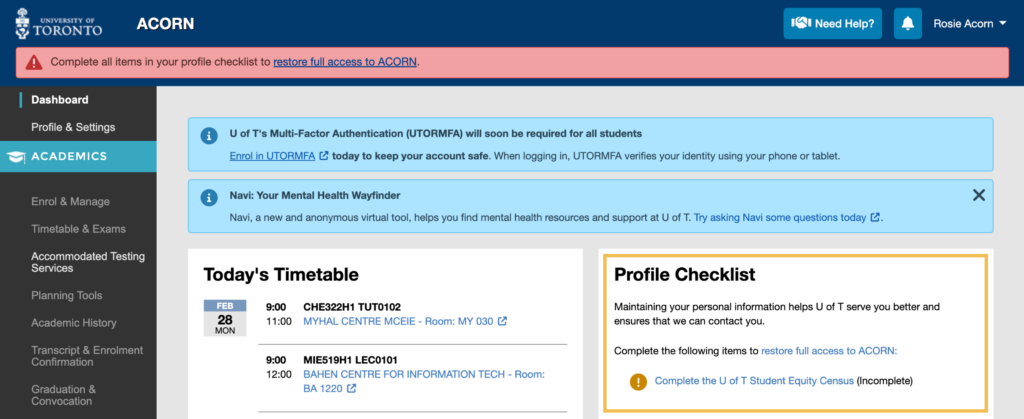
A screenshot of the ACORN Dashboard featuring a red message instructing you to complete your Profile Checklist, a Profile Checklist with one outstanding item, and several inactive links in the main navigation.
The census only takes a few minutes to complete, so you can select “Complete the U of T Student Equity Census” to submit it and restore full access to ACORN. Once you submit your response, your Profile Checklist will be complete and full access to all areas of ACORN will be restored.
Thank you for working with us to keep your profile up to date!
How do I make a request for an Accommodated Test?
Accommodated Testing Services coordinates on-campus and online assessment accommodations for students with disabilities who are enrolled in courses offered on the St. George Campus. You can learn more about Accommodated Testing Services here.
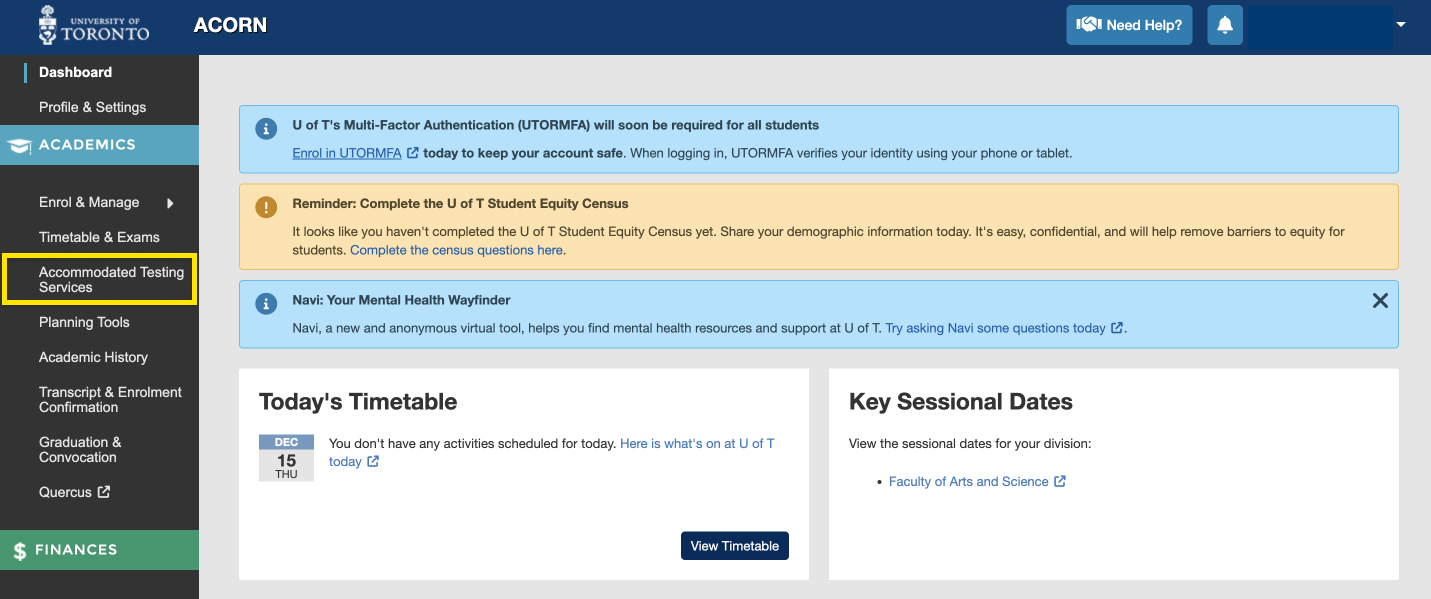
- From the ACORN dashboard, click Accommodated Testing Services under the Academics section of the left-hand navigation menu.
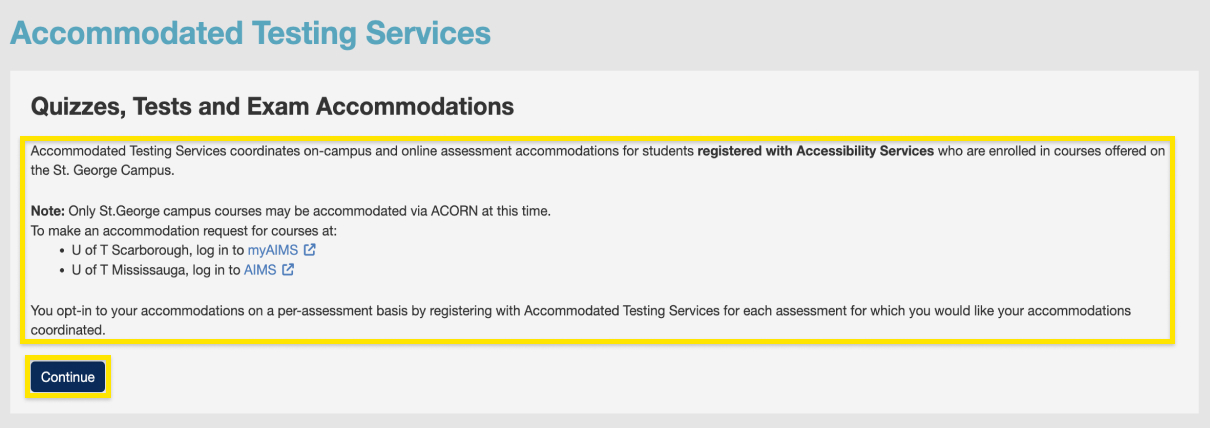
- On the Accommodated Testing Services (ATS) page, you can read an introduction about ATS which includes eligibility requirements. If you would like to make requests for U of T Scarborough or U of T Mississauga, you can click on the links provided which will redirect you to the appropriate pages. If you do meet the eligibility requirements, you can click on the “Continue” button to proceed to the next steps which include requesting an accommodated test and viewing your bookings dashboard.
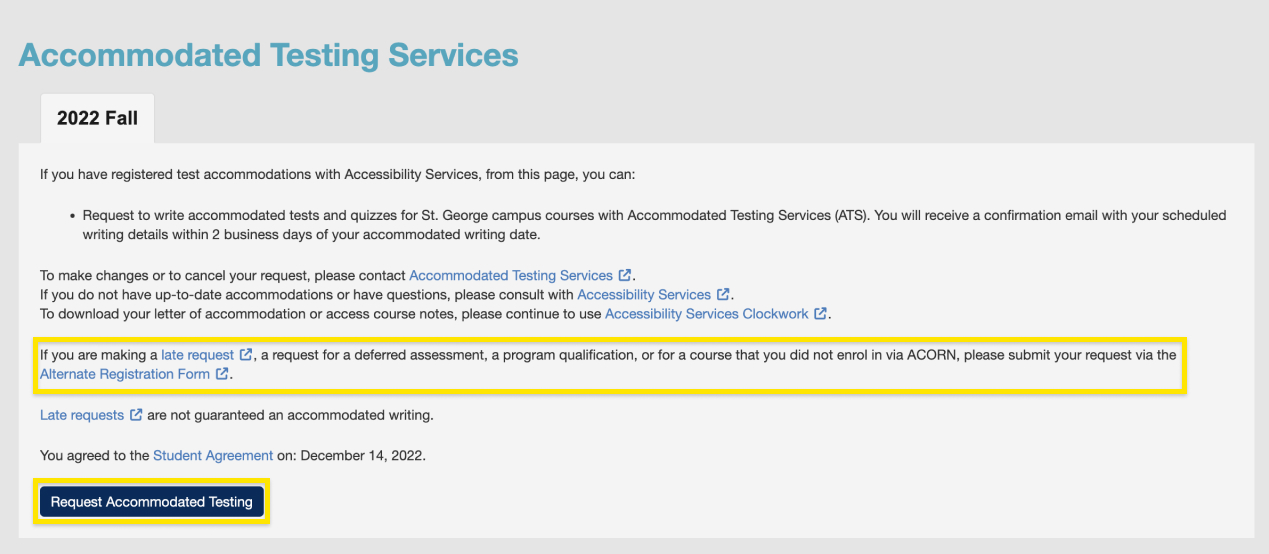
- If you are already registered with Accessibility Services, approved to write quizzes, tests or exams with accommodations and are also registered with Accommodated Testing Services, then you will be able to request to write on-campus or online accommodated tests and quizzes for St. George campus courses by clicking on the “Request Accommodated Testing” button. If you would like to make a request that is late a request, for a deferred assessment, a program qualification, or for a course that you did not enrol in via ACORN, then you will need to submit your request via the Alternate Registration Form.
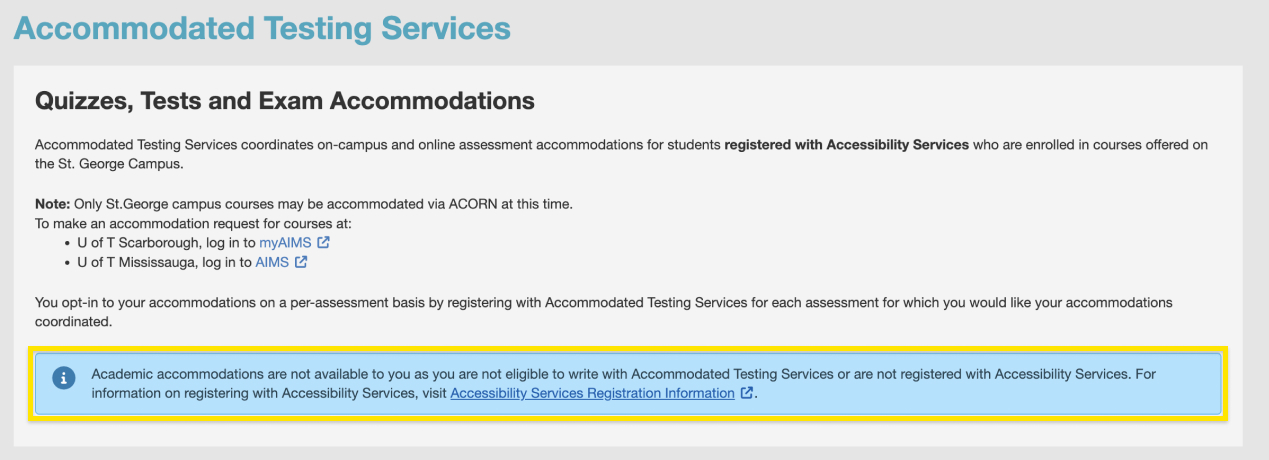
- If you are not registered with Accessibility Services or do not yet have approved accommodations, then you will not be able to proceed with making a request or view your bookings dashboard.
- After you click on the “Request Accommodated Testing” button, you will be asked to complete the form. Keep in mind, this form asks for information about the assessment writing details for the class and not for your requested accommodated details. The first part requires you to complete information about the type of request and activity that you are making the request for. This includes selecting the type of request, choosing a course from your list of registered courses for the current session and selecting whether your instructor has indicated that this assessment must be written in person or not.
- Keep in mind the first part of this question is asking where your instructor said you and your class must write this assessment and not where you would like to write it.
If you have selected a standard assessment and your instructor indicated you must complete this assessment ‘in person, on campus’, then you will be required to write this assessment in person with Accommodated Testing Services (ATS). If your instructor did not indicate that this assessment must be written in person, then you can choose whether you would like to write it in person with Accommodated Testing Services (ATS), or at home or elsewhere.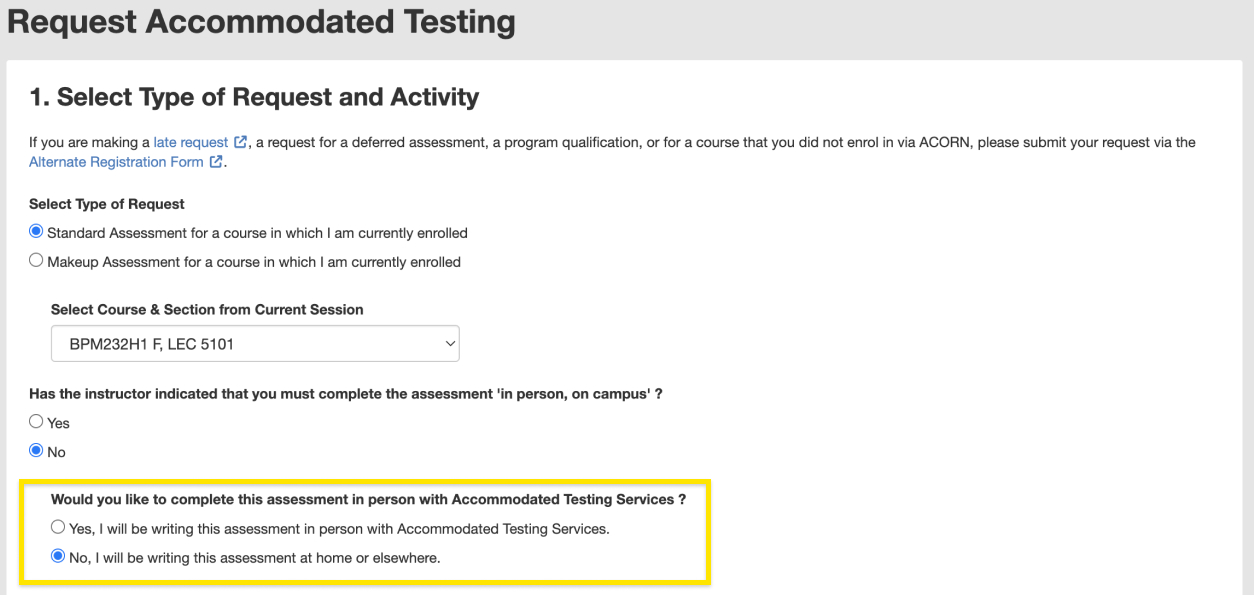
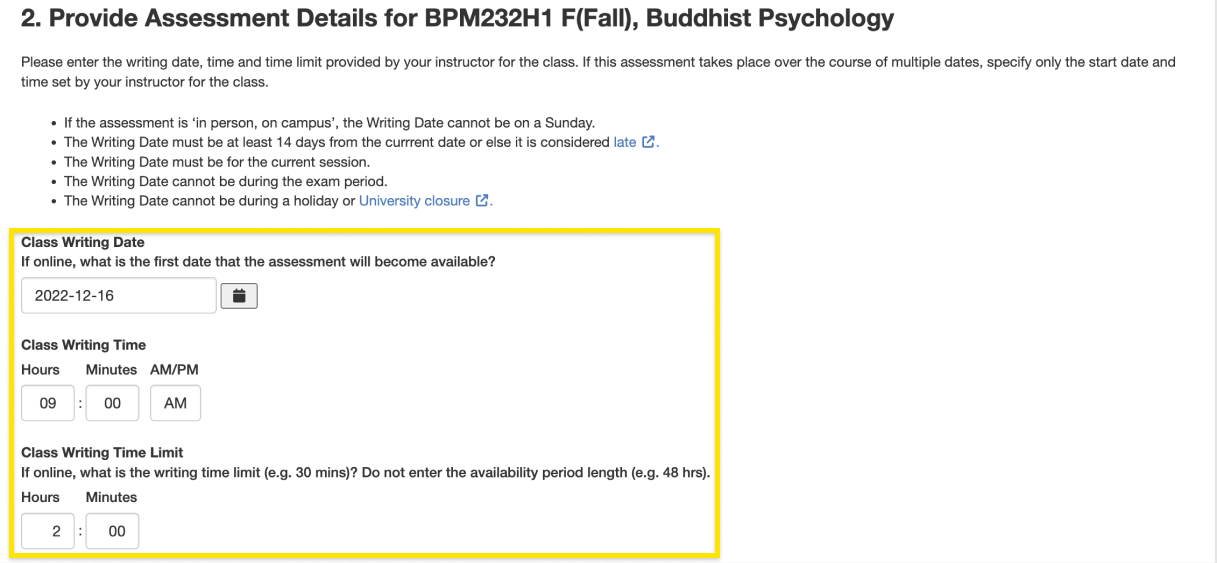
- The next section of the form will ask you to enter the writing details of the assessment including date, time and duration. Please note, if you have selected a Makeup Assessment, then you will be required to enter the date, time and duration the instructor indicated you must write this assessment.
- If you have selected a Standard Assessment then enter the details that the instructor has indicated for you and your class.
Keep in mind these questions are asking you to enter the class writing details for Standard Assessments or details arranged by the instructor for Makeup Assessments and not when you would like to write this assessment.
E.g., My instructor indicated that I have an in-person assessment on September 14th at 2:00pm for a duration of 2 hours. You will enter the following for this scenario:
Class Writing Date: September 7th
Class Writing Time: 2:00pm
Class Writing Time Limit: 2 hours - Also, if your assessment takes place over the course of multiple dates, i.e., has an end date that is different from the start date, then only enter the start date and time for when this assessment will become available.
E.g., My instructor indicated that I have an online assessment that will be available between September 14th at 9:00am to September 16th at 11:59pm. I can write this assessment anytime within that time period but once I start this assessment then I have 3 hours to complete it. You will enter the following for this scenario:
Class Writing Date: September 14th
Class Writing Time: 9:00am
Class Writing Time Limit: 3 hours - Additionally, only enter the duration of the assessment and not the period for when this assessment is available. For example, do not enter 48 hours, in the “Class Writing Time Limit” section for an assessment that has a 2-day availability period.
E.g., My instructor indicated that I have an online assessment that will be available between September 14th from 9:00am to September 16th at 11:59pm . I can choose to complete this assessment any time within that period and there is no time limit. You will enter the following for this scenario:
Class Writing Date: September 14th
Class Writing Time: 9:00am
Class Writing Time Limit: the time you think it will take to complete this assessment (up to 23 hours and 59 mins).
- If you have selected a Standard Assessment then enter the details that the instructor has indicated for you and your class.
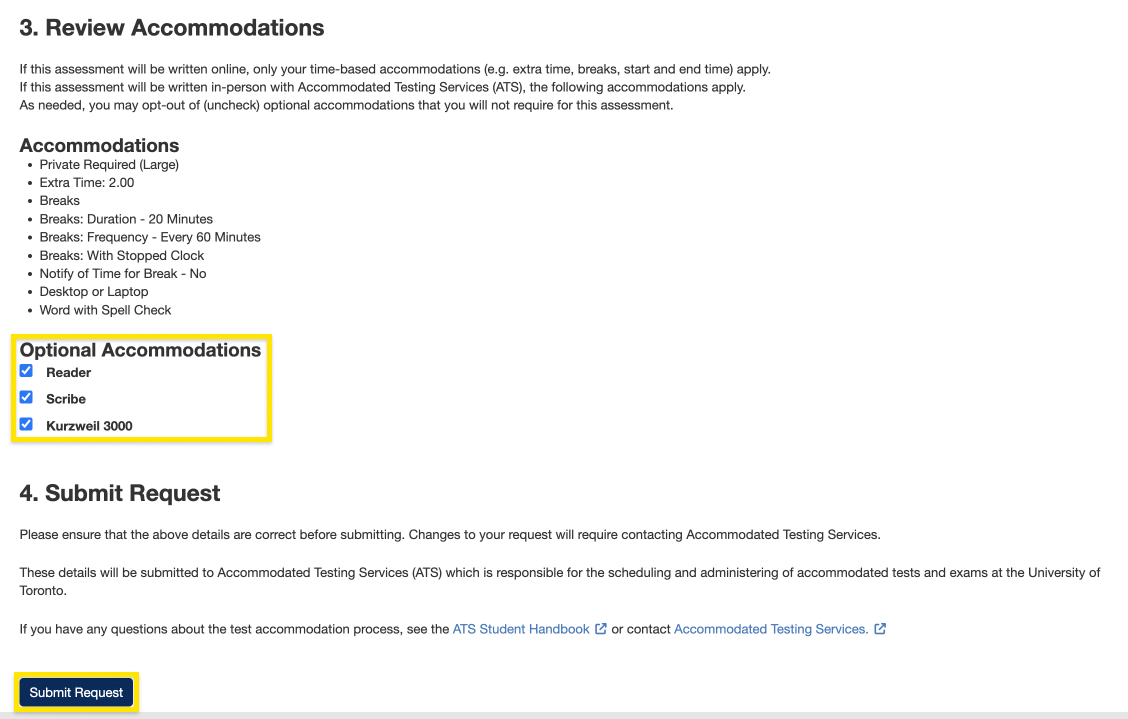
- After completing this information, you can review your accommodations and submit your request by clicking “Submit Request”. If you have any optional accommodations, then you can opt in or out for this request by clicking on the checkbox.
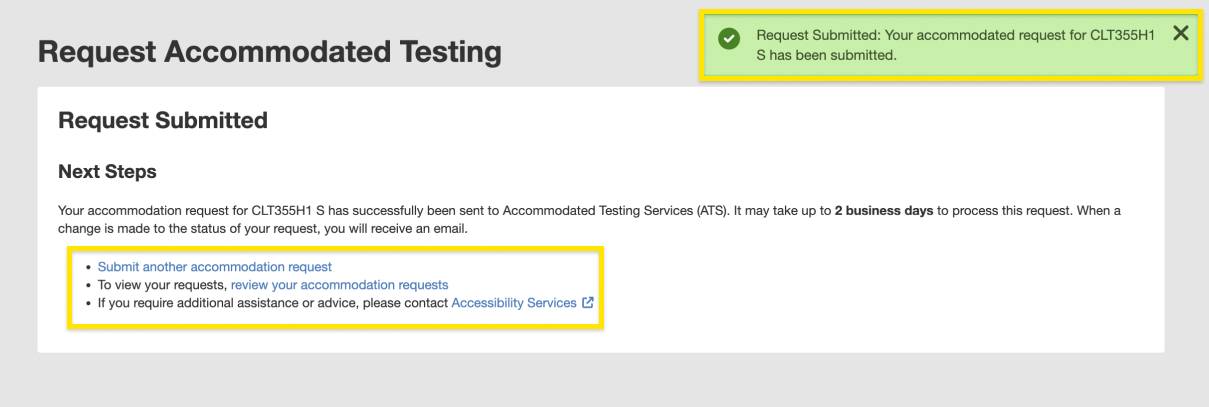
- If your accommodated testing request was created successfully, you will receive a success notice at the top-right corner of your screen. You can now submit another request or navigate to your bookings dashboard.
- If you are making another request for a booking that you have previously made, then you will receive an error message instead. Please follow the instructions in the error message.
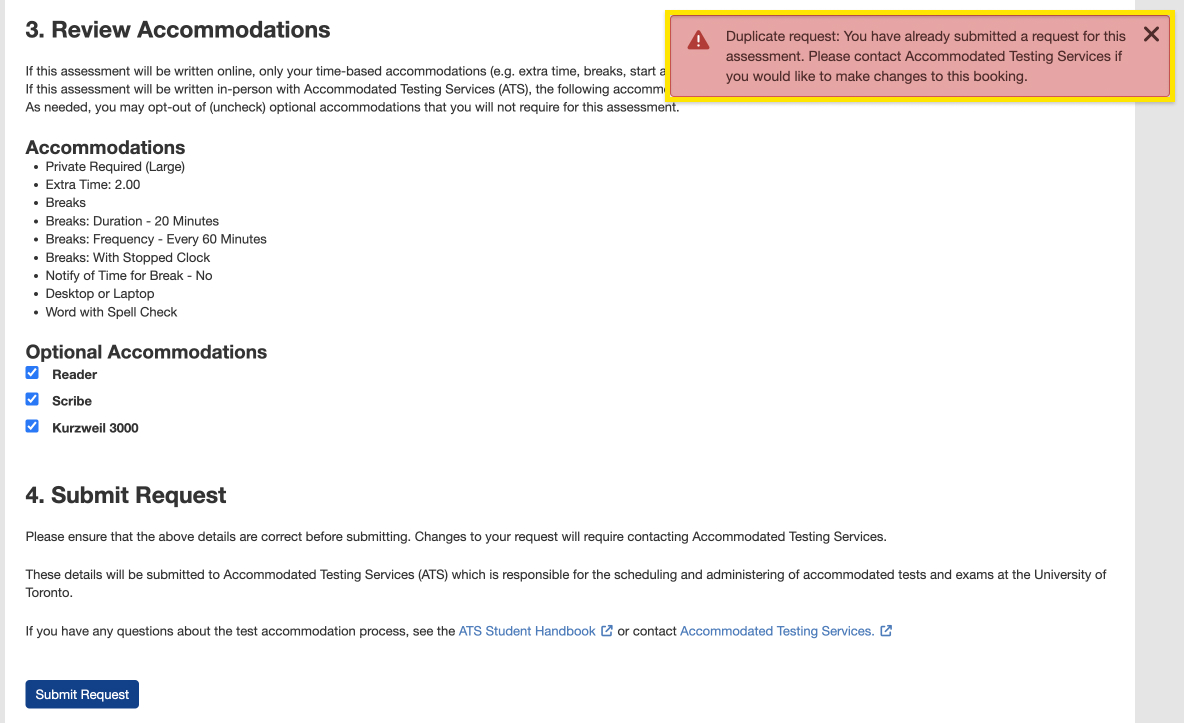
- Keep in mind the first part of this question is asking where your instructor said you and your class must write this assessment and not where you would like to write it.
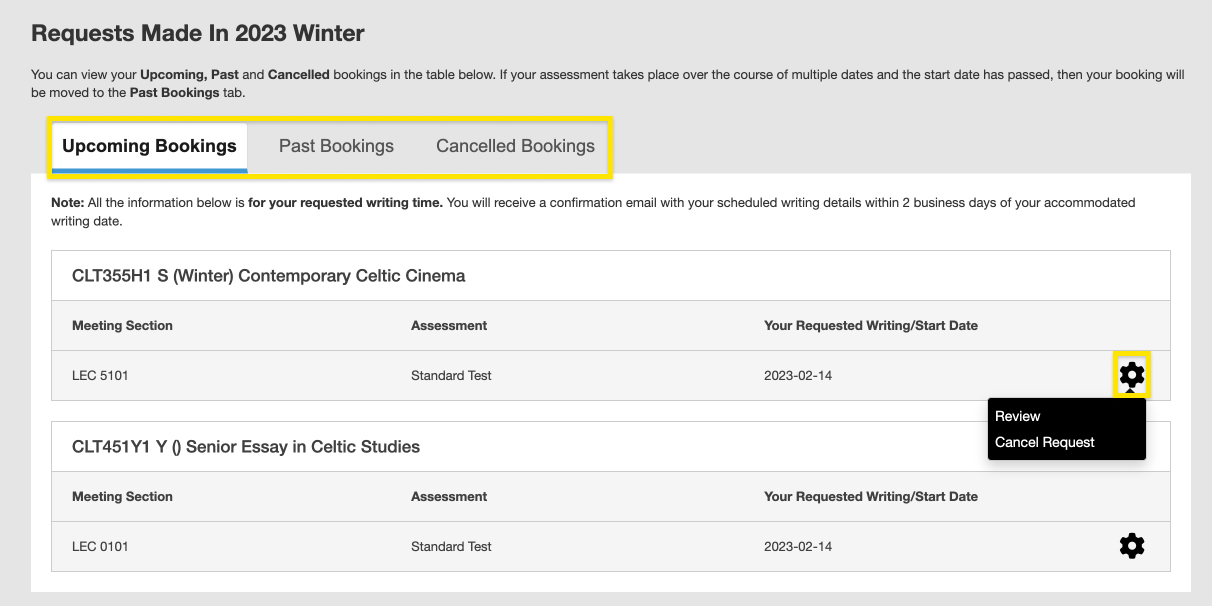
- If your booking is successful and you return to your dashboard, then you can see your upcoming, past or cancelled bookings in the table by clicking through the different tabs. To see more options for your booking you can click on the settings icon.
How do I complete the U of T Student Equity Census?
The U of T Student Equity Census is a demographic data collection initiative that will be used to develop, assess, and maintain programs and initiatives that respond to the needs of our students. You can learn more about the U of T Student Equity Census and view the FAQs here.
- If you have not yet completed the U of T Student Equity Census and are registered for the current academic session, there will be a blue or yellow notification towards the top of the ACORN Dashboard. The link in that notification message will direct you to the U of T Student Equity Census page in ACORN.
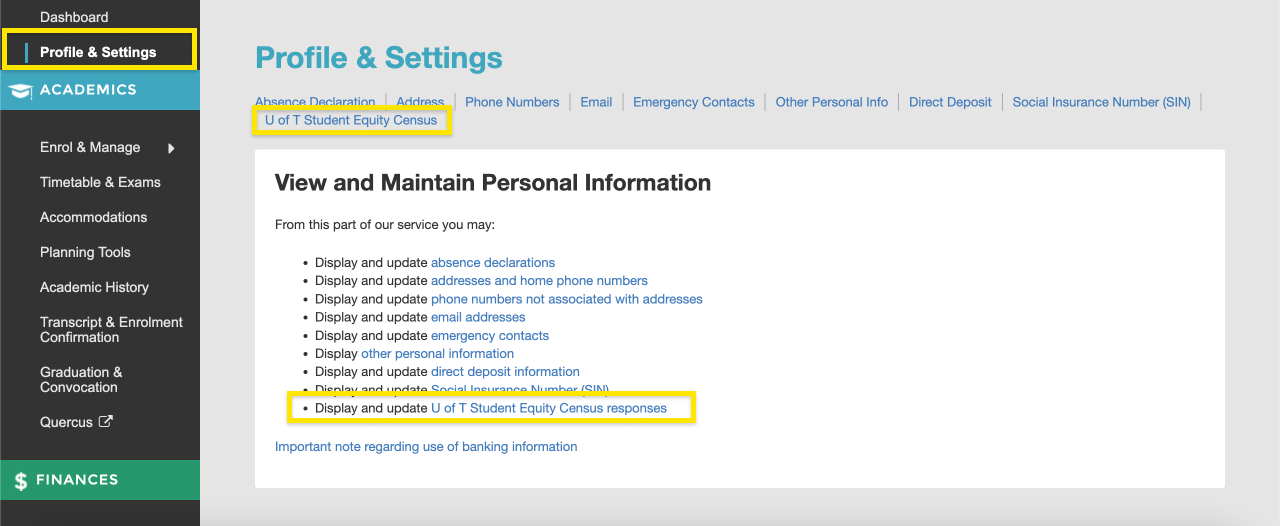
- You can also access the U of T Student Equity Census page by going to “Profile & Settings” from the main navigation menu and selecting “U of T Student Equity Census” towards the top of the page or in the card.
- On the U of T Student Equity Census page, you can read an introduction about the census and select the “Get Started” button.
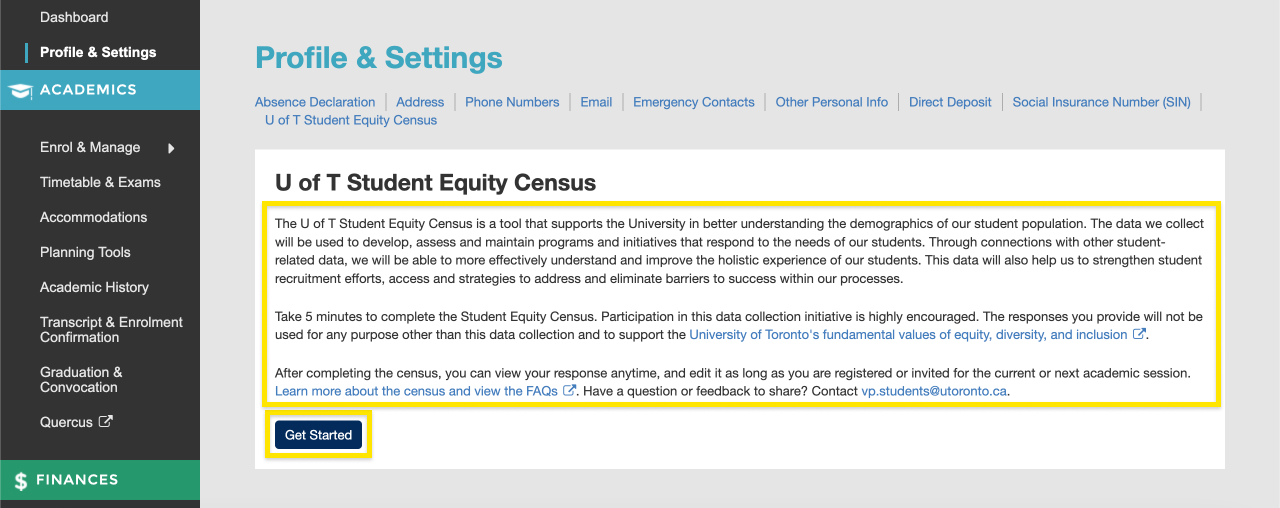
The “U of T Student Equity Census” page in the “Profile & Settings” area containing instructions on how to complete the Census.
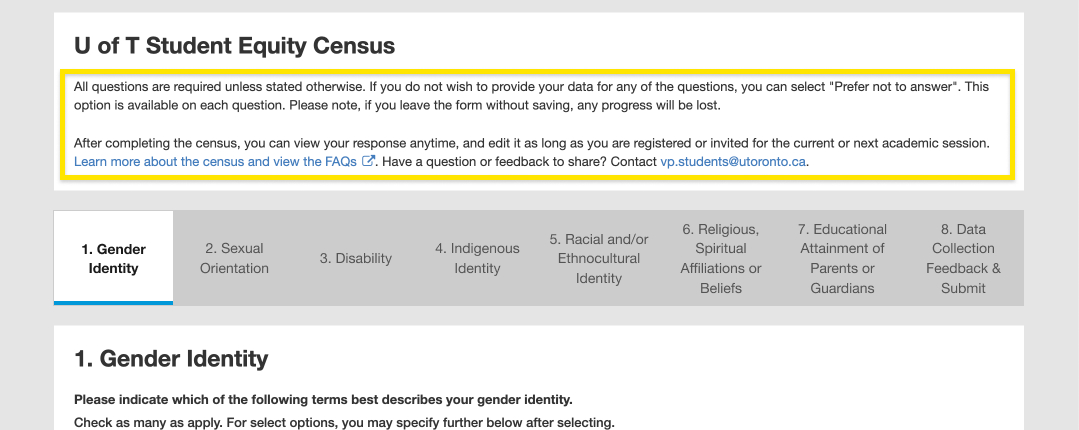
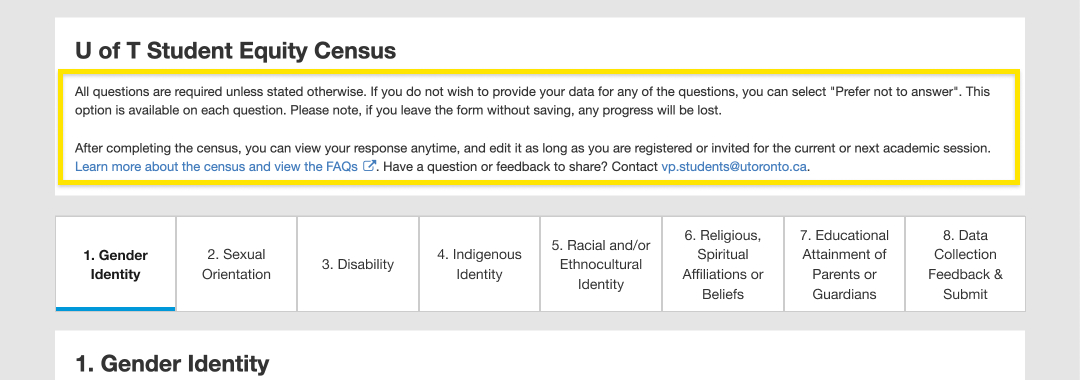
- You will be directed to the first page of the census form. At the top of every page, you can read instructions on how to answer the questions and complete the form.
- All questions are mandatory unless stated otherwise, so you will need to complete all the questions within each step before selecting the “Save & Continue” button to progress. This will save the answers that you’ve provided so far in case you navigate away from the Census.
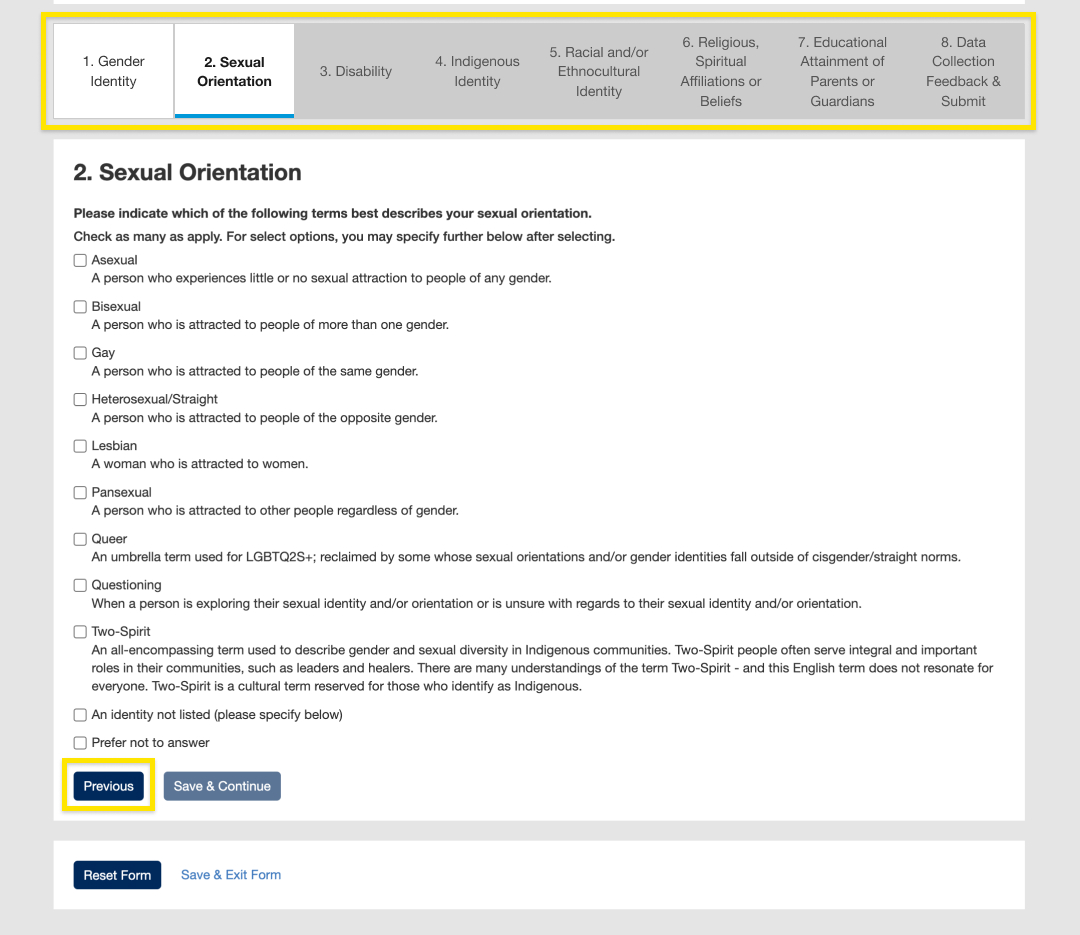
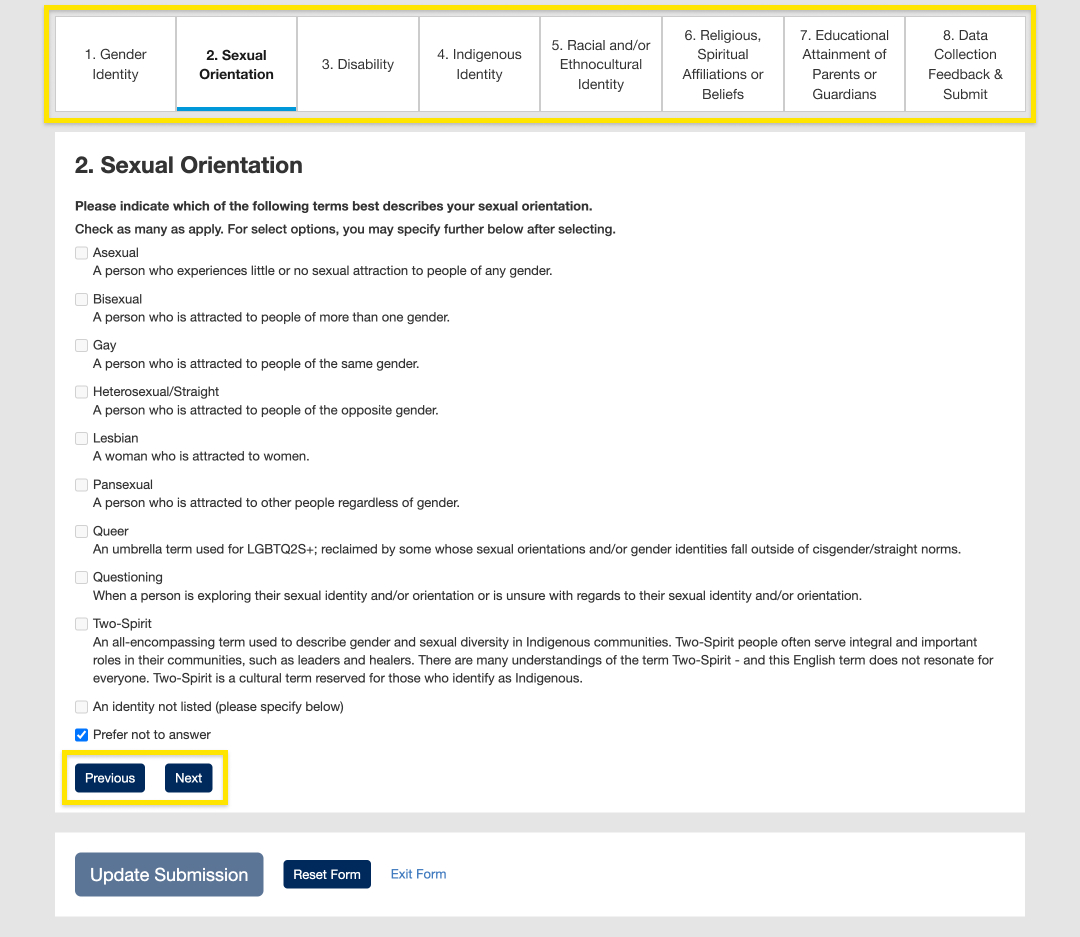
- As you progress through the form, you can select “Previous” or use the navigation towards the top of the form to go to the previous page.
- Depending on your answers to certain questions, additional mandatory questions may appear.
- If you don’t want to answer a question, select “Prefer not to answer”. If you select this option, you will not be able to select other options for the question.
- To erase all of your answers and restart the form, select “Reset Form”. Your answers will be removed, and you will be directed to the first page of the form where you can start over. This action will not override any saved progress until you select either “Save & Continue” or “Save & Exit”.

The “Reset Form” button that appears on every section in the Census when submitting a response for the first time.
- To navigate away from the census, select “Save & Exit Form”. This will redirect you to the U of T Student Equity Census home page where ACORN will inform you that you currently have a response in progress. Please ensure that you return and complete the form as soon as possible.

The “Save & Exit Form” button that appears on every section in the Census when submitting a response for the first time.
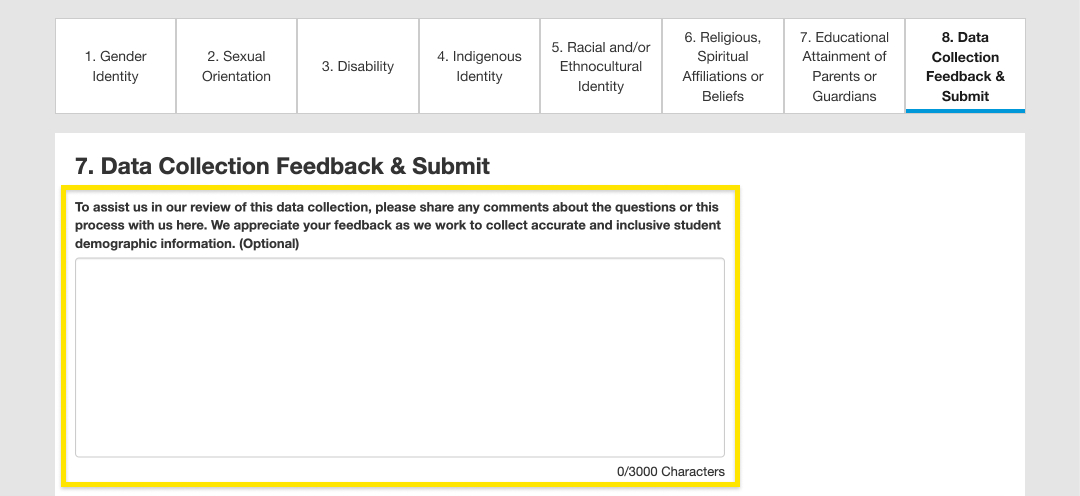
- When you’ve reached the final page of the form (8. Data Collection Feedback & Submit), you can choose to provide the U of T Student Equity Census team with any feedback regarding your experience with the census. This field is optional.
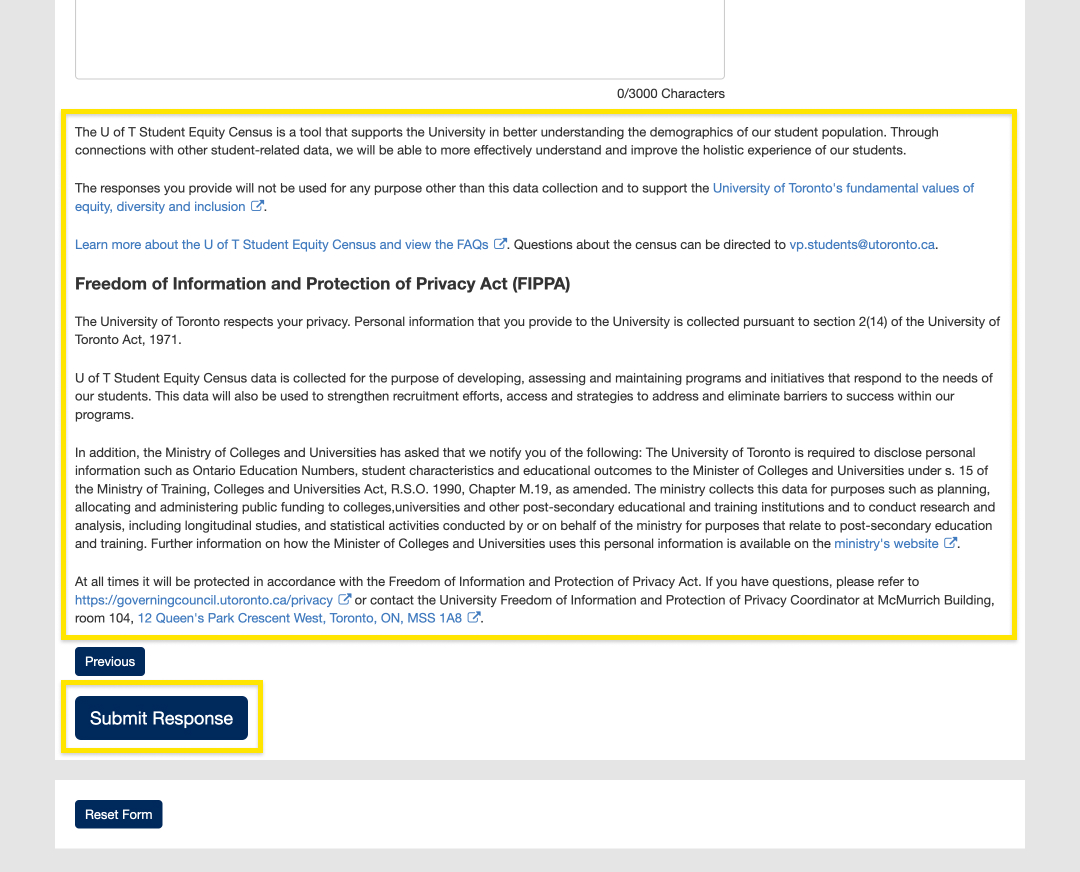
- Once you’ve answered all the required questions in the census and read the important information on the page, select “Submit Response” to save and submit your response.
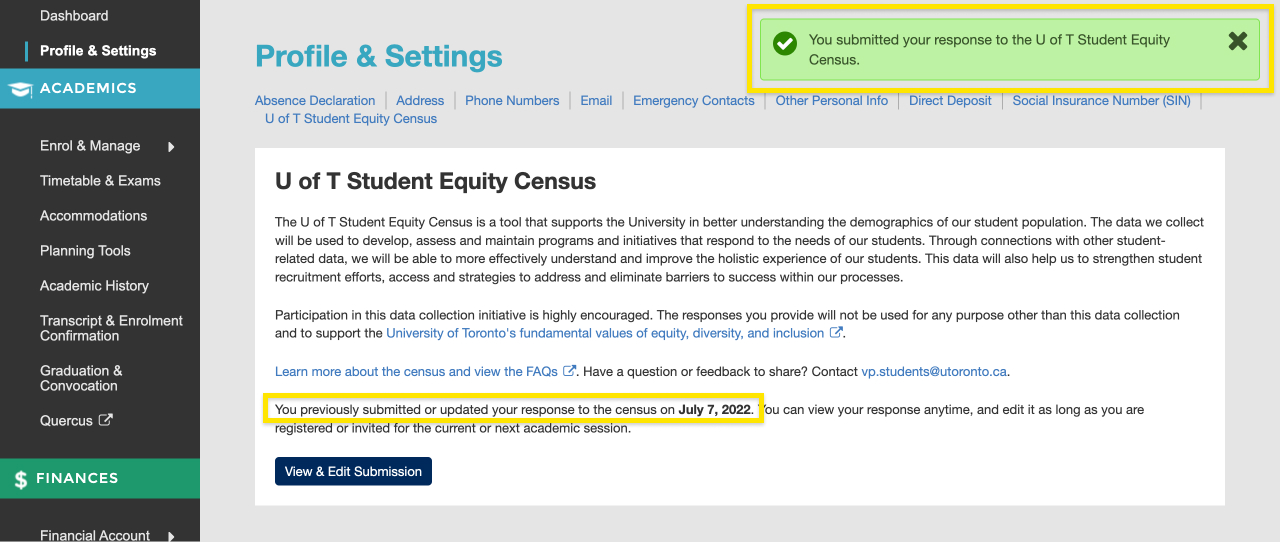
- If your response was submitted successfully, a success toast will appear towards the top of the page. You will be directed to the U of T Student Equity Census home page where you can view your response anytime and edit it as long as you are registered for the current academic session.
How do I view or edit my previous response to the U of T Student Equity Census?
Once you’ve completed and submitted a response, you can return to the U of T Student Equity Census page in ACORN to view it anytime. You may edit your response as long as you are registered for the current academic session.
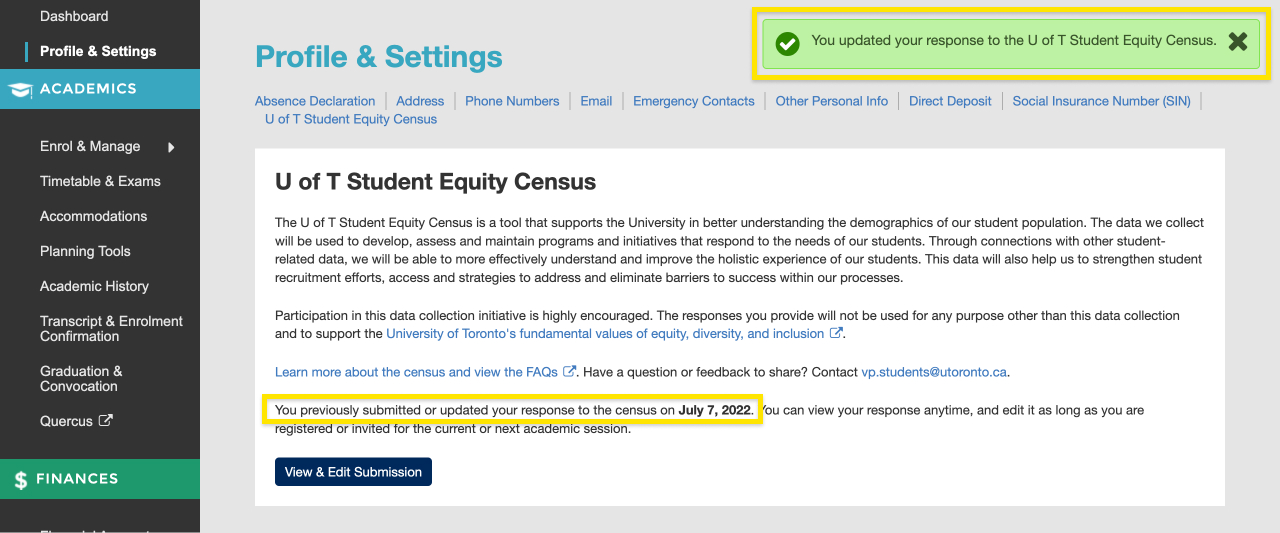
- On the U of T Student Equity Census page in ACORN, you can see the date when you last submitted or updated your response. To view and/or edit it, select the “View & Edit Submission” button (for non-registered students, select the “View Submission” button).
- You will be directed to the first page of the census form. At the top of every page, you can read instructions on how to edit and answer the questions. You can edit any of your previous answers to the questions. If you remove an answer (e.g., removing all selected options or removing a typed response), you will not be able to progress to the next pages in the form until you have selected or typed a new response.
- You can use the navigation at the top of the form to navigate to any page, or select “Back” or “Next” to go to the previous or next page.
- To erase all of your answers and restart the form, select “Reset Form”. Your answers will be removed, and you will be directed to the first page of the form where you can start over. This will not override your previous submission until you answer all the questions and select “Update Submission”.

- To navigate away from viewing or editing your response, select “Exit Form”. This will re-direct you to the U of T Student Equity Census home page. If you have made any changes to your response, your response will not be updated to reflect those changes unless you select “Update Submission”.

- You can use the navigation at the top of the form to navigate to any page, or select “Back” or “Next” to go to the previous or next page.
- Once you’ve finished making changes, select “Update Submission” to save and submit your response. The “Update Submission” button appears on every page of the form and will submit any changes you have made on every page.

- If your response has updated successfully, you will be directed to the U of T Student Equity Census home page and see a success notice at the top-right corner of your screen as well as the date you last updated your response.
How do I get help with academic or financial issues?
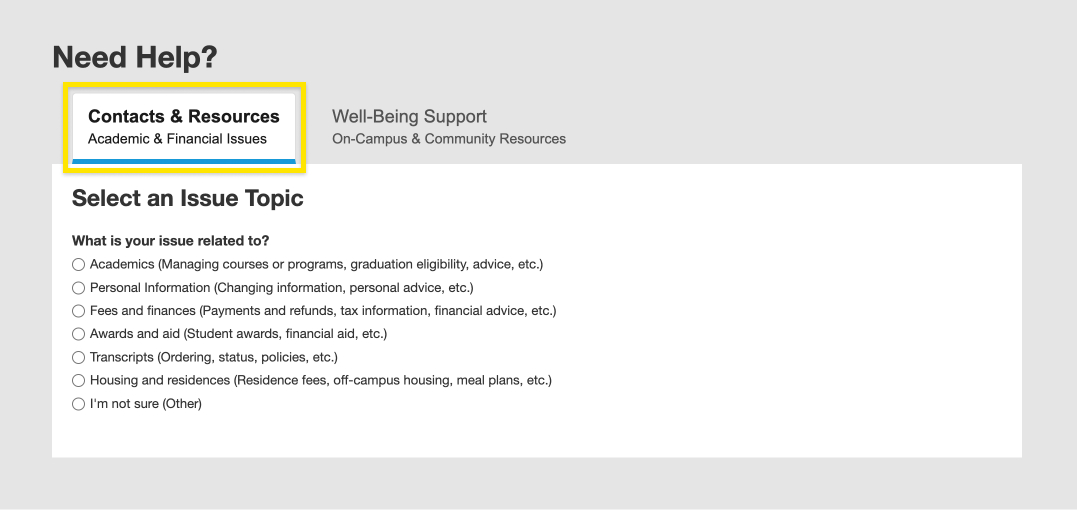
If you have questions regarding academics, finances, and anything else at the University, the “Contacts & Resources” tab on ACORN’s “Need Help?” page directs you to the appropriate office. This page also provides links to helpful resources that may answer your questions.
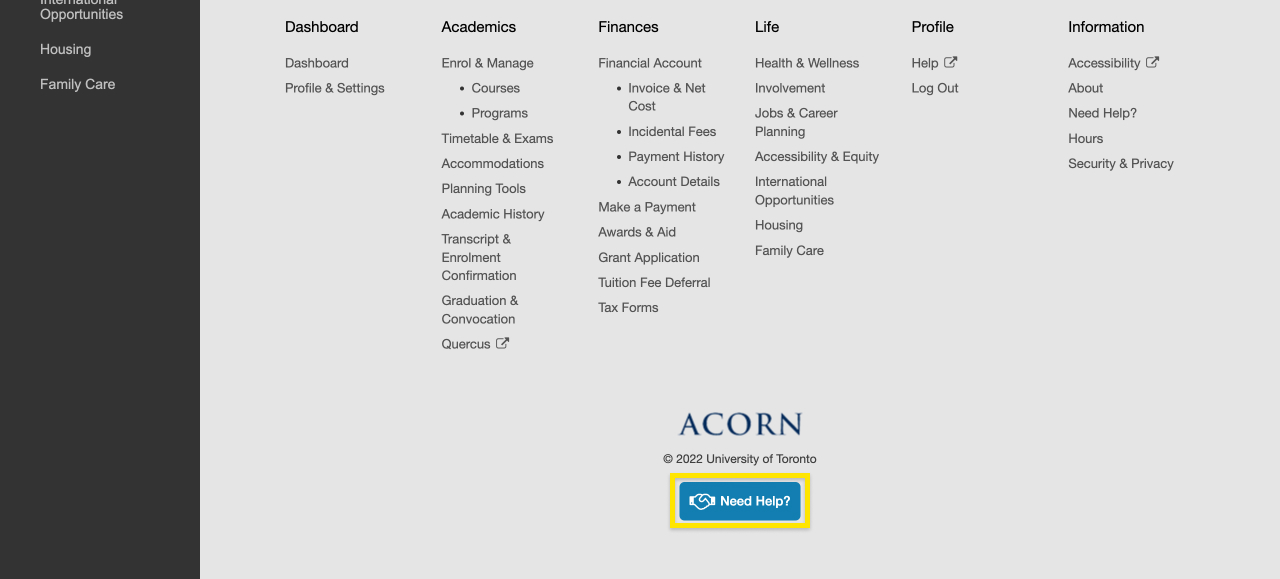
- First, after logging into ACORN, select the “Need Help?” button located towards the top or bottom of the page.
- Next, make sure you are on the “Contacts & Resources” tab.
- Select the topic that relates to your question or issue. Some topic categories have more specific options underneath that you can choose from. If you’re not sure what topic your question or issue falls under, select “I’m not sure”.
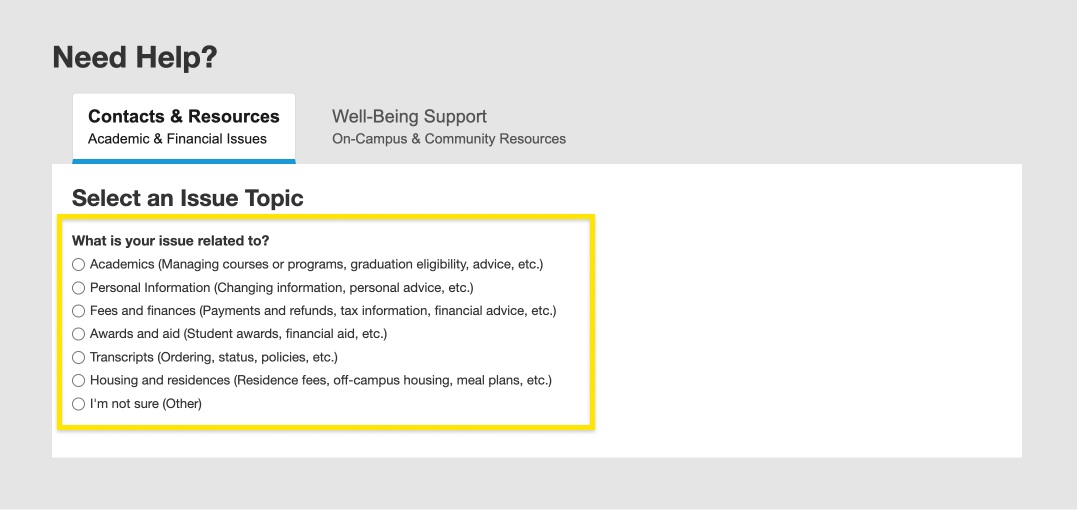
- Depending on the topic you choose, you will be directed to different offices to contact and provided with helpful links and resources about your issue.
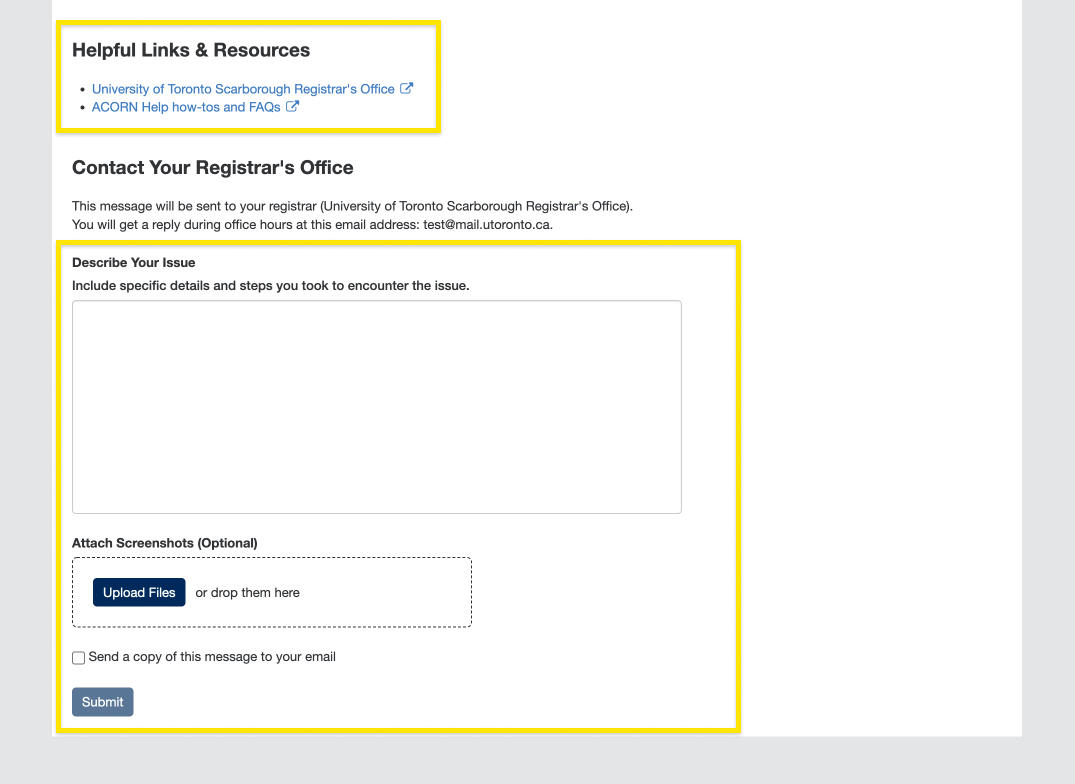
Contacts for each topic:- Academics, Personal information, Financial account, Financial advice, or I’m not sure: Your registrar is your first stop when it comes to academic and financial matters in the University, and you can email your Registrar’s Office directly in ACORN, or by finding their website from this list of registrars. Please note, if you have more than one registrar, you will need to select which registrar to contact. You can describe your issue and upload relevant screenshots or attachments. Once you’re done, you can choose whether you’d like a copy of the email and select submit to send the email.
- Payments, Tax receipts and information, Student awards, Financial aid, or Transcripts: You will be directed to Enrolment Services’ Service Now form where you can follow instructions to submit a ticket regarding your issue.

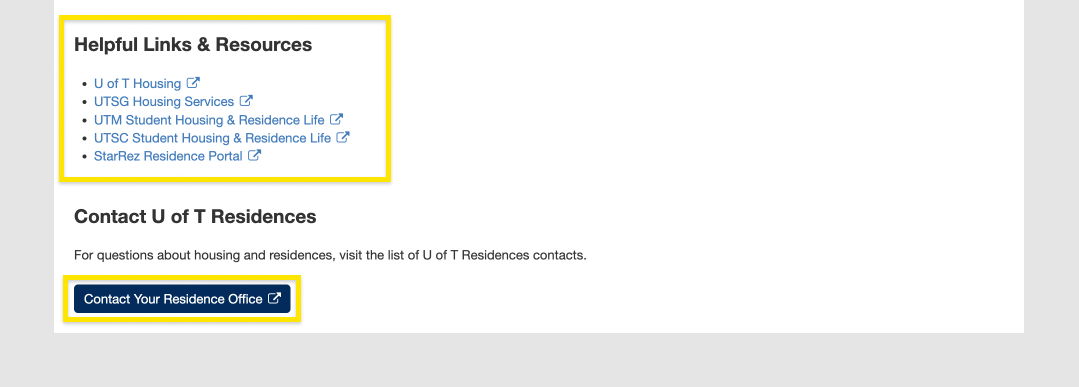
- Housing and residences: You will be directed to a list of residence offices with their emails and phone numbers.
- Academics, Personal information, Financial account, Financial advice, or I’m not sure: Your registrar is your first stop when it comes to academic and financial matters in the University, and you can email your Registrar’s Office directly in ACORN, or by finding their website from this list of registrars. Please note, if you have more than one registrar, you will need to select which registrar to contact. You can describe your issue and upload relevant screenshots or attachments. Once you’re done, you can choose whether you’d like a copy of the email and select submit to send the email.
How do I filter the search results?
In the Search for Courses area, you can select a specific course, enter a keyword, or select specific departments.
Moreover, you can click on the “Show More Filters” link which will display several more filters to help you narrow down your search results. For example, you can select specific Breadth Requirements, or filter by Delivery Mode, Course Level, and any Time Preference.

