How-to
A step by step guide to help you accomplish what you need to get done.
Course Enrolment
- From the ACORN Dashboard, select “Grants, Aid & Awards” on the main navigation menu. Alternatively, select “View My Awards” on the Dashboard Finances card.
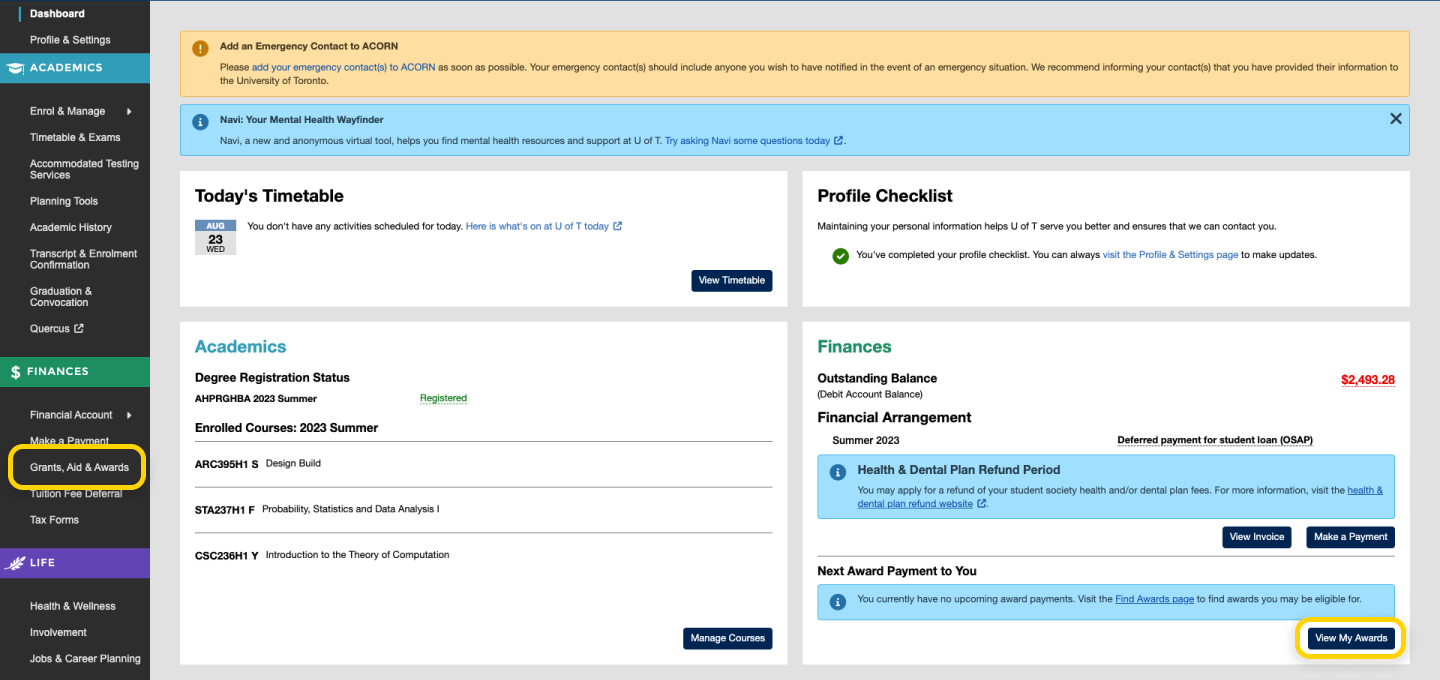
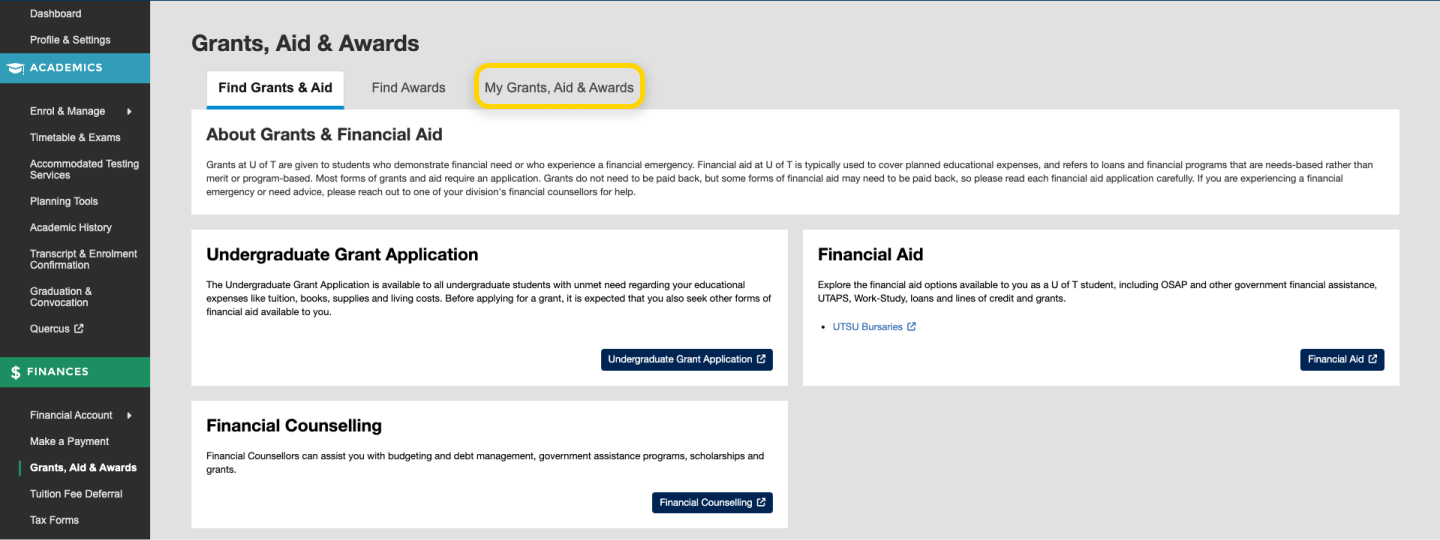
- You will be taken to the My Awards screen. If you selected the “Grants, Aid & Awards” navigation link, select the “My Grants, Aid & Awards” Tab towards the top of the screen to get to My Grants, Aid & Awards.
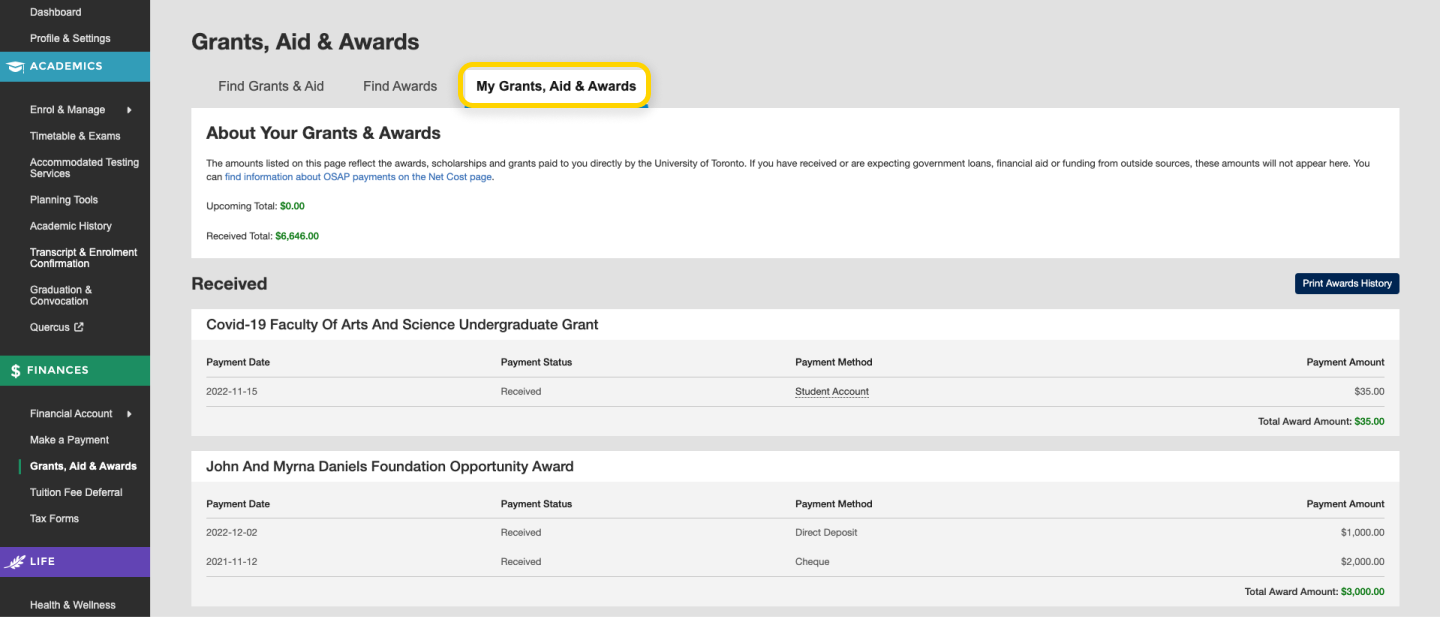
- If you have any received grants, aid or awards, you will see individual payments listed on this screen along with details like payment date, payment status, payment method and payment amount. Some awards are disbursed in multiple installments. If you have an award for which you have received at least one payment, you will see future payments for that award in the “Upcoming” section. Please note that changes to your registration status may affect your eligibility to receive these future payments.
Instructional video: All campuses
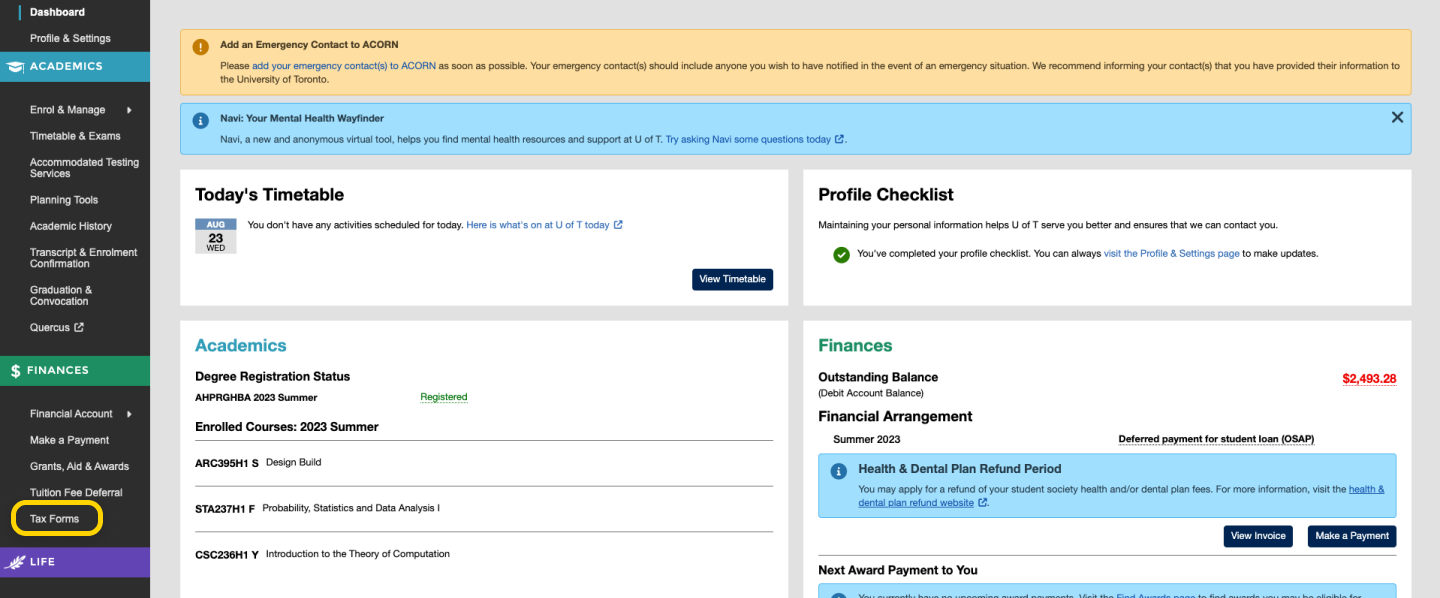
From the ACORN dashboard, select “Tax Forms” on the main navigation menu under Finances.
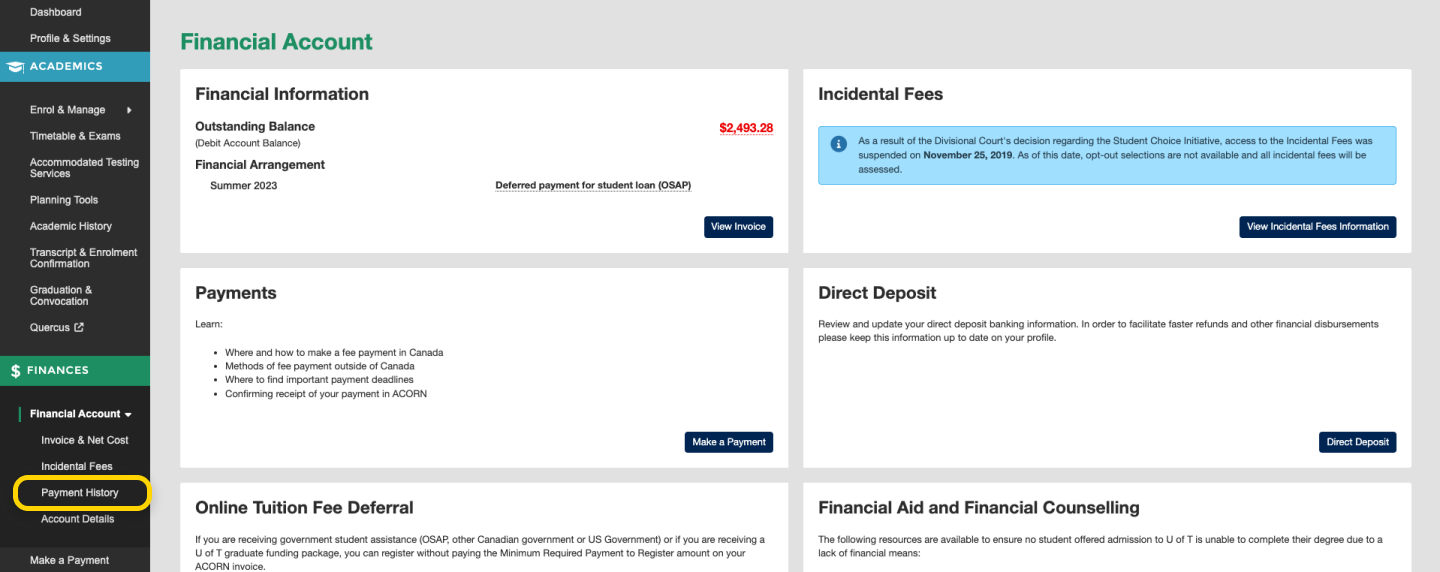
- From the ACORN dashboard, select ‘Financial Account’ on the main navigation under Finances.
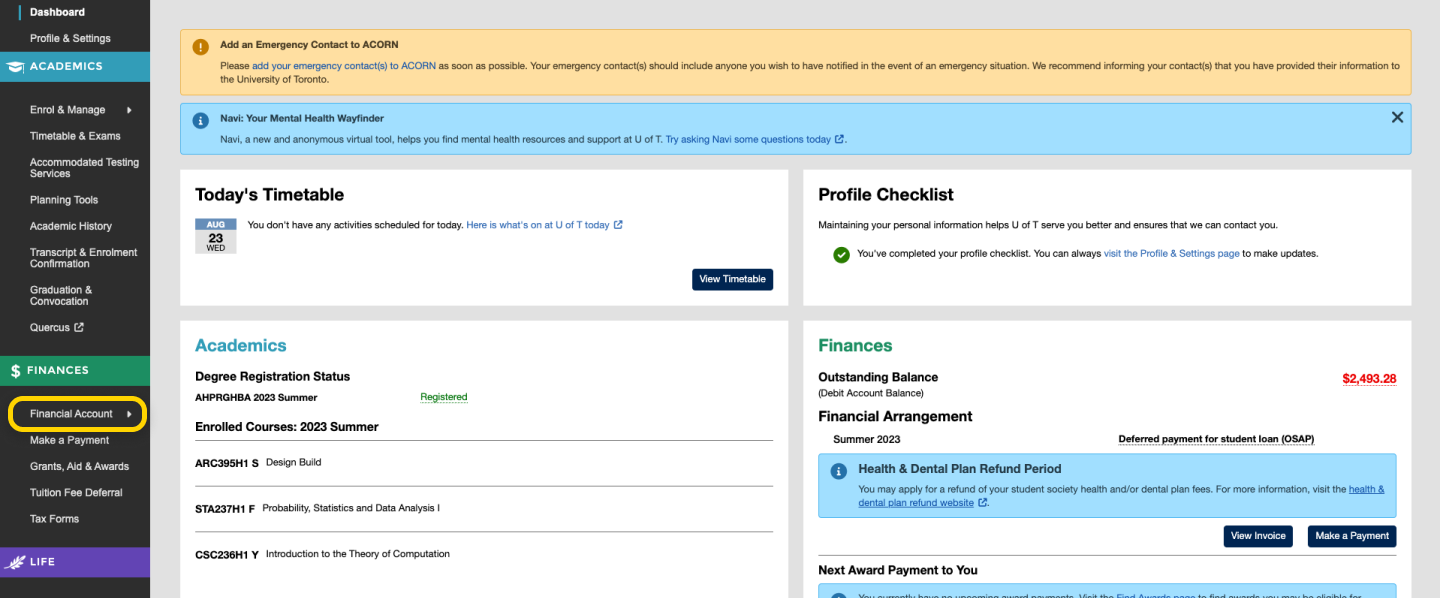
- Select ‘Payment History’ on the sub list of items under the Financial Account menu heading.
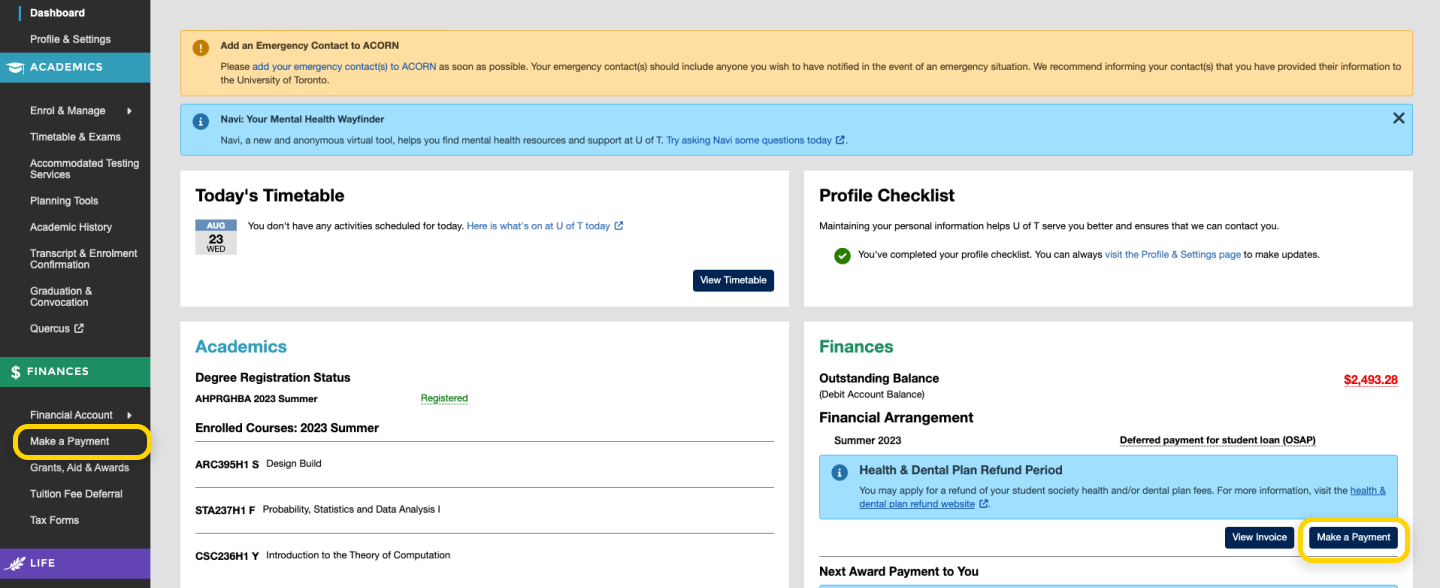
- From the ACORN dashboard, select the “Make a Payment” link on the main navigation or the “Make a Payment” button within the Finances card.
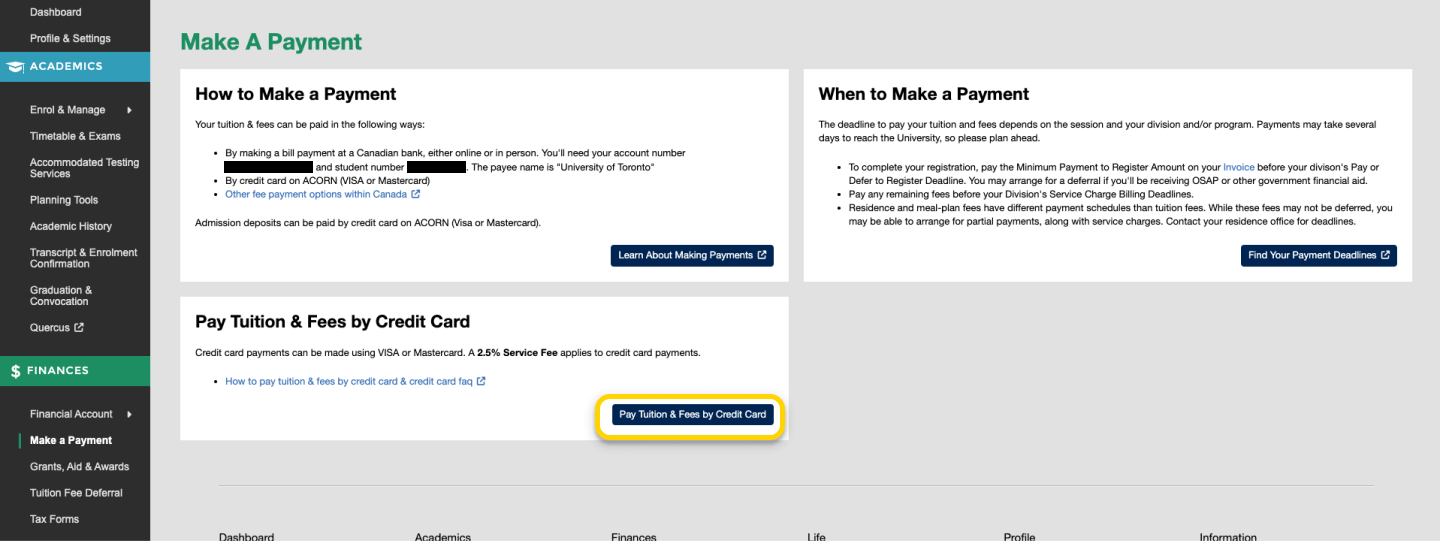
- You will arrive on the Make a Payment Page, which contains information about different ways to pay your fees, as well as payment deadlines. To begin the credit card payment process, select the “Pay Tuition & Fees by Credit Card” button. Keep in mind that a 2.5% Service Fee—charged by and paid to the payment service Moneris—will apply to credit card transactions.
- After you have read the instructions on the Credit Card Payment page, fill out your billing information.
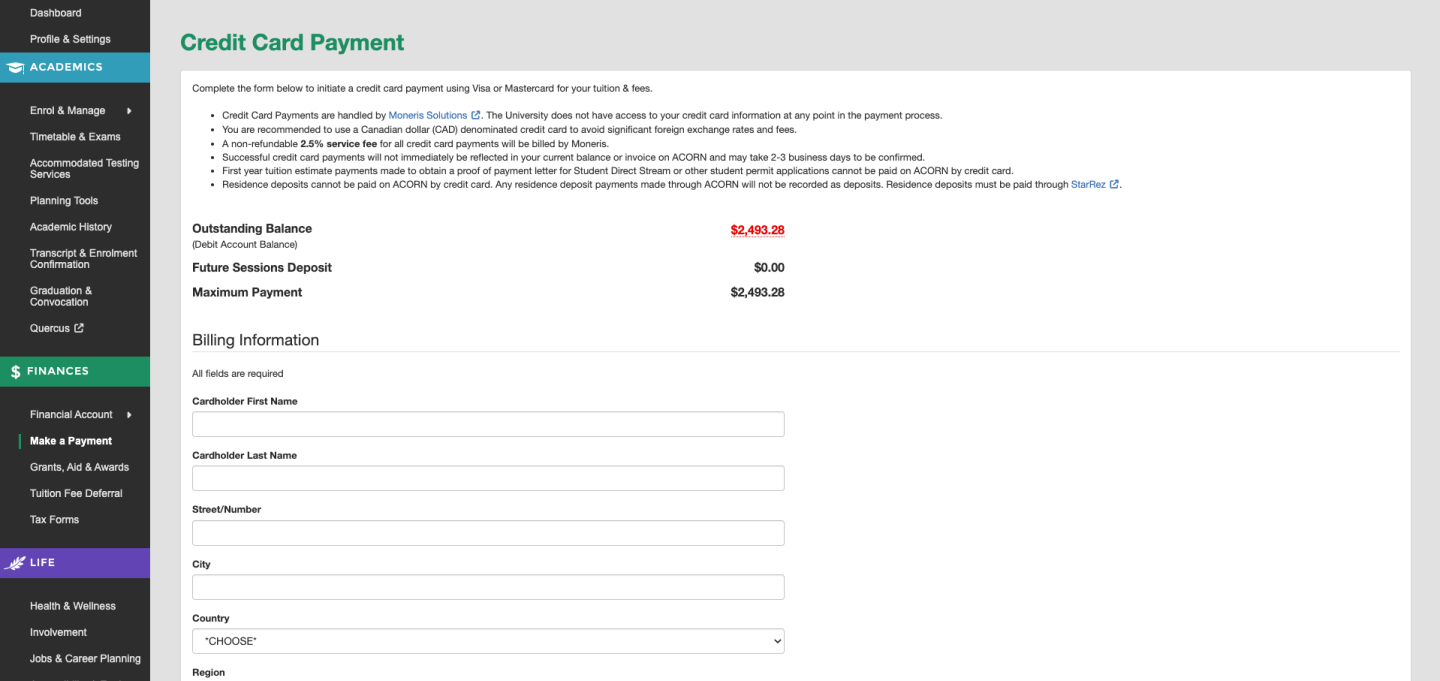
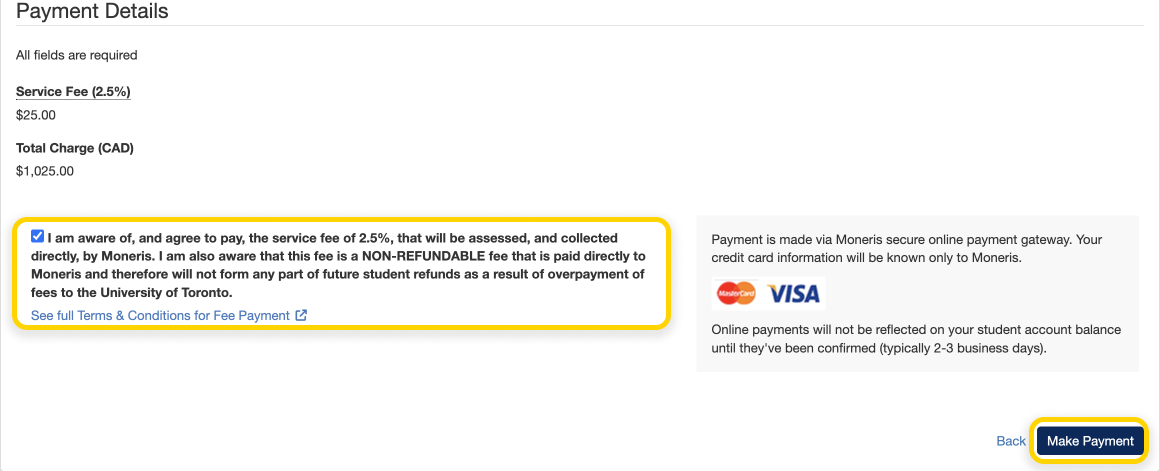
- Enter the amount you want to pay. Please note that your payment amount cannot exceed your outstanding balance in ACORN. After entering your payment amount, the total charge will display. This amount includes the service fee. Read and agree to the terms & conditions and select the “Make Payment” button to move on to the credit card payment step.

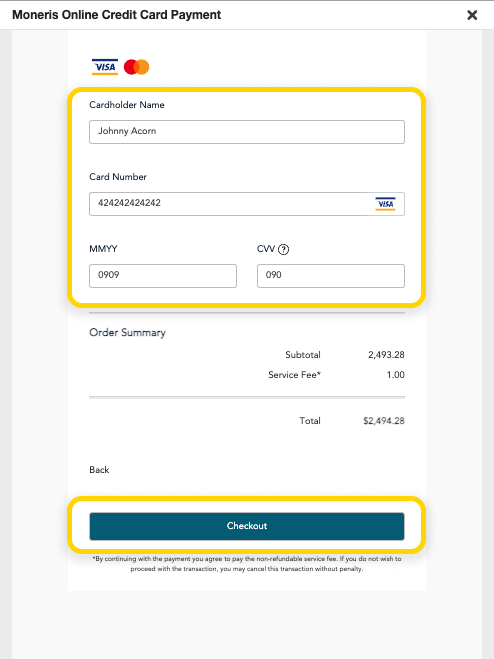
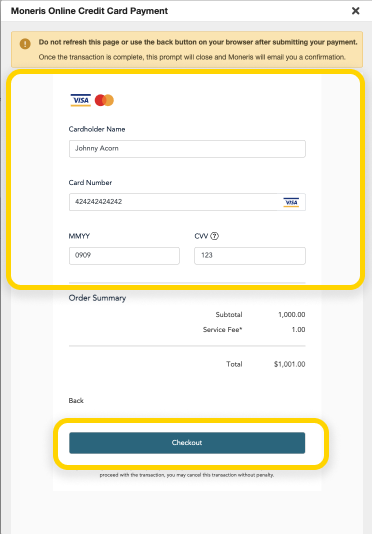
- A pop-up window will appear and ask for your credit card details. Enter your credit card information and select the “Checkout” button to complete your payment.
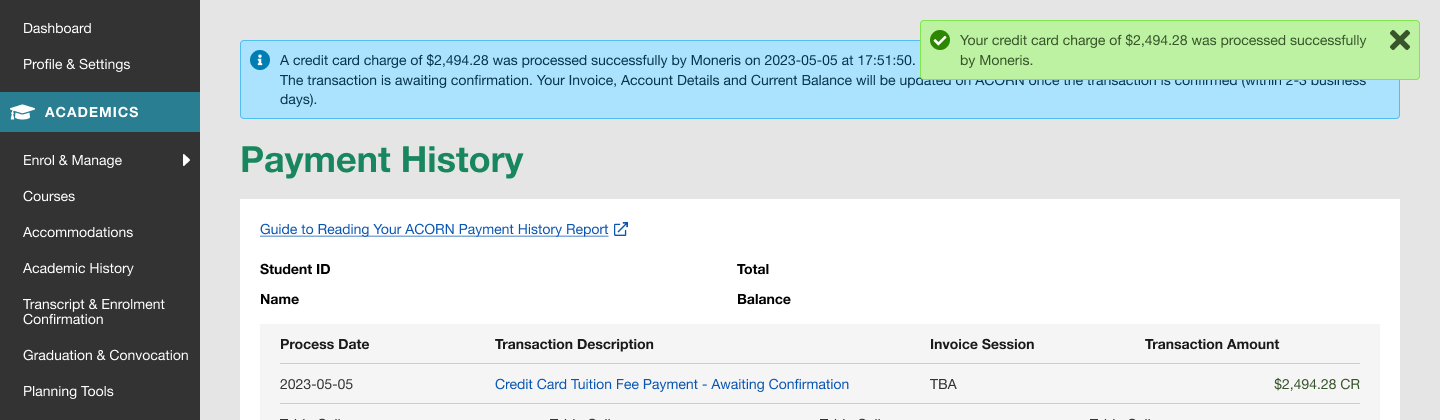
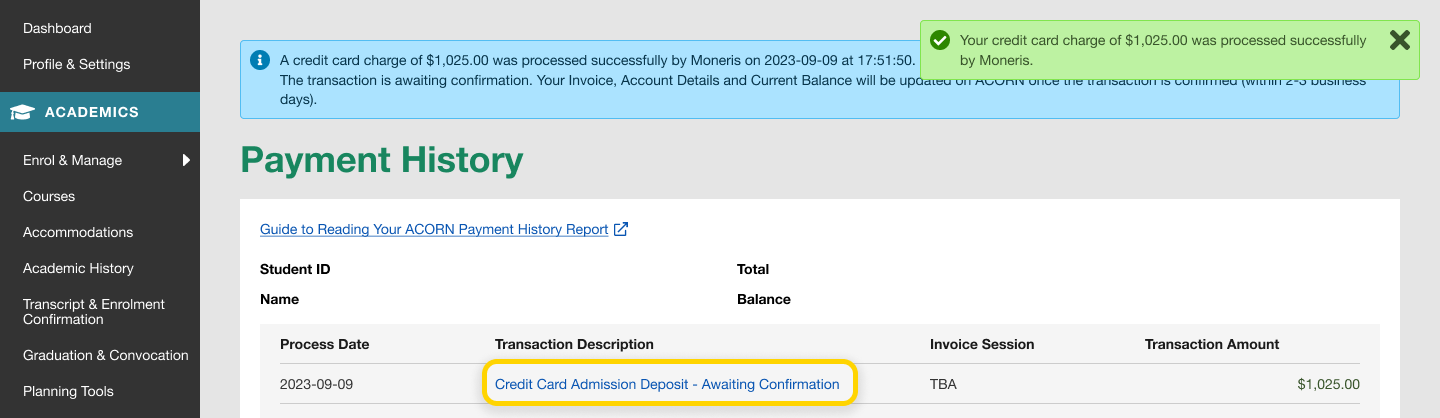
- You will be taken to the Payment History page, and a success message will appear if the payment was successful. Your payment will be processed by Moneris within approximately two business days. Select the link in the Transaction Description column that says “Credit Card Tuition & Fee Payment – Awaiting Confirmation” to view and download your receipt. You will not be able to make another payment until the pending payment has been approved.
Before paying an admission deposit, please make sure you have accepted the admission offer to your degree program by following your division’s instructions. For undergraduate students who applied through OUAC, you will need to accept your offer on OUAC.
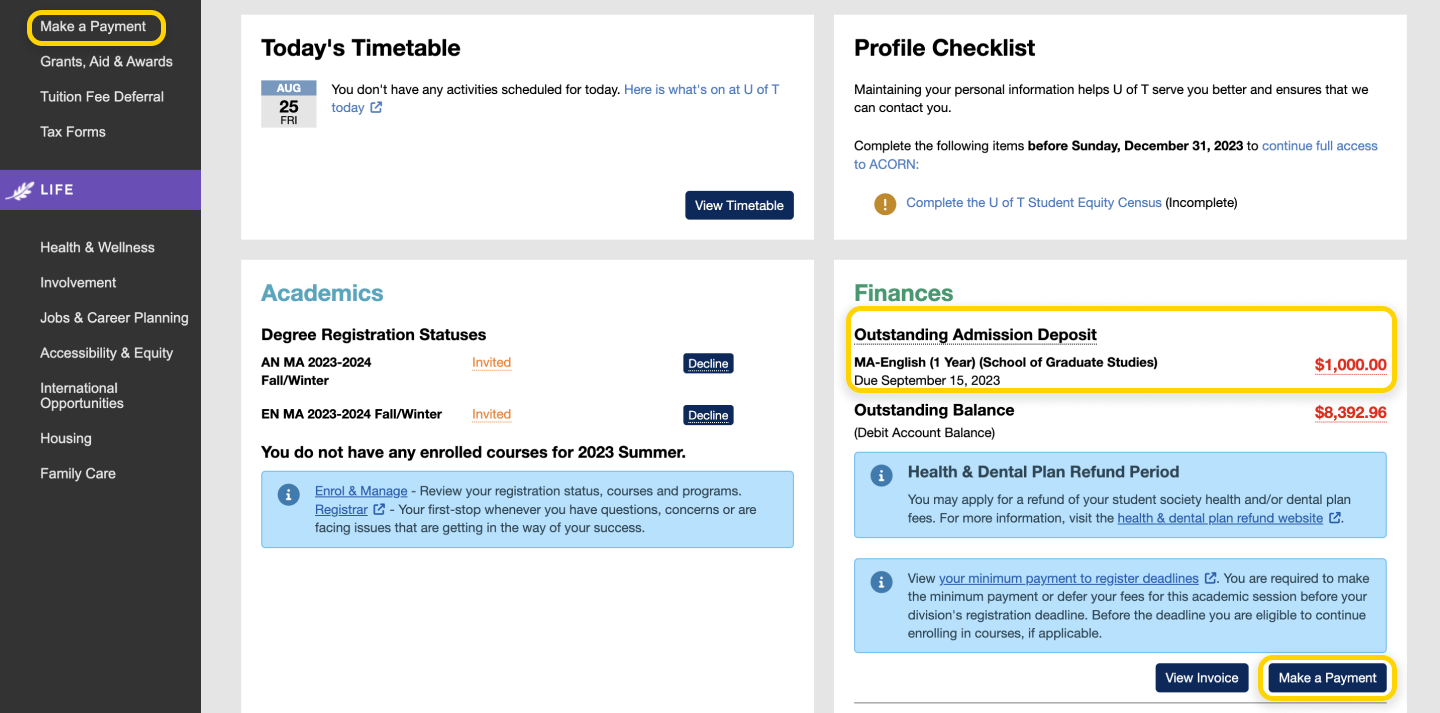
- From the ACORN dashboard, you will see the admission deposit that you can pay for in the Finances card. Multiple deposits may appear here if you were admitted to multiple programs, so please ensure you pay for the right one. Select the “Make a Payment” link on the main navigation or the “Make a Payment” button within the Finances card.
- You will arrive on the Make a Payment Page, where you can learn about your options for making tuition & fee and admission deposit payments. Admission deposit payments can only be paid by credit card on ACORN. To begin the credit card payment process, select the “Pay Deposit by Credit Card” button. Keep in mind that a 2.5% Service Fee—charged by and paid to the payment service Moneris—will apply to credit card transactions.

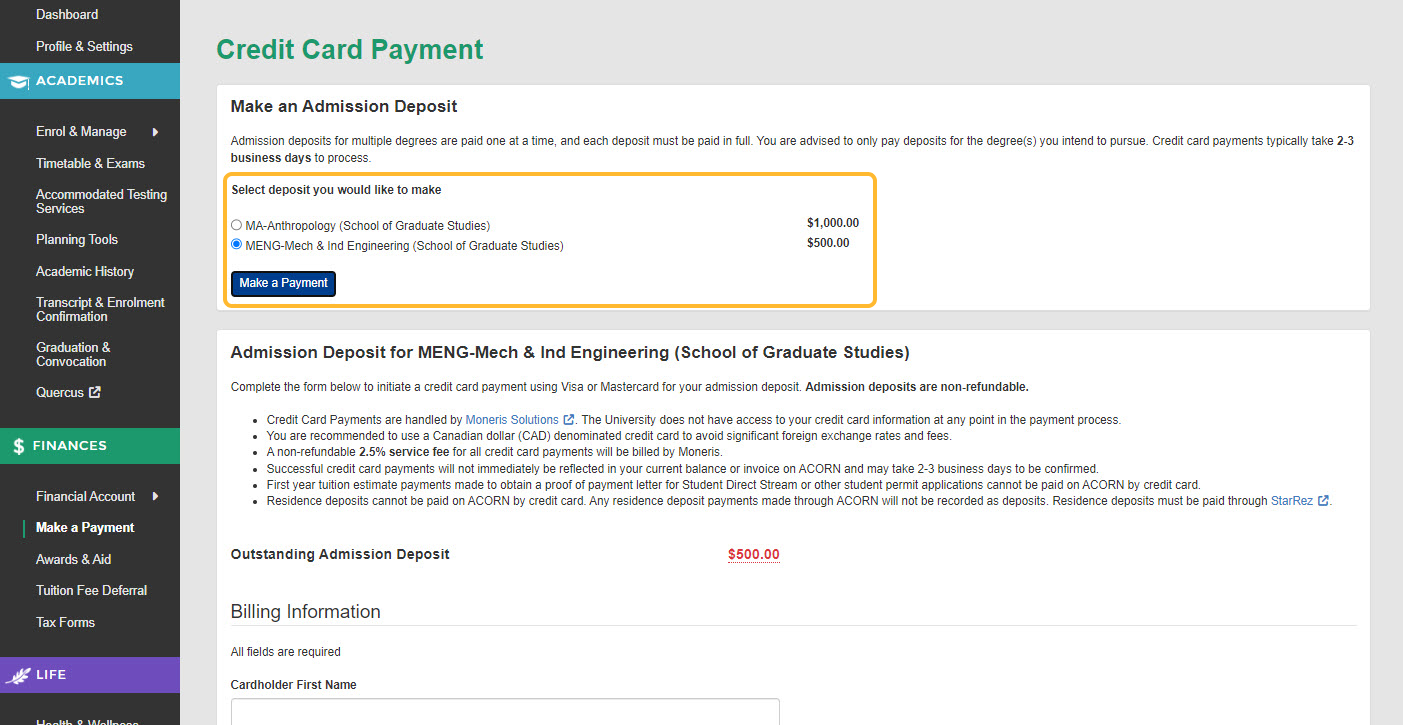
- If you have the option to pay deposits for multiple degree programs, please ensure you select the correct one. After you have read the instructions, fill out your billing information.
If you are only paying for one deposit, the payment page will look like the following: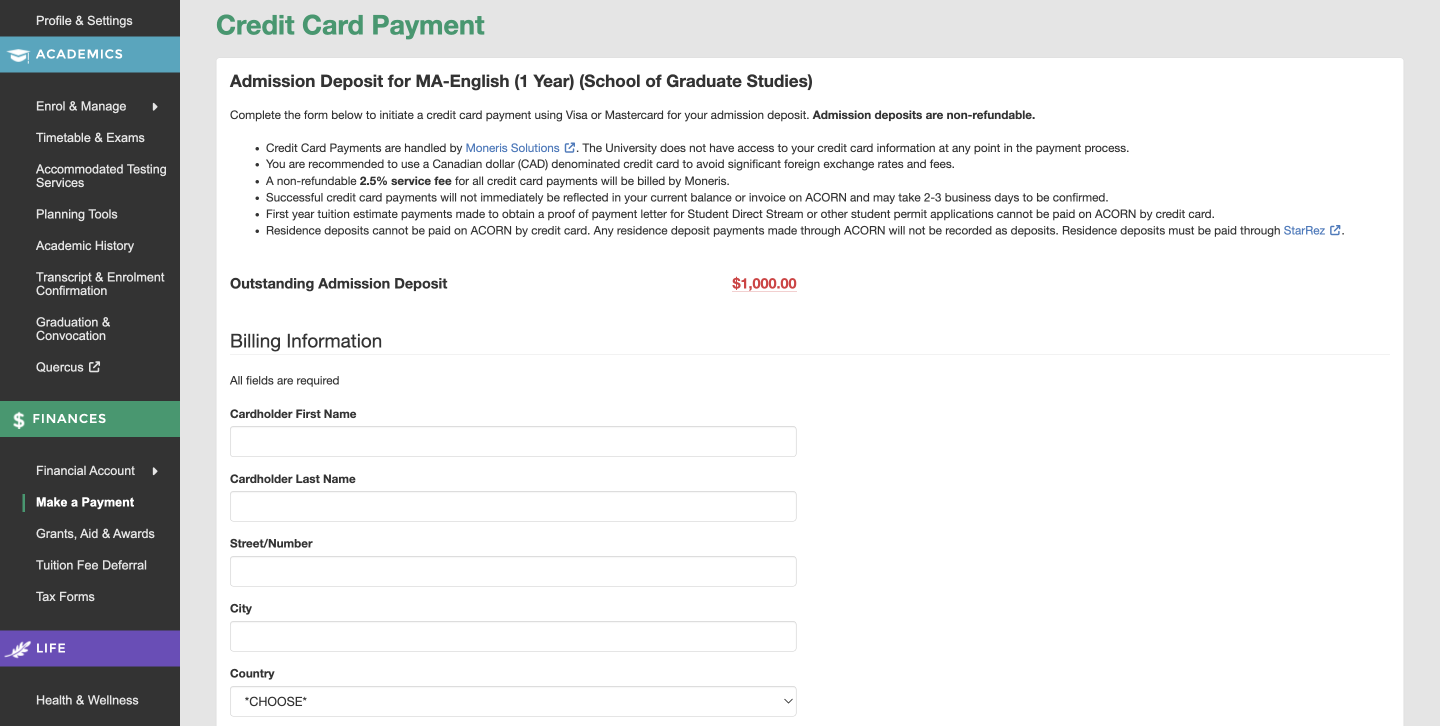
If you have the option to pay more than one deposit, the payment page will look like the following:

- Admission deposits can only be paid in full, so you cannot change the amount to pay. The total charge will display, including the service fee. Read and agree to the terms & conditions and select the “Make Payment” button to move on to the credit card payment step.
- A pop-up window will appear and ask for your credit card details. Enter your credit card information and select the “Checkout” button to complete your payment.
- You will be taken to the Payment History page, and a success message will appear if the payment was successful. Your payment will be processed by Moneris within approximately two to three business days. Select the link in the Transaction Description column that says “Credit Card Admission Deposit – Awaiting Confirmation” to view and download your receipt.
As of Summer 2018, if you will be receiving Full-Time OSAP for the Summer or Fall/Winter sessions, you will be able to see an estimate for what you may need to pay U of T once your upcoming OSAP is applied against your tuition & fees (learn about eligibility for Full-Time OSAP).
This amount is called your “Net Cost”, and it will help you plan ahead and estimate how much in awards funding you may need to seek, or how much you may need to pay out of pocket.
Accessing Your Net Cost
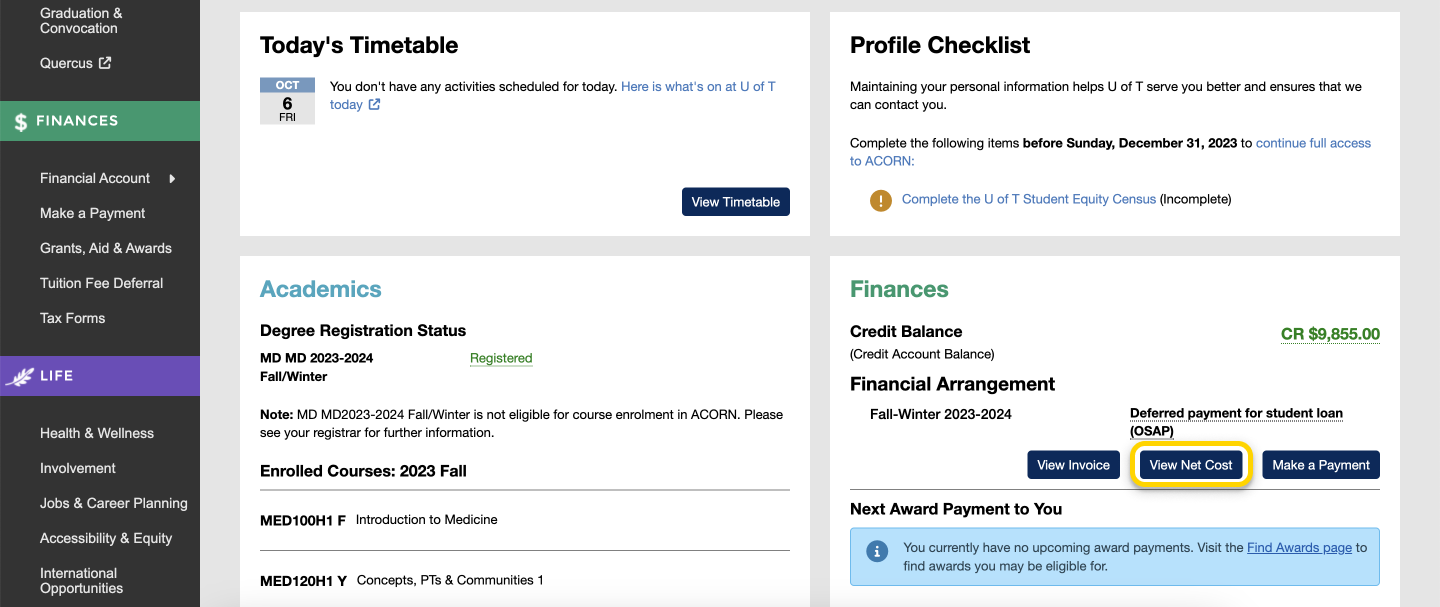
If you will be receiving Full-Time OSAP payments for the upcoming session, you can access your Net Cost page from the ACORN Dashboard.
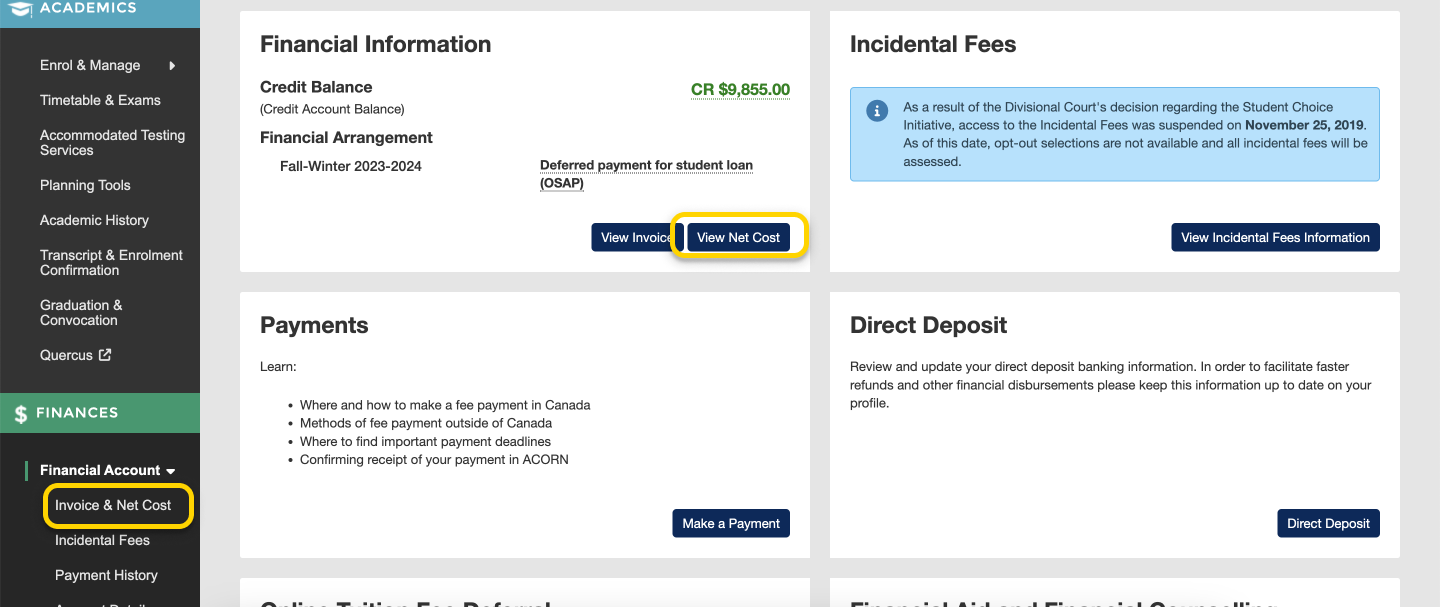
You can also go to Financial Account > Invoice & Net Cost via the main navigation, or click the “View Net Cost” button within the Financial Information card on your Financial Account page.
Understanding Your Net Cost
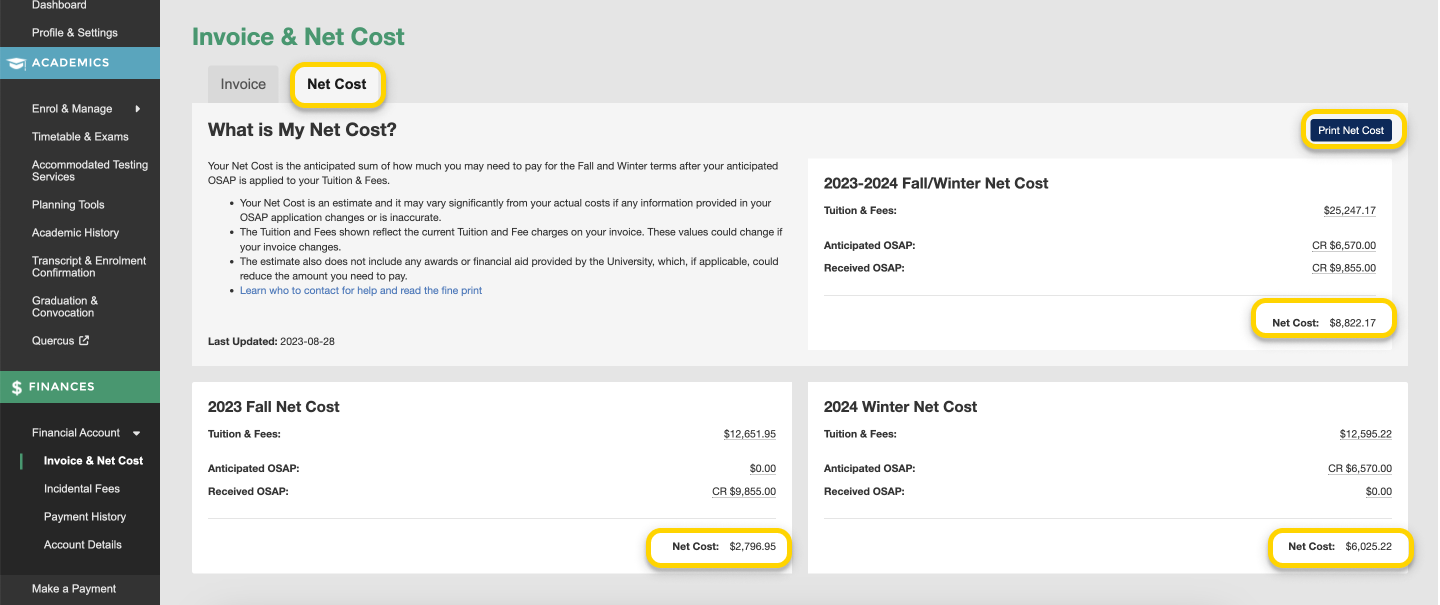
Your Invoice and Net Cost exist on the same page, and you can switch back and forth between them using the two tabs towards the top. Your Net Cost overview for the entire Fall-Winter session is displayed at the top of the page, and contains your tuition and fee charges, anticipated OSAP and received OSAP for the entire Fall-Winter session. Below, your Net Cost is broken down into the Fall and Winter terms individually, and you can find your tuition and fee breakdown and estimated and received OSAP for each term.
For specific definitions of each field, you can hover over an amount—or tap it on mobile—to see more information about it.
Why You May Not See Your Net Cost
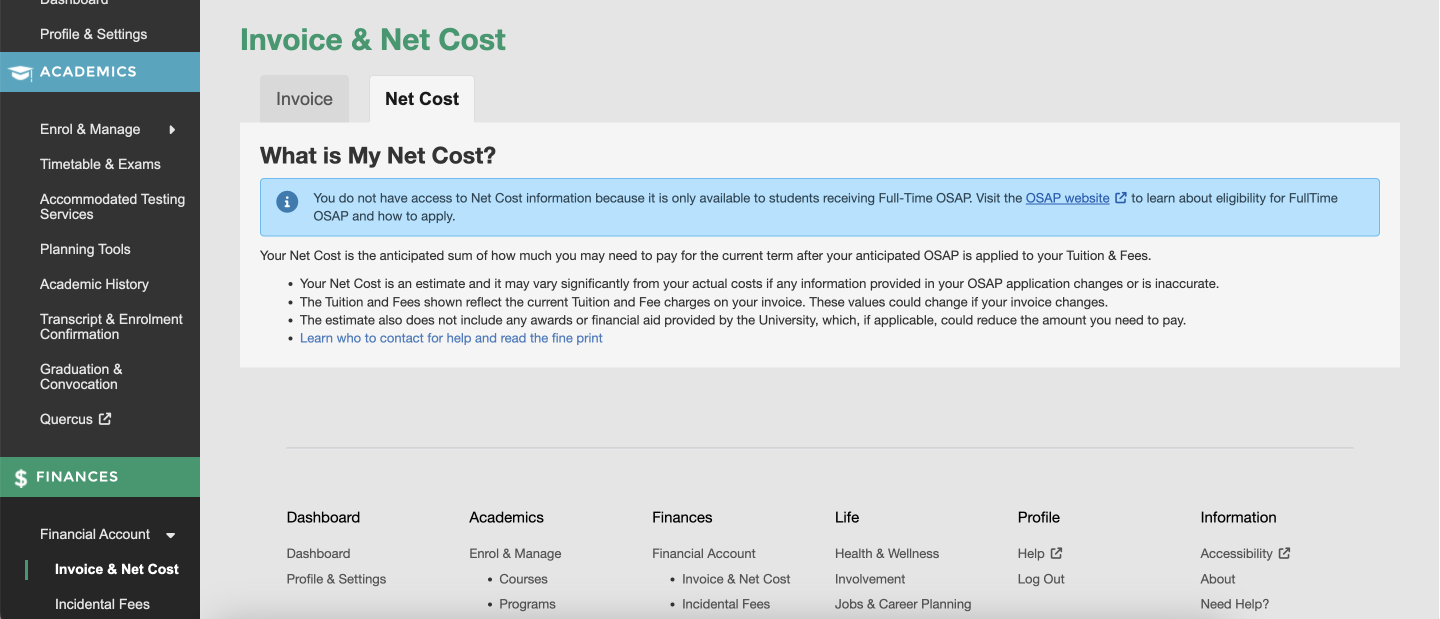
If you see a message like the ones above, it means you cannot see your Net Cost information due to one of the following reasons:
- You are not eligible for Full-Time OSAP
- You are receiving or are eligible only for Part-Time OSAP
- You are not eligible for OSAP for the upcoming term
- You applied for OSAP but your application has been closed
In these cases, unfortunately ACORN cannot display your Net Cost because it does not have an OSAP funding estimate.
Getting Help & More Information
Who to Contact for Help
- For OSAP help, visit the OSAP website. If you still need help, contact osap.staff@utoronto.ca
- For questions about your invoice or charges, contact Student Accounts via ACORN’s Help & Contact form
Net Cost
Your actual Net Cost may vary if the information used to calculate your OSAP assessment is updated.
OSAP
Your Anticipated OSAP is the amount of assistance that OSAP will send directly to the University of Toronto to apply to your tuition and other fees, and is based on your most recent OSAP assessment. If you do not register in the program or course load you indicated on your OSAP application, your eligibility for this assistance may change.
If your Anticipated and Received OSAP amounts are less than your total OSAP funding, OSAP will deposit the difference directly to your bank account. Log in to your OSAP account for the current status of your grants and loans.
There are circumstances where grants provided through OSAP may be converted into OSAP student loans. OSAP grants reflected in your net cost do not include the Ontario Living and Learning Grant (for Crown Wards only).
The financial planning calculator is an exploratory tool that anyone can use in order to estimate what a single year of study might cost at U of T. As an alternative to this article, you can learn how to use the tool by watching this three-minute video.
Before you begin, you should have a general idea of what you will be studying during the upcoming academic year and what your income and savings will be from all sources. This can include summer job savings, expected job earnings for the upcoming academic year or any financial assistance and awards you have received or expect to receive.
- To begin, go to the Financial Planning Calculator and click ‘Start Planning’.

- Provide background information by selecting options that currently apply to you, or if you are exploring your options, simply select which options you think apply to you. You can always change them later to see how your expenses will change. Click ‘Continue’ to proceed to the Estimated Expenses section.

- Estimate your various sources of income to the best of your ability. The more accurate your income estimates are, the more accurate our calculations and financial recommendations will be. If you have no income to enter for a particular field, you may leave it blank. If you want more information about what belongs in each expenses field, hover over (or tap, on a mobile device) the label you are curious about. Click ‘Continue’ to proceed to step 3.

- Based on the background information you provide, we calculate expense estimates for your upcoming academic year. We use educated estimates and calculated averages for many of these values, but feel free to change them to represent your individual situation more accurately. To see information about how each estimate was calculated, hover over (or tap) the label you are curious about. Click ‘Continue’ to proceed to the Summary page.

- On the Budget Summary page, you will see a graph displaying your income, expenses and a third bar indicating whether you are projected to be in a budget deficit or surplus.

- Below the graph you will find a list of personalized resources and next steps that you can take to find ways to save money or receive more financial support, depending on your situation. If you have a budget deficit, these resources will give you a few approaches to getting back on track.

- Want to see what it would cost to switch programs? Live away from home or on campus? Eat out at restaurants a little less and cook more? Use the “Jump to Step” menu to go back and change the information on the form.

- If you change any of your initial inputs, click ‘Recalculate Budget’ and you will be taken to the Budget Summary page with an updated budget summary and set of resources reflecting your changes.

If you have any comments on how you used this calculator or suggestions on how to improve it, please let us know via the “Send Feedback” button at the bottom of the calculator.
- From the ACORN Dashboard, select “Grants, Aid & Awards” on the main navigation menu.
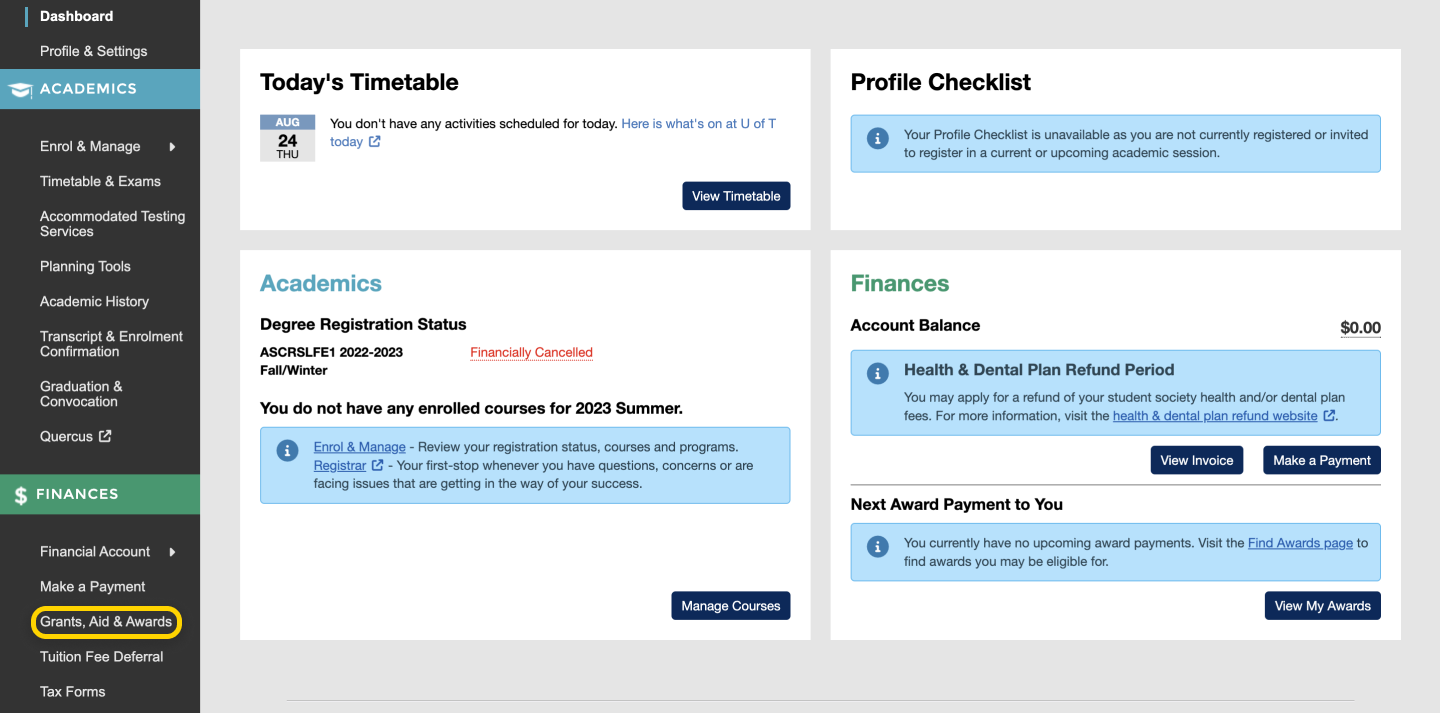
Screenshot highlighting the ‘Grants, Aid & Awards’ link in ACORN’s main navigation.
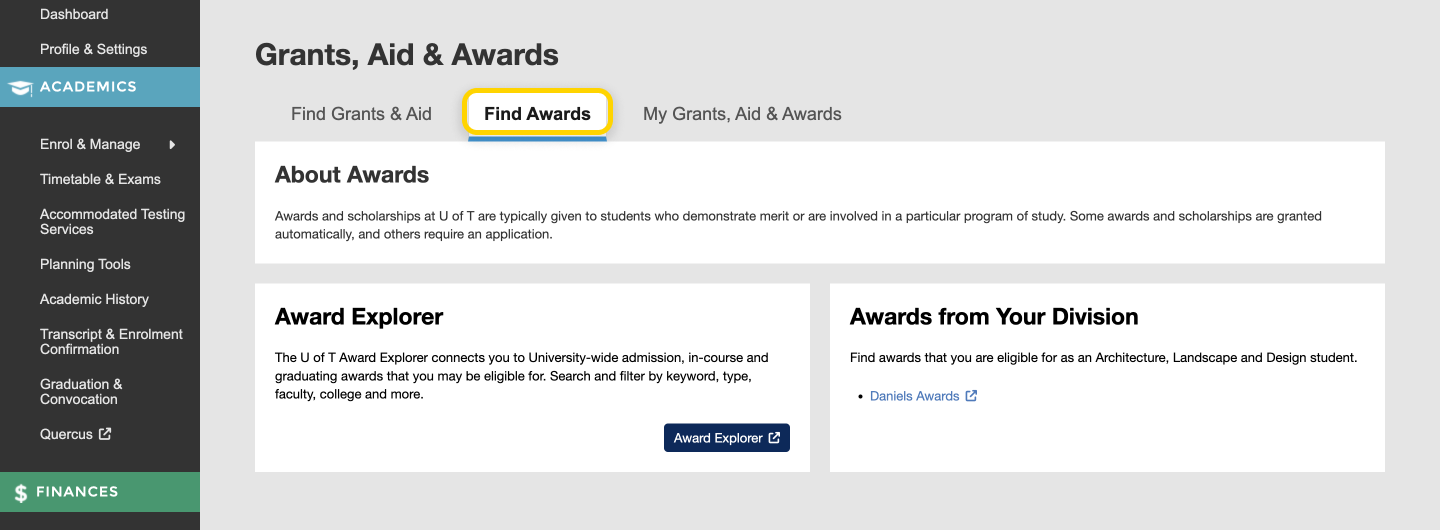
- You will be on the “Find Grants & Aid” section of the Grants, Aid & Awards page. From here, you will see a personalized collection of resources that will direct you to sources of financial aid, grants and awards that you may be eligible for. On this page, you can select the “Find Awards” tab.
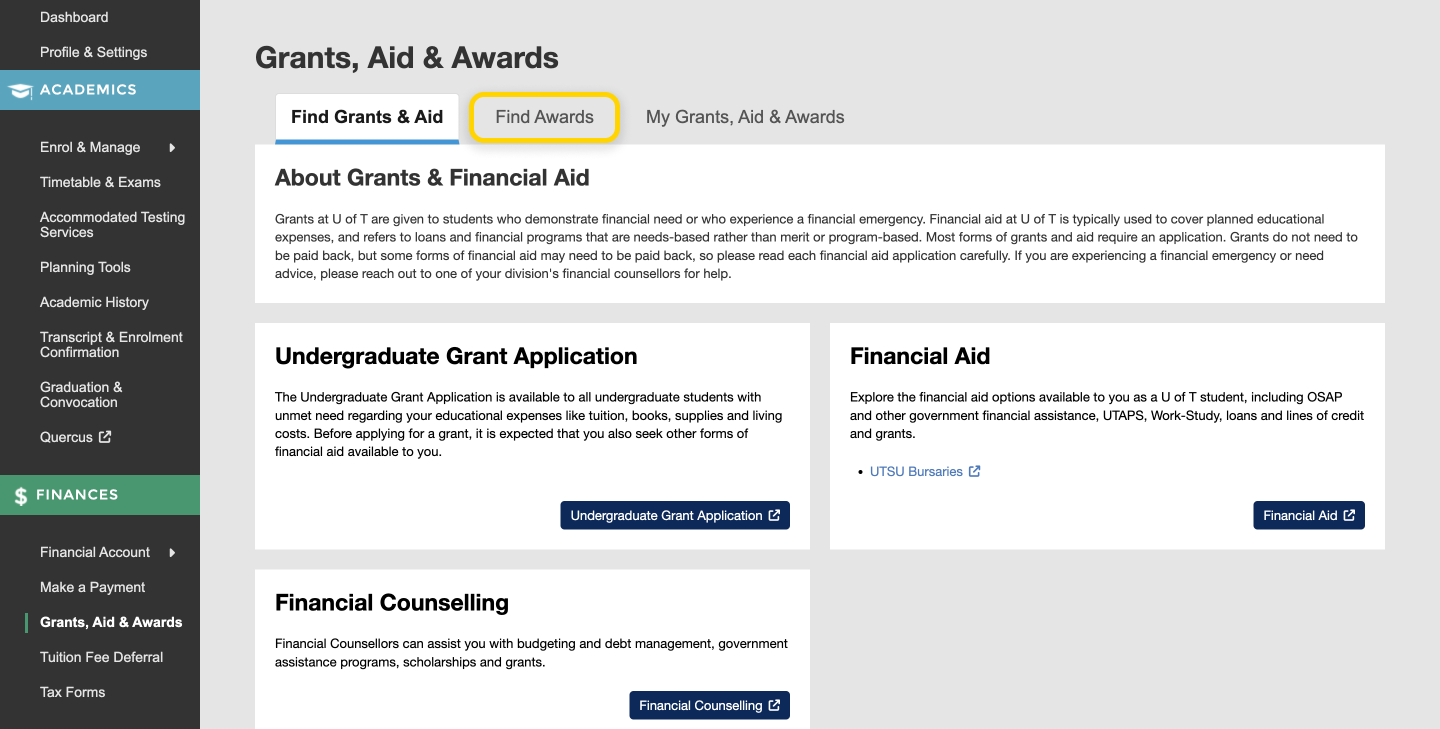
- Once you’re on the Find Awards page, you will see a personalized page with resources for your division, as well as a link to the Award Explorer page.
Instructional video: All campuses
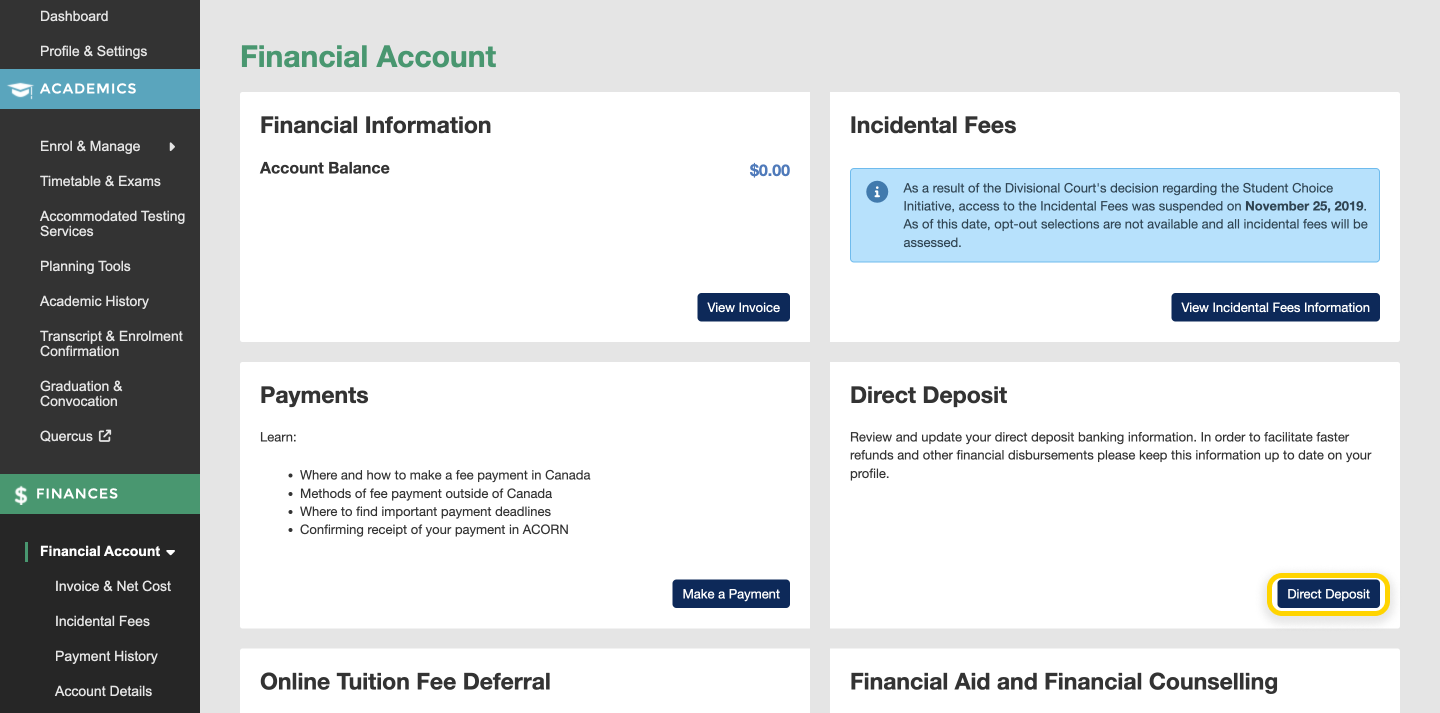
- From the ACORN dashboard, select ‘Financial Account’ on the main navigation menu under Finances.
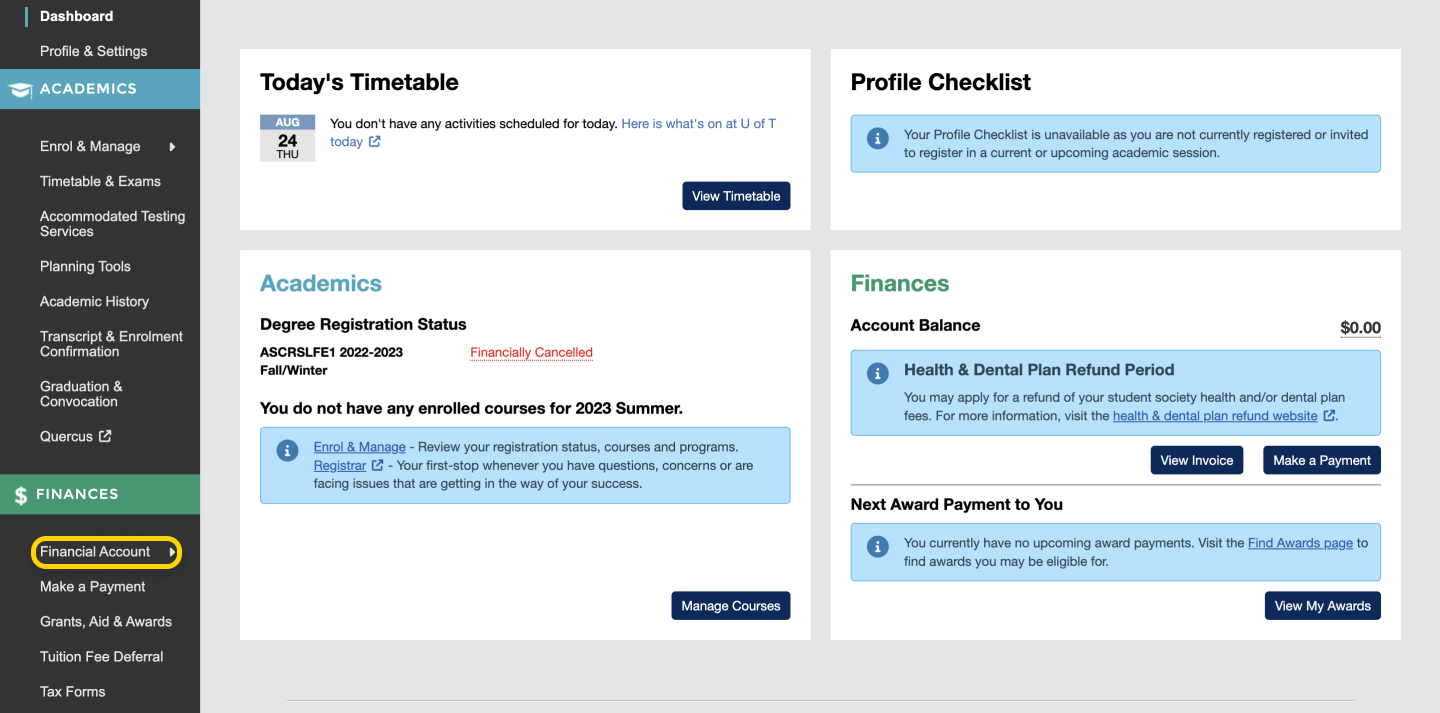
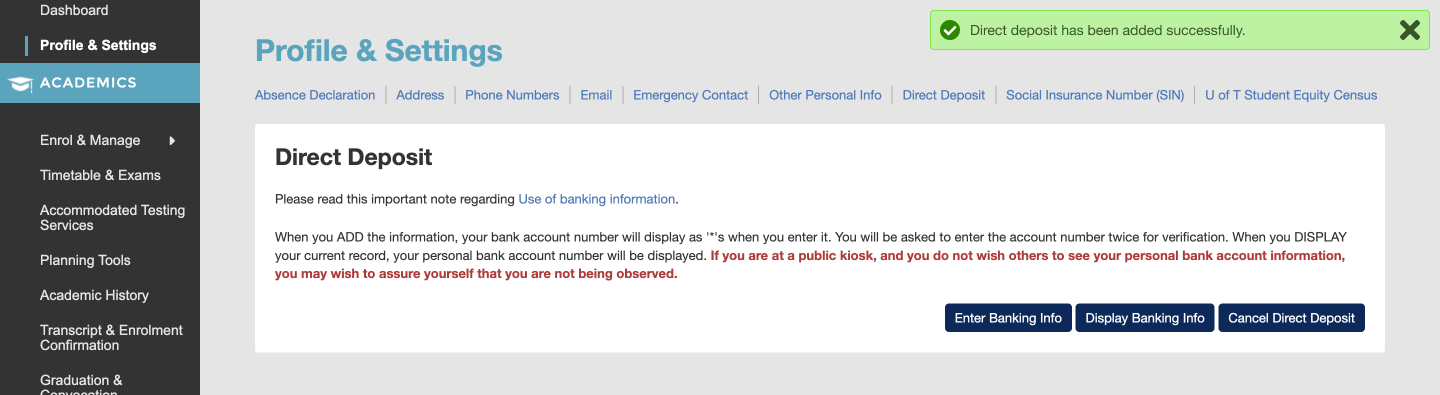
- On the Financial Account screen, locate the direct deposit card and select ‘Direct Deposit’.
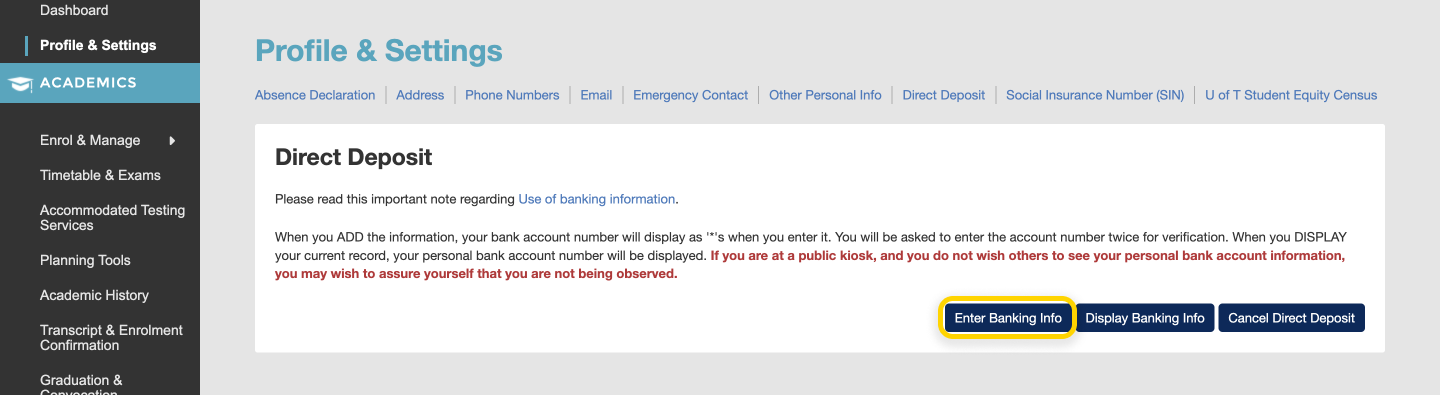
- Select ‘Enter Banking Info’.
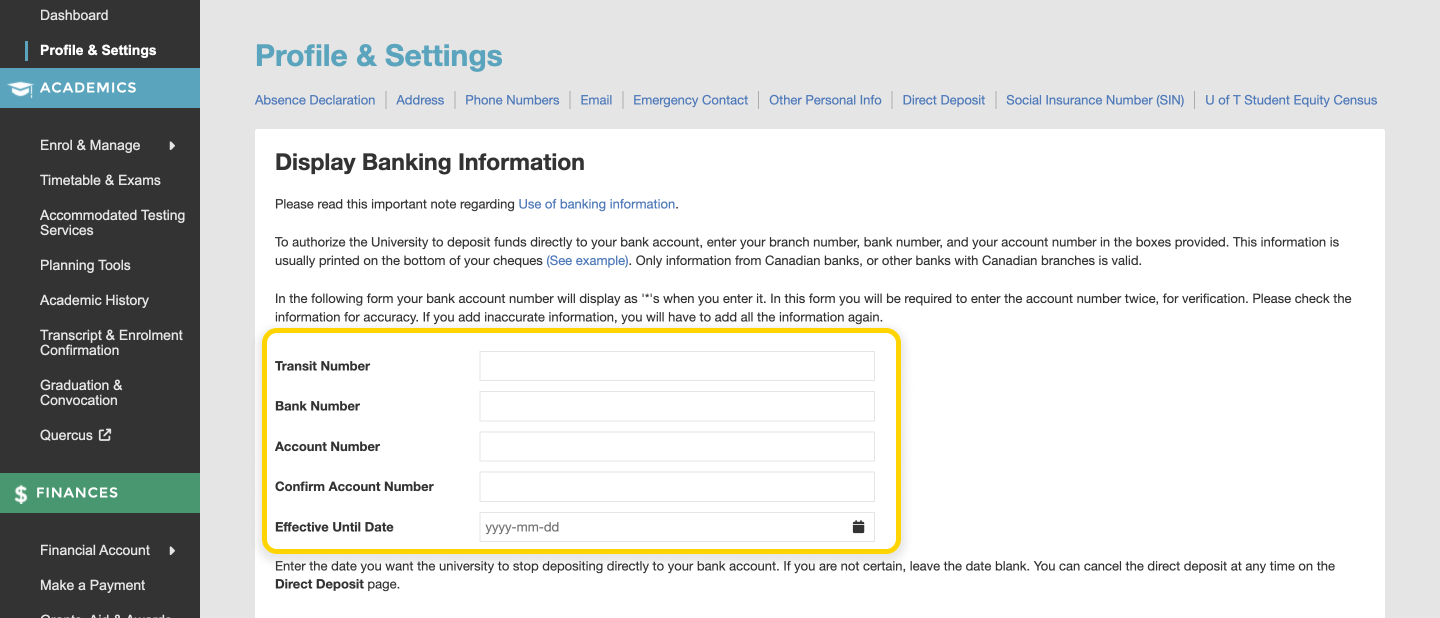
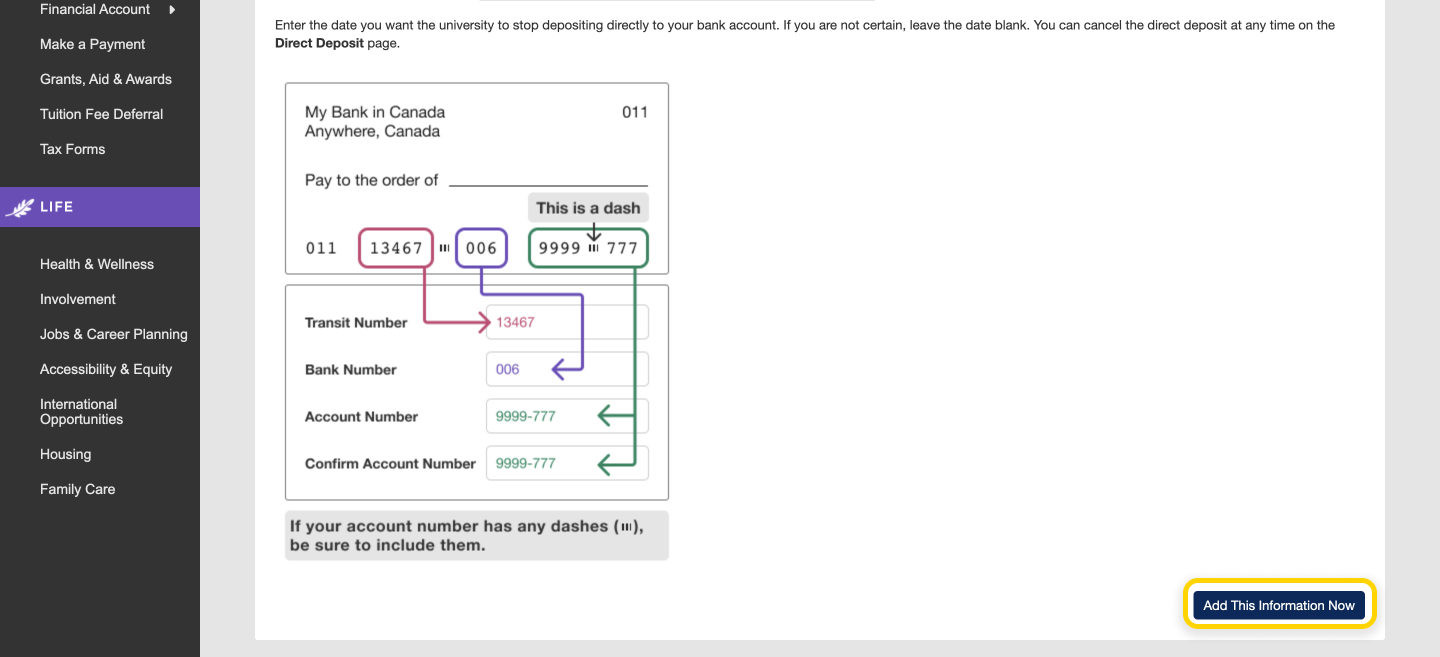
- Enter your banking information. You can find your Transit, Bank and Account numbers by requesting a blank cheque or a print-out of your banking information from your bank.
- Select ‘Add This Information Now’.
- After you have successfully added your banking information, you will get a confirmation message.
Instructional videos: Undergrad student | Grad student
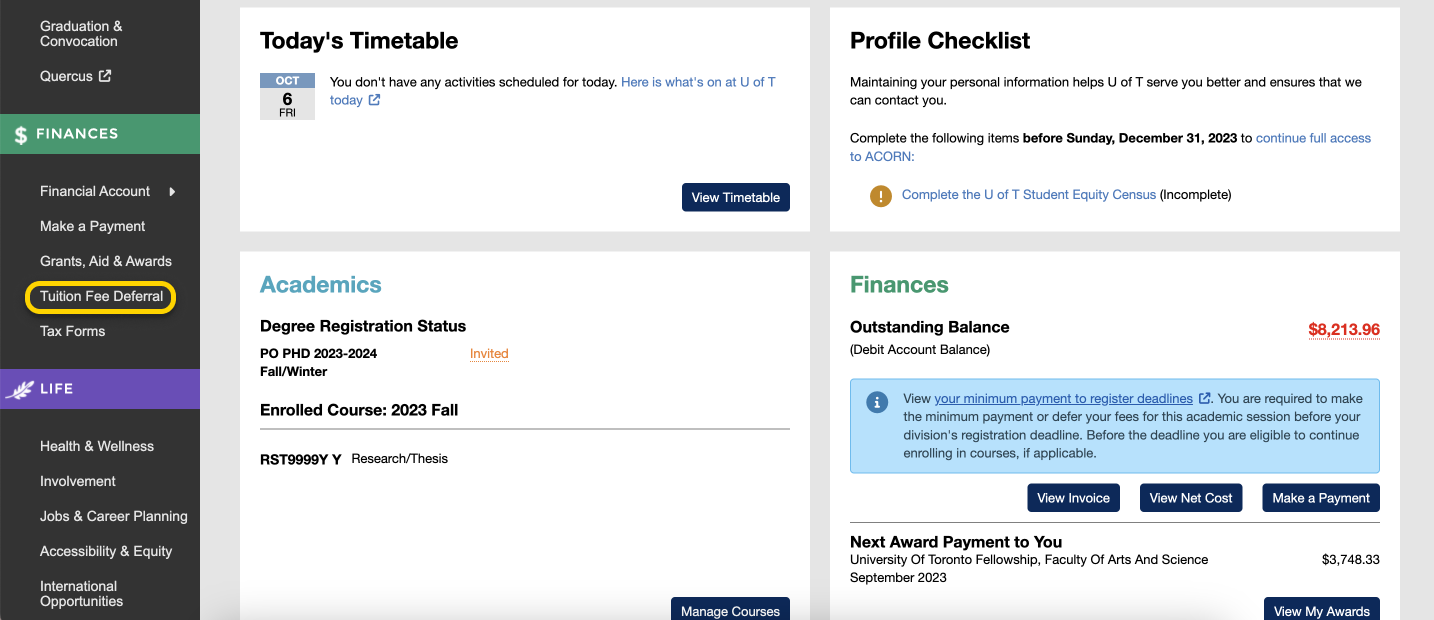
- To defer fees, click ‘Tuition Fee Deferral’ on ACORN’s main navigation under Finances.
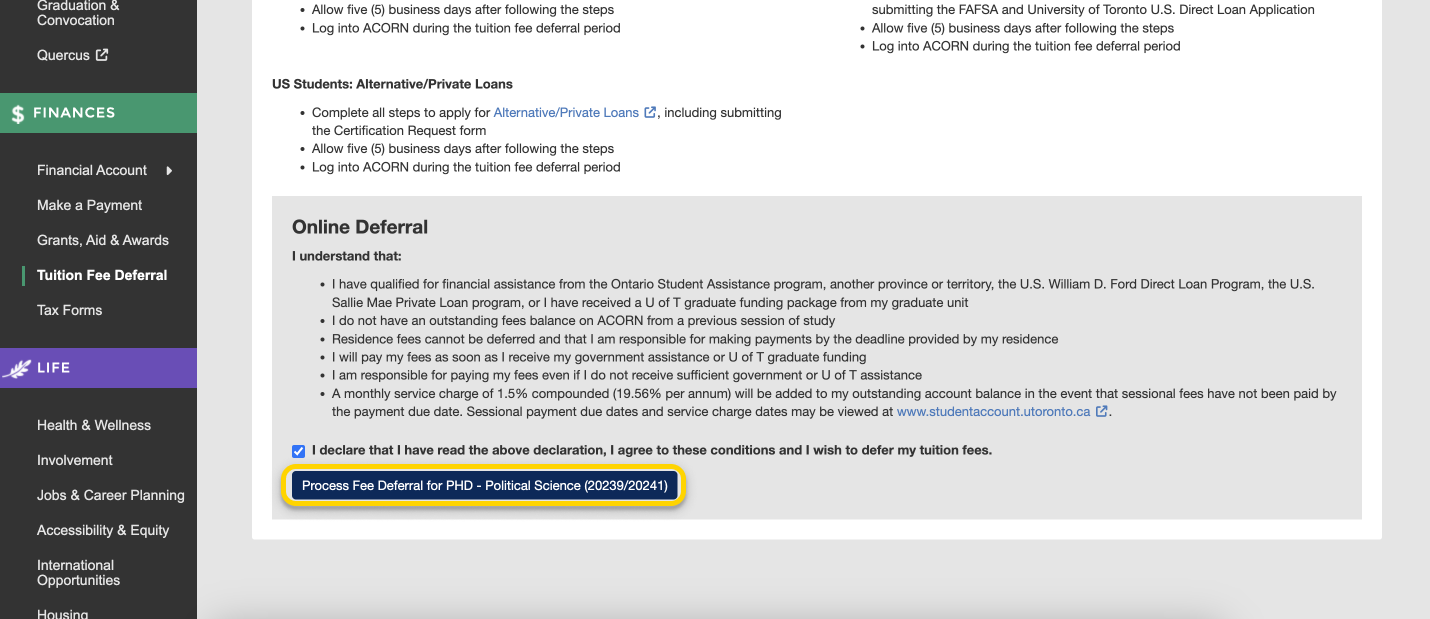
- If you are eligible to defer fees, click on the declaration checkbox, and click ‘Process Fee Deferral’ and confirm.
Instructional video: All campuses
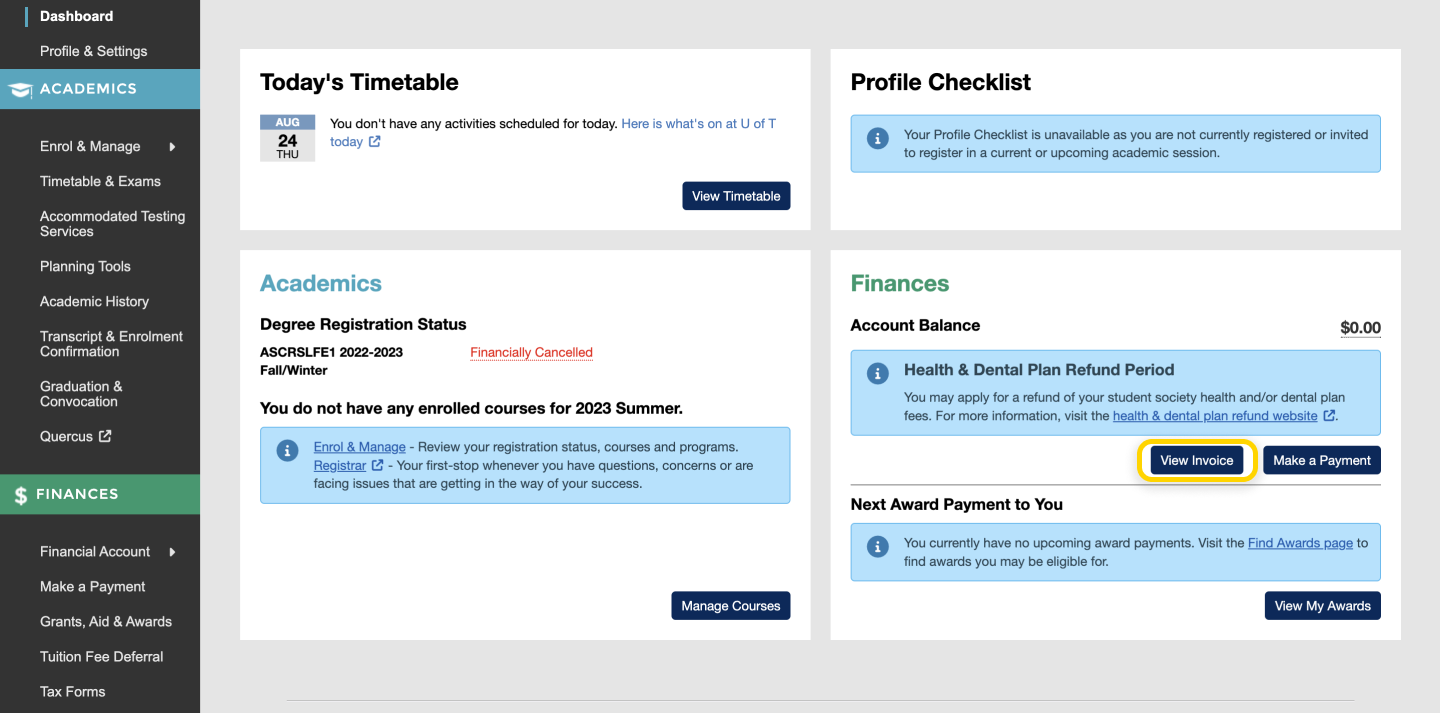
On the ACORN dashboard, select ‘View invoice’ on the Finances status box.
Program Enrolment
- From the ACORN Dashboard, select “Grants, Aid & Awards” on the main navigation menu. Alternatively, select “View My Awards” on the Dashboard Finances card.
- You will be taken to the My Awards screen. If you selected the “Grants, Aid & Awards” navigation link, select the “My Grants, Aid & Awards” Tab towards the top of the screen to get to My Grants, Aid & Awards.
- If you have any received grants, aid or awards, you will see individual payments listed on this screen along with details like payment date, payment status, payment method and payment amount. Some awards are disbursed in multiple installments. If you have an award for which you have received at least one payment, you will see future payments for that award in the “Upcoming” section. Please note that changes to your registration status may affect your eligibility to receive these future payments.
Instructional video: All campuses
From the ACORN dashboard, select “Tax Forms” on the main navigation menu under Finances.
- From the ACORN dashboard, select ‘Financial Account’ on the main navigation under Finances.
- Select ‘Payment History’ on the sub list of items under the Financial Account menu heading.
- From the ACORN dashboard, select the “Make a Payment” link on the main navigation or the “Make a Payment” button within the Finances card.
- You will arrive on the Make a Payment Page, which contains information about different ways to pay your fees, as well as payment deadlines. To begin the credit card payment process, select the “Pay Tuition & Fees by Credit Card” button. Keep in mind that a 2.5% Service Fee—charged by and paid to the payment service Moneris—will apply to credit card transactions.
- After you have read the instructions on the Credit Card Payment page, fill out your billing information.
- Enter the amount you want to pay. Please note that your payment amount cannot exceed your outstanding balance in ACORN. After entering your payment amount, the total charge will display. This amount includes the service fee. Read and agree to the terms & conditions and select the “Make Payment” button to move on to the credit card payment step.
- A pop-up window will appear and ask for your credit card details. Enter your credit card information and select the “Checkout” button to complete your payment.
- You will be taken to the Payment History page, and a success message will appear if the payment was successful. Your payment will be processed by Moneris within approximately two business days. Select the link in the Transaction Description column that says “Credit Card Tuition & Fee Payment – Awaiting Confirmation” to view and download your receipt. You will not be able to make another payment until the pending payment has been approved.
Before paying an admission deposit, please make sure you have accepted the admission offer to your degree program by following your division’s instructions. For undergraduate students who applied through OUAC, you will need to accept your offer on OUAC.
- From the ACORN dashboard, you will see the admission deposit that you can pay for in the Finances card. Multiple deposits may appear here if you were admitted to multiple programs, so please ensure you pay for the right one. Select the “Make a Payment” link on the main navigation or the “Make a Payment” button within the Finances card.
- You will arrive on the Make a Payment Page, where you can learn about your options for making tuition & fee and admission deposit payments. Admission deposit payments can only be paid by credit card on ACORN. To begin the credit card payment process, select the “Pay Deposit by Credit Card” button. Keep in mind that a 2.5% Service Fee—charged by and paid to the payment service Moneris—will apply to credit card transactions.
- If you have the option to pay deposits for multiple degree programs, please ensure you select the correct one. After you have read the instructions, fill out your billing information.
If you are only paying for one deposit, the payment page will look like the following:
If you have the option to pay more than one deposit, the payment page will look like the following:
- Admission deposits can only be paid in full, so you cannot change the amount to pay. The total charge will display, including the service fee. Read and agree to the terms & conditions and select the “Make Payment” button to move on to the credit card payment step.
- A pop-up window will appear and ask for your credit card details. Enter your credit card information and select the “Checkout” button to complete your payment.
- You will be taken to the Payment History page, and a success message will appear if the payment was successful. Your payment will be processed by Moneris within approximately two to three business days. Select the link in the Transaction Description column that says “Credit Card Admission Deposit – Awaiting Confirmation” to view and download your receipt.
As of Summer 2018, if you will be receiving Full-Time OSAP for the Summer or Fall/Winter sessions, you will be able to see an estimate for what you may need to pay U of T once your upcoming OSAP is applied against your tuition & fees (learn about eligibility for Full-Time OSAP).
This amount is called your “Net Cost”, and it will help you plan ahead and estimate how much in awards funding you may need to seek, or how much you may need to pay out of pocket.
Accessing Your Net Cost
If you will be receiving Full-Time OSAP payments for the upcoming session, you can access your Net Cost page from the ACORN Dashboard.
You can also go to Financial Account > Invoice & Net Cost via the main navigation, or click the “View Net Cost” button within the Financial Information card on your Financial Account page.
Understanding Your Net Cost
Your Invoice and Net Cost exist on the same page, and you can switch back and forth between them using the two tabs towards the top. Your Net Cost overview for the entire Fall-Winter session is displayed at the top of the page, and contains your tuition and fee charges, anticipated OSAP and received OSAP for the entire Fall-Winter session. Below, your Net Cost is broken down into the Fall and Winter terms individually, and you can find your tuition and fee breakdown and estimated and received OSAP for each term.
For specific definitions of each field, you can hover over an amount—or tap it on mobile—to see more information about it.
Why You May Not See Your Net Cost
If you see a message like the ones above, it means you cannot see your Net Cost information due to one of the following reasons:
- You are not eligible for Full-Time OSAP
- You are receiving or are eligible only for Part-Time OSAP
- You are not eligible for OSAP for the upcoming term
- You applied for OSAP but your application has been closed
In these cases, unfortunately ACORN cannot display your Net Cost because it does not have an OSAP funding estimate.
Getting Help & More Information
Who to Contact for Help
- For OSAP help, visit the OSAP website. If you still need help, contact osap.staff@utoronto.ca
- For questions about your invoice or charges, contact Student Accounts via ACORN’s Help & Contact form
Net Cost
Your actual Net Cost may vary if the information used to calculate your OSAP assessment is updated.
OSAP
Your Anticipated OSAP is the amount of assistance that OSAP will send directly to the University of Toronto to apply to your tuition and other fees, and is based on your most recent OSAP assessment. If you do not register in the program or course load you indicated on your OSAP application, your eligibility for this assistance may change.
If your Anticipated and Received OSAP amounts are less than your total OSAP funding, OSAP will deposit the difference directly to your bank account. Log in to your OSAP account for the current status of your grants and loans.
There are circumstances where grants provided through OSAP may be converted into OSAP student loans. OSAP grants reflected in your net cost do not include the Ontario Living and Learning Grant (for Crown Wards only).
The financial planning calculator is an exploratory tool that anyone can use in order to estimate what a single year of study might cost at U of T. As an alternative to this article, you can learn how to use the tool by watching this three-minute video.
Before you begin, you should have a general idea of what you will be studying during the upcoming academic year and what your income and savings will be from all sources. This can include summer job savings, expected job earnings for the upcoming academic year or any financial assistance and awards you have received or expect to receive.
- To begin, go to the Financial Planning Calculator and click ‘Start Planning’.
- Provide background information by selecting options that currently apply to you, or if you are exploring your options, simply select which options you think apply to you. You can always change them later to see how your expenses will change. Click ‘Continue’ to proceed to the Estimated Expenses section.
- Estimate your various sources of income to the best of your ability. The more accurate your income estimates are, the more accurate our calculations and financial recommendations will be. If you have no income to enter for a particular field, you may leave it blank. If you want more information about what belongs in each expenses field, hover over (or tap, on a mobile device) the label you are curious about. Click ‘Continue’ to proceed to step 3.
- Based on the background information you provide, we calculate expense estimates for your upcoming academic year. We use educated estimates and calculated averages for many of these values, but feel free to change them to represent your individual situation more accurately. To see information about how each estimate was calculated, hover over (or tap) the label you are curious about. Click ‘Continue’ to proceed to the Summary page.
- On the Budget Summary page, you will see a graph displaying your income, expenses and a third bar indicating whether you are projected to be in a budget deficit or surplus.
- Below the graph you will find a list of personalized resources and next steps that you can take to find ways to save money or receive more financial support, depending on your situation. If you have a budget deficit, these resources will give you a few approaches to getting back on track.
- Want to see what it would cost to switch programs? Live away from home or on campus? Eat out at restaurants a little less and cook more? Use the “Jump to Step” menu to go back and change the information on the form.
- If you change any of your initial inputs, click ‘Recalculate Budget’ and you will be taken to the Budget Summary page with an updated budget summary and set of resources reflecting your changes.
If you have any comments on how you used this calculator or suggestions on how to improve it, please let us know via the “Send Feedback” button at the bottom of the calculator.
- From the ACORN Dashboard, select “Grants, Aid & Awards” on the main navigation menu.
Screenshot highlighting the ‘Grants, Aid & Awards’ link in ACORN’s main navigation.
- You will be on the “Find Grants & Aid” section of the Grants, Aid & Awards page. From here, you will see a personalized collection of resources that will direct you to sources of financial aid, grants and awards that you may be eligible for. On this page, you can select the “Find Awards” tab.
- Once you’re on the Find Awards page, you will see a personalized page with resources for your division, as well as a link to the Award Explorer page.
Instructional video: All campuses
- From the ACORN dashboard, select ‘Financial Account’ on the main navigation menu under Finances.
- On the Financial Account screen, locate the direct deposit card and select ‘Direct Deposit’.
- Select ‘Enter Banking Info’.
- Enter your banking information. You can find your Transit, Bank and Account numbers by requesting a blank cheque or a print-out of your banking information from your bank.
- Select ‘Add This Information Now’.
- After you have successfully added your banking information, you will get a confirmation message.
Instructional videos: Undergrad student | Grad student
- To defer fees, click ‘Tuition Fee Deferral’ on ACORN’s main navigation under Finances.
- If you are eligible to defer fees, click on the declaration checkbox, and click ‘Process Fee Deferral’ and confirm.
Instructional video: All campuses
On the ACORN dashboard, select ‘View invoice’ on the Finances status box.
Finances
- From the ACORN Dashboard, select “Grants, Aid & Awards” on the main navigation menu. Alternatively, select “View My Awards” on the Dashboard Finances card.
- You will be taken to the My Awards screen. If you selected the “Grants, Aid & Awards” navigation link, select the “My Grants, Aid & Awards” Tab towards the top of the screen to get to My Grants, Aid & Awards.
- If you have any received grants, aid or awards, you will see individual payments listed on this screen along with details like payment date, payment status, payment method and payment amount. Some awards are disbursed in multiple installments. If you have an award for which you have received at least one payment, you will see future payments for that award in the “Upcoming” section. Please note that changes to your registration status may affect your eligibility to receive these future payments.
Instructional video: All campuses
From the ACORN dashboard, select “Tax Forms” on the main navigation menu under Finances.
- From the ACORN dashboard, select ‘Financial Account’ on the main navigation under Finances.
- Select ‘Payment History’ on the sub list of items under the Financial Account menu heading.
- From the ACORN dashboard, select the “Make a Payment” link on the main navigation or the “Make a Payment” button within the Finances card.
- You will arrive on the Make a Payment Page, which contains information about different ways to pay your fees, as well as payment deadlines. To begin the credit card payment process, select the “Pay Tuition & Fees by Credit Card” button. Keep in mind that a 2.5% Service Fee—charged by and paid to the payment service Moneris—will apply to credit card transactions.
- After you have read the instructions on the Credit Card Payment page, fill out your billing information.
- Enter the amount you want to pay. Please note that your payment amount cannot exceed your outstanding balance in ACORN. After entering your payment amount, the total charge will display. This amount includes the service fee. Read and agree to the terms & conditions and select the “Make Payment” button to move on to the credit card payment step.
- A pop-up window will appear and ask for your credit card details. Enter your credit card information and select the “Checkout” button to complete your payment.
- You will be taken to the Payment History page, and a success message will appear if the payment was successful. Your payment will be processed by Moneris within approximately two business days. Select the link in the Transaction Description column that says “Credit Card Tuition & Fee Payment – Awaiting Confirmation” to view and download your receipt. You will not be able to make another payment until the pending payment has been approved.
Before paying an admission deposit, please make sure you have accepted the admission offer to your degree program by following your division’s instructions. For undergraduate students who applied through OUAC, you will need to accept your offer on OUAC.
- From the ACORN dashboard, you will see the admission deposit that you can pay for in the Finances card. Multiple deposits may appear here if you were admitted to multiple programs, so please ensure you pay for the right one. Select the “Make a Payment” link on the main navigation or the “Make a Payment” button within the Finances card.
- You will arrive on the Make a Payment Page, where you can learn about your options for making tuition & fee and admission deposit payments. Admission deposit payments can only be paid by credit card on ACORN. To begin the credit card payment process, select the “Pay Deposit by Credit Card” button. Keep in mind that a 2.5% Service Fee—charged by and paid to the payment service Moneris—will apply to credit card transactions.
- If you have the option to pay deposits for multiple degree programs, please ensure you select the correct one. After you have read the instructions, fill out your billing information.
If you are only paying for one deposit, the payment page will look like the following:
If you have the option to pay more than one deposit, the payment page will look like the following:
- Admission deposits can only be paid in full, so you cannot change the amount to pay. The total charge will display, including the service fee. Read and agree to the terms & conditions and select the “Make Payment” button to move on to the credit card payment step.
- A pop-up window will appear and ask for your credit card details. Enter your credit card information and select the “Checkout” button to complete your payment.
- You will be taken to the Payment History page, and a success message will appear if the payment was successful. Your payment will be processed by Moneris within approximately two to three business days. Select the link in the Transaction Description column that says “Credit Card Admission Deposit – Awaiting Confirmation” to view and download your receipt.
As of Summer 2018, if you will be receiving Full-Time OSAP for the Summer or Fall/Winter sessions, you will be able to see an estimate for what you may need to pay U of T once your upcoming OSAP is applied against your tuition & fees (learn about eligibility for Full-Time OSAP).
This amount is called your “Net Cost”, and it will help you plan ahead and estimate how much in awards funding you may need to seek, or how much you may need to pay out of pocket.
Accessing Your Net Cost
If you will be receiving Full-Time OSAP payments for the upcoming session, you can access your Net Cost page from the ACORN Dashboard.
You can also go to Financial Account > Invoice & Net Cost via the main navigation, or click the “View Net Cost” button within the Financial Information card on your Financial Account page.
Understanding Your Net Cost
Your Invoice and Net Cost exist on the same page, and you can switch back and forth between them using the two tabs towards the top. Your Net Cost overview for the entire Fall-Winter session is displayed at the top of the page, and contains your tuition and fee charges, anticipated OSAP and received OSAP for the entire Fall-Winter session. Below, your Net Cost is broken down into the Fall and Winter terms individually, and you can find your tuition and fee breakdown and estimated and received OSAP for each term.
For specific definitions of each field, you can hover over an amount—or tap it on mobile—to see more information about it.
Why You May Not See Your Net Cost
If you see a message like the ones above, it means you cannot see your Net Cost information due to one of the following reasons:
- You are not eligible for Full-Time OSAP
- You are receiving or are eligible only for Part-Time OSAP
- You are not eligible for OSAP for the upcoming term
- You applied for OSAP but your application has been closed
In these cases, unfortunately ACORN cannot display your Net Cost because it does not have an OSAP funding estimate.
Getting Help & More Information
Who to Contact for Help
- For OSAP help, visit the OSAP website. If you still need help, contact osap.staff@utoronto.ca
- For questions about your invoice or charges, contact Student Accounts via ACORN’s Help & Contact form
Net Cost
Your actual Net Cost may vary if the information used to calculate your OSAP assessment is updated.
OSAP
Your Anticipated OSAP is the amount of assistance that OSAP will send directly to the University of Toronto to apply to your tuition and other fees, and is based on your most recent OSAP assessment. If you do not register in the program or course load you indicated on your OSAP application, your eligibility for this assistance may change.
If your Anticipated and Received OSAP amounts are less than your total OSAP funding, OSAP will deposit the difference directly to your bank account. Log in to your OSAP account for the current status of your grants and loans.
There are circumstances where grants provided through OSAP may be converted into OSAP student loans. OSAP grants reflected in your net cost do not include the Ontario Living and Learning Grant (for Crown Wards only).
The financial planning calculator is an exploratory tool that anyone can use in order to estimate what a single year of study might cost at U of T. As an alternative to this article, you can learn how to use the tool by watching this three-minute video.
Before you begin, you should have a general idea of what you will be studying during the upcoming academic year and what your income and savings will be from all sources. This can include summer job savings, expected job earnings for the upcoming academic year or any financial assistance and awards you have received or expect to receive.
- To begin, go to the Financial Planning Calculator and click ‘Start Planning’.
- Provide background information by selecting options that currently apply to you, or if you are exploring your options, simply select which options you think apply to you. You can always change them later to see how your expenses will change. Click ‘Continue’ to proceed to the Estimated Expenses section.
- Estimate your various sources of income to the best of your ability. The more accurate your income estimates are, the more accurate our calculations and financial recommendations will be. If you have no income to enter for a particular field, you may leave it blank. If you want more information about what belongs in each expenses field, hover over (or tap, on a mobile device) the label you are curious about. Click ‘Continue’ to proceed to step 3.
- Based on the background information you provide, we calculate expense estimates for your upcoming academic year. We use educated estimates and calculated averages for many of these values, but feel free to change them to represent your individual situation more accurately. To see information about how each estimate was calculated, hover over (or tap) the label you are curious about. Click ‘Continue’ to proceed to the Summary page.
- On the Budget Summary page, you will see a graph displaying your income, expenses and a third bar indicating whether you are projected to be in a budget deficit or surplus.
- Below the graph you will find a list of personalized resources and next steps that you can take to find ways to save money or receive more financial support, depending on your situation. If you have a budget deficit, these resources will give you a few approaches to getting back on track.
- Want to see what it would cost to switch programs? Live away from home or on campus? Eat out at restaurants a little less and cook more? Use the “Jump to Step” menu to go back and change the information on the form.
- If you change any of your initial inputs, click ‘Recalculate Budget’ and you will be taken to the Budget Summary page with an updated budget summary and set of resources reflecting your changes.
If you have any comments on how you used this calculator or suggestions on how to improve it, please let us know via the “Send Feedback” button at the bottom of the calculator.
- From the ACORN Dashboard, select “Grants, Aid & Awards” on the main navigation menu.
Screenshot highlighting the ‘Grants, Aid & Awards’ link in ACORN’s main navigation.
- You will be on the “Find Grants & Aid” section of the Grants, Aid & Awards page. From here, you will see a personalized collection of resources that will direct you to sources of financial aid, grants and awards that you may be eligible for. On this page, you can select the “Find Awards” tab.
- Once you’re on the Find Awards page, you will see a personalized page with resources for your division, as well as a link to the Award Explorer page.
Instructional video: All campuses
- From the ACORN dashboard, select ‘Financial Account’ on the main navigation menu under Finances.
- On the Financial Account screen, locate the direct deposit card and select ‘Direct Deposit’.
- Select ‘Enter Banking Info’.
- Enter your banking information. You can find your Transit, Bank and Account numbers by requesting a blank cheque or a print-out of your banking information from your bank.
- Select ‘Add This Information Now’.
- After you have successfully added your banking information, you will get a confirmation message.
Instructional videos: Undergrad student | Grad student
- To defer fees, click ‘Tuition Fee Deferral’ on ACORN’s main navigation under Finances.
- If you are eligible to defer fees, click on the declaration checkbox, and click ‘Process Fee Deferral’ and confirm.
Instructional video: All campuses
On the ACORN dashboard, select ‘View invoice’ on the Finances status box.
Profile & Settings
- From the ACORN Dashboard, select “Grants, Aid & Awards” on the main navigation menu. Alternatively, select “View My Awards” on the Dashboard Finances card.
- You will be taken to the My Awards screen. If you selected the “Grants, Aid & Awards” navigation link, select the “My Grants, Aid & Awards” Tab towards the top of the screen to get to My Grants, Aid & Awards.
- If you have any received grants, aid or awards, you will see individual payments listed on this screen along with details like payment date, payment status, payment method and payment amount. Some awards are disbursed in multiple installments. If you have an award for which you have received at least one payment, you will see future payments for that award in the “Upcoming” section. Please note that changes to your registration status may affect your eligibility to receive these future payments.
Instructional video: All campuses
From the ACORN dashboard, select “Tax Forms” on the main navigation menu under Finances.
- From the ACORN dashboard, select ‘Financial Account’ on the main navigation under Finances.
- Select ‘Payment History’ on the sub list of items under the Financial Account menu heading.
- From the ACORN dashboard, select the “Make a Payment” link on the main navigation or the “Make a Payment” button within the Finances card.
- You will arrive on the Make a Payment Page, which contains information about different ways to pay your fees, as well as payment deadlines. To begin the credit card payment process, select the “Pay Tuition & Fees by Credit Card” button. Keep in mind that a 2.5% Service Fee—charged by and paid to the payment service Moneris—will apply to credit card transactions.
- After you have read the instructions on the Credit Card Payment page, fill out your billing information.
- Enter the amount you want to pay. Please note that your payment amount cannot exceed your outstanding balance in ACORN. After entering your payment amount, the total charge will display. This amount includes the service fee. Read and agree to the terms & conditions and select the “Make Payment” button to move on to the credit card payment step.
- A pop-up window will appear and ask for your credit card details. Enter your credit card information and select the “Checkout” button to complete your payment.
- You will be taken to the Payment History page, and a success message will appear if the payment was successful. Your payment will be processed by Moneris within approximately two business days. Select the link in the Transaction Description column that says “Credit Card Tuition & Fee Payment – Awaiting Confirmation” to view and download your receipt. You will not be able to make another payment until the pending payment has been approved.
Before paying an admission deposit, please make sure you have accepted the admission offer to your degree program by following your division’s instructions. For undergraduate students who applied through OUAC, you will need to accept your offer on OUAC.
- From the ACORN dashboard, you will see the admission deposit that you can pay for in the Finances card. Multiple deposits may appear here if you were admitted to multiple programs, so please ensure you pay for the right one. Select the “Make a Payment” link on the main navigation or the “Make a Payment” button within the Finances card.
- You will arrive on the Make a Payment Page, where you can learn about your options for making tuition & fee and admission deposit payments. Admission deposit payments can only be paid by credit card on ACORN. To begin the credit card payment process, select the “Pay Deposit by Credit Card” button. Keep in mind that a 2.5% Service Fee—charged by and paid to the payment service Moneris—will apply to credit card transactions.
- If you have the option to pay deposits for multiple degree programs, please ensure you select the correct one. After you have read the instructions, fill out your billing information.
If you are only paying for one deposit, the payment page will look like the following:
If you have the option to pay more than one deposit, the payment page will look like the following:
- Admission deposits can only be paid in full, so you cannot change the amount to pay. The total charge will display, including the service fee. Read and agree to the terms & conditions and select the “Make Payment” button to move on to the credit card payment step.
- A pop-up window will appear and ask for your credit card details. Enter your credit card information and select the “Checkout” button to complete your payment.
- You will be taken to the Payment History page, and a success message will appear if the payment was successful. Your payment will be processed by Moneris within approximately two to three business days. Select the link in the Transaction Description column that says “Credit Card Admission Deposit – Awaiting Confirmation” to view and download your receipt.
As of Summer 2018, if you will be receiving Full-Time OSAP for the Summer or Fall/Winter sessions, you will be able to see an estimate for what you may need to pay U of T once your upcoming OSAP is applied against your tuition & fees (learn about eligibility for Full-Time OSAP).
This amount is called your “Net Cost”, and it will help you plan ahead and estimate how much in awards funding you may need to seek, or how much you may need to pay out of pocket.
Accessing Your Net Cost
If you will be receiving Full-Time OSAP payments for the upcoming session, you can access your Net Cost page from the ACORN Dashboard.
You can also go to Financial Account > Invoice & Net Cost via the main navigation, or click the “View Net Cost” button within the Financial Information card on your Financial Account page.
Understanding Your Net Cost
Your Invoice and Net Cost exist on the same page, and you can switch back and forth between them using the two tabs towards the top. Your Net Cost overview for the entire Fall-Winter session is displayed at the top of the page, and contains your tuition and fee charges, anticipated OSAP and received OSAP for the entire Fall-Winter session. Below, your Net Cost is broken down into the Fall and Winter terms individually, and you can find your tuition and fee breakdown and estimated and received OSAP for each term.
For specific definitions of each field, you can hover over an amount—or tap it on mobile—to see more information about it.
Why You May Not See Your Net Cost
If you see a message like the ones above, it means you cannot see your Net Cost information due to one of the following reasons:
- You are not eligible for Full-Time OSAP
- You are receiving or are eligible only for Part-Time OSAP
- You are not eligible for OSAP for the upcoming term
- You applied for OSAP but your application has been closed
In these cases, unfortunately ACORN cannot display your Net Cost because it does not have an OSAP funding estimate.
Getting Help & More Information
Who to Contact for Help
- For OSAP help, visit the OSAP website. If you still need help, contact osap.staff@utoronto.ca
- For questions about your invoice or charges, contact Student Accounts via ACORN’s Help & Contact form
Net Cost
Your actual Net Cost may vary if the information used to calculate your OSAP assessment is updated.
OSAP
Your Anticipated OSAP is the amount of assistance that OSAP will send directly to the University of Toronto to apply to your tuition and other fees, and is based on your most recent OSAP assessment. If you do not register in the program or course load you indicated on your OSAP application, your eligibility for this assistance may change.
If your Anticipated and Received OSAP amounts are less than your total OSAP funding, OSAP will deposit the difference directly to your bank account. Log in to your OSAP account for the current status of your grants and loans.
There are circumstances where grants provided through OSAP may be converted into OSAP student loans. OSAP grants reflected in your net cost do not include the Ontario Living and Learning Grant (for Crown Wards only).
The financial planning calculator is an exploratory tool that anyone can use in order to estimate what a single year of study might cost at U of T. As an alternative to this article, you can learn how to use the tool by watching this three-minute video.
Before you begin, you should have a general idea of what you will be studying during the upcoming academic year and what your income and savings will be from all sources. This can include summer job savings, expected job earnings for the upcoming academic year or any financial assistance and awards you have received or expect to receive.
- To begin, go to the Financial Planning Calculator and click ‘Start Planning’.
- Provide background information by selecting options that currently apply to you, or if you are exploring your options, simply select which options you think apply to you. You can always change them later to see how your expenses will change. Click ‘Continue’ to proceed to the Estimated Expenses section.
- Estimate your various sources of income to the best of your ability. The more accurate your income estimates are, the more accurate our calculations and financial recommendations will be. If you have no income to enter for a particular field, you may leave it blank. If you want more information about what belongs in each expenses field, hover over (or tap, on a mobile device) the label you are curious about. Click ‘Continue’ to proceed to step 3.
- Based on the background information you provide, we calculate expense estimates for your upcoming academic year. We use educated estimates and calculated averages for many of these values, but feel free to change them to represent your individual situation more accurately. To see information about how each estimate was calculated, hover over (or tap) the label you are curious about. Click ‘Continue’ to proceed to the Summary page.
- On the Budget Summary page, you will see a graph displaying your income, expenses and a third bar indicating whether you are projected to be in a budget deficit or surplus.
- Below the graph you will find a list of personalized resources and next steps that you can take to find ways to save money or receive more financial support, depending on your situation. If you have a budget deficit, these resources will give you a few approaches to getting back on track.
- Want to see what it would cost to switch programs? Live away from home or on campus? Eat out at restaurants a little less and cook more? Use the “Jump to Step” menu to go back and change the information on the form.
- If you change any of your initial inputs, click ‘Recalculate Budget’ and you will be taken to the Budget Summary page with an updated budget summary and set of resources reflecting your changes.
If you have any comments on how you used this calculator or suggestions on how to improve it, please let us know via the “Send Feedback” button at the bottom of the calculator.
- From the ACORN Dashboard, select “Grants, Aid & Awards” on the main navigation menu.
Screenshot highlighting the ‘Grants, Aid & Awards’ link in ACORN’s main navigation.
- You will be on the “Find Grants & Aid” section of the Grants, Aid & Awards page. From here, you will see a personalized collection of resources that will direct you to sources of financial aid, grants and awards that you may be eligible for. On this page, you can select the “Find Awards” tab.
- Once you’re on the Find Awards page, you will see a personalized page with resources for your division, as well as a link to the Award Explorer page.
Instructional video: All campuses
- From the ACORN dashboard, select ‘Financial Account’ on the main navigation menu under Finances.
- On the Financial Account screen, locate the direct deposit card and select ‘Direct Deposit’.
- Select ‘Enter Banking Info’.
- Enter your banking information. You can find your Transit, Bank and Account numbers by requesting a blank cheque or a print-out of your banking information from your bank.
- Select ‘Add This Information Now’.
- After you have successfully added your banking information, you will get a confirmation message.
Instructional videos: Undergrad student | Grad student
- To defer fees, click ‘Tuition Fee Deferral’ on ACORN’s main navigation under Finances.
- If you are eligible to defer fees, click on the declaration checkbox, and click ‘Process Fee Deferral’ and confirm.
Instructional video: All campuses
On the ACORN dashboard, select ‘View invoice’ on the Finances status box.
UTORid & Password Reset
- From the ACORN Dashboard, select “Grants, Aid & Awards” on the main navigation menu. Alternatively, select “View My Awards” on the Dashboard Finances card.
- You will be taken to the My Awards screen. If you selected the “Grants, Aid & Awards” navigation link, select the “My Grants, Aid & Awards” Tab towards the top of the screen to get to My Grants, Aid & Awards.
- If you have any received grants, aid or awards, you will see individual payments listed on this screen along with details like payment date, payment status, payment method and payment amount. Some awards are disbursed in multiple installments. If you have an award for which you have received at least one payment, you will see future payments for that award in the “Upcoming” section. Please note that changes to your registration status may affect your eligibility to receive these future payments.
Instructional video: All campuses
From the ACORN dashboard, select “Tax Forms” on the main navigation menu under Finances.
- From the ACORN dashboard, select ‘Financial Account’ on the main navigation under Finances.
- Select ‘Payment History’ on the sub list of items under the Financial Account menu heading.
- From the ACORN dashboard, select the “Make a Payment” link on the main navigation or the “Make a Payment” button within the Finances card.
- You will arrive on the Make a Payment Page, which contains information about different ways to pay your fees, as well as payment deadlines. To begin the credit card payment process, select the “Pay Tuition & Fees by Credit Card” button. Keep in mind that a 2.5% Service Fee—charged by and paid to the payment service Moneris—will apply to credit card transactions.
- After you have read the instructions on the Credit Card Payment page, fill out your billing information.
- Enter the amount you want to pay. Please note that your payment amount cannot exceed your outstanding balance in ACORN. After entering your payment amount, the total charge will display. This amount includes the service fee. Read and agree to the terms & conditions and select the “Make Payment” button to move on to the credit card payment step.
- A pop-up window will appear and ask for your credit card details. Enter your credit card information and select the “Checkout” button to complete your payment.
- You will be taken to the Payment History page, and a success message will appear if the payment was successful. Your payment will be processed by Moneris within approximately two business days. Select the link in the Transaction Description column that says “Credit Card Tuition & Fee Payment – Awaiting Confirmation” to view and download your receipt. You will not be able to make another payment until the pending payment has been approved.
Before paying an admission deposit, please make sure you have accepted the admission offer to your degree program by following your division’s instructions. For undergraduate students who applied through OUAC, you will need to accept your offer on OUAC.
- From the ACORN dashboard, you will see the admission deposit that you can pay for in the Finances card. Multiple deposits may appear here if you were admitted to multiple programs, so please ensure you pay for the right one. Select the “Make a Payment” link on the main navigation or the “Make a Payment” button within the Finances card.
- You will arrive on the Make a Payment Page, where you can learn about your options for making tuition & fee and admission deposit payments. Admission deposit payments can only be paid by credit card on ACORN. To begin the credit card payment process, select the “Pay Deposit by Credit Card” button. Keep in mind that a 2.5% Service Fee—charged by and paid to the payment service Moneris—will apply to credit card transactions.
- If you have the option to pay deposits for multiple degree programs, please ensure you select the correct one. After you have read the instructions, fill out your billing information.
If you are only paying for one deposit, the payment page will look like the following:
If you have the option to pay more than one deposit, the payment page will look like the following:
- Admission deposits can only be paid in full, so you cannot change the amount to pay. The total charge will display, including the service fee. Read and agree to the terms & conditions and select the “Make Payment” button to move on to the credit card payment step.
- A pop-up window will appear and ask for your credit card details. Enter your credit card information and select the “Checkout” button to complete your payment.
- You will be taken to the Payment History page, and a success message will appear if the payment was successful. Your payment will be processed by Moneris within approximately two to three business days. Select the link in the Transaction Description column that says “Credit Card Admission Deposit – Awaiting Confirmation” to view and download your receipt.
As of Summer 2018, if you will be receiving Full-Time OSAP for the Summer or Fall/Winter sessions, you will be able to see an estimate for what you may need to pay U of T once your upcoming OSAP is applied against your tuition & fees (learn about eligibility for Full-Time OSAP).
This amount is called your “Net Cost”, and it will help you plan ahead and estimate how much in awards funding you may need to seek, or how much you may need to pay out of pocket.
Accessing Your Net Cost
If you will be receiving Full-Time OSAP payments for the upcoming session, you can access your Net Cost page from the ACORN Dashboard.
You can also go to Financial Account > Invoice & Net Cost via the main navigation, or click the “View Net Cost” button within the Financial Information card on your Financial Account page.
Understanding Your Net Cost
Your Invoice and Net Cost exist on the same page, and you can switch back and forth between them using the two tabs towards the top. Your Net Cost overview for the entire Fall-Winter session is displayed at the top of the page, and contains your tuition and fee charges, anticipated OSAP and received OSAP for the entire Fall-Winter session. Below, your Net Cost is broken down into the Fall and Winter terms individually, and you can find your tuition and fee breakdown and estimated and received OSAP for each term.
For specific definitions of each field, you can hover over an amount—or tap it on mobile—to see more information about it.
Why You May Not See Your Net Cost
If you see a message like the ones above, it means you cannot see your Net Cost information due to one of the following reasons:
- You are not eligible for Full-Time OSAP
- You are receiving or are eligible only for Part-Time OSAP
- You are not eligible for OSAP for the upcoming term
- You applied for OSAP but your application has been closed
In these cases, unfortunately ACORN cannot display your Net Cost because it does not have an OSAP funding estimate.
Getting Help & More Information
Who to Contact for Help
- For OSAP help, visit the OSAP website. If you still need help, contact osap.staff@utoronto.ca
- For questions about your invoice or charges, contact Student Accounts via ACORN’s Help & Contact form
Net Cost
Your actual Net Cost may vary if the information used to calculate your OSAP assessment is updated.
OSAP
Your Anticipated OSAP is the amount of assistance that OSAP will send directly to the University of Toronto to apply to your tuition and other fees, and is based on your most recent OSAP assessment. If you do not register in the program or course load you indicated on your OSAP application, your eligibility for this assistance may change.
If your Anticipated and Received OSAP amounts are less than your total OSAP funding, OSAP will deposit the difference directly to your bank account. Log in to your OSAP account for the current status of your grants and loans.
There are circumstances where grants provided through OSAP may be converted into OSAP student loans. OSAP grants reflected in your net cost do not include the Ontario Living and Learning Grant (for Crown Wards only).
The financial planning calculator is an exploratory tool that anyone can use in order to estimate what a single year of study might cost at U of T. As an alternative to this article, you can learn how to use the tool by watching this three-minute video.
Before you begin, you should have a general idea of what you will be studying during the upcoming academic year and what your income and savings will be from all sources. This can include summer job savings, expected job earnings for the upcoming academic year or any financial assistance and awards you have received or expect to receive.
- To begin, go to the Financial Planning Calculator and click ‘Start Planning’.
- Provide background information by selecting options that currently apply to you, or if you are exploring your options, simply select which options you think apply to you. You can always change them later to see how your expenses will change. Click ‘Continue’ to proceed to the Estimated Expenses section.
- Estimate your various sources of income to the best of your ability. The more accurate your income estimates are, the more accurate our calculations and financial recommendations will be. If you have no income to enter for a particular field, you may leave it blank. If you want more information about what belongs in each expenses field, hover over (or tap, on a mobile device) the label you are curious about. Click ‘Continue’ to proceed to step 3.
- Based on the background information you provide, we calculate expense estimates for your upcoming academic year. We use educated estimates and calculated averages for many of these values, but feel free to change them to represent your individual situation more accurately. To see information about how each estimate was calculated, hover over (or tap) the label you are curious about. Click ‘Continue’ to proceed to the Summary page.
- On the Budget Summary page, you will see a graph displaying your income, expenses and a third bar indicating whether you are projected to be in a budget deficit or surplus.
- Below the graph you will find a list of personalized resources and next steps that you can take to find ways to save money or receive more financial support, depending on your situation. If you have a budget deficit, these resources will give you a few approaches to getting back on track.
- Want to see what it would cost to switch programs? Live away from home or on campus? Eat out at restaurants a little less and cook more? Use the “Jump to Step” menu to go back and change the information on the form.
- If you change any of your initial inputs, click ‘Recalculate Budget’ and you will be taken to the Budget Summary page with an updated budget summary and set of resources reflecting your changes.
If you have any comments on how you used this calculator or suggestions on how to improve it, please let us know via the “Send Feedback” button at the bottom of the calculator.
- From the ACORN Dashboard, select “Grants, Aid & Awards” on the main navigation menu.
Screenshot highlighting the ‘Grants, Aid & Awards’ link in ACORN’s main navigation.
- You will be on the “Find Grants & Aid” section of the Grants, Aid & Awards page. From here, you will see a personalized collection of resources that will direct you to sources of financial aid, grants and awards that you may be eligible for. On this page, you can select the “Find Awards” tab.
- Once you’re on the Find Awards page, you will see a personalized page with resources for your division, as well as a link to the Award Explorer page.
Instructional video: All campuses
- From the ACORN dashboard, select ‘Financial Account’ on the main navigation menu under Finances.
- On the Financial Account screen, locate the direct deposit card and select ‘Direct Deposit’.
- Select ‘Enter Banking Info’.
- Enter your banking information. You can find your Transit, Bank and Account numbers by requesting a blank cheque or a print-out of your banking information from your bank.
- Select ‘Add This Information Now’.
- After you have successfully added your banking information, you will get a confirmation message.
Instructional videos: Undergrad student | Grad student
- To defer fees, click ‘Tuition Fee Deferral’ on ACORN’s main navigation under Finances.
- If you are eligible to defer fees, click on the declaration checkbox, and click ‘Process Fee Deferral’ and confirm.
Instructional video: All campuses
On the ACORN dashboard, select ‘View invoice’ on the Finances status box.
Notifications & Activity
- From the ACORN Dashboard, select “Grants, Aid & Awards” on the main navigation menu. Alternatively, select “View My Awards” on the Dashboard Finances card.
- You will be taken to the My Awards screen. If you selected the “Grants, Aid & Awards” navigation link, select the “My Grants, Aid & Awards” Tab towards the top of the screen to get to My Grants, Aid & Awards.
- If you have any received grants, aid or awards, you will see individual payments listed on this screen along with details like payment date, payment status, payment method and payment amount. Some awards are disbursed in multiple installments. If you have an award for which you have received at least one payment, you will see future payments for that award in the “Upcoming” section. Please note that changes to your registration status may affect your eligibility to receive these future payments.
Instructional video: All campuses
From the ACORN dashboard, select “Tax Forms” on the main navigation menu under Finances.
- From the ACORN dashboard, select ‘Financial Account’ on the main navigation under Finances.
- Select ‘Payment History’ on the sub list of items under the Financial Account menu heading.
- From the ACORN dashboard, select the “Make a Payment” link on the main navigation or the “Make a Payment” button within the Finances card.
- You will arrive on the Make a Payment Page, which contains information about different ways to pay your fees, as well as payment deadlines. To begin the credit card payment process, select the “Pay Tuition & Fees by Credit Card” button. Keep in mind that a 2.5% Service Fee—charged by and paid to the payment service Moneris—will apply to credit card transactions.
- After you have read the instructions on the Credit Card Payment page, fill out your billing information.
- Enter the amount you want to pay. Please note that your payment amount cannot exceed your outstanding balance in ACORN. After entering your payment amount, the total charge will display. This amount includes the service fee. Read and agree to the terms & conditions and select the “Make Payment” button to move on to the credit card payment step.
- A pop-up window will appear and ask for your credit card details. Enter your credit card information and select the “Checkout” button to complete your payment.
- You will be taken to the Payment History page, and a success message will appear if the payment was successful. Your payment will be processed by Moneris within approximately two business days. Select the link in the Transaction Description column that says “Credit Card Tuition & Fee Payment – Awaiting Confirmation” to view and download your receipt. You will not be able to make another payment until the pending payment has been approved.
Before paying an admission deposit, please make sure you have accepted the admission offer to your degree program by following your division’s instructions. For undergraduate students who applied through OUAC, you will need to accept your offer on OUAC.
- From the ACORN dashboard, you will see the admission deposit that you can pay for in the Finances card. Multiple deposits may appear here if you were admitted to multiple programs, so please ensure you pay for the right one. Select the “Make a Payment” link on the main navigation or the “Make a Payment” button within the Finances card.
- You will arrive on the Make a Payment Page, where you can learn about your options for making tuition & fee and admission deposit payments. Admission deposit payments can only be paid by credit card on ACORN. To begin the credit card payment process, select the “Pay Deposit by Credit Card” button. Keep in mind that a 2.5% Service Fee—charged by and paid to the payment service Moneris—will apply to credit card transactions.
- If you have the option to pay deposits for multiple degree programs, please ensure you select the correct one. After you have read the instructions, fill out your billing information.
If you are only paying for one deposit, the payment page will look like the following:
If you have the option to pay more than one deposit, the payment page will look like the following:
- Admission deposits can only be paid in full, so you cannot change the amount to pay. The total charge will display, including the service fee. Read and agree to the terms & conditions and select the “Make Payment” button to move on to the credit card payment step.
- A pop-up window will appear and ask for your credit card details. Enter your credit card information and select the “Checkout” button to complete your payment.
- You will be taken to the Payment History page, and a success message will appear if the payment was successful. Your payment will be processed by Moneris within approximately two to three business days. Select the link in the Transaction Description column that says “Credit Card Admission Deposit – Awaiting Confirmation” to view and download your receipt.
As of Summer 2018, if you will be receiving Full-Time OSAP for the Summer or Fall/Winter sessions, you will be able to see an estimate for what you may need to pay U of T once your upcoming OSAP is applied against your tuition & fees (learn about eligibility for Full-Time OSAP).
This amount is called your “Net Cost”, and it will help you plan ahead and estimate how much in awards funding you may need to seek, or how much you may need to pay out of pocket.
Accessing Your Net Cost
If you will be receiving Full-Time OSAP payments for the upcoming session, you can access your Net Cost page from the ACORN Dashboard.
You can also go to Financial Account > Invoice & Net Cost via the main navigation, or click the “View Net Cost” button within the Financial Information card on your Financial Account page.
Understanding Your Net Cost
Your Invoice and Net Cost exist on the same page, and you can switch back and forth between them using the two tabs towards the top. Your Net Cost overview for the entire Fall-Winter session is displayed at the top of the page, and contains your tuition and fee charges, anticipated OSAP and received OSAP for the entire Fall-Winter session. Below, your Net Cost is broken down into the Fall and Winter terms individually, and you can find your tuition and fee breakdown and estimated and received OSAP for each term.
For specific definitions of each field, you can hover over an amount—or tap it on mobile—to see more information about it.
Why You May Not See Your Net Cost
If you see a message like the ones above, it means you cannot see your Net Cost information due to one of the following reasons:
- You are not eligible for Full-Time OSAP
- You are receiving or are eligible only for Part-Time OSAP
- You are not eligible for OSAP for the upcoming term
- You applied for OSAP but your application has been closed
In these cases, unfortunately ACORN cannot display your Net Cost because it does not have an OSAP funding estimate.
Getting Help & More Information
Who to Contact for Help
- For OSAP help, visit the OSAP website. If you still need help, contact osap.staff@utoronto.ca
- For questions about your invoice or charges, contact Student Accounts via ACORN’s Help & Contact form
Net Cost
Your actual Net Cost may vary if the information used to calculate your OSAP assessment is updated.
OSAP
Your Anticipated OSAP is the amount of assistance that OSAP will send directly to the University of Toronto to apply to your tuition and other fees, and is based on your most recent OSAP assessment. If you do not register in the program or course load you indicated on your OSAP application, your eligibility for this assistance may change.
If your Anticipated and Received OSAP amounts are less than your total OSAP funding, OSAP will deposit the difference directly to your bank account. Log in to your OSAP account for the current status of your grants and loans.
There are circumstances where grants provided through OSAP may be converted into OSAP student loans. OSAP grants reflected in your net cost do not include the Ontario Living and Learning Grant (for Crown Wards only).
The financial planning calculator is an exploratory tool that anyone can use in order to estimate what a single year of study might cost at U of T. As an alternative to this article, you can learn how to use the tool by watching this three-minute video.
Before you begin, you should have a general idea of what you will be studying during the upcoming academic year and what your income and savings will be from all sources. This can include summer job savings, expected job earnings for the upcoming academic year or any financial assistance and awards you have received or expect to receive.
- To begin, go to the Financial Planning Calculator and click ‘Start Planning’.
- Provide background information by selecting options that currently apply to you, or if you are exploring your options, simply select which options you think apply to you. You can always change them later to see how your expenses will change. Click ‘Continue’ to proceed to the Estimated Expenses section.
- Estimate your various sources of income to the best of your ability. The more accurate your income estimates are, the more accurate our calculations and financial recommendations will be. If you have no income to enter for a particular field, you may leave it blank. If you want more information about what belongs in each expenses field, hover over (or tap, on a mobile device) the label you are curious about. Click ‘Continue’ to proceed to step 3.
- Based on the background information you provide, we calculate expense estimates for your upcoming academic year. We use educated estimates and calculated averages for many of these values, but feel free to change them to represent your individual situation more accurately. To see information about how each estimate was calculated, hover over (or tap) the label you are curious about. Click ‘Continue’ to proceed to the Summary page.
- On the Budget Summary page, you will see a graph displaying your income, expenses and a third bar indicating whether you are projected to be in a budget deficit or surplus.
- Below the graph you will find a list of personalized resources and next steps that you can take to find ways to save money or receive more financial support, depending on your situation. If you have a budget deficit, these resources will give you a few approaches to getting back on track.
- Want to see what it would cost to switch programs? Live away from home or on campus? Eat out at restaurants a little less and cook more? Use the “Jump to Step” menu to go back and change the information on the form.
- If you change any of your initial inputs, click ‘Recalculate Budget’ and you will be taken to the Budget Summary page with an updated budget summary and set of resources reflecting your changes.
If you have any comments on how you used this calculator or suggestions on how to improve it, please let us know via the “Send Feedback” button at the bottom of the calculator.
- From the ACORN Dashboard, select “Grants, Aid & Awards” on the main navigation menu.
Screenshot highlighting the ‘Grants, Aid & Awards’ link in ACORN’s main navigation.
- You will be on the “Find Grants & Aid” section of the Grants, Aid & Awards page. From here, you will see a personalized collection of resources that will direct you to sources of financial aid, grants and awards that you may be eligible for. On this page, you can select the “Find Awards” tab.
- Once you’re on the Find Awards page, you will see a personalized page with resources for your division, as well as a link to the Award Explorer page.
Instructional video: All campuses
- From the ACORN dashboard, select ‘Financial Account’ on the main navigation menu under Finances.
- On the Financial Account screen, locate the direct deposit card and select ‘Direct Deposit’.
- Select ‘Enter Banking Info’.
- Enter your banking information. You can find your Transit, Bank and Account numbers by requesting a blank cheque or a print-out of your banking information from your bank.
- Select ‘Add This Information Now’.
- After you have successfully added your banking information, you will get a confirmation message.
Instructional videos: Undergrad student | Grad student
- To defer fees, click ‘Tuition Fee Deferral’ on ACORN’s main navigation under Finances.
- If you are eligible to defer fees, click on the declaration checkbox, and click ‘Process Fee Deferral’ and confirm.
Instructional video: All campuses
On the ACORN dashboard, select ‘View invoice’ on the Finances status box.
Graduation & Convocation
- From the ACORN Dashboard, select “Grants, Aid & Awards” on the main navigation menu. Alternatively, select “View My Awards” on the Dashboard Finances card.
- You will be taken to the My Awards screen. If you selected the “Grants, Aid & Awards” navigation link, select the “My Grants, Aid & Awards” Tab towards the top of the screen to get to My Grants, Aid & Awards.
- If you have any received grants, aid or awards, you will see individual payments listed on this screen along with details like payment date, payment status, payment method and payment amount. Some awards are disbursed in multiple installments. If you have an award for which you have received at least one payment, you will see future payments for that award in the “Upcoming” section. Please note that changes to your registration status may affect your eligibility to receive these future payments.
Instructional video: All campuses
From the ACORN dashboard, select “Tax Forms” on the main navigation menu under Finances.
- From the ACORN dashboard, select ‘Financial Account’ on the main navigation under Finances.
- Select ‘Payment History’ on the sub list of items under the Financial Account menu heading.
- From the ACORN dashboard, select the “Make a Payment” link on the main navigation or the “Make a Payment” button within the Finances card.
- You will arrive on the Make a Payment Page, which contains information about different ways to pay your fees, as well as payment deadlines. To begin the credit card payment process, select the “Pay Tuition & Fees by Credit Card” button. Keep in mind that a 2.5% Service Fee—charged by and paid to the payment service Moneris—will apply to credit card transactions.
- After you have read the instructions on the Credit Card Payment page, fill out your billing information.
- Enter the amount you want to pay. Please note that your payment amount cannot exceed your outstanding balance in ACORN. After entering your payment amount, the total charge will display. This amount includes the service fee. Read and agree to the terms & conditions and select the “Make Payment” button to move on to the credit card payment step.
- A pop-up window will appear and ask for your credit card details. Enter your credit card information and select the “Checkout” button to complete your payment.
- You will be taken to the Payment History page, and a success message will appear if the payment was successful. Your payment will be processed by Moneris within approximately two business days. Select the link in the Transaction Description column that says “Credit Card Tuition & Fee Payment – Awaiting Confirmation” to view and download your receipt. You will not be able to make another payment until the pending payment has been approved.
Before paying an admission deposit, please make sure you have accepted the admission offer to your degree program by following your division’s instructions. For undergraduate students who applied through OUAC, you will need to accept your offer on OUAC.
- From the ACORN dashboard, you will see the admission deposit that you can pay for in the Finances card. Multiple deposits may appear here if you were admitted to multiple programs, so please ensure you pay for the right one. Select the “Make a Payment” link on the main navigation or the “Make a Payment” button within the Finances card.
- You will arrive on the Make a Payment Page, where you can learn about your options for making tuition & fee and admission deposit payments. Admission deposit payments can only be paid by credit card on ACORN. To begin the credit card payment process, select the “Pay Deposit by Credit Card” button. Keep in mind that a 2.5% Service Fee—charged by and paid to the payment service Moneris—will apply to credit card transactions.
- If you have the option to pay deposits for multiple degree programs, please ensure you select the correct one. After you have read the instructions, fill out your billing information.
If you are only paying for one deposit, the payment page will look like the following:
If you have the option to pay more than one deposit, the payment page will look like the following:
- Admission deposits can only be paid in full, so you cannot change the amount to pay. The total charge will display, including the service fee. Read and agree to the terms & conditions and select the “Make Payment” button to move on to the credit card payment step.
- A pop-up window will appear and ask for your credit card details. Enter your credit card information and select the “Checkout” button to complete your payment.
- You will be taken to the Payment History page, and a success message will appear if the payment was successful. Your payment will be processed by Moneris within approximately two to three business days. Select the link in the Transaction Description column that says “Credit Card Admission Deposit – Awaiting Confirmation” to view and download your receipt.
As of Summer 2018, if you will be receiving Full-Time OSAP for the Summer or Fall/Winter sessions, you will be able to see an estimate for what you may need to pay U of T once your upcoming OSAP is applied against your tuition & fees (learn about eligibility for Full-Time OSAP).
This amount is called your “Net Cost”, and it will help you plan ahead and estimate how much in awards funding you may need to seek, or how much you may need to pay out of pocket.
Accessing Your Net Cost
If you will be receiving Full-Time OSAP payments for the upcoming session, you can access your Net Cost page from the ACORN Dashboard.
You can also go to Financial Account > Invoice & Net Cost via the main navigation, or click the “View Net Cost” button within the Financial Information card on your Financial Account page.
Understanding Your Net Cost
Your Invoice and Net Cost exist on the same page, and you can switch back and forth between them using the two tabs towards the top. Your Net Cost overview for the entire Fall-Winter session is displayed at the top of the page, and contains your tuition and fee charges, anticipated OSAP and received OSAP for the entire Fall-Winter session. Below, your Net Cost is broken down into the Fall and Winter terms individually, and you can find your tuition and fee breakdown and estimated and received OSAP for each term.
For specific definitions of each field, you can hover over an amount—or tap it on mobile—to see more information about it.
Why You May Not See Your Net Cost
If you see a message like the ones above, it means you cannot see your Net Cost information due to one of the following reasons:
- You are not eligible for Full-Time OSAP
- You are receiving or are eligible only for Part-Time OSAP
- You are not eligible for OSAP for the upcoming term
- You applied for OSAP but your application has been closed
In these cases, unfortunately ACORN cannot display your Net Cost because it does not have an OSAP funding estimate.
Getting Help & More Information
Who to Contact for Help
- For OSAP help, visit the OSAP website. If you still need help, contact osap.staff@utoronto.ca
- For questions about your invoice or charges, contact Student Accounts via ACORN’s Help & Contact form
Net Cost
Your actual Net Cost may vary if the information used to calculate your OSAP assessment is updated.
OSAP
Your Anticipated OSAP is the amount of assistance that OSAP will send directly to the University of Toronto to apply to your tuition and other fees, and is based on your most recent OSAP assessment. If you do not register in the program or course load you indicated on your OSAP application, your eligibility for this assistance may change.
If your Anticipated and Received OSAP amounts are less than your total OSAP funding, OSAP will deposit the difference directly to your bank account. Log in to your OSAP account for the current status of your grants and loans.
There are circumstances where grants provided through OSAP may be converted into OSAP student loans. OSAP grants reflected in your net cost do not include the Ontario Living and Learning Grant (for Crown Wards only).
The financial planning calculator is an exploratory tool that anyone can use in order to estimate what a single year of study might cost at U of T. As an alternative to this article, you can learn how to use the tool by watching this three-minute video.
Before you begin, you should have a general idea of what you will be studying during the upcoming academic year and what your income and savings will be from all sources. This can include summer job savings, expected job earnings for the upcoming academic year or any financial assistance and awards you have received or expect to receive.
- To begin, go to the Financial Planning Calculator and click ‘Start Planning’.
- Provide background information by selecting options that currently apply to you, or if you are exploring your options, simply select which options you think apply to you. You can always change them later to see how your expenses will change. Click ‘Continue’ to proceed to the Estimated Expenses section.
- Estimate your various sources of income to the best of your ability. The more accurate your income estimates are, the more accurate our calculations and financial recommendations will be. If you have no income to enter for a particular field, you may leave it blank. If you want more information about what belongs in each expenses field, hover over (or tap, on a mobile device) the label you are curious about. Click ‘Continue’ to proceed to step 3.
- Based on the background information you provide, we calculate expense estimates for your upcoming academic year. We use educated estimates and calculated averages for many of these values, but feel free to change them to represent your individual situation more accurately. To see information about how each estimate was calculated, hover over (or tap) the label you are curious about. Click ‘Continue’ to proceed to the Summary page.
- On the Budget Summary page, you will see a graph displaying your income, expenses and a third bar indicating whether you are projected to be in a budget deficit or surplus.
- Below the graph you will find a list of personalized resources and next steps that you can take to find ways to save money or receive more financial support, depending on your situation. If you have a budget deficit, these resources will give you a few approaches to getting back on track.
- Want to see what it would cost to switch programs? Live away from home or on campus? Eat out at restaurants a little less and cook more? Use the “Jump to Step” menu to go back and change the information on the form.
- If you change any of your initial inputs, click ‘Recalculate Budget’ and you will be taken to the Budget Summary page with an updated budget summary and set of resources reflecting your changes.
If you have any comments on how you used this calculator or suggestions on how to improve it, please let us know via the “Send Feedback” button at the bottom of the calculator.
- From the ACORN Dashboard, select “Grants, Aid & Awards” on the main navigation menu.
Screenshot highlighting the ‘Grants, Aid & Awards’ link in ACORN’s main navigation.
- You will be on the “Find Grants & Aid” section of the Grants, Aid & Awards page. From here, you will see a personalized collection of resources that will direct you to sources of financial aid, grants and awards that you may be eligible for. On this page, you can select the “Find Awards” tab.
- Once you’re on the Find Awards page, you will see a personalized page with resources for your division, as well as a link to the Award Explorer page.
Instructional video: All campuses
- From the ACORN dashboard, select ‘Financial Account’ on the main navigation menu under Finances.
- On the Financial Account screen, locate the direct deposit card and select ‘Direct Deposit’.
- Select ‘Enter Banking Info’.
- Enter your banking information. You can find your Transit, Bank and Account numbers by requesting a blank cheque or a print-out of your banking information from your bank.
- Select ‘Add This Information Now’.
- After you have successfully added your banking information, you will get a confirmation message.
Instructional videos: Undergrad student | Grad student
- To defer fees, click ‘Tuition Fee Deferral’ on ACORN’s main navigation under Finances.
- If you are eligible to defer fees, click on the declaration checkbox, and click ‘Process Fee Deferral’ and confirm.
Instructional video: All campuses
On the ACORN dashboard, select ‘View invoice’ on the Finances status box.
Printing Transcripts & Other Documents
- From the ACORN Dashboard, select “Grants, Aid & Awards” on the main navigation menu. Alternatively, select “View My Awards” on the Dashboard Finances card.
- You will be taken to the My Awards screen. If you selected the “Grants, Aid & Awards” navigation link, select the “My Grants, Aid & Awards” Tab towards the top of the screen to get to My Grants, Aid & Awards.
- If you have any received grants, aid or awards, you will see individual payments listed on this screen along with details like payment date, payment status, payment method and payment amount. Some awards are disbursed in multiple installments. If you have an award for which you have received at least one payment, you will see future payments for that award in the “Upcoming” section. Please note that changes to your registration status may affect your eligibility to receive these future payments.
Instructional video: All campuses
From the ACORN dashboard, select “Tax Forms” on the main navigation menu under Finances.
- From the ACORN dashboard, select ‘Financial Account’ on the main navigation under Finances.
- Select ‘Payment History’ on the sub list of items under the Financial Account menu heading.
- From the ACORN dashboard, select the “Make a Payment” link on the main navigation or the “Make a Payment” button within the Finances card.
- You will arrive on the Make a Payment Page, which contains information about different ways to pay your fees, as well as payment deadlines. To begin the credit card payment process, select the “Pay Tuition & Fees by Credit Card” button. Keep in mind that a 2.5% Service Fee—charged by and paid to the payment service Moneris—will apply to credit card transactions.
- After you have read the instructions on the Credit Card Payment page, fill out your billing information.
- Enter the amount you want to pay. Please note that your payment amount cannot exceed your outstanding balance in ACORN. After entering your payment amount, the total charge will display. This amount includes the service fee. Read and agree to the terms & conditions and select the “Make Payment” button to move on to the credit card payment step.
- A pop-up window will appear and ask for your credit card details. Enter your credit card information and select the “Checkout” button to complete your payment.
- You will be taken to the Payment History page, and a success message will appear if the payment was successful. Your payment will be processed by Moneris within approximately two business days. Select the link in the Transaction Description column that says “Credit Card Tuition & Fee Payment – Awaiting Confirmation” to view and download your receipt. You will not be able to make another payment until the pending payment has been approved.
Before paying an admission deposit, please make sure you have accepted the admission offer to your degree program by following your division’s instructions. For undergraduate students who applied through OUAC, you will need to accept your offer on OUAC.
- From the ACORN dashboard, you will see the admission deposit that you can pay for in the Finances card. Multiple deposits may appear here if you were admitted to multiple programs, so please ensure you pay for the right one. Select the “Make a Payment” link on the main navigation or the “Make a Payment” button within the Finances card.
- You will arrive on the Make a Payment Page, where you can learn about your options for making tuition & fee and admission deposit payments. Admission deposit payments can only be paid by credit card on ACORN. To begin the credit card payment process, select the “Pay Deposit by Credit Card” button. Keep in mind that a 2.5% Service Fee—charged by and paid to the payment service Moneris—will apply to credit card transactions.
- If you have the option to pay deposits for multiple degree programs, please ensure you select the correct one. After you have read the instructions, fill out your billing information.
If you are only paying for one deposit, the payment page will look like the following:
If you have the option to pay more than one deposit, the payment page will look like the following:
- Admission deposits can only be paid in full, so you cannot change the amount to pay. The total charge will display, including the service fee. Read and agree to the terms & conditions and select the “Make Payment” button to move on to the credit card payment step.
- A pop-up window will appear and ask for your credit card details. Enter your credit card information and select the “Checkout” button to complete your payment.
- You will be taken to the Payment History page, and a success message will appear if the payment was successful. Your payment will be processed by Moneris within approximately two to three business days. Select the link in the Transaction Description column that says “Credit Card Admission Deposit – Awaiting Confirmation” to view and download your receipt.
As of Summer 2018, if you will be receiving Full-Time OSAP for the Summer or Fall/Winter sessions, you will be able to see an estimate for what you may need to pay U of T once your upcoming OSAP is applied against your tuition & fees (learn about eligibility for Full-Time OSAP).
This amount is called your “Net Cost”, and it will help you plan ahead and estimate how much in awards funding you may need to seek, or how much you may need to pay out of pocket.
Accessing Your Net Cost
If you will be receiving Full-Time OSAP payments for the upcoming session, you can access your Net Cost page from the ACORN Dashboard.
You can also go to Financial Account > Invoice & Net Cost via the main navigation, or click the “View Net Cost” button within the Financial Information card on your Financial Account page.
Understanding Your Net Cost
Your Invoice and Net Cost exist on the same page, and you can switch back and forth between them using the two tabs towards the top. Your Net Cost overview for the entire Fall-Winter session is displayed at the top of the page, and contains your tuition and fee charges, anticipated OSAP and received OSAP for the entire Fall-Winter session. Below, your Net Cost is broken down into the Fall and Winter terms individually, and you can find your tuition and fee breakdown and estimated and received OSAP for each term.
For specific definitions of each field, you can hover over an amount—or tap it on mobile—to see more information about it.
Why You May Not See Your Net Cost
If you see a message like the ones above, it means you cannot see your Net Cost information due to one of the following reasons:
- You are not eligible for Full-Time OSAP
- You are receiving or are eligible only for Part-Time OSAP
- You are not eligible for OSAP for the upcoming term
- You applied for OSAP but your application has been closed
In these cases, unfortunately ACORN cannot display your Net Cost because it does not have an OSAP funding estimate.
Getting Help & More Information
Who to Contact for Help
- For OSAP help, visit the OSAP website. If you still need help, contact osap.staff@utoronto.ca
- For questions about your invoice or charges, contact Student Accounts via ACORN’s Help & Contact form
Net Cost
Your actual Net Cost may vary if the information used to calculate your OSAP assessment is updated.
OSAP
Your Anticipated OSAP is the amount of assistance that OSAP will send directly to the University of Toronto to apply to your tuition and other fees, and is based on your most recent OSAP assessment. If you do not register in the program or course load you indicated on your OSAP application, your eligibility for this assistance may change.
If your Anticipated and Received OSAP amounts are less than your total OSAP funding, OSAP will deposit the difference directly to your bank account. Log in to your OSAP account for the current status of your grants and loans.
There are circumstances where grants provided through OSAP may be converted into OSAP student loans. OSAP grants reflected in your net cost do not include the Ontario Living and Learning Grant (for Crown Wards only).
The financial planning calculator is an exploratory tool that anyone can use in order to estimate what a single year of study might cost at U of T. As an alternative to this article, you can learn how to use the tool by watching this three-minute video.
Before you begin, you should have a general idea of what you will be studying during the upcoming academic year and what your income and savings will be from all sources. This can include summer job savings, expected job earnings for the upcoming academic year or any financial assistance and awards you have received or expect to receive.
- To begin, go to the Financial Planning Calculator and click ‘Start Planning’.
- Provide background information by selecting options that currently apply to you, or if you are exploring your options, simply select which options you think apply to you. You can always change them later to see how your expenses will change. Click ‘Continue’ to proceed to the Estimated Expenses section.
- Estimate your various sources of income to the best of your ability. The more accurate your income estimates are, the more accurate our calculations and financial recommendations will be. If you have no income to enter for a particular field, you may leave it blank. If you want more information about what belongs in each expenses field, hover over (or tap, on a mobile device) the label you are curious about. Click ‘Continue’ to proceed to step 3.
- Based on the background information you provide, we calculate expense estimates for your upcoming academic year. We use educated estimates and calculated averages for many of these values, but feel free to change them to represent your individual situation more accurately. To see information about how each estimate was calculated, hover over (or tap) the label you are curious about. Click ‘Continue’ to proceed to the Summary page.
- On the Budget Summary page, you will see a graph displaying your income, expenses and a third bar indicating whether you are projected to be in a budget deficit or surplus.
- Below the graph you will find a list of personalized resources and next steps that you can take to find ways to save money or receive more financial support, depending on your situation. If you have a budget deficit, these resources will give you a few approaches to getting back on track.
- Want to see what it would cost to switch programs? Live away from home or on campus? Eat out at restaurants a little less and cook more? Use the “Jump to Step” menu to go back and change the information on the form.
- If you change any of your initial inputs, click ‘Recalculate Budget’ and you will be taken to the Budget Summary page with an updated budget summary and set of resources reflecting your changes.
If you have any comments on how you used this calculator or suggestions on how to improve it, please let us know via the “Send Feedback” button at the bottom of the calculator.
- From the ACORN Dashboard, select “Grants, Aid & Awards” on the main navigation menu.
Screenshot highlighting the ‘Grants, Aid & Awards’ link in ACORN’s main navigation.
- You will be on the “Find Grants & Aid” section of the Grants, Aid & Awards page. From here, you will see a personalized collection of resources that will direct you to sources of financial aid, grants and awards that you may be eligible for. On this page, you can select the “Find Awards” tab.
- Once you’re on the Find Awards page, you will see a personalized page with resources for your division, as well as a link to the Award Explorer page.
Instructional video: All campuses
- From the ACORN dashboard, select ‘Financial Account’ on the main navigation menu under Finances.
- On the Financial Account screen, locate the direct deposit card and select ‘Direct Deposit’.
- Select ‘Enter Banking Info’.
- Enter your banking information. You can find your Transit, Bank and Account numbers by requesting a blank cheque or a print-out of your banking information from your bank.
- Select ‘Add This Information Now’.
- After you have successfully added your banking information, you will get a confirmation message.
Instructional videos: Undergrad student | Grad student
- To defer fees, click ‘Tuition Fee Deferral’ on ACORN’s main navigation under Finances.
- If you are eligible to defer fees, click on the declaration checkbox, and click ‘Process Fee Deferral’ and confirm.
Instructional video: All campuses
On the ACORN dashboard, select ‘View invoice’ on the Finances status box.
Getting Help & Feedback
- From the ACORN Dashboard, select “Grants, Aid & Awards” on the main navigation menu. Alternatively, select “View My Awards” on the Dashboard Finances card.
- You will be taken to the My Awards screen. If you selected the “Grants, Aid & Awards” navigation link, select the “My Grants, Aid & Awards” Tab towards the top of the screen to get to My Grants, Aid & Awards.
- If you have any received grants, aid or awards, you will see individual payments listed on this screen along with details like payment date, payment status, payment method and payment amount. Some awards are disbursed in multiple installments. If you have an award for which you have received at least one payment, you will see future payments for that award in the “Upcoming” section. Please note that changes to your registration status may affect your eligibility to receive these future payments.
Instructional video: All campuses
From the ACORN dashboard, select “Tax Forms” on the main navigation menu under Finances.
- From the ACORN dashboard, select ‘Financial Account’ on the main navigation under Finances.
- Select ‘Payment History’ on the sub list of items under the Financial Account menu heading.
- From the ACORN dashboard, select the “Make a Payment” link on the main navigation or the “Make a Payment” button within the Finances card.
- You will arrive on the Make a Payment Page, which contains information about different ways to pay your fees, as well as payment deadlines. To begin the credit card payment process, select the “Pay Tuition & Fees by Credit Card” button. Keep in mind that a 2.5% Service Fee—charged by and paid to the payment service Moneris—will apply to credit card transactions.
- After you have read the instructions on the Credit Card Payment page, fill out your billing information.
- Enter the amount you want to pay. Please note that your payment amount cannot exceed your outstanding balance in ACORN. After entering your payment amount, the total charge will display. This amount includes the service fee. Read and agree to the terms & conditions and select the “Make Payment” button to move on to the credit card payment step.
- A pop-up window will appear and ask for your credit card details. Enter your credit card information and select the “Checkout” button to complete your payment.
- You will be taken to the Payment History page, and a success message will appear if the payment was successful. Your payment will be processed by Moneris within approximately two business days. Select the link in the Transaction Description column that says “Credit Card Tuition & Fee Payment – Awaiting Confirmation” to view and download your receipt. You will not be able to make another payment until the pending payment has been approved.
Before paying an admission deposit, please make sure you have accepted the admission offer to your degree program by following your division’s instructions. For undergraduate students who applied through OUAC, you will need to accept your offer on OUAC.
- From the ACORN dashboard, you will see the admission deposit that you can pay for in the Finances card. Multiple deposits may appear here if you were admitted to multiple programs, so please ensure you pay for the right one. Select the “Make a Payment” link on the main navigation or the “Make a Payment” button within the Finances card.
- You will arrive on the Make a Payment Page, where you can learn about your options for making tuition & fee and admission deposit payments. Admission deposit payments can only be paid by credit card on ACORN. To begin the credit card payment process, select the “Pay Deposit by Credit Card” button. Keep in mind that a 2.5% Service Fee—charged by and paid to the payment service Moneris—will apply to credit card transactions.
- If you have the option to pay deposits for multiple degree programs, please ensure you select the correct one. After you have read the instructions, fill out your billing information.
If you are only paying for one deposit, the payment page will look like the following:
If you have the option to pay more than one deposit, the payment page will look like the following:
- Admission deposits can only be paid in full, so you cannot change the amount to pay. The total charge will display, including the service fee. Read and agree to the terms & conditions and select the “Make Payment” button to move on to the credit card payment step.
- A pop-up window will appear and ask for your credit card details. Enter your credit card information and select the “Checkout” button to complete your payment.
- You will be taken to the Payment History page, and a success message will appear if the payment was successful. Your payment will be processed by Moneris within approximately two to three business days. Select the link in the Transaction Description column that says “Credit Card Admission Deposit – Awaiting Confirmation” to view and download your receipt.
As of Summer 2018, if you will be receiving Full-Time OSAP for the Summer or Fall/Winter sessions, you will be able to see an estimate for what you may need to pay U of T once your upcoming OSAP is applied against your tuition & fees (learn about eligibility for Full-Time OSAP).
This amount is called your “Net Cost”, and it will help you plan ahead and estimate how much in awards funding you may need to seek, or how much you may need to pay out of pocket.
Accessing Your Net Cost
If you will be receiving Full-Time OSAP payments for the upcoming session, you can access your Net Cost page from the ACORN Dashboard.
You can also go to Financial Account > Invoice & Net Cost via the main navigation, or click the “View Net Cost” button within the Financial Information card on your Financial Account page.
Understanding Your Net Cost
Your Invoice and Net Cost exist on the same page, and you can switch back and forth between them using the two tabs towards the top. Your Net Cost overview for the entire Fall-Winter session is displayed at the top of the page, and contains your tuition and fee charges, anticipated OSAP and received OSAP for the entire Fall-Winter session. Below, your Net Cost is broken down into the Fall and Winter terms individually, and you can find your tuition and fee breakdown and estimated and received OSAP for each term.
For specific definitions of each field, you can hover over an amount—or tap it on mobile—to see more information about it.
Why You May Not See Your Net Cost
If you see a message like the ones above, it means you cannot see your Net Cost information due to one of the following reasons:
- You are not eligible for Full-Time OSAP
- You are receiving or are eligible only for Part-Time OSAP
- You are not eligible for OSAP for the upcoming term
- You applied for OSAP but your application has been closed
In these cases, unfortunately ACORN cannot display your Net Cost because it does not have an OSAP funding estimate.
Getting Help & More Information
Who to Contact for Help
- For OSAP help, visit the OSAP website. If you still need help, contact osap.staff@utoronto.ca
- For questions about your invoice or charges, contact Student Accounts via ACORN’s Help & Contact form
Net Cost
Your actual Net Cost may vary if the information used to calculate your OSAP assessment is updated.
OSAP
Your Anticipated OSAP is the amount of assistance that OSAP will send directly to the University of Toronto to apply to your tuition and other fees, and is based on your most recent OSAP assessment. If you do not register in the program or course load you indicated on your OSAP application, your eligibility for this assistance may change.
If your Anticipated and Received OSAP amounts are less than your total OSAP funding, OSAP will deposit the difference directly to your bank account. Log in to your OSAP account for the current status of your grants and loans.
There are circumstances where grants provided through OSAP may be converted into OSAP student loans. OSAP grants reflected in your net cost do not include the Ontario Living and Learning Grant (for Crown Wards only).
The financial planning calculator is an exploratory tool that anyone can use in order to estimate what a single year of study might cost at U of T. As an alternative to this article, you can learn how to use the tool by watching this three-minute video.
Before you begin, you should have a general idea of what you will be studying during the upcoming academic year and what your income and savings will be from all sources. This can include summer job savings, expected job earnings for the upcoming academic year or any financial assistance and awards you have received or expect to receive.
- To begin, go to the Financial Planning Calculator and click ‘Start Planning’.
- Provide background information by selecting options that currently apply to you, or if you are exploring your options, simply select which options you think apply to you. You can always change them later to see how your expenses will change. Click ‘Continue’ to proceed to the Estimated Expenses section.
- Estimate your various sources of income to the best of your ability. The more accurate your income estimates are, the more accurate our calculations and financial recommendations will be. If you have no income to enter for a particular field, you may leave it blank. If you want more information about what belongs in each expenses field, hover over (or tap, on a mobile device) the label you are curious about. Click ‘Continue’ to proceed to step 3.
- Based on the background information you provide, we calculate expense estimates for your upcoming academic year. We use educated estimates and calculated averages for many of these values, but feel free to change them to represent your individual situation more accurately. To see information about how each estimate was calculated, hover over (or tap) the label you are curious about. Click ‘Continue’ to proceed to the Summary page.
- On the Budget Summary page, you will see a graph displaying your income, expenses and a third bar indicating whether you are projected to be in a budget deficit or surplus.
- Below the graph you will find a list of personalized resources and next steps that you can take to find ways to save money or receive more financial support, depending on your situation. If you have a budget deficit, these resources will give you a few approaches to getting back on track.
- Want to see what it would cost to switch programs? Live away from home or on campus? Eat out at restaurants a little less and cook more? Use the “Jump to Step” menu to go back and change the information on the form.
- If you change any of your initial inputs, click ‘Recalculate Budget’ and you will be taken to the Budget Summary page with an updated budget summary and set of resources reflecting your changes.
If you have any comments on how you used this calculator or suggestions on how to improve it, please let us know via the “Send Feedback” button at the bottom of the calculator.
- From the ACORN Dashboard, select “Grants, Aid & Awards” on the main navigation menu.
Screenshot highlighting the ‘Grants, Aid & Awards’ link in ACORN’s main navigation.
- You will be on the “Find Grants & Aid” section of the Grants, Aid & Awards page. From here, you will see a personalized collection of resources that will direct you to sources of financial aid, grants and awards that you may be eligible for. On this page, you can select the “Find Awards” tab.
- Once you’re on the Find Awards page, you will see a personalized page with resources for your division, as well as a link to the Award Explorer page.
Instructional video: All campuses
- From the ACORN dashboard, select ‘Financial Account’ on the main navigation menu under Finances.
- On the Financial Account screen, locate the direct deposit card and select ‘Direct Deposit’.
- Select ‘Enter Banking Info’.
- Enter your banking information. You can find your Transit, Bank and Account numbers by requesting a blank cheque or a print-out of your banking information from your bank.
- Select ‘Add This Information Now’.
- After you have successfully added your banking information, you will get a confirmation message.
Instructional videos: Undergrad student | Grad student
- To defer fees, click ‘Tuition Fee Deferral’ on ACORN’s main navigation under Finances.
- If you are eligible to defer fees, click on the declaration checkbox, and click ‘Process Fee Deferral’ and confirm.
Instructional video: All campuses
On the ACORN dashboard, select ‘View invoice’ on the Finances status box.
Accommodated Testing Services
- From the ACORN Dashboard, select “Grants, Aid & Awards” on the main navigation menu. Alternatively, select “View My Awards” on the Dashboard Finances card.
- You will be taken to the My Awards screen. If you selected the “Grants, Aid & Awards” navigation link, select the “My Grants, Aid & Awards” Tab towards the top of the screen to get to My Grants, Aid & Awards.
- If you have any received grants, aid or awards, you will see individual payments listed on this screen along with details like payment date, payment status, payment method and payment amount. Some awards are disbursed in multiple installments. If you have an award for which you have received at least one payment, you will see future payments for that award in the “Upcoming” section. Please note that changes to your registration status may affect your eligibility to receive these future payments.
Instructional video: All campuses
From the ACORN dashboard, select “Tax Forms” on the main navigation menu under Finances.
- From the ACORN dashboard, select ‘Financial Account’ on the main navigation under Finances.
- Select ‘Payment History’ on the sub list of items under the Financial Account menu heading.
- From the ACORN dashboard, select the “Make a Payment” link on the main navigation or the “Make a Payment” button within the Finances card.
- You will arrive on the Make a Payment Page, which contains information about different ways to pay your fees, as well as payment deadlines. To begin the credit card payment process, select the “Pay Tuition & Fees by Credit Card” button. Keep in mind that a 2.5% Service Fee—charged by and paid to the payment service Moneris—will apply to credit card transactions.
- After you have read the instructions on the Credit Card Payment page, fill out your billing information.
- Enter the amount you want to pay. Please note that your payment amount cannot exceed your outstanding balance in ACORN. After entering your payment amount, the total charge will display. This amount includes the service fee. Read and agree to the terms & conditions and select the “Make Payment” button to move on to the credit card payment step.
- A pop-up window will appear and ask for your credit card details. Enter your credit card information and select the “Checkout” button to complete your payment.
- You will be taken to the Payment History page, and a success message will appear if the payment was successful. Your payment will be processed by Moneris within approximately two business days. Select the link in the Transaction Description column that says “Credit Card Tuition & Fee Payment – Awaiting Confirmation” to view and download your receipt. You will not be able to make another payment until the pending payment has been approved.
Before paying an admission deposit, please make sure you have accepted the admission offer to your degree program by following your division’s instructions. For undergraduate students who applied through OUAC, you will need to accept your offer on OUAC.
- From the ACORN dashboard, you will see the admission deposit that you can pay for in the Finances card. Multiple deposits may appear here if you were admitted to multiple programs, so please ensure you pay for the right one. Select the “Make a Payment” link on the main navigation or the “Make a Payment” button within the Finances card.
- You will arrive on the Make a Payment Page, where you can learn about your options for making tuition & fee and admission deposit payments. Admission deposit payments can only be paid by credit card on ACORN. To begin the credit card payment process, select the “Pay Deposit by Credit Card” button. Keep in mind that a 2.5% Service Fee—charged by and paid to the payment service Moneris—will apply to credit card transactions.
- If you have the option to pay deposits for multiple degree programs, please ensure you select the correct one. After you have read the instructions, fill out your billing information.
If you are only paying for one deposit, the payment page will look like the following:
If you have the option to pay more than one deposit, the payment page will look like the following:
- Admission deposits can only be paid in full, so you cannot change the amount to pay. The total charge will display, including the service fee. Read and agree to the terms & conditions and select the “Make Payment” button to move on to the credit card payment step.
- A pop-up window will appear and ask for your credit card details. Enter your credit card information and select the “Checkout” button to complete your payment.
- You will be taken to the Payment History page, and a success message will appear if the payment was successful. Your payment will be processed by Moneris within approximately two to three business days. Select the link in the Transaction Description column that says “Credit Card Admission Deposit – Awaiting Confirmation” to view and download your receipt.
As of Summer 2018, if you will be receiving Full-Time OSAP for the Summer or Fall/Winter sessions, you will be able to see an estimate for what you may need to pay U of T once your upcoming OSAP is applied against your tuition & fees (learn about eligibility for Full-Time OSAP).
This amount is called your “Net Cost”, and it will help you plan ahead and estimate how much in awards funding you may need to seek, or how much you may need to pay out of pocket.
Accessing Your Net Cost
If you will be receiving Full-Time OSAP payments for the upcoming session, you can access your Net Cost page from the ACORN Dashboard.
You can also go to Financial Account > Invoice & Net Cost via the main navigation, or click the “View Net Cost” button within the Financial Information card on your Financial Account page.
Understanding Your Net Cost
Your Invoice and Net Cost exist on the same page, and you can switch back and forth between them using the two tabs towards the top. Your Net Cost overview for the entire Fall-Winter session is displayed at the top of the page, and contains your tuition and fee charges, anticipated OSAP and received OSAP for the entire Fall-Winter session. Below, your Net Cost is broken down into the Fall and Winter terms individually, and you can find your tuition and fee breakdown and estimated and received OSAP for each term.
For specific definitions of each field, you can hover over an amount—or tap it on mobile—to see more information about it.
Why You May Not See Your Net Cost
If you see a message like the ones above, it means you cannot see your Net Cost information due to one of the following reasons:
- You are not eligible for Full-Time OSAP
- You are receiving or are eligible only for Part-Time OSAP
- You are not eligible for OSAP for the upcoming term
- You applied for OSAP but your application has been closed
In these cases, unfortunately ACORN cannot display your Net Cost because it does not have an OSAP funding estimate.
Getting Help & More Information
Who to Contact for Help
- For OSAP help, visit the OSAP website. If you still need help, contact osap.staff@utoronto.ca
- For questions about your invoice or charges, contact Student Accounts via ACORN’s Help & Contact form
Net Cost
Your actual Net Cost may vary if the information used to calculate your OSAP assessment is updated.
OSAP
Your Anticipated OSAP is the amount of assistance that OSAP will send directly to the University of Toronto to apply to your tuition and other fees, and is based on your most recent OSAP assessment. If you do not register in the program or course load you indicated on your OSAP application, your eligibility for this assistance may change.
If your Anticipated and Received OSAP amounts are less than your total OSAP funding, OSAP will deposit the difference directly to your bank account. Log in to your OSAP account for the current status of your grants and loans.
There are circumstances where grants provided through OSAP may be converted into OSAP student loans. OSAP grants reflected in your net cost do not include the Ontario Living and Learning Grant (for Crown Wards only).
The financial planning calculator is an exploratory tool that anyone can use in order to estimate what a single year of study might cost at U of T. As an alternative to this article, you can learn how to use the tool by watching this three-minute video.
Before you begin, you should have a general idea of what you will be studying during the upcoming academic year and what your income and savings will be from all sources. This can include summer job savings, expected job earnings for the upcoming academic year or any financial assistance and awards you have received or expect to receive.
- To begin, go to the Financial Planning Calculator and click ‘Start Planning’.
- Provide background information by selecting options that currently apply to you, or if you are exploring your options, simply select which options you think apply to you. You can always change them later to see how your expenses will change. Click ‘Continue’ to proceed to the Estimated Expenses section.
- Estimate your various sources of income to the best of your ability. The more accurate your income estimates are, the more accurate our calculations and financial recommendations will be. If you have no income to enter for a particular field, you may leave it blank. If you want more information about what belongs in each expenses field, hover over (or tap, on a mobile device) the label you are curious about. Click ‘Continue’ to proceed to step 3.
- Based on the background information you provide, we calculate expense estimates for your upcoming academic year. We use educated estimates and calculated averages for many of these values, but feel free to change them to represent your individual situation more accurately. To see information about how each estimate was calculated, hover over (or tap) the label you are curious about. Click ‘Continue’ to proceed to the Summary page.
- On the Budget Summary page, you will see a graph displaying your income, expenses and a third bar indicating whether you are projected to be in a budget deficit or surplus.
- Below the graph you will find a list of personalized resources and next steps that you can take to find ways to save money or receive more financial support, depending on your situation. If you have a budget deficit, these resources will give you a few approaches to getting back on track.
- Want to see what it would cost to switch programs? Live away from home or on campus? Eat out at restaurants a little less and cook more? Use the “Jump to Step” menu to go back and change the information on the form.
- If you change any of your initial inputs, click ‘Recalculate Budget’ and you will be taken to the Budget Summary page with an updated budget summary and set of resources reflecting your changes.
If you have any comments on how you used this calculator or suggestions on how to improve it, please let us know via the “Send Feedback” button at the bottom of the calculator.
- From the ACORN Dashboard, select “Grants, Aid & Awards” on the main navigation menu.
Screenshot highlighting the ‘Grants, Aid & Awards’ link in ACORN’s main navigation.
- You will be on the “Find Grants & Aid” section of the Grants, Aid & Awards page. From here, you will see a personalized collection of resources that will direct you to sources of financial aid, grants and awards that you may be eligible for. On this page, you can select the “Find Awards” tab.
- Once you’re on the Find Awards page, you will see a personalized page with resources for your division, as well as a link to the Award Explorer page.
Instructional video: All campuses
- From the ACORN dashboard, select ‘Financial Account’ on the main navigation menu under Finances.
- On the Financial Account screen, locate the direct deposit card and select ‘Direct Deposit’.
- Select ‘Enter Banking Info’.
- Enter your banking information. You can find your Transit, Bank and Account numbers by requesting a blank cheque or a print-out of your banking information from your bank.
- Select ‘Add This Information Now’.
- After you have successfully added your banking information, you will get a confirmation message.
Instructional videos: Undergrad student | Grad student
- To defer fees, click ‘Tuition Fee Deferral’ on ACORN’s main navigation under Finances.
- If you are eligible to defer fees, click on the declaration checkbox, and click ‘Process Fee Deferral’ and confirm.
Instructional video: All campuses
On the ACORN dashboard, select ‘View invoice’ on the Finances status box.