How-to
A step by step guide to help you accomplish what you need to get done.
Course Enrolment
Students from different divisions at U of T enrol in courses at different times. Learn when your division has set up your enrolment time by visiting their website. They may also send you an email about it. Once your division has setup your enrolment start time—usually a week or so prior to your enrolment day—log into ACORN to view your start date and time on the Dashboard.

This is an example of a blue message that will appear on your ACORN Dashboard. Yours will look a little different, as the date and time will be personalized to your program and year of study.
ACORN will not take any additional actions if you enrol in courses that result in a conflict (i.e., it will not drop any course activities on your behalf). It is up to you to resolve any conflicts. You can either leave the courses as they are or enrol in alternative options.
You can try to resolve the conflict in a few different ways:
- Explore different combinations of course sections (Lectures, Tutorials and Practicals)
- See if you can take one of the courses at a later term. Try using Degree Explorer to experiment with your options.
- Select a different course if one of the conflicting courses is not required to complete your program or degree
- On the Courses page, select the Edit button for the course section that you want to change.
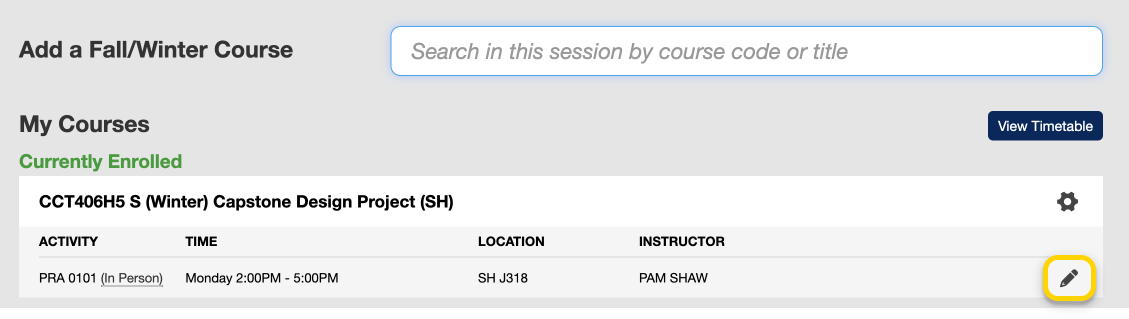
- A modal window will appear that will list the sections that you can change. Select the course section(s) you would like to change to, and then select the Modify button. If you cannot select a certain section, it may be full or you may not have priority to enrol in the section; ACORN should tell you why.
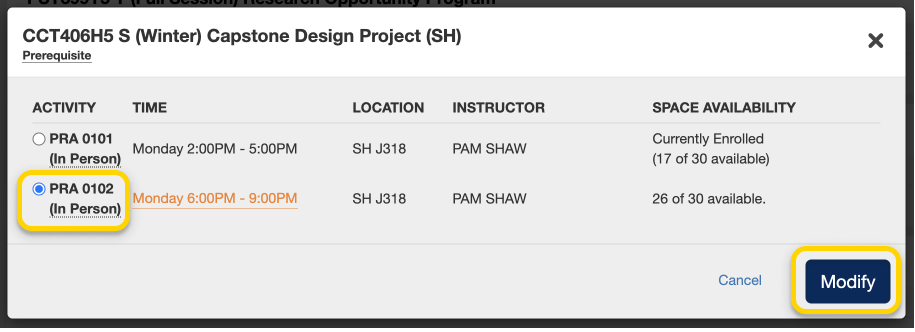
In this example, the student is switching from the first Practical section (PRA 0101) to the second one (PRA 0102).
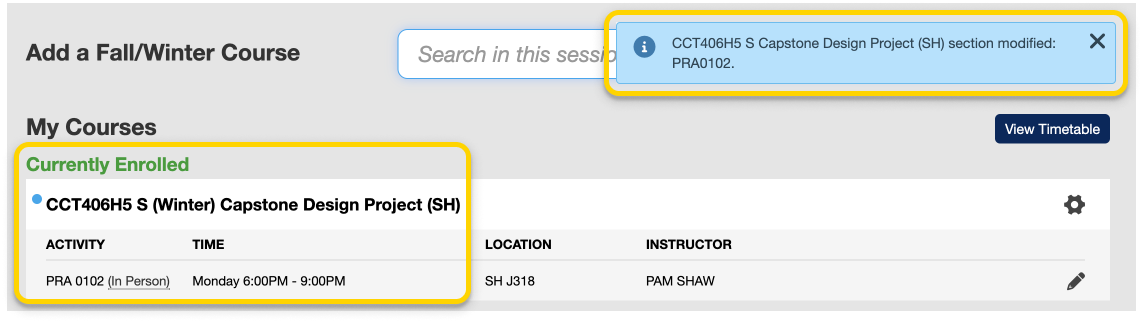
- If you have successfully switched to your desired course section you will receive a success message towards the top of the page. You will also see your updated course in the My Courses section.
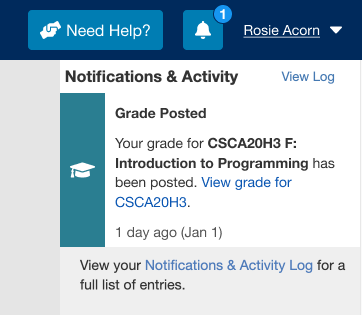
- When a final grade is released for each of your courses, you will get a new notification in ACORN. When you have a new notification, a blue badge containing a number will appear on top of a bell icon towards the top of your page. Select this button to open your Notifications menu.

- If you have received a final grade, there will be a notification here alongside any other notifications that you recently received. Select the link within the notification to view your grade.
- You will be taken to your Academic History page containing your final grade for the course. You can visit your Academic History page at any time via ACORN’s main navigation menu to see an up-to-date list of grades for all of your courses.

Watch a video walkthrough for U of T’s GPA calculator.
The GPA calculator is a U of T-wide tool that allows you to estimate your GPA (Grade Point Average) for the current or upcoming academic sessions. This tool should be used for planning purposes only; refer to your Academic History page in ACORN for your official GPA calculations.
Using the GPA Calculator, you can:
- Calculate your CGPA, SGPA and AGPA
- Use your current CGPA from ACORN to speed up your calculations
- See your GPA calculations update in real-time
- Explore useful academic resources
You may want to calculate your GPA for the following reasons and more:
- Find out what your GPA will be at the end of the semester or year
- Determine whether you will make it into your program of study (POSt)
- Find out if you will graduate with distinction
- Learn which grades you will need to achieve to meet personal goals
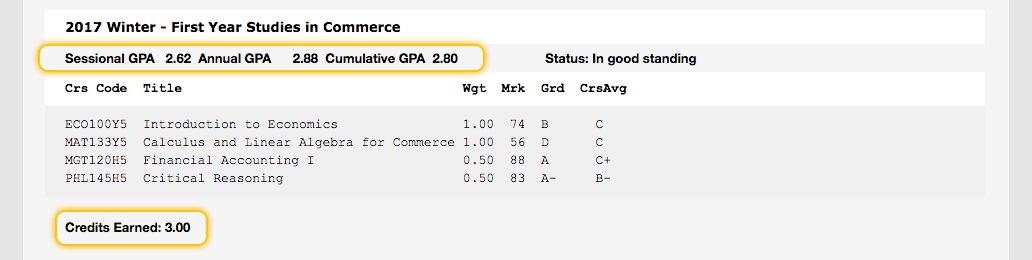
Before starting, have your grades on hand for reference. Find them on your Academic History page in ACORN. When entering grades, include failed courses, and exclude transfer credits, extra (EXT), Credit/No Credit (CR/NCR) and Late Withdrawal (LWD) courses.
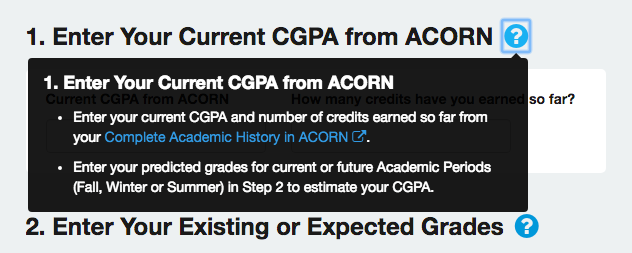
You can view tips for using the GPA Calculator by clicking the help icons beside the step one and step two headings.
Estimate Your CGPA
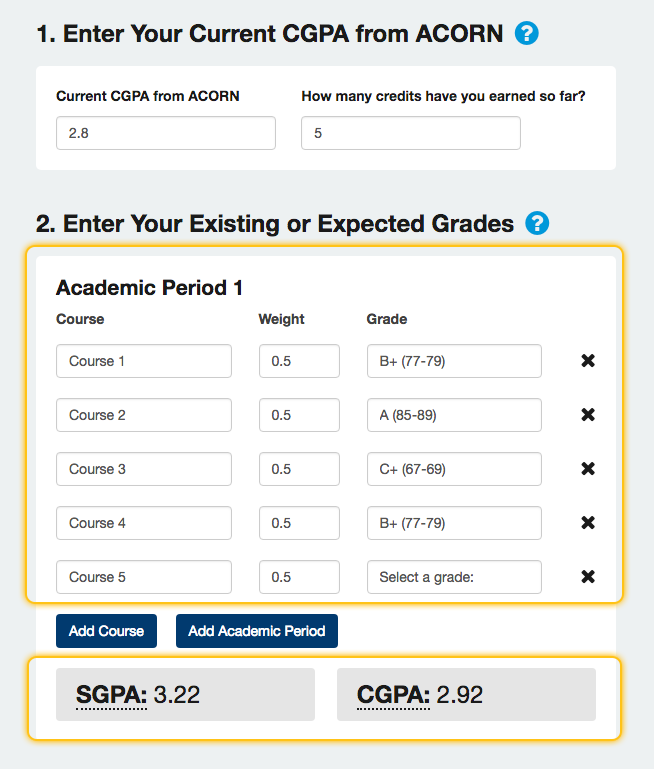
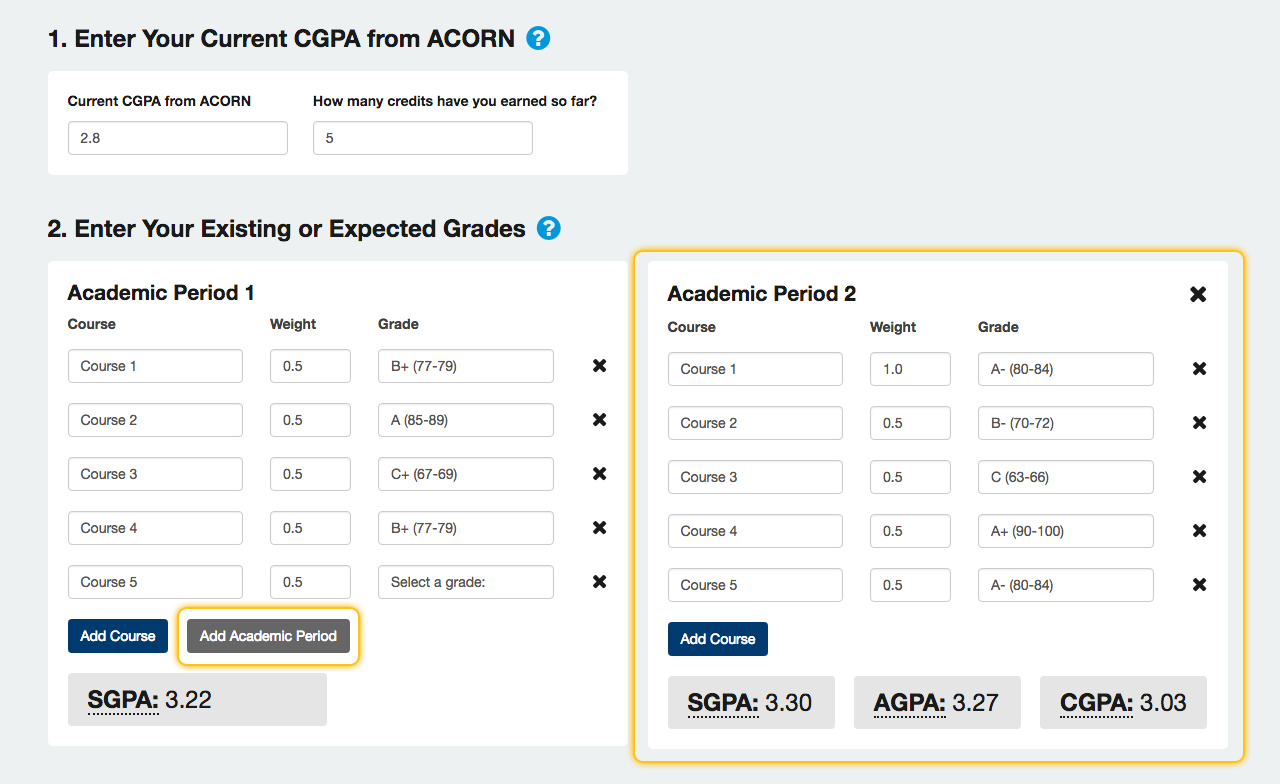
To estimate your Cumulative GPA (CGPA), enter your current Cumulative GPA and current number of credits earned from ACORN into Step 1 of the calculator. This step is optional; you can always enter all of your grades manually into the Academic Period containers, but this method is faster.
In this example, “Academic Period 1” means whichever session you are predicting your grades for. If your official CGPA from ACORN was calculated last Winter, and you are predicting courses for the current Fall/Winter session, Academic Period 1 will represent the Fall semester. You can also enter all of your Fall and Winter marks into Academic Period 1, or enter Fall marks in Academic Period 1 and Winter marks in Academic Period 2. It is up to you.

Next, enter anticipated grades for your courses in progress. Your Sessional and Cumulative GPAs will update immediately at the bottom of the Academic Period 1 container. Your CGPA calculation will take into account the “Current CGPA from ACORN” that you entered in Step 1. Your SGPA calculation will only take into account grades entered in Academic Period 1.
Estimate your SGPA
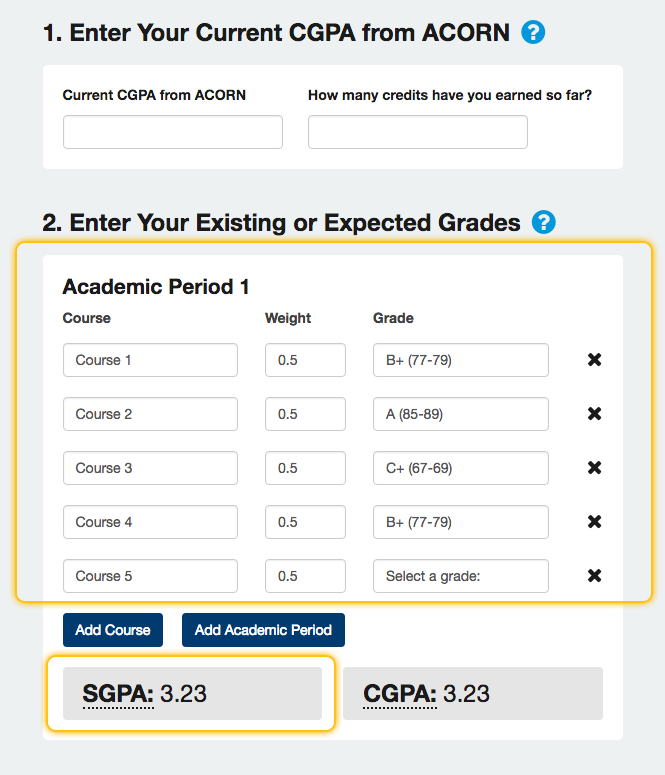
To estimate your Sessional GPA (GPA), enter current and anticipated grades for a single Fall or Winter or entire Summer session (this includes both sub-sessions) in Academic Period 1.
You do not need to add your Current CGPA from ACORN in Step 1 unless you want to see your potential CGPA at the same time.
Estimate Your AGPA
To calculate your Annual GPA (AGPA), enter current and anticipated grades for the Fall session in Academic Period 1 and the Winter session in Academic Period 2. You will need to click the “Add Academic Period” button to open the second session.
You do not need to add your Current CGPA from ACORN in Step 1 unless you want to see your potential CGPA at the same time.
If you are including Y courses worth 1.0 credit courses: Include grades for these courses in Academic Period 2, as grades for these courses are calculated in the Winter term. On your Academic History in ACORN, for the Fall session these courses will have a grade of “IPR” (In Progress). If you enter Y courses in Academic Period 1 (Fall), your estimated AGPA will not be correct.
Tip: If you already know your Fall SGPA, enter it in Step 1 along with the number of credits you earned for the Fall, and enter your Winter grades in Academic Period 1. The calculated CGPA will actually be your AGPA.
Get Academic Help
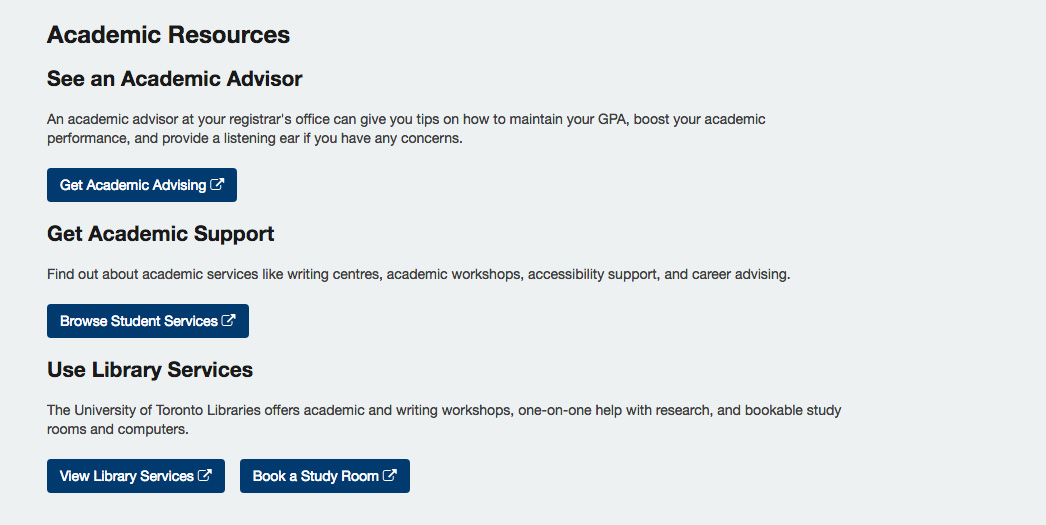
Some useful academic resources are located below the calculator itself. If you want academic advising or have questions about courses, contact your Registrar. You can also find links to helpful academic workshops and events that U of T offers, as well as study spaces you can use.
Send the ACORN/GPA Calculator Team Feedback
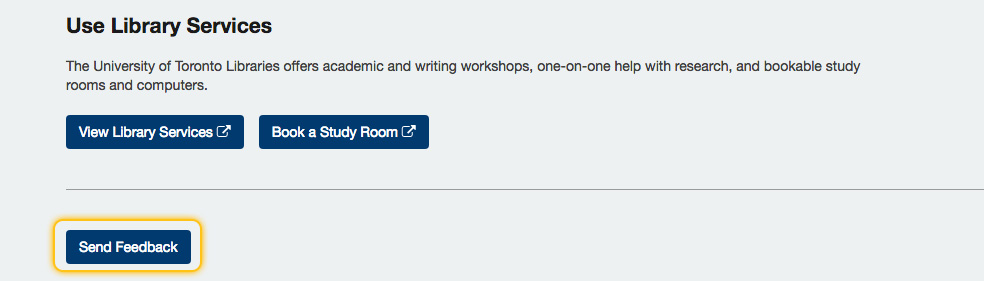
We want to hear your thoughts, ideas and suggestions to improve this GPA Calculator! We care about how and if it works for you, so send us a message via the “Send Feedback” button towards the bottom of the page.
Instructional videos: UTM | UTSC | UTSG
Before enrolling in courses, check when you will be eligible to enrol by viewing your divisional registrar’s important academic dates, and check your enrolment start time on ACORN. You can plan the courses you want to take using the Timetable builder, and learn if you will be eligible to enrol in a course by checking the “Enrolment Controls” section of a course in the search results area. To plan for your entire degree, check out Degree Explorer.
Once you know which courses you want to take, you can add them to your Enrolment Cart in ACORN so that you can enrol in them without searching for them again on enrolment day. The Enrolment Cart is like adding courses to a shopping cart so that you can save them for later. On enrolment day, you’ll need to enrol in each course individually from your cart.
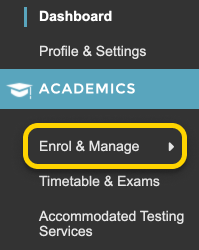
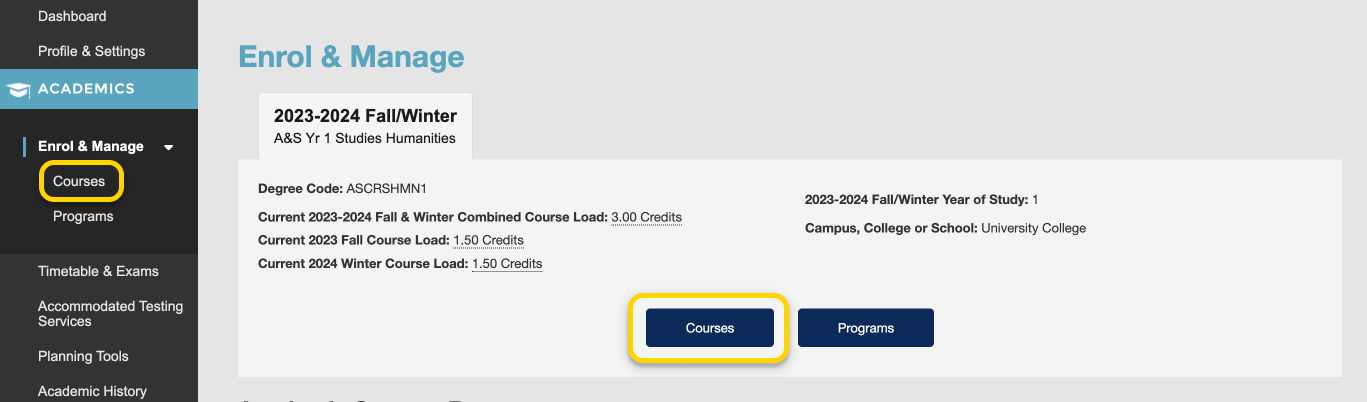
- To get to you Enrolment Cart from the ACORN dashboard, select ‘Enrol & Manage’ on the main navigation menu on the left side of the screen.
- On the Enrol & Manage page, there will be one or more tabs labelled with the academic session. Ensure that you have selected the tab for the session in which you want to enrol in courses. Then, select the Courses button, or the Courses page from the main navigation.
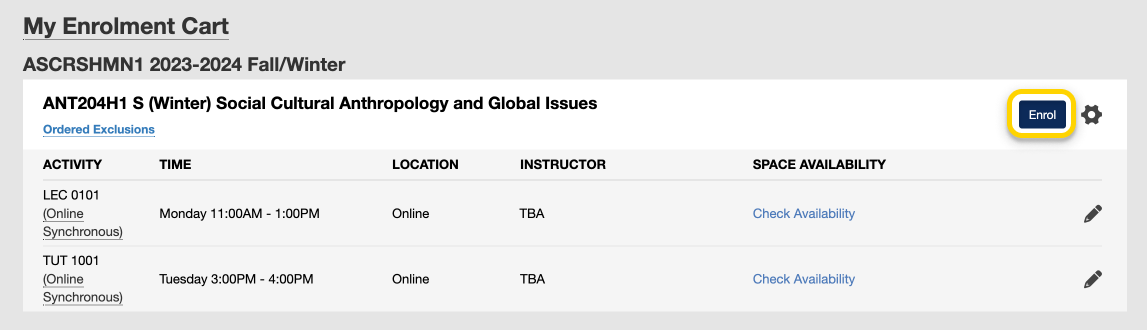
- Find your enrolment cart at the bottom of the Courses screen. If your cart is empty, learn how to add courses to your Enrolment Cart.

- For each course that you would like to enrol in from your Enrolment Cart, select the “Enrol” button.
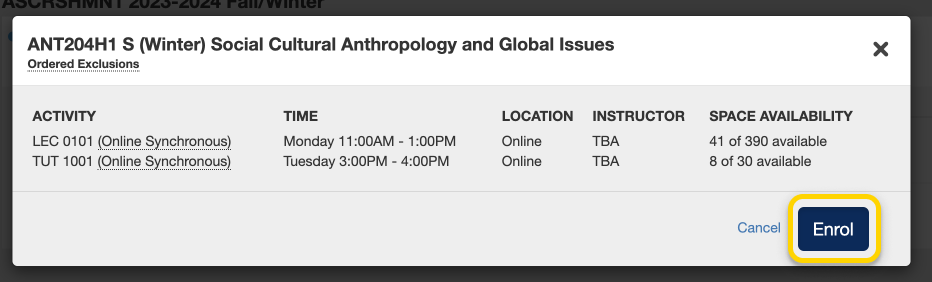
- You will see a confirmation modal window asking whether you would like to enrol in this course. Be sure to check the Time column in case there is a conflict with any of your other currently-enrolled courses, and ensure that the activity that you are selecting do not say “Enrolment Blocked” or “Section Full” under the Space Availability column. If a section says “Enrolment Blocked”, the activity or course may be restricted to students from a certain program, year of study, or campus. Please check the Timetable Builder to learn about any restrictions or Enrolment Controls that a course may have.Next, select “Enrol”.
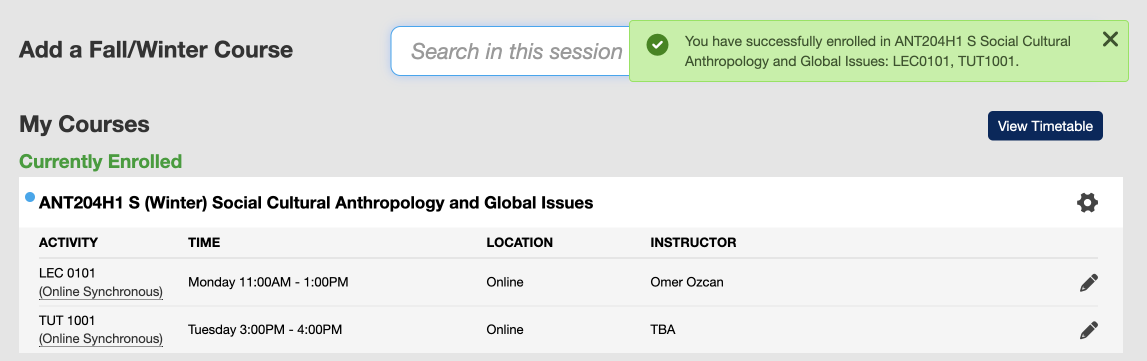
- If you have successfully enrolled in the course you will receive a success notice on the top right corner of your screen and the course will be listed under your currently enrolled courses.
Instructional videos: UTM | UTSC | UTSG
Before enrolling in courses, check when you will be eligible to enrol by viewing your divisional registrar’s important academic dates, and check your enrolment start time on ACORN. You can plan the courses you want to take using the Timetable builder, and learn if you will be eligible to enrol in a course by checking the “Enrolment Controls” section of a course in the search results area. To plan for your entire degree, check out Degree Explorer.
- From the ACORN dashboard, click ‘Enrol & Manage’ on the main navigation menu.
- On the Enrol & Manage page, there will be one or more tabs labelled with the academic session. Ensure that you have selected the tab for the session in which you want to enrol in courses. Then, select the Courses button, or the Courses page from the main navigation.
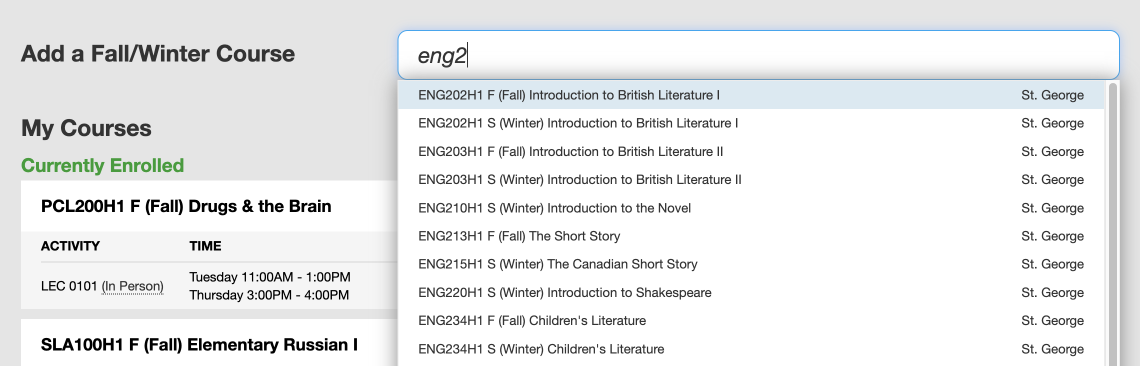
- Use the search field to search for courses by course code or title. Results will start appearing after three characters. From the list of courses that appears, select a course.
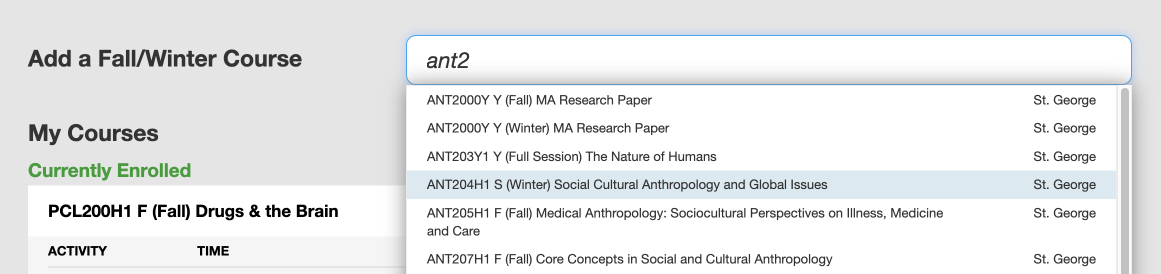
- A modal window will appear. Select a primary activity, which is typically a lecture (LEC), and any secondary activities, which are typically tutorials (TUT) or practicals (PRA). Not every course will have a lecture, and not every course will have tutorials and practicals. Be sure to check the Time column in case there is a conflict with any of your other currently-enrolled courses, and ensure that the activity that you are selecting do not say “Enrolment Blocked” or “Section Full” under the Space Availability column. If a section says “Enrolment Blocked”, the activity or course may be restricted to students from a certain program, year of study, or campus. Please check the Timetable Builder to learn about any restrictions or Enrolment Controls that a course may have. Next, select the “Enrol” button towards the bottom of the modal window. If you are unable to select a particular activity or enrol in the course, ACORN will tell you why. If you think you should be able to enrol in a course and you cannot, please contact your college, divisional or faculty registrar.
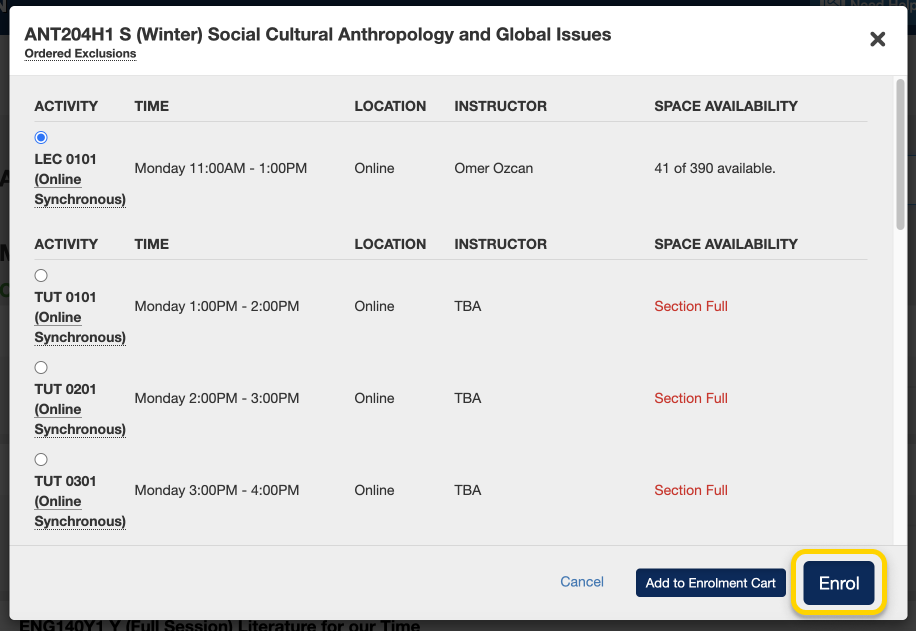
- If you have successfully enrolled in the course you will receive a success notice on the top right corner of your screen and the course will be listed under your currently enrolled courses.
If you want to drop a course, check your division’s important academic dates to determine when you can drop a course without facing an academic or financial penalty.
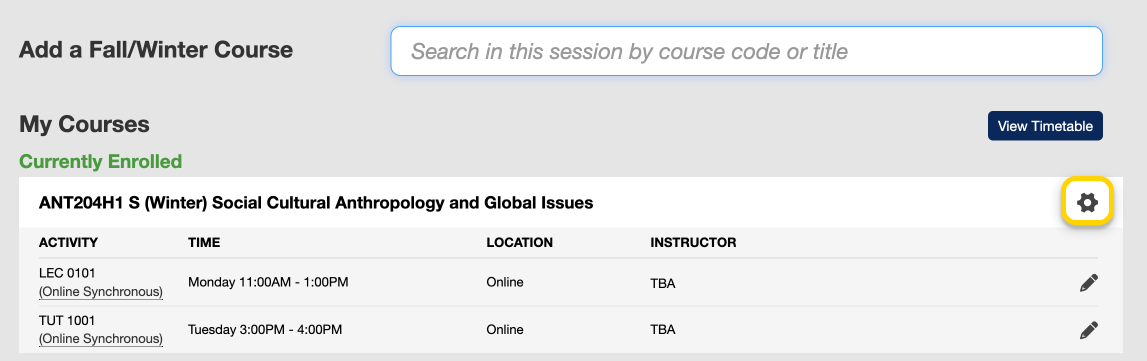
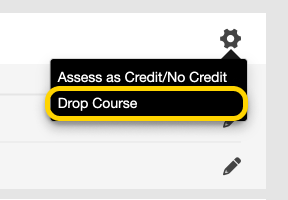
- From your Courses screen, click the gear icon towards the right of the course that you want to drop.
- Select “Drop Course” from the drop-down menu that appears.
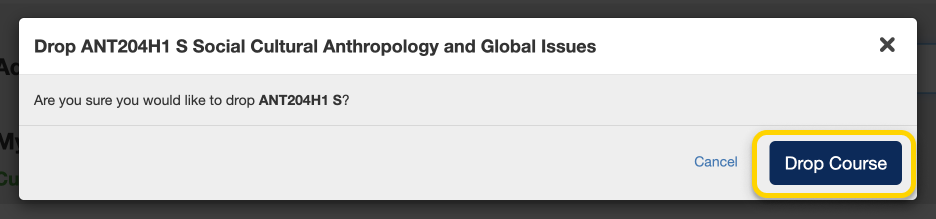
- A modal window will pop up to confirm that you want to drop this course. Once it, appears, double-check the course to make sure it is correct, and select “Drop Course”.
- If you have successfully dropped the course you will receive a success notice towards the top right corner of your screen and the course will no longer be listed under your currently enrolled courses.

You can choose to assess courses as Credit/No Credit when you want to take a course but don’t want it to contribute to your GPA. A course that is assessed as Credit/No Credit will count towards the number of credits you need for your degree as long as you pass the course according to your division’s standards. If you need a final grade in a course for a program requirement or to apply for a certification in the future, you generally should not consider Credit/No Credit. If you’re unsure, contact an academic advisor. Before assessing any courses as Credit/No Credit, check your divisional registrar’s guidelines and deadlines because they may vary.
- On the Courses screen, click the gear icon on the top right corner of the course you want to assess as Credit/No Credit.
- Select ‘Add Credit/No Credit’ from the drop-down menu that appears.

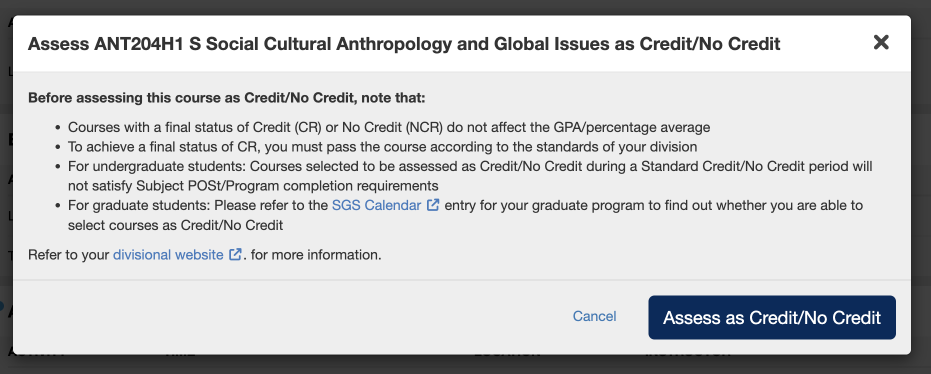
- A modal window will appear to provide more information about assessing the course as Credit/No Credit. Read through this and ensure that assessing the course as Credit/No Credit is appropriate for your situation, and then select “Assess as Credit/No Credit”.
- If you have successfully assessed the course as Credit/No Credit you will receive a success message on the top right corner of your screen. A “Credit/No Credit” indicator will also appear below the course title under your Currently Enrolled courses.

Instructional videos: UTM | UTSC | UTSG
If a course lecture (LEC), tutorial (TUT) or practical (PRA) is full when you try to enrol, you may be able to enrol in the waitlist instead. If enough students drop the course and space becomes available, ACORN will automatically enrol you in that course. Check the academic deadlines for your division to learn when the waitlist period ends. At this point, the waitlist will be removed from that course.
- On the Courses page, use the search field to search for courses by course code or title. Results will start appearing after three characters. From the list of courses that appears, select a course.
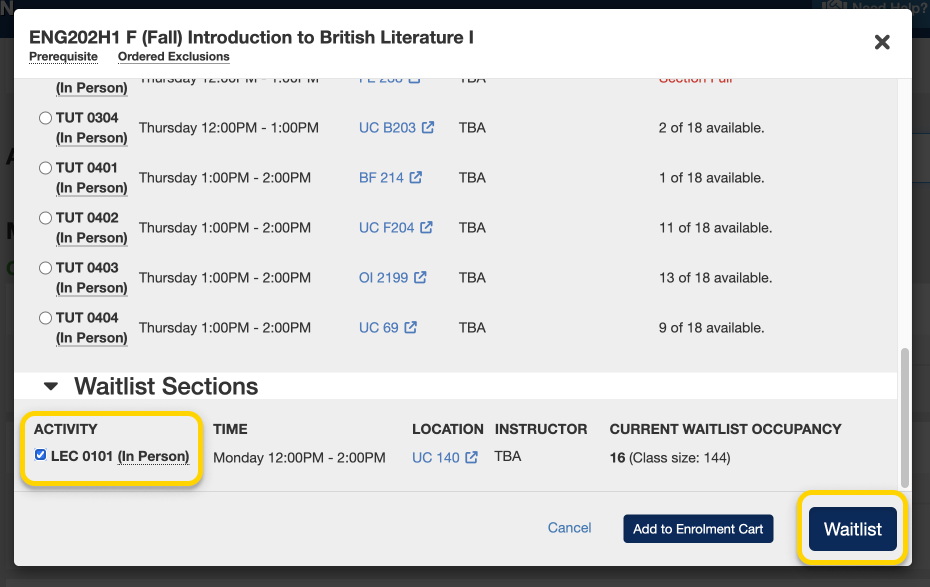
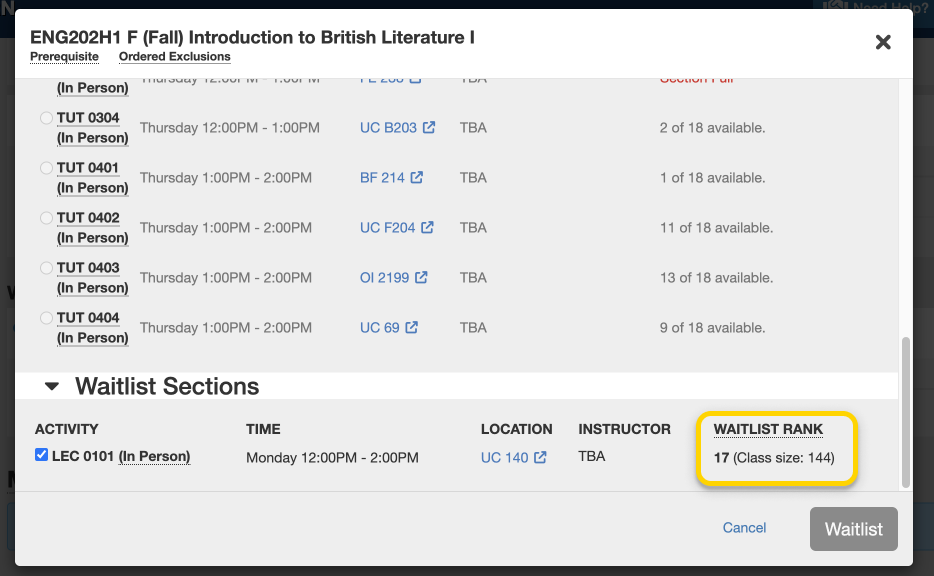
- A modal window will appear. If the course has a waitlist, it will be towards the bottom of the modal window. The “Current Waitlist Occupancy” shows the number of other students who are currently on the waitlist. In this example, the class size is 144, and there are 16 students on the waitlist, excluding you. Select the primary activity (usually a lecture or LEC) for which you would like to join the waitlist, and select the “Waitlist” button. You cannot join the waitlist for secondary activities such as tutorials (TUT) and practicals (PRA), so be sure to enrol in those if needed and after you get into the course.
- If you have successfully enrolled on the waitlist, you will receive a success message towards the top right of your screen and the course will be in the “Waitlisted” section of your currently enrolled courses. You can check your rank on the waitlist at any time by selecting “View rank on waitlist”.

- A modal window will appear showing your rank on the waitlist. In this example, your current position on the waitlist would be 17. There are 16 students in front of you on the waitlist, and the class size is 144 students. If your waitlist rank is 0, then you are next in line to be enrolled into the course. ACORN will send you a notification in your Notifications area if your rank on the waitlist changes.
- ACORN will enrol you in the primary activity (usually a lecture or LEC) of the course automatically if you get into the course from the waitlist. You will also get an email at your U of T email address to update you. If your course has additional activities, such as tutorials (TUT) and practicals (PRA), ACORN will not automatically enroll you in these. Please enrol in these activities as soon as you can after getting into your course so you do not miss any classes.
Your enrolment cart allows you to plan the courses that you want to enrol in ahead of time. You can experiment with different courses, lecture (LEC), tutorial (TUT) and practical (PRA) sections so that you can quickly enrol in your top choices on enrolment day.
Courses in your enrolment cart will not automatically be enrolled for you once your enrolment period begins.
Before adding courses to your cart, check when you will be eligible to enrol by viewing your divisional registrar’s important academic dates, and check your enrolment start time on ACORN. You can plan the courses you want to take using the Timetable builder, and learn if you will be eligible to enrol in a course by checking the “Enrolment Controls” section of a course in the search results area. To plan for your entire degree, check out Degree Explorer.
Instructional videos: UTM | UTSC | UTSG
- From the ACORN dashboard, click ‘Enrol & Manage’ on the main navigation menu.
- On the Enrol & Manage page, you will see one or more tabs labelled with the academic session. Ensure that you have selected the tab for the session for which you want to add courses to your cart. Then, select the Courses button, or the Courses page from the main navigation.
- Use the search field to search for courses by course code or title. Results will start appearing after three characters. From the list of courses that appears, select a course.
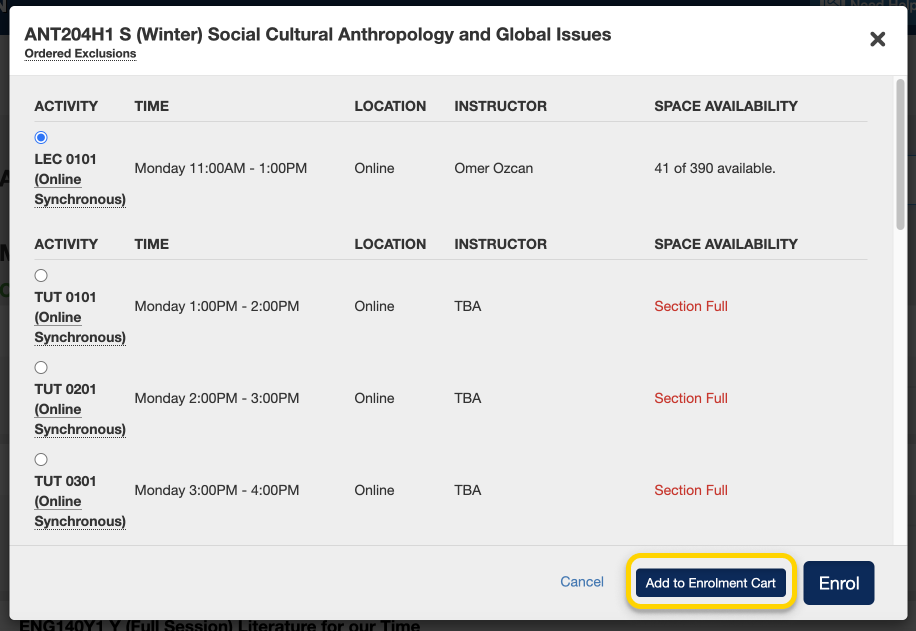
- A modal window will appear. Select a primary activity, which is typically a lecture (LEC), and any secondary activities, which are typically tutorials (TUT) or practicals (PRA). Not every course will have a lecture, and not every course will have tutorials and practicals. Be sure to check the Time column in case there is a conflict with any of your other currently-enrolled courses, and ensure that the activity that you are selecting do not say “Enrolment Blocked” or “Section Full” under the Space Availability column. If a section says “Enrolment Blocked”, the activity or course may be restricted to students from a certain program, year of study, or campus. Please check the Timetable Builder to learn about any restrictions or Enrolment Controls that a course may have.Next, select the “Add to Enrolment Cart” button towards the bottom of the modal window. If you are unable to select a particular activity or enrol in the course, ACORN will tell you why. If you think you should be able to enrol in a course and you cannot, please contact your college, divisional or faculty registrar.
- The course should now appear under your Enrolment Cart towards the bottom of your Courses screen. From here, you can edit the course activities, remove the course from your cart, and enrol starting on your enrolment day. Learn more about how to enrol in a course from your Enrolment Cart.

Program Enrolment
Students from different divisions at U of T enrol in courses at different times. Learn when your division has set up your enrolment time by visiting their website. They may also send you an email about it. Once your division has setup your enrolment start time—usually a week or so prior to your enrolment day—log into ACORN to view your start date and time on the Dashboard.
This is an example of a blue message that will appear on your ACORN Dashboard. Yours will look a little different, as the date and time will be personalized to your program and year of study.
ACORN will not take any additional actions if you enrol in courses that result in a conflict (i.e., it will not drop any course activities on your behalf). It is up to you to resolve any conflicts. You can either leave the courses as they are or enrol in alternative options.
You can try to resolve the conflict in a few different ways:
- Explore different combinations of course sections (Lectures, Tutorials and Practicals)
- See if you can take one of the courses at a later term. Try using Degree Explorer to experiment with your options.
- Select a different course if one of the conflicting courses is not required to complete your program or degree
- On the Courses page, select the Edit button for the course section that you want to change.
- A modal window will appear that will list the sections that you can change. Select the course section(s) you would like to change to, and then select the Modify button. If you cannot select a certain section, it may be full or you may not have priority to enrol in the section; ACORN should tell you why.
In this example, the student is switching from the first Practical section (PRA 0101) to the second one (PRA 0102).
- If you have successfully switched to your desired course section you will receive a success message towards the top of the page. You will also see your updated course in the My Courses section.
- When a final grade is released for each of your courses, you will get a new notification in ACORN. When you have a new notification, a blue badge containing a number will appear on top of a bell icon towards the top of your page. Select this button to open your Notifications menu.
- If you have received a final grade, there will be a notification here alongside any other notifications that you recently received. Select the link within the notification to view your grade.
- You will be taken to your Academic History page containing your final grade for the course. You can visit your Academic History page at any time via ACORN’s main navigation menu to see an up-to-date list of grades for all of your courses.
Watch a video walkthrough for U of T’s GPA calculator.
The GPA calculator is a U of T-wide tool that allows you to estimate your GPA (Grade Point Average) for the current or upcoming academic sessions. This tool should be used for planning purposes only; refer to your Academic History page in ACORN for your official GPA calculations.
Using the GPA Calculator, you can:
- Calculate your CGPA, SGPA and AGPA
- Use your current CGPA from ACORN to speed up your calculations
- See your GPA calculations update in real-time
- Explore useful academic resources
You may want to calculate your GPA for the following reasons and more:
- Find out what your GPA will be at the end of the semester or year
- Determine whether you will make it into your program of study (POSt)
- Find out if you will graduate with distinction
- Learn which grades you will need to achieve to meet personal goals
Before starting, have your grades on hand for reference. Find them on your Academic History page in ACORN. When entering grades, include failed courses, and exclude transfer credits, extra (EXT), Credit/No Credit (CR/NCR) and Late Withdrawal (LWD) courses.
You can view tips for using the GPA Calculator by clicking the help icons beside the step one and step two headings.
Estimate Your CGPA
To estimate your Cumulative GPA (CGPA), enter your current Cumulative GPA and current number of credits earned from ACORN into Step 1 of the calculator. This step is optional; you can always enter all of your grades manually into the Academic Period containers, but this method is faster.
In this example, “Academic Period 1” means whichever session you are predicting your grades for. If your official CGPA from ACORN was calculated last Winter, and you are predicting courses for the current Fall/Winter session, Academic Period 1 will represent the Fall semester. You can also enter all of your Fall and Winter marks into Academic Period 1, or enter Fall marks in Academic Period 1 and Winter marks in Academic Period 2. It is up to you.
Next, enter anticipated grades for your courses in progress. Your Sessional and Cumulative GPAs will update immediately at the bottom of the Academic Period 1 container. Your CGPA calculation will take into account the “Current CGPA from ACORN” that you entered in Step 1. Your SGPA calculation will only take into account grades entered in Academic Period 1.
Estimate your SGPA
To estimate your Sessional GPA (GPA), enter current and anticipated grades for a single Fall or Winter or entire Summer session (this includes both sub-sessions) in Academic Period 1.
You do not need to add your Current CGPA from ACORN in Step 1 unless you want to see your potential CGPA at the same time.
Estimate Your AGPA
To calculate your Annual GPA (AGPA), enter current and anticipated grades for the Fall session in Academic Period 1 and the Winter session in Academic Period 2. You will need to click the “Add Academic Period” button to open the second session.
You do not need to add your Current CGPA from ACORN in Step 1 unless you want to see your potential CGPA at the same time.
If you are including Y courses worth 1.0 credit courses: Include grades for these courses in Academic Period 2, as grades for these courses are calculated in the Winter term. On your Academic History in ACORN, for the Fall session these courses will have a grade of “IPR” (In Progress). If you enter Y courses in Academic Period 1 (Fall), your estimated AGPA will not be correct.
Tip: If you already know your Fall SGPA, enter it in Step 1 along with the number of credits you earned for the Fall, and enter your Winter grades in Academic Period 1. The calculated CGPA will actually be your AGPA.
Get Academic Help
Some useful academic resources are located below the calculator itself. If you want academic advising or have questions about courses, contact your Registrar. You can also find links to helpful academic workshops and events that U of T offers, as well as study spaces you can use.
Send the ACORN/GPA Calculator Team Feedback
We want to hear your thoughts, ideas and suggestions to improve this GPA Calculator! We care about how and if it works for you, so send us a message via the “Send Feedback” button towards the bottom of the page.
Instructional videos: UTM | UTSC | UTSG
Before enrolling in courses, check when you will be eligible to enrol by viewing your divisional registrar’s important academic dates, and check your enrolment start time on ACORN. You can plan the courses you want to take using the Timetable builder, and learn if you will be eligible to enrol in a course by checking the “Enrolment Controls” section of a course in the search results area. To plan for your entire degree, check out Degree Explorer.
Once you know which courses you want to take, you can add them to your Enrolment Cart in ACORN so that you can enrol in them without searching for them again on enrolment day. The Enrolment Cart is like adding courses to a shopping cart so that you can save them for later. On enrolment day, you’ll need to enrol in each course individually from your cart.
- To get to you Enrolment Cart from the ACORN dashboard, select ‘Enrol & Manage’ on the main navigation menu on the left side of the screen.
- On the Enrol & Manage page, there will be one or more tabs labelled with the academic session. Ensure that you have selected the tab for the session in which you want to enrol in courses. Then, select the Courses button, or the Courses page from the main navigation.
- Find your enrolment cart at the bottom of the Courses screen. If your cart is empty, learn how to add courses to your Enrolment Cart.
- For each course that you would like to enrol in from your Enrolment Cart, select the “Enrol” button.
- You will see a confirmation modal window asking whether you would like to enrol in this course. Be sure to check the Time column in case there is a conflict with any of your other currently-enrolled courses, and ensure that the activity that you are selecting do not say “Enrolment Blocked” or “Section Full” under the Space Availability column. If a section says “Enrolment Blocked”, the activity or course may be restricted to students from a certain program, year of study, or campus. Please check the Timetable Builder to learn about any restrictions or Enrolment Controls that a course may have.Next, select “Enrol”.
- If you have successfully enrolled in the course you will receive a success notice on the top right corner of your screen and the course will be listed under your currently enrolled courses.
Instructional videos: UTM | UTSC | UTSG
Before enrolling in courses, check when you will be eligible to enrol by viewing your divisional registrar’s important academic dates, and check your enrolment start time on ACORN. You can plan the courses you want to take using the Timetable builder, and learn if you will be eligible to enrol in a course by checking the “Enrolment Controls” section of a course in the search results area. To plan for your entire degree, check out Degree Explorer.
- From the ACORN dashboard, click ‘Enrol & Manage’ on the main navigation menu.
- On the Enrol & Manage page, there will be one or more tabs labelled with the academic session. Ensure that you have selected the tab for the session in which you want to enrol in courses. Then, select the Courses button, or the Courses page from the main navigation.
- Use the search field to search for courses by course code or title. Results will start appearing after three characters. From the list of courses that appears, select a course.
- A modal window will appear. Select a primary activity, which is typically a lecture (LEC), and any secondary activities, which are typically tutorials (TUT) or practicals (PRA). Not every course will have a lecture, and not every course will have tutorials and practicals. Be sure to check the Time column in case there is a conflict with any of your other currently-enrolled courses, and ensure that the activity that you are selecting do not say “Enrolment Blocked” or “Section Full” under the Space Availability column. If a section says “Enrolment Blocked”, the activity or course may be restricted to students from a certain program, year of study, or campus. Please check the Timetable Builder to learn about any restrictions or Enrolment Controls that a course may have. Next, select the “Enrol” button towards the bottom of the modal window. If you are unable to select a particular activity or enrol in the course, ACORN will tell you why. If you think you should be able to enrol in a course and you cannot, please contact your college, divisional or faculty registrar.
- If you have successfully enrolled in the course you will receive a success notice on the top right corner of your screen and the course will be listed under your currently enrolled courses.
If you want to drop a course, check your division’s important academic dates to determine when you can drop a course without facing an academic or financial penalty.
- From your Courses screen, click the gear icon towards the right of the course that you want to drop.
- Select “Drop Course” from the drop-down menu that appears.
- A modal window will pop up to confirm that you want to drop this course. Once it, appears, double-check the course to make sure it is correct, and select “Drop Course”.
- If you have successfully dropped the course you will receive a success notice towards the top right corner of your screen and the course will no longer be listed under your currently enrolled courses.
You can choose to assess courses as Credit/No Credit when you want to take a course but don’t want it to contribute to your GPA. A course that is assessed as Credit/No Credit will count towards the number of credits you need for your degree as long as you pass the course according to your division’s standards. If you need a final grade in a course for a program requirement or to apply for a certification in the future, you generally should not consider Credit/No Credit. If you’re unsure, contact an academic advisor. Before assessing any courses as Credit/No Credit, check your divisional registrar’s guidelines and deadlines because they may vary.
- On the Courses screen, click the gear icon on the top right corner of the course you want to assess as Credit/No Credit.
- Select ‘Add Credit/No Credit’ from the drop-down menu that appears.
- A modal window will appear to provide more information about assessing the course as Credit/No Credit. Read through this and ensure that assessing the course as Credit/No Credit is appropriate for your situation, and then select “Assess as Credit/No Credit”.
- If you have successfully assessed the course as Credit/No Credit you will receive a success message on the top right corner of your screen. A “Credit/No Credit” indicator will also appear below the course title under your Currently Enrolled courses.
Instructional videos: UTM | UTSC | UTSG
If a course lecture (LEC), tutorial (TUT) or practical (PRA) is full when you try to enrol, you may be able to enrol in the waitlist instead. If enough students drop the course and space becomes available, ACORN will automatically enrol you in that course. Check the academic deadlines for your division to learn when the waitlist period ends. At this point, the waitlist will be removed from that course.
- On the Courses page, use the search field to search for courses by course code or title. Results will start appearing after three characters. From the list of courses that appears, select a course.
- A modal window will appear. If the course has a waitlist, it will be towards the bottom of the modal window. The “Current Waitlist Occupancy” shows the number of other students who are currently on the waitlist. In this example, the class size is 144, and there are 16 students on the waitlist, excluding you. Select the primary activity (usually a lecture or LEC) for which you would like to join the waitlist, and select the “Waitlist” button. You cannot join the waitlist for secondary activities such as tutorials (TUT) and practicals (PRA), so be sure to enrol in those if needed and after you get into the course.
- If you have successfully enrolled on the waitlist, you will receive a success message towards the top right of your screen and the course will be in the “Waitlisted” section of your currently enrolled courses. You can check your rank on the waitlist at any time by selecting “View rank on waitlist”.
- A modal window will appear showing your rank on the waitlist. In this example, your current position on the waitlist would be 17. There are 16 students in front of you on the waitlist, and the class size is 144 students. If your waitlist rank is 0, then you are next in line to be enrolled into the course. ACORN will send you a notification in your Notifications area if your rank on the waitlist changes.
- ACORN will enrol you in the primary activity (usually a lecture or LEC) of the course automatically if you get into the course from the waitlist. You will also get an email at your U of T email address to update you. If your course has additional activities, such as tutorials (TUT) and practicals (PRA), ACORN will not automatically enroll you in these. Please enrol in these activities as soon as you can after getting into your course so you do not miss any classes.
Your enrolment cart allows you to plan the courses that you want to enrol in ahead of time. You can experiment with different courses, lecture (LEC), tutorial (TUT) and practical (PRA) sections so that you can quickly enrol in your top choices on enrolment day.
Courses in your enrolment cart will not automatically be enrolled for you once your enrolment period begins.
Before adding courses to your cart, check when you will be eligible to enrol by viewing your divisional registrar’s important academic dates, and check your enrolment start time on ACORN. You can plan the courses you want to take using the Timetable builder, and learn if you will be eligible to enrol in a course by checking the “Enrolment Controls” section of a course in the search results area. To plan for your entire degree, check out Degree Explorer.
Instructional videos: UTM | UTSC | UTSG
- From the ACORN dashboard, click ‘Enrol & Manage’ on the main navigation menu.
- On the Enrol & Manage page, you will see one or more tabs labelled with the academic session. Ensure that you have selected the tab for the session for which you want to add courses to your cart. Then, select the Courses button, or the Courses page from the main navigation.
- Use the search field to search for courses by course code or title. Results will start appearing after three characters. From the list of courses that appears, select a course.
- A modal window will appear. Select a primary activity, which is typically a lecture (LEC), and any secondary activities, which are typically tutorials (TUT) or practicals (PRA). Not every course will have a lecture, and not every course will have tutorials and practicals. Be sure to check the Time column in case there is a conflict with any of your other currently-enrolled courses, and ensure that the activity that you are selecting do not say “Enrolment Blocked” or “Section Full” under the Space Availability column. If a section says “Enrolment Blocked”, the activity or course may be restricted to students from a certain program, year of study, or campus. Please check the Timetable Builder to learn about any restrictions or Enrolment Controls that a course may have.Next, select the “Add to Enrolment Cart” button towards the bottom of the modal window. If you are unable to select a particular activity or enrol in the course, ACORN will tell you why. If you think you should be able to enrol in a course and you cannot, please contact your college, divisional or faculty registrar.
- The course should now appear under your Enrolment Cart towards the bottom of your Courses screen. From here, you can edit the course activities, remove the course from your cart, and enrol starting on your enrolment day. Learn more about how to enrol in a course from your Enrolment Cart.
Finances
Students from different divisions at U of T enrol in courses at different times. Learn when your division has set up your enrolment time by visiting their website. They may also send you an email about it. Once your division has setup your enrolment start time—usually a week or so prior to your enrolment day—log into ACORN to view your start date and time on the Dashboard.
This is an example of a blue message that will appear on your ACORN Dashboard. Yours will look a little different, as the date and time will be personalized to your program and year of study.
ACORN will not take any additional actions if you enrol in courses that result in a conflict (i.e., it will not drop any course activities on your behalf). It is up to you to resolve any conflicts. You can either leave the courses as they are or enrol in alternative options.
You can try to resolve the conflict in a few different ways:
- Explore different combinations of course sections (Lectures, Tutorials and Practicals)
- See if you can take one of the courses at a later term. Try using Degree Explorer to experiment with your options.
- Select a different course if one of the conflicting courses is not required to complete your program or degree
- On the Courses page, select the Edit button for the course section that you want to change.
- A modal window will appear that will list the sections that you can change. Select the course section(s) you would like to change to, and then select the Modify button. If you cannot select a certain section, it may be full or you may not have priority to enrol in the section; ACORN should tell you why.
In this example, the student is switching from the first Practical section (PRA 0101) to the second one (PRA 0102).
- If you have successfully switched to your desired course section you will receive a success message towards the top of the page. You will also see your updated course in the My Courses section.
- When a final grade is released for each of your courses, you will get a new notification in ACORN. When you have a new notification, a blue badge containing a number will appear on top of a bell icon towards the top of your page. Select this button to open your Notifications menu.
- If you have received a final grade, there will be a notification here alongside any other notifications that you recently received. Select the link within the notification to view your grade.
- You will be taken to your Academic History page containing your final grade for the course. You can visit your Academic History page at any time via ACORN’s main navigation menu to see an up-to-date list of grades for all of your courses.
Watch a video walkthrough for U of T’s GPA calculator.
The GPA calculator is a U of T-wide tool that allows you to estimate your GPA (Grade Point Average) for the current or upcoming academic sessions. This tool should be used for planning purposes only; refer to your Academic History page in ACORN for your official GPA calculations.
Using the GPA Calculator, you can:
- Calculate your CGPA, SGPA and AGPA
- Use your current CGPA from ACORN to speed up your calculations
- See your GPA calculations update in real-time
- Explore useful academic resources
You may want to calculate your GPA for the following reasons and more:
- Find out what your GPA will be at the end of the semester or year
- Determine whether you will make it into your program of study (POSt)
- Find out if you will graduate with distinction
- Learn which grades you will need to achieve to meet personal goals
Before starting, have your grades on hand for reference. Find them on your Academic History page in ACORN. When entering grades, include failed courses, and exclude transfer credits, extra (EXT), Credit/No Credit (CR/NCR) and Late Withdrawal (LWD) courses.
You can view tips for using the GPA Calculator by clicking the help icons beside the step one and step two headings.
Estimate Your CGPA
To estimate your Cumulative GPA (CGPA), enter your current Cumulative GPA and current number of credits earned from ACORN into Step 1 of the calculator. This step is optional; you can always enter all of your grades manually into the Academic Period containers, but this method is faster.
In this example, “Academic Period 1” means whichever session you are predicting your grades for. If your official CGPA from ACORN was calculated last Winter, and you are predicting courses for the current Fall/Winter session, Academic Period 1 will represent the Fall semester. You can also enter all of your Fall and Winter marks into Academic Period 1, or enter Fall marks in Academic Period 1 and Winter marks in Academic Period 2. It is up to you.
Next, enter anticipated grades for your courses in progress. Your Sessional and Cumulative GPAs will update immediately at the bottom of the Academic Period 1 container. Your CGPA calculation will take into account the “Current CGPA from ACORN” that you entered in Step 1. Your SGPA calculation will only take into account grades entered in Academic Period 1.
Estimate your SGPA
To estimate your Sessional GPA (GPA), enter current and anticipated grades for a single Fall or Winter or entire Summer session (this includes both sub-sessions) in Academic Period 1.
You do not need to add your Current CGPA from ACORN in Step 1 unless you want to see your potential CGPA at the same time.
Estimate Your AGPA
To calculate your Annual GPA (AGPA), enter current and anticipated grades for the Fall session in Academic Period 1 and the Winter session in Academic Period 2. You will need to click the “Add Academic Period” button to open the second session.
You do not need to add your Current CGPA from ACORN in Step 1 unless you want to see your potential CGPA at the same time.
If you are including Y courses worth 1.0 credit courses: Include grades for these courses in Academic Period 2, as grades for these courses are calculated in the Winter term. On your Academic History in ACORN, for the Fall session these courses will have a grade of “IPR” (In Progress). If you enter Y courses in Academic Period 1 (Fall), your estimated AGPA will not be correct.
Tip: If you already know your Fall SGPA, enter it in Step 1 along with the number of credits you earned for the Fall, and enter your Winter grades in Academic Period 1. The calculated CGPA will actually be your AGPA.
Get Academic Help
Some useful academic resources are located below the calculator itself. If you want academic advising or have questions about courses, contact your Registrar. You can also find links to helpful academic workshops and events that U of T offers, as well as study spaces you can use.
Send the ACORN/GPA Calculator Team Feedback
We want to hear your thoughts, ideas and suggestions to improve this GPA Calculator! We care about how and if it works for you, so send us a message via the “Send Feedback” button towards the bottom of the page.
Instructional videos: UTM | UTSC | UTSG
Before enrolling in courses, check when you will be eligible to enrol by viewing your divisional registrar’s important academic dates, and check your enrolment start time on ACORN. You can plan the courses you want to take using the Timetable builder, and learn if you will be eligible to enrol in a course by checking the “Enrolment Controls” section of a course in the search results area. To plan for your entire degree, check out Degree Explorer.
Once you know which courses you want to take, you can add them to your Enrolment Cart in ACORN so that you can enrol in them without searching for them again on enrolment day. The Enrolment Cart is like adding courses to a shopping cart so that you can save them for later. On enrolment day, you’ll need to enrol in each course individually from your cart.
- To get to you Enrolment Cart from the ACORN dashboard, select ‘Enrol & Manage’ on the main navigation menu on the left side of the screen.
- On the Enrol & Manage page, there will be one or more tabs labelled with the academic session. Ensure that you have selected the tab for the session in which you want to enrol in courses. Then, select the Courses button, or the Courses page from the main navigation.
- Find your enrolment cart at the bottom of the Courses screen. If your cart is empty, learn how to add courses to your Enrolment Cart.
- For each course that you would like to enrol in from your Enrolment Cart, select the “Enrol” button.
- You will see a confirmation modal window asking whether you would like to enrol in this course. Be sure to check the Time column in case there is a conflict with any of your other currently-enrolled courses, and ensure that the activity that you are selecting do not say “Enrolment Blocked” or “Section Full” under the Space Availability column. If a section says “Enrolment Blocked”, the activity or course may be restricted to students from a certain program, year of study, or campus. Please check the Timetable Builder to learn about any restrictions or Enrolment Controls that a course may have.Next, select “Enrol”.
- If you have successfully enrolled in the course you will receive a success notice on the top right corner of your screen and the course will be listed under your currently enrolled courses.
Instructional videos: UTM | UTSC | UTSG
Before enrolling in courses, check when you will be eligible to enrol by viewing your divisional registrar’s important academic dates, and check your enrolment start time on ACORN. You can plan the courses you want to take using the Timetable builder, and learn if you will be eligible to enrol in a course by checking the “Enrolment Controls” section of a course in the search results area. To plan for your entire degree, check out Degree Explorer.
- From the ACORN dashboard, click ‘Enrol & Manage’ on the main navigation menu.
- On the Enrol & Manage page, there will be one or more tabs labelled with the academic session. Ensure that you have selected the tab for the session in which you want to enrol in courses. Then, select the Courses button, or the Courses page from the main navigation.
- Use the search field to search for courses by course code or title. Results will start appearing after three characters. From the list of courses that appears, select a course.
- A modal window will appear. Select a primary activity, which is typically a lecture (LEC), and any secondary activities, which are typically tutorials (TUT) or practicals (PRA). Not every course will have a lecture, and not every course will have tutorials and practicals. Be sure to check the Time column in case there is a conflict with any of your other currently-enrolled courses, and ensure that the activity that you are selecting do not say “Enrolment Blocked” or “Section Full” under the Space Availability column. If a section says “Enrolment Blocked”, the activity or course may be restricted to students from a certain program, year of study, or campus. Please check the Timetable Builder to learn about any restrictions or Enrolment Controls that a course may have. Next, select the “Enrol” button towards the bottom of the modal window. If you are unable to select a particular activity or enrol in the course, ACORN will tell you why. If you think you should be able to enrol in a course and you cannot, please contact your college, divisional or faculty registrar.
- If you have successfully enrolled in the course you will receive a success notice on the top right corner of your screen and the course will be listed under your currently enrolled courses.
If you want to drop a course, check your division’s important academic dates to determine when you can drop a course without facing an academic or financial penalty.
- From your Courses screen, click the gear icon towards the right of the course that you want to drop.
- Select “Drop Course” from the drop-down menu that appears.
- A modal window will pop up to confirm that you want to drop this course. Once it, appears, double-check the course to make sure it is correct, and select “Drop Course”.
- If you have successfully dropped the course you will receive a success notice towards the top right corner of your screen and the course will no longer be listed under your currently enrolled courses.
You can choose to assess courses as Credit/No Credit when you want to take a course but don’t want it to contribute to your GPA. A course that is assessed as Credit/No Credit will count towards the number of credits you need for your degree as long as you pass the course according to your division’s standards. If you need a final grade in a course for a program requirement or to apply for a certification in the future, you generally should not consider Credit/No Credit. If you’re unsure, contact an academic advisor. Before assessing any courses as Credit/No Credit, check your divisional registrar’s guidelines and deadlines because they may vary.
- On the Courses screen, click the gear icon on the top right corner of the course you want to assess as Credit/No Credit.
- Select ‘Add Credit/No Credit’ from the drop-down menu that appears.
- A modal window will appear to provide more information about assessing the course as Credit/No Credit. Read through this and ensure that assessing the course as Credit/No Credit is appropriate for your situation, and then select “Assess as Credit/No Credit”.
- If you have successfully assessed the course as Credit/No Credit you will receive a success message on the top right corner of your screen. A “Credit/No Credit” indicator will also appear below the course title under your Currently Enrolled courses.
Instructional videos: UTM | UTSC | UTSG
If a course lecture (LEC), tutorial (TUT) or practical (PRA) is full when you try to enrol, you may be able to enrol in the waitlist instead. If enough students drop the course and space becomes available, ACORN will automatically enrol you in that course. Check the academic deadlines for your division to learn when the waitlist period ends. At this point, the waitlist will be removed from that course.
- On the Courses page, use the search field to search for courses by course code or title. Results will start appearing after three characters. From the list of courses that appears, select a course.
- A modal window will appear. If the course has a waitlist, it will be towards the bottom of the modal window. The “Current Waitlist Occupancy” shows the number of other students who are currently on the waitlist. In this example, the class size is 144, and there are 16 students on the waitlist, excluding you. Select the primary activity (usually a lecture or LEC) for which you would like to join the waitlist, and select the “Waitlist” button. You cannot join the waitlist for secondary activities such as tutorials (TUT) and practicals (PRA), so be sure to enrol in those if needed and after you get into the course.
- If you have successfully enrolled on the waitlist, you will receive a success message towards the top right of your screen and the course will be in the “Waitlisted” section of your currently enrolled courses. You can check your rank on the waitlist at any time by selecting “View rank on waitlist”.
- A modal window will appear showing your rank on the waitlist. In this example, your current position on the waitlist would be 17. There are 16 students in front of you on the waitlist, and the class size is 144 students. If your waitlist rank is 0, then you are next in line to be enrolled into the course. ACORN will send you a notification in your Notifications area if your rank on the waitlist changes.
- ACORN will enrol you in the primary activity (usually a lecture or LEC) of the course automatically if you get into the course from the waitlist. You will also get an email at your U of T email address to update you. If your course has additional activities, such as tutorials (TUT) and practicals (PRA), ACORN will not automatically enroll you in these. Please enrol in these activities as soon as you can after getting into your course so you do not miss any classes.
Your enrolment cart allows you to plan the courses that you want to enrol in ahead of time. You can experiment with different courses, lecture (LEC), tutorial (TUT) and practical (PRA) sections so that you can quickly enrol in your top choices on enrolment day.
Courses in your enrolment cart will not automatically be enrolled for you once your enrolment period begins.
Before adding courses to your cart, check when you will be eligible to enrol by viewing your divisional registrar’s important academic dates, and check your enrolment start time on ACORN. You can plan the courses you want to take using the Timetable builder, and learn if you will be eligible to enrol in a course by checking the “Enrolment Controls” section of a course in the search results area. To plan for your entire degree, check out Degree Explorer.
Instructional videos: UTM | UTSC | UTSG
- From the ACORN dashboard, click ‘Enrol & Manage’ on the main navigation menu.
- On the Enrol & Manage page, you will see one or more tabs labelled with the academic session. Ensure that you have selected the tab for the session for which you want to add courses to your cart. Then, select the Courses button, or the Courses page from the main navigation.
- Use the search field to search for courses by course code or title. Results will start appearing after three characters. From the list of courses that appears, select a course.
- A modal window will appear. Select a primary activity, which is typically a lecture (LEC), and any secondary activities, which are typically tutorials (TUT) or practicals (PRA). Not every course will have a lecture, and not every course will have tutorials and practicals. Be sure to check the Time column in case there is a conflict with any of your other currently-enrolled courses, and ensure that the activity that you are selecting do not say “Enrolment Blocked” or “Section Full” under the Space Availability column. If a section says “Enrolment Blocked”, the activity or course may be restricted to students from a certain program, year of study, or campus. Please check the Timetable Builder to learn about any restrictions or Enrolment Controls that a course may have.Next, select the “Add to Enrolment Cart” button towards the bottom of the modal window. If you are unable to select a particular activity or enrol in the course, ACORN will tell you why. If you think you should be able to enrol in a course and you cannot, please contact your college, divisional or faculty registrar.
- The course should now appear under your Enrolment Cart towards the bottom of your Courses screen. From here, you can edit the course activities, remove the course from your cart, and enrol starting on your enrolment day. Learn more about how to enrol in a course from your Enrolment Cart.
Profile & Settings
Students from different divisions at U of T enrol in courses at different times. Learn when your division has set up your enrolment time by visiting their website. They may also send you an email about it. Once your division has setup your enrolment start time—usually a week or so prior to your enrolment day—log into ACORN to view your start date and time on the Dashboard.
This is an example of a blue message that will appear on your ACORN Dashboard. Yours will look a little different, as the date and time will be personalized to your program and year of study.
ACORN will not take any additional actions if you enrol in courses that result in a conflict (i.e., it will not drop any course activities on your behalf). It is up to you to resolve any conflicts. You can either leave the courses as they are or enrol in alternative options.
You can try to resolve the conflict in a few different ways:
- Explore different combinations of course sections (Lectures, Tutorials and Practicals)
- See if you can take one of the courses at a later term. Try using Degree Explorer to experiment with your options.
- Select a different course if one of the conflicting courses is not required to complete your program or degree
- On the Courses page, select the Edit button for the course section that you want to change.
- A modal window will appear that will list the sections that you can change. Select the course section(s) you would like to change to, and then select the Modify button. If you cannot select a certain section, it may be full or you may not have priority to enrol in the section; ACORN should tell you why.
In this example, the student is switching from the first Practical section (PRA 0101) to the second one (PRA 0102).
- If you have successfully switched to your desired course section you will receive a success message towards the top of the page. You will also see your updated course in the My Courses section.
- When a final grade is released for each of your courses, you will get a new notification in ACORN. When you have a new notification, a blue badge containing a number will appear on top of a bell icon towards the top of your page. Select this button to open your Notifications menu.
- If you have received a final grade, there will be a notification here alongside any other notifications that you recently received. Select the link within the notification to view your grade.
- You will be taken to your Academic History page containing your final grade for the course. You can visit your Academic History page at any time via ACORN’s main navigation menu to see an up-to-date list of grades for all of your courses.
Watch a video walkthrough for U of T’s GPA calculator.
The GPA calculator is a U of T-wide tool that allows you to estimate your GPA (Grade Point Average) for the current or upcoming academic sessions. This tool should be used for planning purposes only; refer to your Academic History page in ACORN for your official GPA calculations.
Using the GPA Calculator, you can:
- Calculate your CGPA, SGPA and AGPA
- Use your current CGPA from ACORN to speed up your calculations
- See your GPA calculations update in real-time
- Explore useful academic resources
You may want to calculate your GPA for the following reasons and more:
- Find out what your GPA will be at the end of the semester or year
- Determine whether you will make it into your program of study (POSt)
- Find out if you will graduate with distinction
- Learn which grades you will need to achieve to meet personal goals
Before starting, have your grades on hand for reference. Find them on your Academic History page in ACORN. When entering grades, include failed courses, and exclude transfer credits, extra (EXT), Credit/No Credit (CR/NCR) and Late Withdrawal (LWD) courses.
You can view tips for using the GPA Calculator by clicking the help icons beside the step one and step two headings.
Estimate Your CGPA
To estimate your Cumulative GPA (CGPA), enter your current Cumulative GPA and current number of credits earned from ACORN into Step 1 of the calculator. This step is optional; you can always enter all of your grades manually into the Academic Period containers, but this method is faster.
In this example, “Academic Period 1” means whichever session you are predicting your grades for. If your official CGPA from ACORN was calculated last Winter, and you are predicting courses for the current Fall/Winter session, Academic Period 1 will represent the Fall semester. You can also enter all of your Fall and Winter marks into Academic Period 1, or enter Fall marks in Academic Period 1 and Winter marks in Academic Period 2. It is up to you.
Next, enter anticipated grades for your courses in progress. Your Sessional and Cumulative GPAs will update immediately at the bottom of the Academic Period 1 container. Your CGPA calculation will take into account the “Current CGPA from ACORN” that you entered in Step 1. Your SGPA calculation will only take into account grades entered in Academic Period 1.
Estimate your SGPA
To estimate your Sessional GPA (GPA), enter current and anticipated grades for a single Fall or Winter or entire Summer session (this includes both sub-sessions) in Academic Period 1.
You do not need to add your Current CGPA from ACORN in Step 1 unless you want to see your potential CGPA at the same time.
Estimate Your AGPA
To calculate your Annual GPA (AGPA), enter current and anticipated grades for the Fall session in Academic Period 1 and the Winter session in Academic Period 2. You will need to click the “Add Academic Period” button to open the second session.
You do not need to add your Current CGPA from ACORN in Step 1 unless you want to see your potential CGPA at the same time.
If you are including Y courses worth 1.0 credit courses: Include grades for these courses in Academic Period 2, as grades for these courses are calculated in the Winter term. On your Academic History in ACORN, for the Fall session these courses will have a grade of “IPR” (In Progress). If you enter Y courses in Academic Period 1 (Fall), your estimated AGPA will not be correct.
Tip: If you already know your Fall SGPA, enter it in Step 1 along with the number of credits you earned for the Fall, and enter your Winter grades in Academic Period 1. The calculated CGPA will actually be your AGPA.
Get Academic Help
Some useful academic resources are located below the calculator itself. If you want academic advising or have questions about courses, contact your Registrar. You can also find links to helpful academic workshops and events that U of T offers, as well as study spaces you can use.
Send the ACORN/GPA Calculator Team Feedback
We want to hear your thoughts, ideas and suggestions to improve this GPA Calculator! We care about how and if it works for you, so send us a message via the “Send Feedback” button towards the bottom of the page.
Instructional videos: UTM | UTSC | UTSG
Before enrolling in courses, check when you will be eligible to enrol by viewing your divisional registrar’s important academic dates, and check your enrolment start time on ACORN. You can plan the courses you want to take using the Timetable builder, and learn if you will be eligible to enrol in a course by checking the “Enrolment Controls” section of a course in the search results area. To plan for your entire degree, check out Degree Explorer.
Once you know which courses you want to take, you can add them to your Enrolment Cart in ACORN so that you can enrol in them without searching for them again on enrolment day. The Enrolment Cart is like adding courses to a shopping cart so that you can save them for later. On enrolment day, you’ll need to enrol in each course individually from your cart.
- To get to you Enrolment Cart from the ACORN dashboard, select ‘Enrol & Manage’ on the main navigation menu on the left side of the screen.
- On the Enrol & Manage page, there will be one or more tabs labelled with the academic session. Ensure that you have selected the tab for the session in which you want to enrol in courses. Then, select the Courses button, or the Courses page from the main navigation.
- Find your enrolment cart at the bottom of the Courses screen. If your cart is empty, learn how to add courses to your Enrolment Cart.
- For each course that you would like to enrol in from your Enrolment Cart, select the “Enrol” button.
- You will see a confirmation modal window asking whether you would like to enrol in this course. Be sure to check the Time column in case there is a conflict with any of your other currently-enrolled courses, and ensure that the activity that you are selecting do not say “Enrolment Blocked” or “Section Full” under the Space Availability column. If a section says “Enrolment Blocked”, the activity or course may be restricted to students from a certain program, year of study, or campus. Please check the Timetable Builder to learn about any restrictions or Enrolment Controls that a course may have.Next, select “Enrol”.
- If you have successfully enrolled in the course you will receive a success notice on the top right corner of your screen and the course will be listed under your currently enrolled courses.
Instructional videos: UTM | UTSC | UTSG
Before enrolling in courses, check when you will be eligible to enrol by viewing your divisional registrar’s important academic dates, and check your enrolment start time on ACORN. You can plan the courses you want to take using the Timetable builder, and learn if you will be eligible to enrol in a course by checking the “Enrolment Controls” section of a course in the search results area. To plan for your entire degree, check out Degree Explorer.
- From the ACORN dashboard, click ‘Enrol & Manage’ on the main navigation menu.
- On the Enrol & Manage page, there will be one or more tabs labelled with the academic session. Ensure that you have selected the tab for the session in which you want to enrol in courses. Then, select the Courses button, or the Courses page from the main navigation.
- Use the search field to search for courses by course code or title. Results will start appearing after three characters. From the list of courses that appears, select a course.
- A modal window will appear. Select a primary activity, which is typically a lecture (LEC), and any secondary activities, which are typically tutorials (TUT) or practicals (PRA). Not every course will have a lecture, and not every course will have tutorials and practicals. Be sure to check the Time column in case there is a conflict with any of your other currently-enrolled courses, and ensure that the activity that you are selecting do not say “Enrolment Blocked” or “Section Full” under the Space Availability column. If a section says “Enrolment Blocked”, the activity or course may be restricted to students from a certain program, year of study, or campus. Please check the Timetable Builder to learn about any restrictions or Enrolment Controls that a course may have. Next, select the “Enrol” button towards the bottom of the modal window. If you are unable to select a particular activity or enrol in the course, ACORN will tell you why. If you think you should be able to enrol in a course and you cannot, please contact your college, divisional or faculty registrar.
- If you have successfully enrolled in the course you will receive a success notice on the top right corner of your screen and the course will be listed under your currently enrolled courses.
If you want to drop a course, check your division’s important academic dates to determine when you can drop a course without facing an academic or financial penalty.
- From your Courses screen, click the gear icon towards the right of the course that you want to drop.
- Select “Drop Course” from the drop-down menu that appears.
- A modal window will pop up to confirm that you want to drop this course. Once it, appears, double-check the course to make sure it is correct, and select “Drop Course”.
- If you have successfully dropped the course you will receive a success notice towards the top right corner of your screen and the course will no longer be listed under your currently enrolled courses.
You can choose to assess courses as Credit/No Credit when you want to take a course but don’t want it to contribute to your GPA. A course that is assessed as Credit/No Credit will count towards the number of credits you need for your degree as long as you pass the course according to your division’s standards. If you need a final grade in a course for a program requirement or to apply for a certification in the future, you generally should not consider Credit/No Credit. If you’re unsure, contact an academic advisor. Before assessing any courses as Credit/No Credit, check your divisional registrar’s guidelines and deadlines because they may vary.
- On the Courses screen, click the gear icon on the top right corner of the course you want to assess as Credit/No Credit.
- Select ‘Add Credit/No Credit’ from the drop-down menu that appears.
- A modal window will appear to provide more information about assessing the course as Credit/No Credit. Read through this and ensure that assessing the course as Credit/No Credit is appropriate for your situation, and then select “Assess as Credit/No Credit”.
- If you have successfully assessed the course as Credit/No Credit you will receive a success message on the top right corner of your screen. A “Credit/No Credit” indicator will also appear below the course title under your Currently Enrolled courses.
Instructional videos: UTM | UTSC | UTSG
If a course lecture (LEC), tutorial (TUT) or practical (PRA) is full when you try to enrol, you may be able to enrol in the waitlist instead. If enough students drop the course and space becomes available, ACORN will automatically enrol you in that course. Check the academic deadlines for your division to learn when the waitlist period ends. At this point, the waitlist will be removed from that course.
- On the Courses page, use the search field to search for courses by course code or title. Results will start appearing after three characters. From the list of courses that appears, select a course.
- A modal window will appear. If the course has a waitlist, it will be towards the bottom of the modal window. The “Current Waitlist Occupancy” shows the number of other students who are currently on the waitlist. In this example, the class size is 144, and there are 16 students on the waitlist, excluding you. Select the primary activity (usually a lecture or LEC) for which you would like to join the waitlist, and select the “Waitlist” button. You cannot join the waitlist for secondary activities such as tutorials (TUT) and practicals (PRA), so be sure to enrol in those if needed and after you get into the course.
- If you have successfully enrolled on the waitlist, you will receive a success message towards the top right of your screen and the course will be in the “Waitlisted” section of your currently enrolled courses. You can check your rank on the waitlist at any time by selecting “View rank on waitlist”.
- A modal window will appear showing your rank on the waitlist. In this example, your current position on the waitlist would be 17. There are 16 students in front of you on the waitlist, and the class size is 144 students. If your waitlist rank is 0, then you are next in line to be enrolled into the course. ACORN will send you a notification in your Notifications area if your rank on the waitlist changes.
- ACORN will enrol you in the primary activity (usually a lecture or LEC) of the course automatically if you get into the course from the waitlist. You will also get an email at your U of T email address to update you. If your course has additional activities, such as tutorials (TUT) and practicals (PRA), ACORN will not automatically enroll you in these. Please enrol in these activities as soon as you can after getting into your course so you do not miss any classes.
Your enrolment cart allows you to plan the courses that you want to enrol in ahead of time. You can experiment with different courses, lecture (LEC), tutorial (TUT) and practical (PRA) sections so that you can quickly enrol in your top choices on enrolment day.
Courses in your enrolment cart will not automatically be enrolled for you once your enrolment period begins.
Before adding courses to your cart, check when you will be eligible to enrol by viewing your divisional registrar’s important academic dates, and check your enrolment start time on ACORN. You can plan the courses you want to take using the Timetable builder, and learn if you will be eligible to enrol in a course by checking the “Enrolment Controls” section of a course in the search results area. To plan for your entire degree, check out Degree Explorer.
Instructional videos: UTM | UTSC | UTSG
- From the ACORN dashboard, click ‘Enrol & Manage’ on the main navigation menu.
- On the Enrol & Manage page, you will see one or more tabs labelled with the academic session. Ensure that you have selected the tab for the session for which you want to add courses to your cart. Then, select the Courses button, or the Courses page from the main navigation.
- Use the search field to search for courses by course code or title. Results will start appearing after three characters. From the list of courses that appears, select a course.
- A modal window will appear. Select a primary activity, which is typically a lecture (LEC), and any secondary activities, which are typically tutorials (TUT) or practicals (PRA). Not every course will have a lecture, and not every course will have tutorials and practicals. Be sure to check the Time column in case there is a conflict with any of your other currently-enrolled courses, and ensure that the activity that you are selecting do not say “Enrolment Blocked” or “Section Full” under the Space Availability column. If a section says “Enrolment Blocked”, the activity or course may be restricted to students from a certain program, year of study, or campus. Please check the Timetable Builder to learn about any restrictions or Enrolment Controls that a course may have.Next, select the “Add to Enrolment Cart” button towards the bottom of the modal window. If you are unable to select a particular activity or enrol in the course, ACORN will tell you why. If you think you should be able to enrol in a course and you cannot, please contact your college, divisional or faculty registrar.
- The course should now appear under your Enrolment Cart towards the bottom of your Courses screen. From here, you can edit the course activities, remove the course from your cart, and enrol starting on your enrolment day. Learn more about how to enrol in a course from your Enrolment Cart.
UTORid & Password Reset
Students from different divisions at U of T enrol in courses at different times. Learn when your division has set up your enrolment time by visiting their website. They may also send you an email about it. Once your division has setup your enrolment start time—usually a week or so prior to your enrolment day—log into ACORN to view your start date and time on the Dashboard.
This is an example of a blue message that will appear on your ACORN Dashboard. Yours will look a little different, as the date and time will be personalized to your program and year of study.
ACORN will not take any additional actions if you enrol in courses that result in a conflict (i.e., it will not drop any course activities on your behalf). It is up to you to resolve any conflicts. You can either leave the courses as they are or enrol in alternative options.
You can try to resolve the conflict in a few different ways:
- Explore different combinations of course sections (Lectures, Tutorials and Practicals)
- See if you can take one of the courses at a later term. Try using Degree Explorer to experiment with your options.
- Select a different course if one of the conflicting courses is not required to complete your program or degree
- On the Courses page, select the Edit button for the course section that you want to change.
- A modal window will appear that will list the sections that you can change. Select the course section(s) you would like to change to, and then select the Modify button. If you cannot select a certain section, it may be full or you may not have priority to enrol in the section; ACORN should tell you why.
In this example, the student is switching from the first Practical section (PRA 0101) to the second one (PRA 0102).
- If you have successfully switched to your desired course section you will receive a success message towards the top of the page. You will also see your updated course in the My Courses section.
- When a final grade is released for each of your courses, you will get a new notification in ACORN. When you have a new notification, a blue badge containing a number will appear on top of a bell icon towards the top of your page. Select this button to open your Notifications menu.
- If you have received a final grade, there will be a notification here alongside any other notifications that you recently received. Select the link within the notification to view your grade.
- You will be taken to your Academic History page containing your final grade for the course. You can visit your Academic History page at any time via ACORN’s main navigation menu to see an up-to-date list of grades for all of your courses.
Watch a video walkthrough for U of T’s GPA calculator.
The GPA calculator is a U of T-wide tool that allows you to estimate your GPA (Grade Point Average) for the current or upcoming academic sessions. This tool should be used for planning purposes only; refer to your Academic History page in ACORN for your official GPA calculations.
Using the GPA Calculator, you can:
- Calculate your CGPA, SGPA and AGPA
- Use your current CGPA from ACORN to speed up your calculations
- See your GPA calculations update in real-time
- Explore useful academic resources
You may want to calculate your GPA for the following reasons and more:
- Find out what your GPA will be at the end of the semester or year
- Determine whether you will make it into your program of study (POSt)
- Find out if you will graduate with distinction
- Learn which grades you will need to achieve to meet personal goals
Before starting, have your grades on hand for reference. Find them on your Academic History page in ACORN. When entering grades, include failed courses, and exclude transfer credits, extra (EXT), Credit/No Credit (CR/NCR) and Late Withdrawal (LWD) courses.
You can view tips for using the GPA Calculator by clicking the help icons beside the step one and step two headings.
Estimate Your CGPA
To estimate your Cumulative GPA (CGPA), enter your current Cumulative GPA and current number of credits earned from ACORN into Step 1 of the calculator. This step is optional; you can always enter all of your grades manually into the Academic Period containers, but this method is faster.
In this example, “Academic Period 1” means whichever session you are predicting your grades for. If your official CGPA from ACORN was calculated last Winter, and you are predicting courses for the current Fall/Winter session, Academic Period 1 will represent the Fall semester. You can also enter all of your Fall and Winter marks into Academic Period 1, or enter Fall marks in Academic Period 1 and Winter marks in Academic Period 2. It is up to you.
Next, enter anticipated grades for your courses in progress. Your Sessional and Cumulative GPAs will update immediately at the bottom of the Academic Period 1 container. Your CGPA calculation will take into account the “Current CGPA from ACORN” that you entered in Step 1. Your SGPA calculation will only take into account grades entered in Academic Period 1.
Estimate your SGPA
To estimate your Sessional GPA (GPA), enter current and anticipated grades for a single Fall or Winter or entire Summer session (this includes both sub-sessions) in Academic Period 1.
You do not need to add your Current CGPA from ACORN in Step 1 unless you want to see your potential CGPA at the same time.
Estimate Your AGPA
To calculate your Annual GPA (AGPA), enter current and anticipated grades for the Fall session in Academic Period 1 and the Winter session in Academic Period 2. You will need to click the “Add Academic Period” button to open the second session.
You do not need to add your Current CGPA from ACORN in Step 1 unless you want to see your potential CGPA at the same time.
If you are including Y courses worth 1.0 credit courses: Include grades for these courses in Academic Period 2, as grades for these courses are calculated in the Winter term. On your Academic History in ACORN, for the Fall session these courses will have a grade of “IPR” (In Progress). If you enter Y courses in Academic Period 1 (Fall), your estimated AGPA will not be correct.
Tip: If you already know your Fall SGPA, enter it in Step 1 along with the number of credits you earned for the Fall, and enter your Winter grades in Academic Period 1. The calculated CGPA will actually be your AGPA.
Get Academic Help
Some useful academic resources are located below the calculator itself. If you want academic advising or have questions about courses, contact your Registrar. You can also find links to helpful academic workshops and events that U of T offers, as well as study spaces you can use.
Send the ACORN/GPA Calculator Team Feedback
We want to hear your thoughts, ideas and suggestions to improve this GPA Calculator! We care about how and if it works for you, so send us a message via the “Send Feedback” button towards the bottom of the page.
Instructional videos: UTM | UTSC | UTSG
Before enrolling in courses, check when you will be eligible to enrol by viewing your divisional registrar’s important academic dates, and check your enrolment start time on ACORN. You can plan the courses you want to take using the Timetable builder, and learn if you will be eligible to enrol in a course by checking the “Enrolment Controls” section of a course in the search results area. To plan for your entire degree, check out Degree Explorer.
Once you know which courses you want to take, you can add them to your Enrolment Cart in ACORN so that you can enrol in them without searching for them again on enrolment day. The Enrolment Cart is like adding courses to a shopping cart so that you can save them for later. On enrolment day, you’ll need to enrol in each course individually from your cart.
- To get to you Enrolment Cart from the ACORN dashboard, select ‘Enrol & Manage’ on the main navigation menu on the left side of the screen.
- On the Enrol & Manage page, there will be one or more tabs labelled with the academic session. Ensure that you have selected the tab for the session in which you want to enrol in courses. Then, select the Courses button, or the Courses page from the main navigation.
- Find your enrolment cart at the bottom of the Courses screen. If your cart is empty, learn how to add courses to your Enrolment Cart.
- For each course that you would like to enrol in from your Enrolment Cart, select the “Enrol” button.
- You will see a confirmation modal window asking whether you would like to enrol in this course. Be sure to check the Time column in case there is a conflict with any of your other currently-enrolled courses, and ensure that the activity that you are selecting do not say “Enrolment Blocked” or “Section Full” under the Space Availability column. If a section says “Enrolment Blocked”, the activity or course may be restricted to students from a certain program, year of study, or campus. Please check the Timetable Builder to learn about any restrictions or Enrolment Controls that a course may have.Next, select “Enrol”.
- If you have successfully enrolled in the course you will receive a success notice on the top right corner of your screen and the course will be listed under your currently enrolled courses.
Instructional videos: UTM | UTSC | UTSG
Before enrolling in courses, check when you will be eligible to enrol by viewing your divisional registrar’s important academic dates, and check your enrolment start time on ACORN. You can plan the courses you want to take using the Timetable builder, and learn if you will be eligible to enrol in a course by checking the “Enrolment Controls” section of a course in the search results area. To plan for your entire degree, check out Degree Explorer.
- From the ACORN dashboard, click ‘Enrol & Manage’ on the main navigation menu.
- On the Enrol & Manage page, there will be one or more tabs labelled with the academic session. Ensure that you have selected the tab for the session in which you want to enrol in courses. Then, select the Courses button, or the Courses page from the main navigation.
- Use the search field to search for courses by course code or title. Results will start appearing after three characters. From the list of courses that appears, select a course.
- A modal window will appear. Select a primary activity, which is typically a lecture (LEC), and any secondary activities, which are typically tutorials (TUT) or practicals (PRA). Not every course will have a lecture, and not every course will have tutorials and practicals. Be sure to check the Time column in case there is a conflict with any of your other currently-enrolled courses, and ensure that the activity that you are selecting do not say “Enrolment Blocked” or “Section Full” under the Space Availability column. If a section says “Enrolment Blocked”, the activity or course may be restricted to students from a certain program, year of study, or campus. Please check the Timetable Builder to learn about any restrictions or Enrolment Controls that a course may have. Next, select the “Enrol” button towards the bottom of the modal window. If you are unable to select a particular activity or enrol in the course, ACORN will tell you why. If you think you should be able to enrol in a course and you cannot, please contact your college, divisional or faculty registrar.
- If you have successfully enrolled in the course you will receive a success notice on the top right corner of your screen and the course will be listed under your currently enrolled courses.
If you want to drop a course, check your division’s important academic dates to determine when you can drop a course without facing an academic or financial penalty.
- From your Courses screen, click the gear icon towards the right of the course that you want to drop.
- Select “Drop Course” from the drop-down menu that appears.
- A modal window will pop up to confirm that you want to drop this course. Once it, appears, double-check the course to make sure it is correct, and select “Drop Course”.
- If you have successfully dropped the course you will receive a success notice towards the top right corner of your screen and the course will no longer be listed under your currently enrolled courses.
You can choose to assess courses as Credit/No Credit when you want to take a course but don’t want it to contribute to your GPA. A course that is assessed as Credit/No Credit will count towards the number of credits you need for your degree as long as you pass the course according to your division’s standards. If you need a final grade in a course for a program requirement or to apply for a certification in the future, you generally should not consider Credit/No Credit. If you’re unsure, contact an academic advisor. Before assessing any courses as Credit/No Credit, check your divisional registrar’s guidelines and deadlines because they may vary.
- On the Courses screen, click the gear icon on the top right corner of the course you want to assess as Credit/No Credit.
- Select ‘Add Credit/No Credit’ from the drop-down menu that appears.
- A modal window will appear to provide more information about assessing the course as Credit/No Credit. Read through this and ensure that assessing the course as Credit/No Credit is appropriate for your situation, and then select “Assess as Credit/No Credit”.
- If you have successfully assessed the course as Credit/No Credit you will receive a success message on the top right corner of your screen. A “Credit/No Credit” indicator will also appear below the course title under your Currently Enrolled courses.
Instructional videos: UTM | UTSC | UTSG
If a course lecture (LEC), tutorial (TUT) or practical (PRA) is full when you try to enrol, you may be able to enrol in the waitlist instead. If enough students drop the course and space becomes available, ACORN will automatically enrol you in that course. Check the academic deadlines for your division to learn when the waitlist period ends. At this point, the waitlist will be removed from that course.
- On the Courses page, use the search field to search for courses by course code or title. Results will start appearing after three characters. From the list of courses that appears, select a course.
- A modal window will appear. If the course has a waitlist, it will be towards the bottom of the modal window. The “Current Waitlist Occupancy” shows the number of other students who are currently on the waitlist. In this example, the class size is 144, and there are 16 students on the waitlist, excluding you. Select the primary activity (usually a lecture or LEC) for which you would like to join the waitlist, and select the “Waitlist” button. You cannot join the waitlist for secondary activities such as tutorials (TUT) and practicals (PRA), so be sure to enrol in those if needed and after you get into the course.
- If you have successfully enrolled on the waitlist, you will receive a success message towards the top right of your screen and the course will be in the “Waitlisted” section of your currently enrolled courses. You can check your rank on the waitlist at any time by selecting “View rank on waitlist”.
- A modal window will appear showing your rank on the waitlist. In this example, your current position on the waitlist would be 17. There are 16 students in front of you on the waitlist, and the class size is 144 students. If your waitlist rank is 0, then you are next in line to be enrolled into the course. ACORN will send you a notification in your Notifications area if your rank on the waitlist changes.
- ACORN will enrol you in the primary activity (usually a lecture or LEC) of the course automatically if you get into the course from the waitlist. You will also get an email at your U of T email address to update you. If your course has additional activities, such as tutorials (TUT) and practicals (PRA), ACORN will not automatically enroll you in these. Please enrol in these activities as soon as you can after getting into your course so you do not miss any classes.
Your enrolment cart allows you to plan the courses that you want to enrol in ahead of time. You can experiment with different courses, lecture (LEC), tutorial (TUT) and practical (PRA) sections so that you can quickly enrol in your top choices on enrolment day.
Courses in your enrolment cart will not automatically be enrolled for you once your enrolment period begins.
Before adding courses to your cart, check when you will be eligible to enrol by viewing your divisional registrar’s important academic dates, and check your enrolment start time on ACORN. You can plan the courses you want to take using the Timetable builder, and learn if you will be eligible to enrol in a course by checking the “Enrolment Controls” section of a course in the search results area. To plan for your entire degree, check out Degree Explorer.
Instructional videos: UTM | UTSC | UTSG
- From the ACORN dashboard, click ‘Enrol & Manage’ on the main navigation menu.
- On the Enrol & Manage page, you will see one or more tabs labelled with the academic session. Ensure that you have selected the tab for the session for which you want to add courses to your cart. Then, select the Courses button, or the Courses page from the main navigation.
- Use the search field to search for courses by course code or title. Results will start appearing after three characters. From the list of courses that appears, select a course.
- A modal window will appear. Select a primary activity, which is typically a lecture (LEC), and any secondary activities, which are typically tutorials (TUT) or practicals (PRA). Not every course will have a lecture, and not every course will have tutorials and practicals. Be sure to check the Time column in case there is a conflict with any of your other currently-enrolled courses, and ensure that the activity that you are selecting do not say “Enrolment Blocked” or “Section Full” under the Space Availability column. If a section says “Enrolment Blocked”, the activity or course may be restricted to students from a certain program, year of study, or campus. Please check the Timetable Builder to learn about any restrictions or Enrolment Controls that a course may have.Next, select the “Add to Enrolment Cart” button towards the bottom of the modal window. If you are unable to select a particular activity or enrol in the course, ACORN will tell you why. If you think you should be able to enrol in a course and you cannot, please contact your college, divisional or faculty registrar.
- The course should now appear under your Enrolment Cart towards the bottom of your Courses screen. From here, you can edit the course activities, remove the course from your cart, and enrol starting on your enrolment day. Learn more about how to enrol in a course from your Enrolment Cart.
Notifications & Activity
Students from different divisions at U of T enrol in courses at different times. Learn when your division has set up your enrolment time by visiting their website. They may also send you an email about it. Once your division has setup your enrolment start time—usually a week or so prior to your enrolment day—log into ACORN to view your start date and time on the Dashboard.
This is an example of a blue message that will appear on your ACORN Dashboard. Yours will look a little different, as the date and time will be personalized to your program and year of study.
ACORN will not take any additional actions if you enrol in courses that result in a conflict (i.e., it will not drop any course activities on your behalf). It is up to you to resolve any conflicts. You can either leave the courses as they are or enrol in alternative options.
You can try to resolve the conflict in a few different ways:
- Explore different combinations of course sections (Lectures, Tutorials and Practicals)
- See if you can take one of the courses at a later term. Try using Degree Explorer to experiment with your options.
- Select a different course if one of the conflicting courses is not required to complete your program or degree
- On the Courses page, select the Edit button for the course section that you want to change.
- A modal window will appear that will list the sections that you can change. Select the course section(s) you would like to change to, and then select the Modify button. If you cannot select a certain section, it may be full or you may not have priority to enrol in the section; ACORN should tell you why.
In this example, the student is switching from the first Practical section (PRA 0101) to the second one (PRA 0102).
- If you have successfully switched to your desired course section you will receive a success message towards the top of the page. You will also see your updated course in the My Courses section.
- When a final grade is released for each of your courses, you will get a new notification in ACORN. When you have a new notification, a blue badge containing a number will appear on top of a bell icon towards the top of your page. Select this button to open your Notifications menu.
- If you have received a final grade, there will be a notification here alongside any other notifications that you recently received. Select the link within the notification to view your grade.
- You will be taken to your Academic History page containing your final grade for the course. You can visit your Academic History page at any time via ACORN’s main navigation menu to see an up-to-date list of grades for all of your courses.
Watch a video walkthrough for U of T’s GPA calculator.
The GPA calculator is a U of T-wide tool that allows you to estimate your GPA (Grade Point Average) for the current or upcoming academic sessions. This tool should be used for planning purposes only; refer to your Academic History page in ACORN for your official GPA calculations.
Using the GPA Calculator, you can:
- Calculate your CGPA, SGPA and AGPA
- Use your current CGPA from ACORN to speed up your calculations
- See your GPA calculations update in real-time
- Explore useful academic resources
You may want to calculate your GPA for the following reasons and more:
- Find out what your GPA will be at the end of the semester or year
- Determine whether you will make it into your program of study (POSt)
- Find out if you will graduate with distinction
- Learn which grades you will need to achieve to meet personal goals
Before starting, have your grades on hand for reference. Find them on your Academic History page in ACORN. When entering grades, include failed courses, and exclude transfer credits, extra (EXT), Credit/No Credit (CR/NCR) and Late Withdrawal (LWD) courses.
You can view tips for using the GPA Calculator by clicking the help icons beside the step one and step two headings.
Estimate Your CGPA
To estimate your Cumulative GPA (CGPA), enter your current Cumulative GPA and current number of credits earned from ACORN into Step 1 of the calculator. This step is optional; you can always enter all of your grades manually into the Academic Period containers, but this method is faster.
In this example, “Academic Period 1” means whichever session you are predicting your grades for. If your official CGPA from ACORN was calculated last Winter, and you are predicting courses for the current Fall/Winter session, Academic Period 1 will represent the Fall semester. You can also enter all of your Fall and Winter marks into Academic Period 1, or enter Fall marks in Academic Period 1 and Winter marks in Academic Period 2. It is up to you.
Next, enter anticipated grades for your courses in progress. Your Sessional and Cumulative GPAs will update immediately at the bottom of the Academic Period 1 container. Your CGPA calculation will take into account the “Current CGPA from ACORN” that you entered in Step 1. Your SGPA calculation will only take into account grades entered in Academic Period 1.
Estimate your SGPA
To estimate your Sessional GPA (GPA), enter current and anticipated grades for a single Fall or Winter or entire Summer session (this includes both sub-sessions) in Academic Period 1.
You do not need to add your Current CGPA from ACORN in Step 1 unless you want to see your potential CGPA at the same time.
Estimate Your AGPA
To calculate your Annual GPA (AGPA), enter current and anticipated grades for the Fall session in Academic Period 1 and the Winter session in Academic Period 2. You will need to click the “Add Academic Period” button to open the second session.
You do not need to add your Current CGPA from ACORN in Step 1 unless you want to see your potential CGPA at the same time.
If you are including Y courses worth 1.0 credit courses: Include grades for these courses in Academic Period 2, as grades for these courses are calculated in the Winter term. On your Academic History in ACORN, for the Fall session these courses will have a grade of “IPR” (In Progress). If you enter Y courses in Academic Period 1 (Fall), your estimated AGPA will not be correct.
Tip: If you already know your Fall SGPA, enter it in Step 1 along with the number of credits you earned for the Fall, and enter your Winter grades in Academic Period 1. The calculated CGPA will actually be your AGPA.
Get Academic Help
Some useful academic resources are located below the calculator itself. If you want academic advising or have questions about courses, contact your Registrar. You can also find links to helpful academic workshops and events that U of T offers, as well as study spaces you can use.
Send the ACORN/GPA Calculator Team Feedback
We want to hear your thoughts, ideas and suggestions to improve this GPA Calculator! We care about how and if it works for you, so send us a message via the “Send Feedback” button towards the bottom of the page.
Instructional videos: UTM | UTSC | UTSG
Before enrolling in courses, check when you will be eligible to enrol by viewing your divisional registrar’s important academic dates, and check your enrolment start time on ACORN. You can plan the courses you want to take using the Timetable builder, and learn if you will be eligible to enrol in a course by checking the “Enrolment Controls” section of a course in the search results area. To plan for your entire degree, check out Degree Explorer.
Once you know which courses you want to take, you can add them to your Enrolment Cart in ACORN so that you can enrol in them without searching for them again on enrolment day. The Enrolment Cart is like adding courses to a shopping cart so that you can save them for later. On enrolment day, you’ll need to enrol in each course individually from your cart.
- To get to you Enrolment Cart from the ACORN dashboard, select ‘Enrol & Manage’ on the main navigation menu on the left side of the screen.
- On the Enrol & Manage page, there will be one or more tabs labelled with the academic session. Ensure that you have selected the tab for the session in which you want to enrol in courses. Then, select the Courses button, or the Courses page from the main navigation.
- Find your enrolment cart at the bottom of the Courses screen. If your cart is empty, learn how to add courses to your Enrolment Cart.
- For each course that you would like to enrol in from your Enrolment Cart, select the “Enrol” button.
- You will see a confirmation modal window asking whether you would like to enrol in this course. Be sure to check the Time column in case there is a conflict with any of your other currently-enrolled courses, and ensure that the activity that you are selecting do not say “Enrolment Blocked” or “Section Full” under the Space Availability column. If a section says “Enrolment Blocked”, the activity or course may be restricted to students from a certain program, year of study, or campus. Please check the Timetable Builder to learn about any restrictions or Enrolment Controls that a course may have.Next, select “Enrol”.
- If you have successfully enrolled in the course you will receive a success notice on the top right corner of your screen and the course will be listed under your currently enrolled courses.
Instructional videos: UTM | UTSC | UTSG
Before enrolling in courses, check when you will be eligible to enrol by viewing your divisional registrar’s important academic dates, and check your enrolment start time on ACORN. You can plan the courses you want to take using the Timetable builder, and learn if you will be eligible to enrol in a course by checking the “Enrolment Controls” section of a course in the search results area. To plan for your entire degree, check out Degree Explorer.
- From the ACORN dashboard, click ‘Enrol & Manage’ on the main navigation menu.
- On the Enrol & Manage page, there will be one or more tabs labelled with the academic session. Ensure that you have selected the tab for the session in which you want to enrol in courses. Then, select the Courses button, or the Courses page from the main navigation.
- Use the search field to search for courses by course code or title. Results will start appearing after three characters. From the list of courses that appears, select a course.
- A modal window will appear. Select a primary activity, which is typically a lecture (LEC), and any secondary activities, which are typically tutorials (TUT) or practicals (PRA). Not every course will have a lecture, and not every course will have tutorials and practicals. Be sure to check the Time column in case there is a conflict with any of your other currently-enrolled courses, and ensure that the activity that you are selecting do not say “Enrolment Blocked” or “Section Full” under the Space Availability column. If a section says “Enrolment Blocked”, the activity or course may be restricted to students from a certain program, year of study, or campus. Please check the Timetable Builder to learn about any restrictions or Enrolment Controls that a course may have. Next, select the “Enrol” button towards the bottom of the modal window. If you are unable to select a particular activity or enrol in the course, ACORN will tell you why. If you think you should be able to enrol in a course and you cannot, please contact your college, divisional or faculty registrar.
- If you have successfully enrolled in the course you will receive a success notice on the top right corner of your screen and the course will be listed under your currently enrolled courses.
If you want to drop a course, check your division’s important academic dates to determine when you can drop a course without facing an academic or financial penalty.
- From your Courses screen, click the gear icon towards the right of the course that you want to drop.
- Select “Drop Course” from the drop-down menu that appears.
- A modal window will pop up to confirm that you want to drop this course. Once it, appears, double-check the course to make sure it is correct, and select “Drop Course”.
- If you have successfully dropped the course you will receive a success notice towards the top right corner of your screen and the course will no longer be listed under your currently enrolled courses.
You can choose to assess courses as Credit/No Credit when you want to take a course but don’t want it to contribute to your GPA. A course that is assessed as Credit/No Credit will count towards the number of credits you need for your degree as long as you pass the course according to your division’s standards. If you need a final grade in a course for a program requirement or to apply for a certification in the future, you generally should not consider Credit/No Credit. If you’re unsure, contact an academic advisor. Before assessing any courses as Credit/No Credit, check your divisional registrar’s guidelines and deadlines because they may vary.
- On the Courses screen, click the gear icon on the top right corner of the course you want to assess as Credit/No Credit.
- Select ‘Add Credit/No Credit’ from the drop-down menu that appears.
- A modal window will appear to provide more information about assessing the course as Credit/No Credit. Read through this and ensure that assessing the course as Credit/No Credit is appropriate for your situation, and then select “Assess as Credit/No Credit”.
- If you have successfully assessed the course as Credit/No Credit you will receive a success message on the top right corner of your screen. A “Credit/No Credit” indicator will also appear below the course title under your Currently Enrolled courses.
Instructional videos: UTM | UTSC | UTSG
If a course lecture (LEC), tutorial (TUT) or practical (PRA) is full when you try to enrol, you may be able to enrol in the waitlist instead. If enough students drop the course and space becomes available, ACORN will automatically enrol you in that course. Check the academic deadlines for your division to learn when the waitlist period ends. At this point, the waitlist will be removed from that course.
- On the Courses page, use the search field to search for courses by course code or title. Results will start appearing after three characters. From the list of courses that appears, select a course.
- A modal window will appear. If the course has a waitlist, it will be towards the bottom of the modal window. The “Current Waitlist Occupancy” shows the number of other students who are currently on the waitlist. In this example, the class size is 144, and there are 16 students on the waitlist, excluding you. Select the primary activity (usually a lecture or LEC) for which you would like to join the waitlist, and select the “Waitlist” button. You cannot join the waitlist for secondary activities such as tutorials (TUT) and practicals (PRA), so be sure to enrol in those if needed and after you get into the course.
- If you have successfully enrolled on the waitlist, you will receive a success message towards the top right of your screen and the course will be in the “Waitlisted” section of your currently enrolled courses. You can check your rank on the waitlist at any time by selecting “View rank on waitlist”.
- A modal window will appear showing your rank on the waitlist. In this example, your current position on the waitlist would be 17. There are 16 students in front of you on the waitlist, and the class size is 144 students. If your waitlist rank is 0, then you are next in line to be enrolled into the course. ACORN will send you a notification in your Notifications area if your rank on the waitlist changes.
- ACORN will enrol you in the primary activity (usually a lecture or LEC) of the course automatically if you get into the course from the waitlist. You will also get an email at your U of T email address to update you. If your course has additional activities, such as tutorials (TUT) and practicals (PRA), ACORN will not automatically enroll you in these. Please enrol in these activities as soon as you can after getting into your course so you do not miss any classes.
Your enrolment cart allows you to plan the courses that you want to enrol in ahead of time. You can experiment with different courses, lecture (LEC), tutorial (TUT) and practical (PRA) sections so that you can quickly enrol in your top choices on enrolment day.
Courses in your enrolment cart will not automatically be enrolled for you once your enrolment period begins.
Before adding courses to your cart, check when you will be eligible to enrol by viewing your divisional registrar’s important academic dates, and check your enrolment start time on ACORN. You can plan the courses you want to take using the Timetable builder, and learn if you will be eligible to enrol in a course by checking the “Enrolment Controls” section of a course in the search results area. To plan for your entire degree, check out Degree Explorer.
Instructional videos: UTM | UTSC | UTSG
- From the ACORN dashboard, click ‘Enrol & Manage’ on the main navigation menu.
- On the Enrol & Manage page, you will see one or more tabs labelled with the academic session. Ensure that you have selected the tab for the session for which you want to add courses to your cart. Then, select the Courses button, or the Courses page from the main navigation.
- Use the search field to search for courses by course code or title. Results will start appearing after three characters. From the list of courses that appears, select a course.
- A modal window will appear. Select a primary activity, which is typically a lecture (LEC), and any secondary activities, which are typically tutorials (TUT) or practicals (PRA). Not every course will have a lecture, and not every course will have tutorials and practicals. Be sure to check the Time column in case there is a conflict with any of your other currently-enrolled courses, and ensure that the activity that you are selecting do not say “Enrolment Blocked” or “Section Full” under the Space Availability column. If a section says “Enrolment Blocked”, the activity or course may be restricted to students from a certain program, year of study, or campus. Please check the Timetable Builder to learn about any restrictions or Enrolment Controls that a course may have.Next, select the “Add to Enrolment Cart” button towards the bottom of the modal window. If you are unable to select a particular activity or enrol in the course, ACORN will tell you why. If you think you should be able to enrol in a course and you cannot, please contact your college, divisional or faculty registrar.
- The course should now appear under your Enrolment Cart towards the bottom of your Courses screen. From here, you can edit the course activities, remove the course from your cart, and enrol starting on your enrolment day. Learn more about how to enrol in a course from your Enrolment Cart.
Graduation & Convocation
Students from different divisions at U of T enrol in courses at different times. Learn when your division has set up your enrolment time by visiting their website. They may also send you an email about it. Once your division has setup your enrolment start time—usually a week or so prior to your enrolment day—log into ACORN to view your start date and time on the Dashboard.
This is an example of a blue message that will appear on your ACORN Dashboard. Yours will look a little different, as the date and time will be personalized to your program and year of study.
ACORN will not take any additional actions if you enrol in courses that result in a conflict (i.e., it will not drop any course activities on your behalf). It is up to you to resolve any conflicts. You can either leave the courses as they are or enrol in alternative options.
You can try to resolve the conflict in a few different ways:
- Explore different combinations of course sections (Lectures, Tutorials and Practicals)
- See if you can take one of the courses at a later term. Try using Degree Explorer to experiment with your options.
- Select a different course if one of the conflicting courses is not required to complete your program or degree
- On the Courses page, select the Edit button for the course section that you want to change.
- A modal window will appear that will list the sections that you can change. Select the course section(s) you would like to change to, and then select the Modify button. If you cannot select a certain section, it may be full or you may not have priority to enrol in the section; ACORN should tell you why.
In this example, the student is switching from the first Practical section (PRA 0101) to the second one (PRA 0102).
- If you have successfully switched to your desired course section you will receive a success message towards the top of the page. You will also see your updated course in the My Courses section.
- When a final grade is released for each of your courses, you will get a new notification in ACORN. When you have a new notification, a blue badge containing a number will appear on top of a bell icon towards the top of your page. Select this button to open your Notifications menu.
- If you have received a final grade, there will be a notification here alongside any other notifications that you recently received. Select the link within the notification to view your grade.
- You will be taken to your Academic History page containing your final grade for the course. You can visit your Academic History page at any time via ACORN’s main navigation menu to see an up-to-date list of grades for all of your courses.
Watch a video walkthrough for U of T’s GPA calculator.
The GPA calculator is a U of T-wide tool that allows you to estimate your GPA (Grade Point Average) for the current or upcoming academic sessions. This tool should be used for planning purposes only; refer to your Academic History page in ACORN for your official GPA calculations.
Using the GPA Calculator, you can:
- Calculate your CGPA, SGPA and AGPA
- Use your current CGPA from ACORN to speed up your calculations
- See your GPA calculations update in real-time
- Explore useful academic resources
You may want to calculate your GPA for the following reasons and more:
- Find out what your GPA will be at the end of the semester or year
- Determine whether you will make it into your program of study (POSt)
- Find out if you will graduate with distinction
- Learn which grades you will need to achieve to meet personal goals
Before starting, have your grades on hand for reference. Find them on your Academic History page in ACORN. When entering grades, include failed courses, and exclude transfer credits, extra (EXT), Credit/No Credit (CR/NCR) and Late Withdrawal (LWD) courses.
You can view tips for using the GPA Calculator by clicking the help icons beside the step one and step two headings.
Estimate Your CGPA
To estimate your Cumulative GPA (CGPA), enter your current Cumulative GPA and current number of credits earned from ACORN into Step 1 of the calculator. This step is optional; you can always enter all of your grades manually into the Academic Period containers, but this method is faster.
In this example, “Academic Period 1” means whichever session you are predicting your grades for. If your official CGPA from ACORN was calculated last Winter, and you are predicting courses for the current Fall/Winter session, Academic Period 1 will represent the Fall semester. You can also enter all of your Fall and Winter marks into Academic Period 1, or enter Fall marks in Academic Period 1 and Winter marks in Academic Period 2. It is up to you.
Next, enter anticipated grades for your courses in progress. Your Sessional and Cumulative GPAs will update immediately at the bottom of the Academic Period 1 container. Your CGPA calculation will take into account the “Current CGPA from ACORN” that you entered in Step 1. Your SGPA calculation will only take into account grades entered in Academic Period 1.
Estimate your SGPA
To estimate your Sessional GPA (GPA), enter current and anticipated grades for a single Fall or Winter or entire Summer session (this includes both sub-sessions) in Academic Period 1.
You do not need to add your Current CGPA from ACORN in Step 1 unless you want to see your potential CGPA at the same time.
Estimate Your AGPA
To calculate your Annual GPA (AGPA), enter current and anticipated grades for the Fall session in Academic Period 1 and the Winter session in Academic Period 2. You will need to click the “Add Academic Period” button to open the second session.
You do not need to add your Current CGPA from ACORN in Step 1 unless you want to see your potential CGPA at the same time.
If you are including Y courses worth 1.0 credit courses: Include grades for these courses in Academic Period 2, as grades for these courses are calculated in the Winter term. On your Academic History in ACORN, for the Fall session these courses will have a grade of “IPR” (In Progress). If you enter Y courses in Academic Period 1 (Fall), your estimated AGPA will not be correct.
Tip: If you already know your Fall SGPA, enter it in Step 1 along with the number of credits you earned for the Fall, and enter your Winter grades in Academic Period 1. The calculated CGPA will actually be your AGPA.
Get Academic Help
Some useful academic resources are located below the calculator itself. If you want academic advising or have questions about courses, contact your Registrar. You can also find links to helpful academic workshops and events that U of T offers, as well as study spaces you can use.
Send the ACORN/GPA Calculator Team Feedback
We want to hear your thoughts, ideas and suggestions to improve this GPA Calculator! We care about how and if it works for you, so send us a message via the “Send Feedback” button towards the bottom of the page.
Instructional videos: UTM | UTSC | UTSG
Before enrolling in courses, check when you will be eligible to enrol by viewing your divisional registrar’s important academic dates, and check your enrolment start time on ACORN. You can plan the courses you want to take using the Timetable builder, and learn if you will be eligible to enrol in a course by checking the “Enrolment Controls” section of a course in the search results area. To plan for your entire degree, check out Degree Explorer.
Once you know which courses you want to take, you can add them to your Enrolment Cart in ACORN so that you can enrol in them without searching for them again on enrolment day. The Enrolment Cart is like adding courses to a shopping cart so that you can save them for later. On enrolment day, you’ll need to enrol in each course individually from your cart.
- To get to you Enrolment Cart from the ACORN dashboard, select ‘Enrol & Manage’ on the main navigation menu on the left side of the screen.
- On the Enrol & Manage page, there will be one or more tabs labelled with the academic session. Ensure that you have selected the tab for the session in which you want to enrol in courses. Then, select the Courses button, or the Courses page from the main navigation.
- Find your enrolment cart at the bottom of the Courses screen. If your cart is empty, learn how to add courses to your Enrolment Cart.
- For each course that you would like to enrol in from your Enrolment Cart, select the “Enrol” button.
- You will see a confirmation modal window asking whether you would like to enrol in this course. Be sure to check the Time column in case there is a conflict with any of your other currently-enrolled courses, and ensure that the activity that you are selecting do not say “Enrolment Blocked” or “Section Full” under the Space Availability column. If a section says “Enrolment Blocked”, the activity or course may be restricted to students from a certain program, year of study, or campus. Please check the Timetable Builder to learn about any restrictions or Enrolment Controls that a course may have.Next, select “Enrol”.
- If you have successfully enrolled in the course you will receive a success notice on the top right corner of your screen and the course will be listed under your currently enrolled courses.
Instructional videos: UTM | UTSC | UTSG
Before enrolling in courses, check when you will be eligible to enrol by viewing your divisional registrar’s important academic dates, and check your enrolment start time on ACORN. You can plan the courses you want to take using the Timetable builder, and learn if you will be eligible to enrol in a course by checking the “Enrolment Controls” section of a course in the search results area. To plan for your entire degree, check out Degree Explorer.
- From the ACORN dashboard, click ‘Enrol & Manage’ on the main navigation menu.
- On the Enrol & Manage page, there will be one or more tabs labelled with the academic session. Ensure that you have selected the tab for the session in which you want to enrol in courses. Then, select the Courses button, or the Courses page from the main navigation.
- Use the search field to search for courses by course code or title. Results will start appearing after three characters. From the list of courses that appears, select a course.
- A modal window will appear. Select a primary activity, which is typically a lecture (LEC), and any secondary activities, which are typically tutorials (TUT) or practicals (PRA). Not every course will have a lecture, and not every course will have tutorials and practicals. Be sure to check the Time column in case there is a conflict with any of your other currently-enrolled courses, and ensure that the activity that you are selecting do not say “Enrolment Blocked” or “Section Full” under the Space Availability column. If a section says “Enrolment Blocked”, the activity or course may be restricted to students from a certain program, year of study, or campus. Please check the Timetable Builder to learn about any restrictions or Enrolment Controls that a course may have. Next, select the “Enrol” button towards the bottom of the modal window. If you are unable to select a particular activity or enrol in the course, ACORN will tell you why. If you think you should be able to enrol in a course and you cannot, please contact your college, divisional or faculty registrar.
- If you have successfully enrolled in the course you will receive a success notice on the top right corner of your screen and the course will be listed under your currently enrolled courses.
If you want to drop a course, check your division’s important academic dates to determine when you can drop a course without facing an academic or financial penalty.
- From your Courses screen, click the gear icon towards the right of the course that you want to drop.
- Select “Drop Course” from the drop-down menu that appears.
- A modal window will pop up to confirm that you want to drop this course. Once it, appears, double-check the course to make sure it is correct, and select “Drop Course”.
- If you have successfully dropped the course you will receive a success notice towards the top right corner of your screen and the course will no longer be listed under your currently enrolled courses.
You can choose to assess courses as Credit/No Credit when you want to take a course but don’t want it to contribute to your GPA. A course that is assessed as Credit/No Credit will count towards the number of credits you need for your degree as long as you pass the course according to your division’s standards. If you need a final grade in a course for a program requirement or to apply for a certification in the future, you generally should not consider Credit/No Credit. If you’re unsure, contact an academic advisor. Before assessing any courses as Credit/No Credit, check your divisional registrar’s guidelines and deadlines because they may vary.
- On the Courses screen, click the gear icon on the top right corner of the course you want to assess as Credit/No Credit.
- Select ‘Add Credit/No Credit’ from the drop-down menu that appears.
- A modal window will appear to provide more information about assessing the course as Credit/No Credit. Read through this and ensure that assessing the course as Credit/No Credit is appropriate for your situation, and then select “Assess as Credit/No Credit”.
- If you have successfully assessed the course as Credit/No Credit you will receive a success message on the top right corner of your screen. A “Credit/No Credit” indicator will also appear below the course title under your Currently Enrolled courses.
Instructional videos: UTM | UTSC | UTSG
If a course lecture (LEC), tutorial (TUT) or practical (PRA) is full when you try to enrol, you may be able to enrol in the waitlist instead. If enough students drop the course and space becomes available, ACORN will automatically enrol you in that course. Check the academic deadlines for your division to learn when the waitlist period ends. At this point, the waitlist will be removed from that course.
- On the Courses page, use the search field to search for courses by course code or title. Results will start appearing after three characters. From the list of courses that appears, select a course.
- A modal window will appear. If the course has a waitlist, it will be towards the bottom of the modal window. The “Current Waitlist Occupancy” shows the number of other students who are currently on the waitlist. In this example, the class size is 144, and there are 16 students on the waitlist, excluding you. Select the primary activity (usually a lecture or LEC) for which you would like to join the waitlist, and select the “Waitlist” button. You cannot join the waitlist for secondary activities such as tutorials (TUT) and practicals (PRA), so be sure to enrol in those if needed and after you get into the course.
- If you have successfully enrolled on the waitlist, you will receive a success message towards the top right of your screen and the course will be in the “Waitlisted” section of your currently enrolled courses. You can check your rank on the waitlist at any time by selecting “View rank on waitlist”.
- A modal window will appear showing your rank on the waitlist. In this example, your current position on the waitlist would be 17. There are 16 students in front of you on the waitlist, and the class size is 144 students. If your waitlist rank is 0, then you are next in line to be enrolled into the course. ACORN will send you a notification in your Notifications area if your rank on the waitlist changes.
- ACORN will enrol you in the primary activity (usually a lecture or LEC) of the course automatically if you get into the course from the waitlist. You will also get an email at your U of T email address to update you. If your course has additional activities, such as tutorials (TUT) and practicals (PRA), ACORN will not automatically enroll you in these. Please enrol in these activities as soon as you can after getting into your course so you do not miss any classes.
Your enrolment cart allows you to plan the courses that you want to enrol in ahead of time. You can experiment with different courses, lecture (LEC), tutorial (TUT) and practical (PRA) sections so that you can quickly enrol in your top choices on enrolment day.
Courses in your enrolment cart will not automatically be enrolled for you once your enrolment period begins.
Before adding courses to your cart, check when you will be eligible to enrol by viewing your divisional registrar’s important academic dates, and check your enrolment start time on ACORN. You can plan the courses you want to take using the Timetable builder, and learn if you will be eligible to enrol in a course by checking the “Enrolment Controls” section of a course in the search results area. To plan for your entire degree, check out Degree Explorer.
Instructional videos: UTM | UTSC | UTSG
- From the ACORN dashboard, click ‘Enrol & Manage’ on the main navigation menu.
- On the Enrol & Manage page, you will see one or more tabs labelled with the academic session. Ensure that you have selected the tab for the session for which you want to add courses to your cart. Then, select the Courses button, or the Courses page from the main navigation.
- Use the search field to search for courses by course code or title. Results will start appearing after three characters. From the list of courses that appears, select a course.
- A modal window will appear. Select a primary activity, which is typically a lecture (LEC), and any secondary activities, which are typically tutorials (TUT) or practicals (PRA). Not every course will have a lecture, and not every course will have tutorials and practicals. Be sure to check the Time column in case there is a conflict with any of your other currently-enrolled courses, and ensure that the activity that you are selecting do not say “Enrolment Blocked” or “Section Full” under the Space Availability column. If a section says “Enrolment Blocked”, the activity or course may be restricted to students from a certain program, year of study, or campus. Please check the Timetable Builder to learn about any restrictions or Enrolment Controls that a course may have.Next, select the “Add to Enrolment Cart” button towards the bottom of the modal window. If you are unable to select a particular activity or enrol in the course, ACORN will tell you why. If you think you should be able to enrol in a course and you cannot, please contact your college, divisional or faculty registrar.
- The course should now appear under your Enrolment Cart towards the bottom of your Courses screen. From here, you can edit the course activities, remove the course from your cart, and enrol starting on your enrolment day. Learn more about how to enrol in a course from your Enrolment Cart.
Printing Transcripts & Other Documents
Students from different divisions at U of T enrol in courses at different times. Learn when your division has set up your enrolment time by visiting their website. They may also send you an email about it. Once your division has setup your enrolment start time—usually a week or so prior to your enrolment day—log into ACORN to view your start date and time on the Dashboard.
This is an example of a blue message that will appear on your ACORN Dashboard. Yours will look a little different, as the date and time will be personalized to your program and year of study.
ACORN will not take any additional actions if you enrol in courses that result in a conflict (i.e., it will not drop any course activities on your behalf). It is up to you to resolve any conflicts. You can either leave the courses as they are or enrol in alternative options.
You can try to resolve the conflict in a few different ways:
- Explore different combinations of course sections (Lectures, Tutorials and Practicals)
- See if you can take one of the courses at a later term. Try using Degree Explorer to experiment with your options.
- Select a different course if one of the conflicting courses is not required to complete your program or degree
- On the Courses page, select the Edit button for the course section that you want to change.
- A modal window will appear that will list the sections that you can change. Select the course section(s) you would like to change to, and then select the Modify button. If you cannot select a certain section, it may be full or you may not have priority to enrol in the section; ACORN should tell you why.
In this example, the student is switching from the first Practical section (PRA 0101) to the second one (PRA 0102).
- If you have successfully switched to your desired course section you will receive a success message towards the top of the page. You will also see your updated course in the My Courses section.
- When a final grade is released for each of your courses, you will get a new notification in ACORN. When you have a new notification, a blue badge containing a number will appear on top of a bell icon towards the top of your page. Select this button to open your Notifications menu.
- If you have received a final grade, there will be a notification here alongside any other notifications that you recently received. Select the link within the notification to view your grade.
- You will be taken to your Academic History page containing your final grade for the course. You can visit your Academic History page at any time via ACORN’s main navigation menu to see an up-to-date list of grades for all of your courses.
Watch a video walkthrough for U of T’s GPA calculator.
The GPA calculator is a U of T-wide tool that allows you to estimate your GPA (Grade Point Average) for the current or upcoming academic sessions. This tool should be used for planning purposes only; refer to your Academic History page in ACORN for your official GPA calculations.
Using the GPA Calculator, you can:
- Calculate your CGPA, SGPA and AGPA
- Use your current CGPA from ACORN to speed up your calculations
- See your GPA calculations update in real-time
- Explore useful academic resources
You may want to calculate your GPA for the following reasons and more:
- Find out what your GPA will be at the end of the semester or year
- Determine whether you will make it into your program of study (POSt)
- Find out if you will graduate with distinction
- Learn which grades you will need to achieve to meet personal goals
Before starting, have your grades on hand for reference. Find them on your Academic History page in ACORN. When entering grades, include failed courses, and exclude transfer credits, extra (EXT), Credit/No Credit (CR/NCR) and Late Withdrawal (LWD) courses.
You can view tips for using the GPA Calculator by clicking the help icons beside the step one and step two headings.
Estimate Your CGPA
To estimate your Cumulative GPA (CGPA), enter your current Cumulative GPA and current number of credits earned from ACORN into Step 1 of the calculator. This step is optional; you can always enter all of your grades manually into the Academic Period containers, but this method is faster.
In this example, “Academic Period 1” means whichever session you are predicting your grades for. If your official CGPA from ACORN was calculated last Winter, and you are predicting courses for the current Fall/Winter session, Academic Period 1 will represent the Fall semester. You can also enter all of your Fall and Winter marks into Academic Period 1, or enter Fall marks in Academic Period 1 and Winter marks in Academic Period 2. It is up to you.
Next, enter anticipated grades for your courses in progress. Your Sessional and Cumulative GPAs will update immediately at the bottom of the Academic Period 1 container. Your CGPA calculation will take into account the “Current CGPA from ACORN” that you entered in Step 1. Your SGPA calculation will only take into account grades entered in Academic Period 1.
Estimate your SGPA
To estimate your Sessional GPA (GPA), enter current and anticipated grades for a single Fall or Winter or entire Summer session (this includes both sub-sessions) in Academic Period 1.
You do not need to add your Current CGPA from ACORN in Step 1 unless you want to see your potential CGPA at the same time.
Estimate Your AGPA
To calculate your Annual GPA (AGPA), enter current and anticipated grades for the Fall session in Academic Period 1 and the Winter session in Academic Period 2. You will need to click the “Add Academic Period” button to open the second session.
You do not need to add your Current CGPA from ACORN in Step 1 unless you want to see your potential CGPA at the same time.
If you are including Y courses worth 1.0 credit courses: Include grades for these courses in Academic Period 2, as grades for these courses are calculated in the Winter term. On your Academic History in ACORN, for the Fall session these courses will have a grade of “IPR” (In Progress). If you enter Y courses in Academic Period 1 (Fall), your estimated AGPA will not be correct.
Tip: If you already know your Fall SGPA, enter it in Step 1 along with the number of credits you earned for the Fall, and enter your Winter grades in Academic Period 1. The calculated CGPA will actually be your AGPA.
Get Academic Help
Some useful academic resources are located below the calculator itself. If you want academic advising or have questions about courses, contact your Registrar. You can also find links to helpful academic workshops and events that U of T offers, as well as study spaces you can use.
Send the ACORN/GPA Calculator Team Feedback
We want to hear your thoughts, ideas and suggestions to improve this GPA Calculator! We care about how and if it works for you, so send us a message via the “Send Feedback” button towards the bottom of the page.
Instructional videos: UTM | UTSC | UTSG
Before enrolling in courses, check when you will be eligible to enrol by viewing your divisional registrar’s important academic dates, and check your enrolment start time on ACORN. You can plan the courses you want to take using the Timetable builder, and learn if you will be eligible to enrol in a course by checking the “Enrolment Controls” section of a course in the search results area. To plan for your entire degree, check out Degree Explorer.
Once you know which courses you want to take, you can add them to your Enrolment Cart in ACORN so that you can enrol in them without searching for them again on enrolment day. The Enrolment Cart is like adding courses to a shopping cart so that you can save them for later. On enrolment day, you’ll need to enrol in each course individually from your cart.
- To get to you Enrolment Cart from the ACORN dashboard, select ‘Enrol & Manage’ on the main navigation menu on the left side of the screen.
- On the Enrol & Manage page, there will be one or more tabs labelled with the academic session. Ensure that you have selected the tab for the session in which you want to enrol in courses. Then, select the Courses button, or the Courses page from the main navigation.
- Find your enrolment cart at the bottom of the Courses screen. If your cart is empty, learn how to add courses to your Enrolment Cart.
- For each course that you would like to enrol in from your Enrolment Cart, select the “Enrol” button.
- You will see a confirmation modal window asking whether you would like to enrol in this course. Be sure to check the Time column in case there is a conflict with any of your other currently-enrolled courses, and ensure that the activity that you are selecting do not say “Enrolment Blocked” or “Section Full” under the Space Availability column. If a section says “Enrolment Blocked”, the activity or course may be restricted to students from a certain program, year of study, or campus. Please check the Timetable Builder to learn about any restrictions or Enrolment Controls that a course may have.Next, select “Enrol”.
- If you have successfully enrolled in the course you will receive a success notice on the top right corner of your screen and the course will be listed under your currently enrolled courses.
Instructional videos: UTM | UTSC | UTSG
Before enrolling in courses, check when you will be eligible to enrol by viewing your divisional registrar’s important academic dates, and check your enrolment start time on ACORN. You can plan the courses you want to take using the Timetable builder, and learn if you will be eligible to enrol in a course by checking the “Enrolment Controls” section of a course in the search results area. To plan for your entire degree, check out Degree Explorer.
- From the ACORN dashboard, click ‘Enrol & Manage’ on the main navigation menu.
- On the Enrol & Manage page, there will be one or more tabs labelled with the academic session. Ensure that you have selected the tab for the session in which you want to enrol in courses. Then, select the Courses button, or the Courses page from the main navigation.
- Use the search field to search for courses by course code or title. Results will start appearing after three characters. From the list of courses that appears, select a course.
- A modal window will appear. Select a primary activity, which is typically a lecture (LEC), and any secondary activities, which are typically tutorials (TUT) or practicals (PRA). Not every course will have a lecture, and not every course will have tutorials and practicals. Be sure to check the Time column in case there is a conflict with any of your other currently-enrolled courses, and ensure that the activity that you are selecting do not say “Enrolment Blocked” or “Section Full” under the Space Availability column. If a section says “Enrolment Blocked”, the activity or course may be restricted to students from a certain program, year of study, or campus. Please check the Timetable Builder to learn about any restrictions or Enrolment Controls that a course may have. Next, select the “Enrol” button towards the bottom of the modal window. If you are unable to select a particular activity or enrol in the course, ACORN will tell you why. If you think you should be able to enrol in a course and you cannot, please contact your college, divisional or faculty registrar.
- If you have successfully enrolled in the course you will receive a success notice on the top right corner of your screen and the course will be listed under your currently enrolled courses.
If you want to drop a course, check your division’s important academic dates to determine when you can drop a course without facing an academic or financial penalty.
- From your Courses screen, click the gear icon towards the right of the course that you want to drop.
- Select “Drop Course” from the drop-down menu that appears.
- A modal window will pop up to confirm that you want to drop this course. Once it, appears, double-check the course to make sure it is correct, and select “Drop Course”.
- If you have successfully dropped the course you will receive a success notice towards the top right corner of your screen and the course will no longer be listed under your currently enrolled courses.
You can choose to assess courses as Credit/No Credit when you want to take a course but don’t want it to contribute to your GPA. A course that is assessed as Credit/No Credit will count towards the number of credits you need for your degree as long as you pass the course according to your division’s standards. If you need a final grade in a course for a program requirement or to apply for a certification in the future, you generally should not consider Credit/No Credit. If you’re unsure, contact an academic advisor. Before assessing any courses as Credit/No Credit, check your divisional registrar’s guidelines and deadlines because they may vary.
- On the Courses screen, click the gear icon on the top right corner of the course you want to assess as Credit/No Credit.
- Select ‘Add Credit/No Credit’ from the drop-down menu that appears.
- A modal window will appear to provide more information about assessing the course as Credit/No Credit. Read through this and ensure that assessing the course as Credit/No Credit is appropriate for your situation, and then select “Assess as Credit/No Credit”.
- If you have successfully assessed the course as Credit/No Credit you will receive a success message on the top right corner of your screen. A “Credit/No Credit” indicator will also appear below the course title under your Currently Enrolled courses.
Instructional videos: UTM | UTSC | UTSG
If a course lecture (LEC), tutorial (TUT) or practical (PRA) is full when you try to enrol, you may be able to enrol in the waitlist instead. If enough students drop the course and space becomes available, ACORN will automatically enrol you in that course. Check the academic deadlines for your division to learn when the waitlist period ends. At this point, the waitlist will be removed from that course.
- On the Courses page, use the search field to search for courses by course code or title. Results will start appearing after three characters. From the list of courses that appears, select a course.
- A modal window will appear. If the course has a waitlist, it will be towards the bottom of the modal window. The “Current Waitlist Occupancy” shows the number of other students who are currently on the waitlist. In this example, the class size is 144, and there are 16 students on the waitlist, excluding you. Select the primary activity (usually a lecture or LEC) for which you would like to join the waitlist, and select the “Waitlist” button. You cannot join the waitlist for secondary activities such as tutorials (TUT) and practicals (PRA), so be sure to enrol in those if needed and after you get into the course.
- If you have successfully enrolled on the waitlist, you will receive a success message towards the top right of your screen and the course will be in the “Waitlisted” section of your currently enrolled courses. You can check your rank on the waitlist at any time by selecting “View rank on waitlist”.
- A modal window will appear showing your rank on the waitlist. In this example, your current position on the waitlist would be 17. There are 16 students in front of you on the waitlist, and the class size is 144 students. If your waitlist rank is 0, then you are next in line to be enrolled into the course. ACORN will send you a notification in your Notifications area if your rank on the waitlist changes.
- ACORN will enrol you in the primary activity (usually a lecture or LEC) of the course automatically if you get into the course from the waitlist. You will also get an email at your U of T email address to update you. If your course has additional activities, such as tutorials (TUT) and practicals (PRA), ACORN will not automatically enroll you in these. Please enrol in these activities as soon as you can after getting into your course so you do not miss any classes.
Your enrolment cart allows you to plan the courses that you want to enrol in ahead of time. You can experiment with different courses, lecture (LEC), tutorial (TUT) and practical (PRA) sections so that you can quickly enrol in your top choices on enrolment day.
Courses in your enrolment cart will not automatically be enrolled for you once your enrolment period begins.
Before adding courses to your cart, check when you will be eligible to enrol by viewing your divisional registrar’s important academic dates, and check your enrolment start time on ACORN. You can plan the courses you want to take using the Timetable builder, and learn if you will be eligible to enrol in a course by checking the “Enrolment Controls” section of a course in the search results area. To plan for your entire degree, check out Degree Explorer.
Instructional videos: UTM | UTSC | UTSG
- From the ACORN dashboard, click ‘Enrol & Manage’ on the main navigation menu.
- On the Enrol & Manage page, you will see one or more tabs labelled with the academic session. Ensure that you have selected the tab for the session for which you want to add courses to your cart. Then, select the Courses button, or the Courses page from the main navigation.
- Use the search field to search for courses by course code or title. Results will start appearing after three characters. From the list of courses that appears, select a course.
- A modal window will appear. Select a primary activity, which is typically a lecture (LEC), and any secondary activities, which are typically tutorials (TUT) or practicals (PRA). Not every course will have a lecture, and not every course will have tutorials and practicals. Be sure to check the Time column in case there is a conflict with any of your other currently-enrolled courses, and ensure that the activity that you are selecting do not say “Enrolment Blocked” or “Section Full” under the Space Availability column. If a section says “Enrolment Blocked”, the activity or course may be restricted to students from a certain program, year of study, or campus. Please check the Timetable Builder to learn about any restrictions or Enrolment Controls that a course may have.Next, select the “Add to Enrolment Cart” button towards the bottom of the modal window. If you are unable to select a particular activity or enrol in the course, ACORN will tell you why. If you think you should be able to enrol in a course and you cannot, please contact your college, divisional or faculty registrar.
- The course should now appear under your Enrolment Cart towards the bottom of your Courses screen. From here, you can edit the course activities, remove the course from your cart, and enrol starting on your enrolment day. Learn more about how to enrol in a course from your Enrolment Cart.
Getting Help & Feedback
Students from different divisions at U of T enrol in courses at different times. Learn when your division has set up your enrolment time by visiting their website. They may also send you an email about it. Once your division has setup your enrolment start time—usually a week or so prior to your enrolment day—log into ACORN to view your start date and time on the Dashboard.
This is an example of a blue message that will appear on your ACORN Dashboard. Yours will look a little different, as the date and time will be personalized to your program and year of study.
ACORN will not take any additional actions if you enrol in courses that result in a conflict (i.e., it will not drop any course activities on your behalf). It is up to you to resolve any conflicts. You can either leave the courses as they are or enrol in alternative options.
You can try to resolve the conflict in a few different ways:
- Explore different combinations of course sections (Lectures, Tutorials and Practicals)
- See if you can take one of the courses at a later term. Try using Degree Explorer to experiment with your options.
- Select a different course if one of the conflicting courses is not required to complete your program or degree
- On the Courses page, select the Edit button for the course section that you want to change.
- A modal window will appear that will list the sections that you can change. Select the course section(s) you would like to change to, and then select the Modify button. If you cannot select a certain section, it may be full or you may not have priority to enrol in the section; ACORN should tell you why.
In this example, the student is switching from the first Practical section (PRA 0101) to the second one (PRA 0102).
- If you have successfully switched to your desired course section you will receive a success message towards the top of the page. You will also see your updated course in the My Courses section.
- When a final grade is released for each of your courses, you will get a new notification in ACORN. When you have a new notification, a blue badge containing a number will appear on top of a bell icon towards the top of your page. Select this button to open your Notifications menu.
- If you have received a final grade, there will be a notification here alongside any other notifications that you recently received. Select the link within the notification to view your grade.
- You will be taken to your Academic History page containing your final grade for the course. You can visit your Academic History page at any time via ACORN’s main navigation menu to see an up-to-date list of grades for all of your courses.
Watch a video walkthrough for U of T’s GPA calculator.
The GPA calculator is a U of T-wide tool that allows you to estimate your GPA (Grade Point Average) for the current or upcoming academic sessions. This tool should be used for planning purposes only; refer to your Academic History page in ACORN for your official GPA calculations.
Using the GPA Calculator, you can:
- Calculate your CGPA, SGPA and AGPA
- Use your current CGPA from ACORN to speed up your calculations
- See your GPA calculations update in real-time
- Explore useful academic resources
You may want to calculate your GPA for the following reasons and more:
- Find out what your GPA will be at the end of the semester or year
- Determine whether you will make it into your program of study (POSt)
- Find out if you will graduate with distinction
- Learn which grades you will need to achieve to meet personal goals
Before starting, have your grades on hand for reference. Find them on your Academic History page in ACORN. When entering grades, include failed courses, and exclude transfer credits, extra (EXT), Credit/No Credit (CR/NCR) and Late Withdrawal (LWD) courses.
You can view tips for using the GPA Calculator by clicking the help icons beside the step one and step two headings.
Estimate Your CGPA
To estimate your Cumulative GPA (CGPA), enter your current Cumulative GPA and current number of credits earned from ACORN into Step 1 of the calculator. This step is optional; you can always enter all of your grades manually into the Academic Period containers, but this method is faster.
In this example, “Academic Period 1” means whichever session you are predicting your grades for. If your official CGPA from ACORN was calculated last Winter, and you are predicting courses for the current Fall/Winter session, Academic Period 1 will represent the Fall semester. You can also enter all of your Fall and Winter marks into Academic Period 1, or enter Fall marks in Academic Period 1 and Winter marks in Academic Period 2. It is up to you.
Next, enter anticipated grades for your courses in progress. Your Sessional and Cumulative GPAs will update immediately at the bottom of the Academic Period 1 container. Your CGPA calculation will take into account the “Current CGPA from ACORN” that you entered in Step 1. Your SGPA calculation will only take into account grades entered in Academic Period 1.
Estimate your SGPA
To estimate your Sessional GPA (GPA), enter current and anticipated grades for a single Fall or Winter or entire Summer session (this includes both sub-sessions) in Academic Period 1.
You do not need to add your Current CGPA from ACORN in Step 1 unless you want to see your potential CGPA at the same time.
Estimate Your AGPA
To calculate your Annual GPA (AGPA), enter current and anticipated grades for the Fall session in Academic Period 1 and the Winter session in Academic Period 2. You will need to click the “Add Academic Period” button to open the second session.
You do not need to add your Current CGPA from ACORN in Step 1 unless you want to see your potential CGPA at the same time.
If you are including Y courses worth 1.0 credit courses: Include grades for these courses in Academic Period 2, as grades for these courses are calculated in the Winter term. On your Academic History in ACORN, for the Fall session these courses will have a grade of “IPR” (In Progress). If you enter Y courses in Academic Period 1 (Fall), your estimated AGPA will not be correct.
Tip: If you already know your Fall SGPA, enter it in Step 1 along with the number of credits you earned for the Fall, and enter your Winter grades in Academic Period 1. The calculated CGPA will actually be your AGPA.
Get Academic Help
Some useful academic resources are located below the calculator itself. If you want academic advising or have questions about courses, contact your Registrar. You can also find links to helpful academic workshops and events that U of T offers, as well as study spaces you can use.
Send the ACORN/GPA Calculator Team Feedback
We want to hear your thoughts, ideas and suggestions to improve this GPA Calculator! We care about how and if it works for you, so send us a message via the “Send Feedback” button towards the bottom of the page.
Instructional videos: UTM | UTSC | UTSG
Before enrolling in courses, check when you will be eligible to enrol by viewing your divisional registrar’s important academic dates, and check your enrolment start time on ACORN. You can plan the courses you want to take using the Timetable builder, and learn if you will be eligible to enrol in a course by checking the “Enrolment Controls” section of a course in the search results area. To plan for your entire degree, check out Degree Explorer.
Once you know which courses you want to take, you can add them to your Enrolment Cart in ACORN so that you can enrol in them without searching for them again on enrolment day. The Enrolment Cart is like adding courses to a shopping cart so that you can save them for later. On enrolment day, you’ll need to enrol in each course individually from your cart.
- To get to you Enrolment Cart from the ACORN dashboard, select ‘Enrol & Manage’ on the main navigation menu on the left side of the screen.
- On the Enrol & Manage page, there will be one or more tabs labelled with the academic session. Ensure that you have selected the tab for the session in which you want to enrol in courses. Then, select the Courses button, or the Courses page from the main navigation.
- Find your enrolment cart at the bottom of the Courses screen. If your cart is empty, learn how to add courses to your Enrolment Cart.
- For each course that you would like to enrol in from your Enrolment Cart, select the “Enrol” button.
- You will see a confirmation modal window asking whether you would like to enrol in this course. Be sure to check the Time column in case there is a conflict with any of your other currently-enrolled courses, and ensure that the activity that you are selecting do not say “Enrolment Blocked” or “Section Full” under the Space Availability column. If a section says “Enrolment Blocked”, the activity or course may be restricted to students from a certain program, year of study, or campus. Please check the Timetable Builder to learn about any restrictions or Enrolment Controls that a course may have.Next, select “Enrol”.
- If you have successfully enrolled in the course you will receive a success notice on the top right corner of your screen and the course will be listed under your currently enrolled courses.
Instructional videos: UTM | UTSC | UTSG
Before enrolling in courses, check when you will be eligible to enrol by viewing your divisional registrar’s important academic dates, and check your enrolment start time on ACORN. You can plan the courses you want to take using the Timetable builder, and learn if you will be eligible to enrol in a course by checking the “Enrolment Controls” section of a course in the search results area. To plan for your entire degree, check out Degree Explorer.
- From the ACORN dashboard, click ‘Enrol & Manage’ on the main navigation menu.
- On the Enrol & Manage page, there will be one or more tabs labelled with the academic session. Ensure that you have selected the tab for the session in which you want to enrol in courses. Then, select the Courses button, or the Courses page from the main navigation.
- Use the search field to search for courses by course code or title. Results will start appearing after three characters. From the list of courses that appears, select a course.
- A modal window will appear. Select a primary activity, which is typically a lecture (LEC), and any secondary activities, which are typically tutorials (TUT) or practicals (PRA). Not every course will have a lecture, and not every course will have tutorials and practicals. Be sure to check the Time column in case there is a conflict with any of your other currently-enrolled courses, and ensure that the activity that you are selecting do not say “Enrolment Blocked” or “Section Full” under the Space Availability column. If a section says “Enrolment Blocked”, the activity or course may be restricted to students from a certain program, year of study, or campus. Please check the Timetable Builder to learn about any restrictions or Enrolment Controls that a course may have. Next, select the “Enrol” button towards the bottom of the modal window. If you are unable to select a particular activity or enrol in the course, ACORN will tell you why. If you think you should be able to enrol in a course and you cannot, please contact your college, divisional or faculty registrar.
- If you have successfully enrolled in the course you will receive a success notice on the top right corner of your screen and the course will be listed under your currently enrolled courses.
If you want to drop a course, check your division’s important academic dates to determine when you can drop a course without facing an academic or financial penalty.
- From your Courses screen, click the gear icon towards the right of the course that you want to drop.
- Select “Drop Course” from the drop-down menu that appears.
- A modal window will pop up to confirm that you want to drop this course. Once it, appears, double-check the course to make sure it is correct, and select “Drop Course”.
- If you have successfully dropped the course you will receive a success notice towards the top right corner of your screen and the course will no longer be listed under your currently enrolled courses.
You can choose to assess courses as Credit/No Credit when you want to take a course but don’t want it to contribute to your GPA. A course that is assessed as Credit/No Credit will count towards the number of credits you need for your degree as long as you pass the course according to your division’s standards. If you need a final grade in a course for a program requirement or to apply for a certification in the future, you generally should not consider Credit/No Credit. If you’re unsure, contact an academic advisor. Before assessing any courses as Credit/No Credit, check your divisional registrar’s guidelines and deadlines because they may vary.
- On the Courses screen, click the gear icon on the top right corner of the course you want to assess as Credit/No Credit.
- Select ‘Add Credit/No Credit’ from the drop-down menu that appears.
- A modal window will appear to provide more information about assessing the course as Credit/No Credit. Read through this and ensure that assessing the course as Credit/No Credit is appropriate for your situation, and then select “Assess as Credit/No Credit”.
- If you have successfully assessed the course as Credit/No Credit you will receive a success message on the top right corner of your screen. A “Credit/No Credit” indicator will also appear below the course title under your Currently Enrolled courses.
Instructional videos: UTM | UTSC | UTSG
If a course lecture (LEC), tutorial (TUT) or practical (PRA) is full when you try to enrol, you may be able to enrol in the waitlist instead. If enough students drop the course and space becomes available, ACORN will automatically enrol you in that course. Check the academic deadlines for your division to learn when the waitlist period ends. At this point, the waitlist will be removed from that course.
- On the Courses page, use the search field to search for courses by course code or title. Results will start appearing after three characters. From the list of courses that appears, select a course.
- A modal window will appear. If the course has a waitlist, it will be towards the bottom of the modal window. The “Current Waitlist Occupancy” shows the number of other students who are currently on the waitlist. In this example, the class size is 144, and there are 16 students on the waitlist, excluding you. Select the primary activity (usually a lecture or LEC) for which you would like to join the waitlist, and select the “Waitlist” button. You cannot join the waitlist for secondary activities such as tutorials (TUT) and practicals (PRA), so be sure to enrol in those if needed and after you get into the course.
- If you have successfully enrolled on the waitlist, you will receive a success message towards the top right of your screen and the course will be in the “Waitlisted” section of your currently enrolled courses. You can check your rank on the waitlist at any time by selecting “View rank on waitlist”.
- A modal window will appear showing your rank on the waitlist. In this example, your current position on the waitlist would be 17. There are 16 students in front of you on the waitlist, and the class size is 144 students. If your waitlist rank is 0, then you are next in line to be enrolled into the course. ACORN will send you a notification in your Notifications area if your rank on the waitlist changes.
- ACORN will enrol you in the primary activity (usually a lecture or LEC) of the course automatically if you get into the course from the waitlist. You will also get an email at your U of T email address to update you. If your course has additional activities, such as tutorials (TUT) and practicals (PRA), ACORN will not automatically enroll you in these. Please enrol in these activities as soon as you can after getting into your course so you do not miss any classes.
Your enrolment cart allows you to plan the courses that you want to enrol in ahead of time. You can experiment with different courses, lecture (LEC), tutorial (TUT) and practical (PRA) sections so that you can quickly enrol in your top choices on enrolment day.
Courses in your enrolment cart will not automatically be enrolled for you once your enrolment period begins.
Before adding courses to your cart, check when you will be eligible to enrol by viewing your divisional registrar’s important academic dates, and check your enrolment start time on ACORN. You can plan the courses you want to take using the Timetable builder, and learn if you will be eligible to enrol in a course by checking the “Enrolment Controls” section of a course in the search results area. To plan for your entire degree, check out Degree Explorer.
Instructional videos: UTM | UTSC | UTSG
- From the ACORN dashboard, click ‘Enrol & Manage’ on the main navigation menu.
- On the Enrol & Manage page, you will see one or more tabs labelled with the academic session. Ensure that you have selected the tab for the session for which you want to add courses to your cart. Then, select the Courses button, or the Courses page from the main navigation.
- Use the search field to search for courses by course code or title. Results will start appearing after three characters. From the list of courses that appears, select a course.
- A modal window will appear. Select a primary activity, which is typically a lecture (LEC), and any secondary activities, which are typically tutorials (TUT) or practicals (PRA). Not every course will have a lecture, and not every course will have tutorials and practicals. Be sure to check the Time column in case there is a conflict with any of your other currently-enrolled courses, and ensure that the activity that you are selecting do not say “Enrolment Blocked” or “Section Full” under the Space Availability column. If a section says “Enrolment Blocked”, the activity or course may be restricted to students from a certain program, year of study, or campus. Please check the Timetable Builder to learn about any restrictions or Enrolment Controls that a course may have.Next, select the “Add to Enrolment Cart” button towards the bottom of the modal window. If you are unable to select a particular activity or enrol in the course, ACORN will tell you why. If you think you should be able to enrol in a course and you cannot, please contact your college, divisional or faculty registrar.
- The course should now appear under your Enrolment Cart towards the bottom of your Courses screen. From here, you can edit the course activities, remove the course from your cart, and enrol starting on your enrolment day. Learn more about how to enrol in a course from your Enrolment Cart.
Accommodated Testing Services
Students from different divisions at U of T enrol in courses at different times. Learn when your division has set up your enrolment time by visiting their website. They may also send you an email about it. Once your division has setup your enrolment start time—usually a week or so prior to your enrolment day—log into ACORN to view your start date and time on the Dashboard.
This is an example of a blue message that will appear on your ACORN Dashboard. Yours will look a little different, as the date and time will be personalized to your program and year of study.
ACORN will not take any additional actions if you enrol in courses that result in a conflict (i.e., it will not drop any course activities on your behalf). It is up to you to resolve any conflicts. You can either leave the courses as they are or enrol in alternative options.
You can try to resolve the conflict in a few different ways:
- Explore different combinations of course sections (Lectures, Tutorials and Practicals)
- See if you can take one of the courses at a later term. Try using Degree Explorer to experiment with your options.
- Select a different course if one of the conflicting courses is not required to complete your program or degree
- On the Courses page, select the Edit button for the course section that you want to change.
- A modal window will appear that will list the sections that you can change. Select the course section(s) you would like to change to, and then select the Modify button. If you cannot select a certain section, it may be full or you may not have priority to enrol in the section; ACORN should tell you why.
In this example, the student is switching from the first Practical section (PRA 0101) to the second one (PRA 0102).
- If you have successfully switched to your desired course section you will receive a success message towards the top of the page. You will also see your updated course in the My Courses section.
- When a final grade is released for each of your courses, you will get a new notification in ACORN. When you have a new notification, a blue badge containing a number will appear on top of a bell icon towards the top of your page. Select this button to open your Notifications menu.
- If you have received a final grade, there will be a notification here alongside any other notifications that you recently received. Select the link within the notification to view your grade.
- You will be taken to your Academic History page containing your final grade for the course. You can visit your Academic History page at any time via ACORN’s main navigation menu to see an up-to-date list of grades for all of your courses.
Watch a video walkthrough for U of T’s GPA calculator.
The GPA calculator is a U of T-wide tool that allows you to estimate your GPA (Grade Point Average) for the current or upcoming academic sessions. This tool should be used for planning purposes only; refer to your Academic History page in ACORN for your official GPA calculations.
Using the GPA Calculator, you can:
- Calculate your CGPA, SGPA and AGPA
- Use your current CGPA from ACORN to speed up your calculations
- See your GPA calculations update in real-time
- Explore useful academic resources
You may want to calculate your GPA for the following reasons and more:
- Find out what your GPA will be at the end of the semester or year
- Determine whether you will make it into your program of study (POSt)
- Find out if you will graduate with distinction
- Learn which grades you will need to achieve to meet personal goals
Before starting, have your grades on hand for reference. Find them on your Academic History page in ACORN. When entering grades, include failed courses, and exclude transfer credits, extra (EXT), Credit/No Credit (CR/NCR) and Late Withdrawal (LWD) courses.
You can view tips for using the GPA Calculator by clicking the help icons beside the step one and step two headings.
Estimate Your CGPA
To estimate your Cumulative GPA (CGPA), enter your current Cumulative GPA and current number of credits earned from ACORN into Step 1 of the calculator. This step is optional; you can always enter all of your grades manually into the Academic Period containers, but this method is faster.
In this example, “Academic Period 1” means whichever session you are predicting your grades for. If your official CGPA from ACORN was calculated last Winter, and you are predicting courses for the current Fall/Winter session, Academic Period 1 will represent the Fall semester. You can also enter all of your Fall and Winter marks into Academic Period 1, or enter Fall marks in Academic Period 1 and Winter marks in Academic Period 2. It is up to you.
Next, enter anticipated grades for your courses in progress. Your Sessional and Cumulative GPAs will update immediately at the bottom of the Academic Period 1 container. Your CGPA calculation will take into account the “Current CGPA from ACORN” that you entered in Step 1. Your SGPA calculation will only take into account grades entered in Academic Period 1.
Estimate your SGPA
To estimate your Sessional GPA (GPA), enter current and anticipated grades for a single Fall or Winter or entire Summer session (this includes both sub-sessions) in Academic Period 1.
You do not need to add your Current CGPA from ACORN in Step 1 unless you want to see your potential CGPA at the same time.
Estimate Your AGPA
To calculate your Annual GPA (AGPA), enter current and anticipated grades for the Fall session in Academic Period 1 and the Winter session in Academic Period 2. You will need to click the “Add Academic Period” button to open the second session.
You do not need to add your Current CGPA from ACORN in Step 1 unless you want to see your potential CGPA at the same time.
If you are including Y courses worth 1.0 credit courses: Include grades for these courses in Academic Period 2, as grades for these courses are calculated in the Winter term. On your Academic History in ACORN, for the Fall session these courses will have a grade of “IPR” (In Progress). If you enter Y courses in Academic Period 1 (Fall), your estimated AGPA will not be correct.
Tip: If you already know your Fall SGPA, enter it in Step 1 along with the number of credits you earned for the Fall, and enter your Winter grades in Academic Period 1. The calculated CGPA will actually be your AGPA.
Get Academic Help
Some useful academic resources are located below the calculator itself. If you want academic advising or have questions about courses, contact your Registrar. You can also find links to helpful academic workshops and events that U of T offers, as well as study spaces you can use.
Send the ACORN/GPA Calculator Team Feedback
We want to hear your thoughts, ideas and suggestions to improve this GPA Calculator! We care about how and if it works for you, so send us a message via the “Send Feedback” button towards the bottom of the page.
Instructional videos: UTM | UTSC | UTSG
Before enrolling in courses, check when you will be eligible to enrol by viewing your divisional registrar’s important academic dates, and check your enrolment start time on ACORN. You can plan the courses you want to take using the Timetable builder, and learn if you will be eligible to enrol in a course by checking the “Enrolment Controls” section of a course in the search results area. To plan for your entire degree, check out Degree Explorer.
Once you know which courses you want to take, you can add them to your Enrolment Cart in ACORN so that you can enrol in them without searching for them again on enrolment day. The Enrolment Cart is like adding courses to a shopping cart so that you can save them for later. On enrolment day, you’ll need to enrol in each course individually from your cart.
- To get to you Enrolment Cart from the ACORN dashboard, select ‘Enrol & Manage’ on the main navigation menu on the left side of the screen.
- On the Enrol & Manage page, there will be one or more tabs labelled with the academic session. Ensure that you have selected the tab for the session in which you want to enrol in courses. Then, select the Courses button, or the Courses page from the main navigation.
- Find your enrolment cart at the bottom of the Courses screen. If your cart is empty, learn how to add courses to your Enrolment Cart.
- For each course that you would like to enrol in from your Enrolment Cart, select the “Enrol” button.
- You will see a confirmation modal window asking whether you would like to enrol in this course. Be sure to check the Time column in case there is a conflict with any of your other currently-enrolled courses, and ensure that the activity that you are selecting do not say “Enrolment Blocked” or “Section Full” under the Space Availability column. If a section says “Enrolment Blocked”, the activity or course may be restricted to students from a certain program, year of study, or campus. Please check the Timetable Builder to learn about any restrictions or Enrolment Controls that a course may have.Next, select “Enrol”.
- If you have successfully enrolled in the course you will receive a success notice on the top right corner of your screen and the course will be listed under your currently enrolled courses.
Instructional videos: UTM | UTSC | UTSG
Before enrolling in courses, check when you will be eligible to enrol by viewing your divisional registrar’s important academic dates, and check your enrolment start time on ACORN. You can plan the courses you want to take using the Timetable builder, and learn if you will be eligible to enrol in a course by checking the “Enrolment Controls” section of a course in the search results area. To plan for your entire degree, check out Degree Explorer.
- From the ACORN dashboard, click ‘Enrol & Manage’ on the main navigation menu.
- On the Enrol & Manage page, there will be one or more tabs labelled with the academic session. Ensure that you have selected the tab for the session in which you want to enrol in courses. Then, select the Courses button, or the Courses page from the main navigation.
- Use the search field to search for courses by course code or title. Results will start appearing after three characters. From the list of courses that appears, select a course.
- A modal window will appear. Select a primary activity, which is typically a lecture (LEC), and any secondary activities, which are typically tutorials (TUT) or practicals (PRA). Not every course will have a lecture, and not every course will have tutorials and practicals. Be sure to check the Time column in case there is a conflict with any of your other currently-enrolled courses, and ensure that the activity that you are selecting do not say “Enrolment Blocked” or “Section Full” under the Space Availability column. If a section says “Enrolment Blocked”, the activity or course may be restricted to students from a certain program, year of study, or campus. Please check the Timetable Builder to learn about any restrictions or Enrolment Controls that a course may have. Next, select the “Enrol” button towards the bottom of the modal window. If you are unable to select a particular activity or enrol in the course, ACORN will tell you why. If you think you should be able to enrol in a course and you cannot, please contact your college, divisional or faculty registrar.
- If you have successfully enrolled in the course you will receive a success notice on the top right corner of your screen and the course will be listed under your currently enrolled courses.
If you want to drop a course, check your division’s important academic dates to determine when you can drop a course without facing an academic or financial penalty.
- From your Courses screen, click the gear icon towards the right of the course that you want to drop.
- Select “Drop Course” from the drop-down menu that appears.
- A modal window will pop up to confirm that you want to drop this course. Once it, appears, double-check the course to make sure it is correct, and select “Drop Course”.
- If you have successfully dropped the course you will receive a success notice towards the top right corner of your screen and the course will no longer be listed under your currently enrolled courses.
You can choose to assess courses as Credit/No Credit when you want to take a course but don’t want it to contribute to your GPA. A course that is assessed as Credit/No Credit will count towards the number of credits you need for your degree as long as you pass the course according to your division’s standards. If you need a final grade in a course for a program requirement or to apply for a certification in the future, you generally should not consider Credit/No Credit. If you’re unsure, contact an academic advisor. Before assessing any courses as Credit/No Credit, check your divisional registrar’s guidelines and deadlines because they may vary.
- On the Courses screen, click the gear icon on the top right corner of the course you want to assess as Credit/No Credit.
- Select ‘Add Credit/No Credit’ from the drop-down menu that appears.
- A modal window will appear to provide more information about assessing the course as Credit/No Credit. Read through this and ensure that assessing the course as Credit/No Credit is appropriate for your situation, and then select “Assess as Credit/No Credit”.
- If you have successfully assessed the course as Credit/No Credit you will receive a success message on the top right corner of your screen. A “Credit/No Credit” indicator will also appear below the course title under your Currently Enrolled courses.
Instructional videos: UTM | UTSC | UTSG
If a course lecture (LEC), tutorial (TUT) or practical (PRA) is full when you try to enrol, you may be able to enrol in the waitlist instead. If enough students drop the course and space becomes available, ACORN will automatically enrol you in that course. Check the academic deadlines for your division to learn when the waitlist period ends. At this point, the waitlist will be removed from that course.
- On the Courses page, use the search field to search for courses by course code or title. Results will start appearing after three characters. From the list of courses that appears, select a course.
- A modal window will appear. If the course has a waitlist, it will be towards the bottom of the modal window. The “Current Waitlist Occupancy” shows the number of other students who are currently on the waitlist. In this example, the class size is 144, and there are 16 students on the waitlist, excluding you. Select the primary activity (usually a lecture or LEC) for which you would like to join the waitlist, and select the “Waitlist” button. You cannot join the waitlist for secondary activities such as tutorials (TUT) and practicals (PRA), so be sure to enrol in those if needed and after you get into the course.
- If you have successfully enrolled on the waitlist, you will receive a success message towards the top right of your screen and the course will be in the “Waitlisted” section of your currently enrolled courses. You can check your rank on the waitlist at any time by selecting “View rank on waitlist”.
- A modal window will appear showing your rank on the waitlist. In this example, your current position on the waitlist would be 17. There are 16 students in front of you on the waitlist, and the class size is 144 students. If your waitlist rank is 0, then you are next in line to be enrolled into the course. ACORN will send you a notification in your Notifications area if your rank on the waitlist changes.
- ACORN will enrol you in the primary activity (usually a lecture or LEC) of the course automatically if you get into the course from the waitlist. You will also get an email at your U of T email address to update you. If your course has additional activities, such as tutorials (TUT) and practicals (PRA), ACORN will not automatically enroll you in these. Please enrol in these activities as soon as you can after getting into your course so you do not miss any classes.
Your enrolment cart allows you to plan the courses that you want to enrol in ahead of time. You can experiment with different courses, lecture (LEC), tutorial (TUT) and practical (PRA) sections so that you can quickly enrol in your top choices on enrolment day.
Courses in your enrolment cart will not automatically be enrolled for you once your enrolment period begins.
Before adding courses to your cart, check when you will be eligible to enrol by viewing your divisional registrar’s important academic dates, and check your enrolment start time on ACORN. You can plan the courses you want to take using the Timetable builder, and learn if you will be eligible to enrol in a course by checking the “Enrolment Controls” section of a course in the search results area. To plan for your entire degree, check out Degree Explorer.
Instructional videos: UTM | UTSC | UTSG
- From the ACORN dashboard, click ‘Enrol & Manage’ on the main navigation menu.
- On the Enrol & Manage page, you will see one or more tabs labelled with the academic session. Ensure that you have selected the tab for the session for which you want to add courses to your cart. Then, select the Courses button, or the Courses page from the main navigation.
- Use the search field to search for courses by course code or title. Results will start appearing after three characters. From the list of courses that appears, select a course.
- A modal window will appear. Select a primary activity, which is typically a lecture (LEC), and any secondary activities, which are typically tutorials (TUT) or practicals (PRA). Not every course will have a lecture, and not every course will have tutorials and practicals. Be sure to check the Time column in case there is a conflict with any of your other currently-enrolled courses, and ensure that the activity that you are selecting do not say “Enrolment Blocked” or “Section Full” under the Space Availability column. If a section says “Enrolment Blocked”, the activity or course may be restricted to students from a certain program, year of study, or campus. Please check the Timetable Builder to learn about any restrictions or Enrolment Controls that a course may have.Next, select the “Add to Enrolment Cart” button towards the bottom of the modal window. If you are unable to select a particular activity or enrol in the course, ACORN will tell you why. If you think you should be able to enrol in a course and you cannot, please contact your college, divisional or faculty registrar.
- The course should now appear under your Enrolment Cart towards the bottom of your Courses screen. From here, you can edit the course activities, remove the course from your cart, and enrol starting on your enrolment day. Learn more about how to enrol in a course from your Enrolment Cart.